登録日: 2021-06-11 更新日: 2021-06-11
前回、「LXLE Linux 18.04.3」をUSB メモリにインストール しました。
カーネルのバージョンが低いので、快適に使っていけるかは、お気に入りのアプリで使いたい機能(バージョン)が動くかだろうと思います。
-
今回は、依存関係に左右されない「ユニバーサルパッケージ」のひとつの「snap」でアプリをインストールしてみました。お気に入りのアプリがうまく動けばいいですね。
-
-
使用したPC は「ASUS Chromebox CN60 」で、プロセッサは第4世代の「Intel Celeron 2955U 」で古めのPC です。BIOS 立ち上げでなく、UEFI 立ち上げにF/W を置換しています。
-
(注)リンクを戻るときはブラウザの左上の「←」をクリック
-
-
目次
-
4. 「Geany」のプラグインをapt でインストール:「X」
5. 「Geany」のプラグインをビルドしてインストール:「◯」
-
-
-
--- - --- - --- - --- - --- - --- - --- - --- - --- - --- - --- - -
LXLE Linux 18.04.3 のデスクトップ画面:
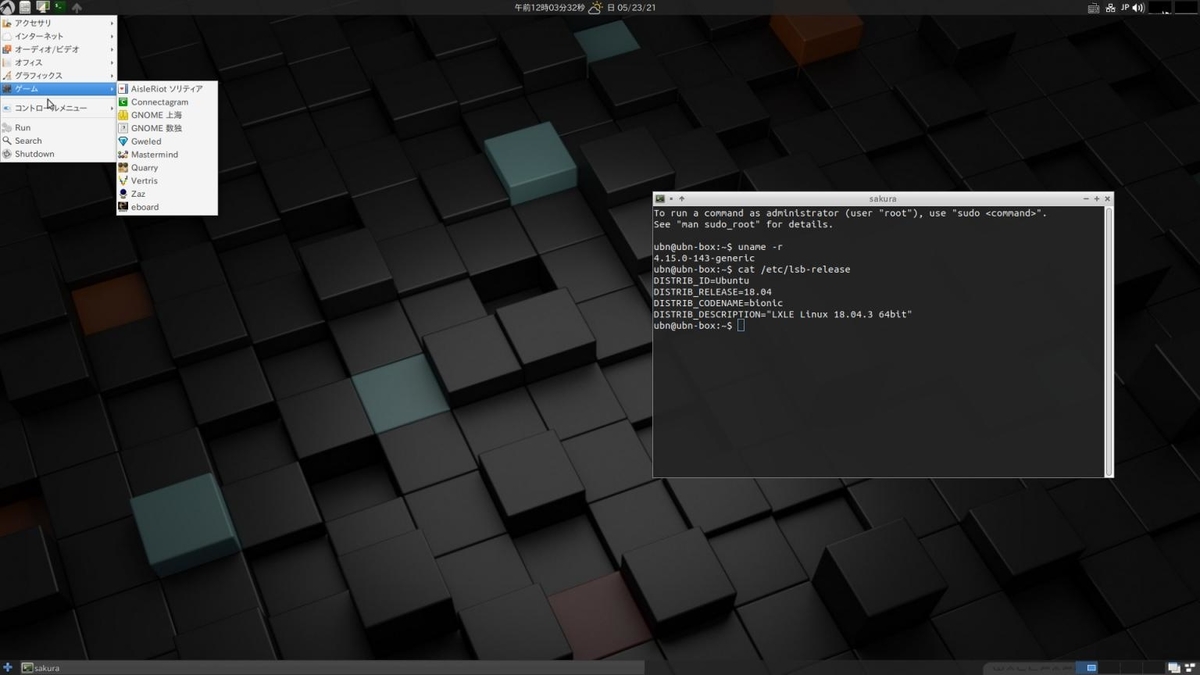
→シンプルです。
-
現在のバージョンを表示:
2021-06-04 現在
カーネル:
$ uname -r
4.15.0-144-generic  ←(注目)
→実績のある安定版のカーネルです。
最新のアプリは最新の共有ライブラリを使って開発されるのが普通です。 共有ライブラリはカーネルのバージョンと密接に関係しており、アプリのビルド時の条件になります。
カーネルのバージョンが低いので共有ライブラリのバージョンが制限されて、ほとんどのアプリが最新バージョンではないと思われます。
-
$ cat /etc/lsb-release
DISTRIB_ID=Ubuntu
DISTRIB_RELEASE=18.04
DISTRIB_CODENAME=bionic
DISTRIB_DESCRIPTION="Ubuntu 18.04.5 LTS"  ←(注目)
→一番下の行は「LXLE Linux 18.04.3 64bit」でした。更新により「Ubuntu 18.04.5 LTS」に書き換えられました。
-
「Ubuntu 18.04.5 LTS」はポイントリリースと呼ばれます。アップデートを累積したイメージなので、 そのイメージを使うことでインストール後のアップデートの手間を省けます。
Ubuntu 18.04 LTS は5年のサポートなので、それまではLXLE もセキュリティやシステム更新の恩恵を受けられそう。
-
-
--- - --- - --- - --- - --- - --- - --- - --- - --- - --- - --- - --
-
LXLE について:
-
LXLE 公式:
-
- LXLE は、古いPC の再生を目的とする、Ubuntu LTS ベースでLXDE デスクトップ環境のディストリビューションです。
-
32ビットと 64ビットのOS バージョンが(今のところは)提供されています:
LTS ベースのディストリビューションの欠点の1つは、最新のアプリケーションが少ないことです。
好みのアプリを入れるかは自由に選べます。
-
-
--- - --- - --- - --- - --- - --- - --- - --- - --- - --- - --- - ---
-
「LXLE Linux 18.04.3」のインストール
-
-
-
--- - --- - --- - --- - --- - --- - --- - --- - --- - --- - --- - ----
-
1). snap でアプリをインストール:
-
(1). snap について:
Ubuntu の開発元のカノニカル(canonical) が開発したパッケージ管理システムが Snappy で、現在は「Snaps」と呼ばれています。
アプリケーションに依存する全てをパッケージ化して、パッケージ化で問題となる「依存関係の解決」を行う、 「ユニバーサルパッケージ」と呼ばれるやり方のひとつです。
開発されプログラムを、YAML フォーマットで記述したメタデータ(.yaml) を元に、 仮想マシン上の「snapcraft」ツールでビルドしたのが「snap パッケージ」です。
ビルドされたパッケージは、Launchpad アカウントがあれば誰でも、Snap Store サイトとなる「snapcraft.io」(一種のリポジトリ)を介して配布できます。
-
「snapd」は snap パッケージを管理するためのデーモンで、snap コマンドでsnap パッケージを管理します。 /etc/profile.d/ には、snap パッケージでインストールしたバイナリのパスとデスクトップエントリをエクスポートできるようにスクリプトがインストールされています。
snap ファイルは、通常のアプリとは違い、システムにより動的にマウントされるファイルシステムです。
-
(2). snap パッケージをインストールするには:
Install FeatherPad (UNOFFICIAL) on Ubuntu
→検索してみると、cookie の使用を強要され、個人情報を使うことに承諾しないと次に進めませんでした。 好みではないので、snap を使いたいときは、コマンド(snap serch、snap find) で検索しています。 支障があるのはサンプル画像が見れないくらい。
-
(3). Ubuntu 16.04 LTS 以降であれば、snap は使える状態:
$ apt search snapd | grep インストール済み
:
libsnapd-glib1/bionic-updates,bionic-security,now 1.49-0ubuntu0.18.04.2 amd64 [インストール済み、自動]
snapd/bionic-updates,bionic-security,now 2.48.3+18.04 amd64 [インストール済み]
ubuntu-core-launcher/bionic-updates,bionic-security,now 2.48.3+18.04 amd64 [インストール済み]
→snapd デーモンのインストールがされていれば、snap が使えます。
-
snapd がインストールされていない場合:
Ubuntu、Linux Mint、Debian、ともに共通:
$ sudo apt update
$ sudo apt install snapd
→ちなみに、「snap」は遺伝子関連のまったく違うアプリなので間違えないように注意。
-
その他のディストリビューションの場合:
参考:
snapdインストール方法まとめ【Ubuntu・Linux Mint・Debian・Fedoraなど】
-
(4). snap コマンドを試してみました:
$ snap --help

$ snap list
No snaps are installed yet. Try 'snap install hello-world'.
→snap パッケージがまったくインストールされておらず一覧表示はできないので、動作確認用のパッケージを入れてと言われました。
$ snap search hello-world | grep canonical
hello-world                6.4  canonical*            -        The 'hello-world' of snaps
test-snapd-hello-classic   1.0  test-snaps-canonical  classic  A hello-world with classic confinement
→検索でいっぱい出てくるので絞り込みました。
提供元が「canonical」だと確認済の提供元を示す「✓」マークが付いています。 残念ながら、grep に指定できず、結果にも表示されません。
-
(5). 確認用のパッケージをインストール:
$ sudo snap install hello-world
:
2021-05-27T19:04:13+09:00 INFO Waiting for automatic snapd restart...
hello-world 6.4 from Canonical✓ installed
→最初だからか「core」(最低限必要なシステム共通の部分: Ubuntu Core)も入り、けっこう時間がかかりました。
-
(6). 実行:
$ which hello-world
/snap/bin/hello-world

$ hello-world
Hello World!
-
(7). インストール済みのsnap 一覧:
$ snap list
Name               Version          Rev    Tracking       Publisher   Notes
core               16-2.50.1        11167  latest/stable  canonical✓  core
core18             20210507         2066   latest/stable  canonical✓  base
gtk-common-themes  0.1-52-gb92ac40  1515   latest/stable  canonical✓  -
hello-world  6.4      29     latest/stable  canonical✓  -
→「Version」と「Rev」があるみたい。 依存のパッケージがどんどん追加されて行きます。
-
「core」は「base snap」と呼ばれます。
base snap:

    core20:Ubuntu 20.04 LTS のパッケージを元に作られた base snap
    core18:Ubuntu 18.04 LTS のパッケージを元に作られた base snap
    core:Ubuntu 20.04 LTS のパッケージを元に作られた base snap
    bare:何も提供しないbase snap
ひとつのアプリにすべてのパッケージ依存を含めるのは無駄なので、大きな共通部分(必要最低限のシステム部分)をまとめたものです。すべてのsnap パッケージはいずれかのbase snapに依存するようです。
-
(8). snap のバージョンの確認:
$ snap --version
snap    2.50.1
snapd   2.50.1
series  16
ubuntu  18.04
kernel  4.15.0-144-generic
-
(9). snap パッケージの詳細表示:
$ snap info hello-world
-
(10). 削除も試しました:
$ sudo snap remove hello-world
:
hello-world removed
-
(11). 削除されたか確認:
$ snap list hello-world
error: no matching snaps installed

$ snap list
Name               Version          Rev    Tracking       Publisher   Notes
core               16-2.50.1        11167  latest/stable  canonical✓  core
core18             20210507         2066   latest/stable  canonical✓  base
gtk-common-themes  0.1-52-gb92ac40  1515   latest/stable  canonical✓  -
-
-
--- - --- - --- - --- - --- - --- - --- - --- - --- - --- - --- - -----
-
2). snap コマンドの使い方:
-
参考:
「sudo」は付けても付けなくてもよいです。必要なときは、認証ダイアログが開いて、パスワードを聞いてきます。
-
(1). snap の検索:
$ snap find スナップ名
または、
$ snap search スナップ名
-
(2). snap のインストール:
$ sudo snap install スナップ名
-
(3). snap のアンインストール:
$ sudo snap remove スナップ名
-
(4). インストール済みsnap を一覧表示:
$ snap list

Name               Version                     Rev    Tracking       Publisher   Notes
core               16-2.50.1                   11167  latest/stable  canonical✓  core
core18             20210507                    2066   latest/stable  canonical✓  base
geany-gtk          1.33.01+git                 378    latest/edge    fehfeh1     -
gnome-3-28-1804    3.28.0-19-g98f9e67.98f9e67  145    latest/stable  canonical✓  -
gtk-common-themes  0.1-52-gb92ac40             1515   latest/stable  canonical✓  -
libreoffice        7.1.3.2                     218    latest/stable  canonical✓  -
-
(5). インストール済みsnap をアップデート(すべて):
$ sudo snap refresh
:
All snaps up to date.
-
(6). インストール済みsnap をアップデート(指定したsnap のみ):
$ sudo snap refresh スナップ名
-
-
--- - --- - --- - --- - --- - --- - --- - --- - --- - --- - --- - ----- -
-
3). 参考: snap 関連の情報:
-
(1). PC 使用情報の表示のコマンドをインストール:
Ubuntu の紹介ページでよく見る画面です。
$ sudo apt install screenfetch
:
以下のパッケージが新たにインストールされます:
  screenfetch
-
(2). PC 使用情報の表示:
$ screenfetch
↓
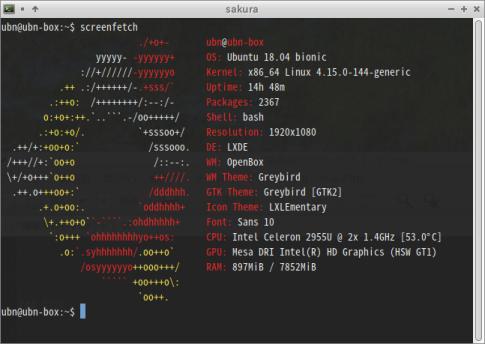
→よく見る表示です。カラーでUbuntu のロゴが表示されますが、Ubuntu らしくするならフォントとオレンジの色合いの調整が必要みたい。情報からCPU とGPU の詳細がわかります。
-
(3). PC 使用情報の表示(ロゴ表示なし):
$ screenfetch -n

 ubn@ubn-box
 OS: Ubuntu 18.04 bionic
 Kernel: x86_64 Linux 4.15.0-144-generic
 Uptime: 2d 12h 49m
 Packages: 2363
 Shell: bash
 Resolution: 1920x1080
 DE: LXDE
 WM: OpenBox
 WM Theme: Greybird
 GTK Theme: Greybird [GTK2]
 Icon Theme: LXLEmentary
 Font: Sans 10
 CPU: Intel Celeron 2955U @ 2x 1.4GHz [52.0°C]
 GPU: Mesa DRI Intel(R) HD Graphics (HSW GT1)
 RAM: 905MiB / 7852MiB
→ストレージ系の情報が足りません。
-
(4). ストレージ系の情報を表示:
$ lsblk

NAME   MAJ:MIN RM   SIZE RO TYPE MOUNTPOINT
loop0    7:0    0  99.2M  1 loop /snap/core/11167    ←(snap がマウントされてます)
loop1    7:1    0 162.9M  1 loop /snap/gnome-3-28-1804/145
loop2    7:2    0    99M  1 loop /snap/core/11081
loop3    7:3    0 621.8M  1 loop /snap/libreoffice/218
loop4    7:4    0  96.4M  1 loop /snap/geany-gtk/378
loop5    7:5    0  65.1M  1 loop /snap/gtk-common-themes/1515
loop6    7:6    0  55.4M  1 loop /snap/core18/2066
sda      8:0    0 238.5G  0 disk        ←(内蔵SSD)
├─sda1   8:1    0   512M  0 part
└─sda2   8:2    0   238G  0 part
sdb      8:16   1  58.4G  0 disk         ←(USB メモリ): 立ち上げデバイス
├─sdb1   8:17   1   487M  0 part /boot/efi
└─sdb2   8:18   1    58G  0 part /
zram0  252:0    0   1.9G  0 disk [SWAP]
zram1  252:1    0   1.9G  0 disk [SWAP]
→ストレージの情報を確認したら、loop0〜6 に「snap」がマウントされていました。 行末の数字は「Rev」です。
-
(5). インストールされている「snap」の一覧を表示:
$ snap list
Name               Version                     Rev    Tracking       Publisher   Notes
core               16-2.50.1                   11167  latest/stable  canonical✓  core
core18             20210507                    2066   latest/stable  canonical✓  base
geany-gtk          1.33.01+git                 378    latest/edge    fehfeh1     -
gnome-3-28-1804    3.28.0-19-g98f9e67.98f9e67  145    latest/stable  canonical✓  -
gtk-common-themes  0.1-52-gb92ac40             1515   latest/stable  canonical✓  -
libreoffice        7.1.3.2                     218    latest/stable  canonical✓  -
→「Rev」に注目するとマウント状態がわかりやすいです。
-
(6). マウントされた 「/snap/core/11081」がインストール一覧にありません
-
「--all」はすべてのRev を表示:
$ snap list --all core

Name  Version    Rev    Tracking       Publisher   Notes
core  16-2.50    11081  latest/stable  canonical✓  core,disabled
core  16-2.50.1  11167  latest/stable  canonical✓  core   ←(使用中のcore)
→core のアップデートがあったのかもしれません。
-
-
--- - --- - --- - --- - --- - --- - --- - --- - --- - --- - --- - ----- --
-
1. 「featherpad」をsnap でインストール:(結果は「◯」)
ヘルプファイルを個人的な備忘録として使えない(ファイルの書込みができない)以外は、正常に動作します。
-
1). featherpad の検索:
$ snap search featherpad
Name        Version          Publisher  Notes  Summary
featherpad  0.15.0+pkg-ab30  brlin      -      Lightweight Qt5 Plain-Text Editor for Linux
-
2). 「featherpad」のインストール:
$ sudo snap install featherpad
:
featherpad 0.15.0+pkg-ab30 from 林博仁(Buo-ren, Lin) (brlin) installed
-
3). インストールされたか確認:
$ ls -1 /snap/bin/
featherpad
geany-gtk.geany
libreoffice
libreoffice.base
libreoffice.calc
libreoffice.draw
libreoffice.filebug
libreoffice.impress
libreoffice.math
libreoffice.writer

$ which featherpad
/usr/bin/featherpad

$ echo $PATH
/usr/local/sbin:/usr/local/bin:/usr/sbin:/usr/bin:/sbin:/bin:/usr/games:/usr/local/games:/snap/bin
→「/snap/bin」の優先度は低いです。
$ /snap/bin/featherpad --version
→Featherpadの「非公式配布」であることを知らせる警告ダイアログ「Hello!」が表示されました。
-
4). 警告ダイアログを非表示にしました:
$ sudo snap set featherpad silent-unofficial-notice=yes

$ /snap/bin/featherpad --version
FeatherPad 0.15.0
→最新ではありませんが、バージョンはそれなりです。
- メニューに自動で登録されていません。
→ただし、デスクトップファイルが奥まったところに置かれているのでそれを利用できます。
取りあえずは、端末、もしくは、メニュー →RUN →「/snap/bin/featherpad」で起動できます。
-
5). ヘルプを「書き込み保護された備忘録」として使うことはできません
→書込み保護されてマウントされるので、システムに置かれたファイルには書込みできません。
-
6). 履歴ファイルの更新ができなくなったとき:
- ホームにある設定ファイルを削除すると復旧できます
設定ファイルの削除:
$ rm ~/snap/featherpad/current/.config/featherpad/fp.conf
featherpad を再起動
→エディタの設定はやり直し。
-
7). インストール済みのsnap 一覧:
$ snap list featherpad
Name        Version          Rev   Tracking       Publisher  Notes
featherpad  0.15.0+pkg-ab30  1070  latest/stable  brlin      -

$ snap list
Name               Version          Rev    Tracking       Publisher   Notes
core               16-2.50          11081  latest/stable  canonical✓  core
core18             20210507         2066   latest/stable  canonical✓  base
featherpad         0.15.0+pkg-ab30  1070   latest/stable  brlin       -
gtk-common-themes  0.1-52-gb92ac40  1515   latest/stable  canonical✓  -
→依存のパッケージがアプリのインストールのたびに、どんどん追加されて行きます。
-
8). snap パッケージの詳細表示:
$ snap info featherpad

name:      featherpad
summary:   Lightweight Qt5 Plain-Text Editor for Linux
publisher: 林博仁(Buo-ren, Lin) (brlin)
store-url: https://snapcraft.io/featherpad
contact:   https://github.com/Lin-Buo-Ren/featherpad-snap/issues
license:   GPL-3.0
description: |
  FeatherPad (by Pedram Pourang, a.k.a. Tsu Jan <tsujan2000@gmail.com>) is a
  lightweight Qt5 plain-text editor for Linux. It is independent of any
  desktop environment and has:

  * Drag-and-drop support, including tab detachment and attachment;
:
  * Haiku OS support (by [khallebal at GitHub](https://github.com/khallebal));
  * macOS support (by [Pavel Shlyak](https://github.com/shlyakpavel)); and
  * Other features that can be found in its settings, on its menus or when it
  is actually used.

  **Snap-specific information**

  This snap is NOT an official distribution of FeatherPad, refer [the snap's
  own issue tracker](https://github.com/Lin-Buo-Ren/featherpad-snap/issues)
  for support.

↓ (和訳)
**snap 固有の情報**

このsnap はFeatherPad の公式ディストリビューションではありません。
[スナップの独自の課題追跡システム](https://github.com/Lin-Buo-Ren/featherpad-snap/issues)
でサポートされます。

commands:
  - featherpad
snap-id:      ehKXiBnCazJq33WaVi9s1sd3wcuPCulo
tracking:     latest/stable
refresh-date: yesterday at 19:14 JST
channels:
  latest/stable:    0.15.0+pkg-ab30 2020-10-01 (1070)  98MB -
  latest/candidate: ↑
  latest/beta:      0.15.0+pkg-ab30 2020-10-01 (1070)  98MB -
  latest/edge:      0.16.0+pkg-4af8 2021-01-05 (1316) 103MB -
installed:          0.15.0+pkg-ab30            (1070)  98MB -
-
9). snap のマウントポイントからファイルの場所を検索:
$ lsblk | grep featherpad
loop7    7:7    0  93.7M  1 loop /snap/featherpad/1070
↓ 探すと:
-
(1). デスクトップファイルの場所:
$ ls /snap/featherpad/1070/share/applications/featherpad.desktop
-
(2). アイコンの場所:
$ ls /snap/featherpad/1070/share/icons/hicolor/scalable/apps/featherpad.svg
-
(3). 実行ファイルの場所:
$ ls /snap/bin/featherpad
$ ls /snap/featherpad/1070/bin/featherpad
-
(4). 翻訳ファイルの場所:
/snap/featherpad/1070/share/featherpad/translations/featherpad_ja.qm
-
(5). ヘルプファイルの場所:
$ ls -l /snap/featherpad/1070/share/featherpad/help_ja
:
-rw-r--r-- 1 root root 16739 10月  1  2020 help_ja
-
10). ヘルプファイルが修正できるか確認:
$ sudo pluma /snap/featherpad/1070/share/featherpad/help_ja
→エラーは出ませんが修正できません。ro でマウントされていると思われます。
-
マウントの状態を確認:
$ mount | grep featherpad
/var/lib/snapd/snaps/featherpad_1070.snap on /snap/featherpad/1070 type squashfs (ro,nodev,relatime,x-gdu.hide)
nsfs on /run/snapd/ns/featherpad.mnt type nsfs (rw)
→書き込み保護されています。「squashfs」は、pappy linux やライブUSB メモリで使われている圧縮された読み込み専用のファイルシステムです。「nsfs」はあまり見ないファイルシステムで、検索してもnfs やntfs しかヒットしません。こちらは書き込みが出来るようで、組み合わせて使われているみたい。
-
11). メニューへの追加:
-
(1). デスクトップファイルのコピー:
$ cd /snap/featherpad/1070/share/applications/
$ sudo cp featherpad.desktop /usr/share/applications/snap-featherpad.desktop
-
(2). デスクトップファイルの修正:
$ sudo pluma /usr/share/applications/snap-featherpad.desktop
↓ 下記の行に置換:
Name=snap-FeatherPad
Name[ja]=FeatherPad テキストエディタ(snap)
Exec=/snap/bin/featherpad %F
Icon=/snap/featherpad/1070/share/icons/hicolor/scalable/apps/featherpad.svg

Exec=/snap/bin/featherpad --win
→共存できるようにファイル名やアプリ名が重ならないようにしました。
-
12). メニューにて「featherpad」を起動:
メニュー →アクセサリ →「FeatherPad テキストエディタ(snap)」
→バージョンは「0.15.0」です。
日本語入力可能です。
-
snap パッケージを削除する場合:
$ sudo snap remove featherpad
:
featherpad removed
-
-
--- - --- - --- - --- - --- - --- - --- - --- - --- - --- - --- - ----- ---
-
2. 「Geany」をsnap でインストール:(結果は「◯」)
-
1). snaps でインストールできるか確認:
$ apt list geany
:
geany/bionic 1.32-2 amd64

$ snap search geany
Name        Version      Publisher  Notes  Summary
geany-gtk   1.33.01+git  fehfeh1    -      A fast and lightweight IDE
chartgeany  6.2.6-1snap  lucast70   -      Technical analysis software
→公式リポジトリよりもバージョンが少し高いです。インストールしてみる価値はありそう。
-
2). インストール:
$ snap install geany-gtk
→認証ダイアログ表示: パスワード入力
error: snap "geany-gtk" is not available on stable but is available to install
       on the following channels:

       edge       snap install --edge geany-gtk

       Please be mindful pre-release channels may include features not
       completely tested or implemented. Get more information with 'snap info
       geany-gtk'.
和訳:
エラー: snap の「geany-gtk」は安定版では利用できませんが、次のチャネルでインストールできます。

edge チャネル:

$ snap install --edge geany-gtk


プレリリース チャンネルには、完全にテストまたは実装されていない機能が含まれている可能性があることに注意してください。

詳細情報:

$ snap info geany-gtk
-
3). 「geany-gtk」の詳細を確認:
$ snap info geany-gtk
name:      geany-gtk
summary:   A fast and lightweight IDE
publisher: Felicia Hendrickson (fehfeh1)
store-url: https://snapcraft.io/geany-gtk
:
channels:
  latest/stable:    –
  latest/candidate: –
  latest/beta:      –
  latest/edge:      1.33.01+git 2020-10-04 (378) 101MB -
→色々なチャンネルがあるみたい。
-
4). チャンネルの指定のやり方:
$ snap install --help
:
Usage:
  snap install [install-OPTIONS] <snap>...
:
      --channel=                      Use this channel instead of stable
      --edge                          Install from the edge channel(端?版)
      --beta                          Install from the beta channel(ベータ版)
      --candidate                     Install from the candidate channel(候補版)
      --stable                        Install from the stable channel(安定版)
→edge 版というのは一番安定していない版なのかな?。 検索してもマイクロソフト edge が出てくるだけ。
-
5). インストール:
$ snap install --channel=edge geany-gtk
:
geany-gtk (edge) 1.33.01+git from Felicia Hendrickson (fehfeh1) installed
もしくは、
$ snap install --edge geany-gtk
-
6). インストールされたか確認:
$ snap list
Name               Version          Rev    Tracking       Publisher   Notes
core               16-2.50.1        11167  latest/stable  canonical✓  core
core18             20210507         2066   latest/stable  canonical✓  base
geany-gtk          1.33.01+git      378    latest/edge    fehfeh1     -
gtk-common-themes  0.1-52-gb92ac40  1515   latest/stable  canonical✓  -
-
7). snap のマウントポイントからファイルの場所を検索:
$ lsblk | grep geany
loop4    7:4    0  96.4M  1 loop /snap/geany-gtk/378
↓ 探すと:
-
(1). デスクトップファイルの場所:
$ ls /snap/geany-gtk/378/share/applications/geany.desktop
-
(2). アイコンの場所:
$ ls /snap/geany-gtk/378/share/icons/hicolor/scalable/apps/geany.svg
-
(3). 実行ファイルの場所:
$ ls /snap/bin/geany-gtk.geany
$ ls /snap/geany-gtk/378/bin/geany
-
(4). 設定ファイルの場所:
$ ls ~/snap/
featherpad  hello-world  libreoffice
→ここにはありません。
-
8). 起動:
$ /snap/geany-gtk/378/bin/geany
→起動できました。以前設定したテーマ「monokai」が反映されています。日本語入力も可能です。
-
なので、通常の設定ファイルが使われていることになります:
$ ls ~/.config/geany/
→これなら、プラグインは普通に追加できるかも。
後で確認することにしました。
-
バージョン確認:
$ /snap/geany-gtk/378/bin/geany --version
geany 1.37.1 (Jun  3 2021 以降に次を使用してビルドGTK 3.22.30, GLib 2.56.4)
-
9). メニューへの追加:
-
(1). デスクトップファイルのコピー:
$ sudo cp /snap/geany-gtk/378/share/applications/geany.desktop /usr/share/applications/snap-geany.desktop
-
(2). デスクトップファイルの修正:
$ sudo pluma /usr/share/applications/snap-geany.desktop
↓ 下記の行に置換:
Name=snap-Geany
Name[ja]=Geany (snap)
Exec=/snap/geany-gtk/378/bin/geany %F
Icon=/snap/geany-gtk/378/share/icons/hicolor/scalable/apps/geany.svg
-
10). メニューにて「Geany (snap)」を起動:
メニュー →プログラミング →「Geany (snap)」
→バージョンは「1.37.1」です。
    (Jun  3 2021 以降にビルド)
GTK+ v3.22.30 と  GLib  v2.56.4 実行時ライブラリを使用
コマンドでのバージョン表示:
$ /snap/geany-gtk/378/bin/geany --version
geany 1.37.1 (Jun  3 2021 以降に次を使用してビルドGTK 3.22.30, GLib 2.56.4)
ヘルプでのバージョン表示の実行時のライブラリのバージョンとコマンドでのバージョン表示のビルド時のライブラリが同じです。
-
→日本語入力できました。以前追加したテーマ(monokai) も反映されています。
-
-
--- - --- - --- - --- - --- - --- - --- - --- - --- - --- - --- - ----- ----
-
3. 「LibreOffice」をsnap でインストール:(結果は「◎」)
-
1). snaps でインストールできるか確認:
$ snap search libreoffice
:
Name          Version  Publisher   Notes  Summary
libreoffice   7.1.3.2  canonical✓  -      LibreOffice is a powerful office suite including word processing and creation of spreadsheets, slideshows and databases
-
2). インストール:
$ snap install libreoffice
→認証ダイアログ表示: パスワード入力

libreoffice 7.1.3.2 from Canonical✓ installed
-
3). インストールされたか確認:
$ snap list libreoffice
Name         Version  Rev  Tracking       Publisher   Notes
libreoffice  7.1.3.2  218  latest/stable  canonical✓  -
-
$ which libreoffice
/snap/bin/libreoffice

$ whereis libreoffice
libreoffice: /snap/bin/libreoffice.filebug /snap/bin/libreoffice.calc /snap/bin/libreoffice.impress /snap/bin/libreoffice.base /snap/bin/libreoffice.math /snap/bin/libreoffice.writer /snap/bin/libreoffice.draw /snap/bin/libreoffice
$ snap info libreoffice
name:    libreoffice
summary: LibreOffice is a powerful office suite including word processing and
  creation of spreadsheets, slideshows and databases
publisher: Canonical✓
store-url: https://snapcraft.io/libreoffice
contact:   https://bugs.launchpad.net/ubuntu/+source/libreoffice/+bugs?field.tag=snap
license:   unset

description: |
:

commands:
  - libreoffice.base   ← (データベース)
  - libreoffice.calc  ← (スプレッドシート)
  - libreoffice.draw  ←  (ベクター グラフィックスとフローチャート)
  - libreoffice.filebug
  - libreoffice.impress ←  (プレゼンテーション)
  - libreoffice     ←(オフィススイート)
  - libreoffice.math  ← (数式編集)
  - libreoffice.writer  ← (ワープロ)

snap-id:      CpUkI0qPIIBVRsjy49adNq4D6Ra72y4v
tracking:     latest/stable
refresh-date: today at 04:59 JST

channels:
  latest/stable:    7.1.3.2      2021-05-18 (218) 651MB -
  latest/candidate: 7.1.3.2      2021-05-19 (220) 651MB -
  latest/beta:      ↑
  latest/edge:      7.1.3.2~uc20 2021-05-08 (216) 793MB -
installed:          7.1.3.2                 (218) 651MB -
-
4). snap のマウントポイントから場所を検索:
$ lsblk | grep libreoffice
loop3    7:3    0 621.8M  1 loop /snap/libreoffice/218
↓ 探すと:
-
デスクトップファイルの場所:
$ ls -1 /snap/libreoffice/218/meta/gui/
base.desktop
calc.desktop
draw.desktop
impress.desktop
libreoffice.desktop
math.desktop
writer.desktop
もしくは、
$ ls -1 /snap/libreoffice/218/lib/libreoffice/share/xdg/
base.desktop
calc.desktop
draw.desktop
impress.desktop
math.desktop
startcenter.desktop
writer.desktop
xsltfilter.desktop
-
アイコンの場所:
$ ls -1 /snap/libreoffice/218/usr/share/icons/hicolor/256x256/apps/
libreoffice7.1-base.png
libreoffice7.1-calc.png
libreoffice7.1-chart.png
libreoffice7.1-draw.png
libreoffice7.1-impress.png
libreoffice7.1-main.png
libreoffice7.1-math.png
libreoffice7.1-startcenter.png
libreoffice7.1-writer.png
-
実行ファイルの場所:
$ ls -1 /snap/bin/libre*
/snap/bin/libreoffice
/snap/bin/libreoffice.base
/snap/bin/libreoffice.calc
/snap/bin/libreoffice.draw
/snap/bin/libreoffice.filebug
/snap/bin/libreoffice.impress
/snap/bin/libreoffice.math
/snap/bin/libreoffice.writer
-
5). 起動できるか確認:
/snap/bin/libreoffice
/snap/bin/libreoffice.writer
/snap/bin/libreoffice.calc
/snap/bin/libreoffice.impress
/snap/bin/libreoffice.draw
/snap/bin/libreoffice.base
/snap/bin/libreoffice.math
/snap/bin/libreoffice.filebug
-
6). メニューへの追加:
-
(1). デスクトップファイルのコピー:
$ cd /usr/share/applications/

$ sudo cp /snap/libreoffice/218/meta/gui/libreoffice.desktop snap-LibreOffice.desktop
$ sudo cp /snap/libreoffice/218/meta/gui/base.desktop snap-LibreOffice.base.desktop
$ sudo cp /snap/libreoffice/218/meta/gui/calc.desktop snap-LibreOffice.calc.desktop
$ sudo cp /snap/libreoffice/218/meta/gui/draw.desktop snap-LibreOffice.draw.desktop
$ sudo cp /snap/libreoffice/218/meta/gui/impress.desktop snap-LibreOffice.impress.desktop
$ sudo cp /snap/libreoffice/218/meta/gui/math.desktop snap-LibreOffice.math.desktop
$ sudo cp /snap/libreoffice/218/meta/gui/writer.desktop snap-LibreOffice.writer.desktop
-
(2). コピーされたか確認:
$ ls -1 /usr/share/applications/snap-Libre*
/usr/share/applications/snap-LibreOffice.base.desktop
/usr/share/applications/snap-LibreOffice.calc.desktop
/usr/share/applications/snap-LibreOffice.desktop
/usr/share/applications/snap-LibreOffice.draw.desktop
/usr/share/applications/snap-LibreOffice.impress.desktop
/usr/share/applications/snap-LibreOffice.math.desktop
/usr/share/applications/snap-LibreOffice.writer.desktop
-
(3). デスクトップファイルの修正 1:
$ sudo pluma /usr/share/applications/snap-LibreOffice.desktop
↓ 下記の行に置換:
Icon=/snap/libreoffice/218/usr/share/icons/hicolor/256x256/apps/libreoffice7.1-startcenter.png
Exec=/snap/bin/libreoffice %U
Name=snap-LibreOffice
Name[ja]=LibreOffice オフィス(snap)
後半の修正:
[Desktop Action Writer]
Name=Writer
Exec=/snap/bin/libreoffice

[Desktop Action Calc]
Name=Calc
Exec=/snap/bin/libreoffice

[Desktop Action Impress]
Name=Impress
Exec=/snap/bin/libreoffice

[Desktop Action Draw]
Name=Draw
Exec=/snap/bin/libreoffice

[Desktop Action Base]
Name=Base
Exec=/snap/bin/libreoffice

[Desktop Action Math]
Name=Math
Exec=/snap/bin/libreoffice
-
(4). デスクトップファイルの修正 2:
$ sudo pluma /usr/share/applications/snap-LibreOffice.base.desktop
↓ 下記の行に置換:
Icon=/snap/libreoffice/218/usr/share/icons/hicolor/256x256/apps/libreoffice7.1-base.png
Exec=/snap/bin/libreoffice.base %U
Name=snap-LibreOffice Base
Name[ja]=LibreOffice Base(snap)
-
(5). デスクトップファイルの修正 3:
$ sudo pluma /usr/share/applications/snap-LibreOffice.calc.desktop
↓ 下記の行に置換:
Icon=/snap/libreoffice/218/usr/share/icons/hicolor/256x256/apps/libreoffice7.1-calc.png
Exec=/snap/bin/libreoffice.calc %U
Name=snap-LibreOffice Calc
Name[ja]=LibreOffice Calc(snap)
-
(6). デスクトップファイルの修正 4:
$ sudo pluma /usr/share/applications/snap-LibreOffice.draw.desktop
↓ 下記の行に置換:
Icon=/snap/libreoffice/218/usr/share/icons/hicolor/256x256/apps/libreoffice7.1-draw.png
Exec=/snap/bin/libreoffice.draw %U
Name=snap-LibreOffice Draw
Name[ja]=LibreOffice Draw(snap)
-
(7). デスクトップファイルの修正 5:
$ sudo pluma /usr/share/applications/snap-LibreOffice.impress.desktop
↓ 下記の行に置換:
Icon=/snap/libreoffice/218/usr/share/icons/hicolor/256x256/apps/libreoffice7.1-impress.png
Exec=/snap/bin/libreoffice.impress %U
Name=snap-LibreOffice Impress
Name[ja]=LibreOffice Impress(snap)
-
(8). デスクトップファイルの修正 6:
$ sudo pluma /usr/share/applications/snap-LibreOffice.math.desktop
↓ 下記の行に置換:
Icon=/snap/libreoffice/218/usr/share/icons/hicolor/256x256/apps/libreoffice7.1-math.png
Exec=/snap/bin/libreoffice.math %U
Name=snap-LibreOffice Math
Name[ja]=LibreOffice Math(snap)
-
(9). デスクトップファイルの修正 7:
$ sudo pluma /usr/share/applications/snap-LibreOffice.writer.desktop
↓ 下記の行に置換:
Icon=/snap/libreoffice/218/usr/share/icons/hicolor/256x256/apps/libreoffice7.1-writer.png
Exec=/snap/bin/libreoffice.writer %U
Name=snap-LibreOffice Writer
Name[ja]=LibreOffice Writer(snap)
-
7). メニューにて「LibreOffice」を起動:
メニュー →オフィス →「LibreOffice オフィス(snap)」
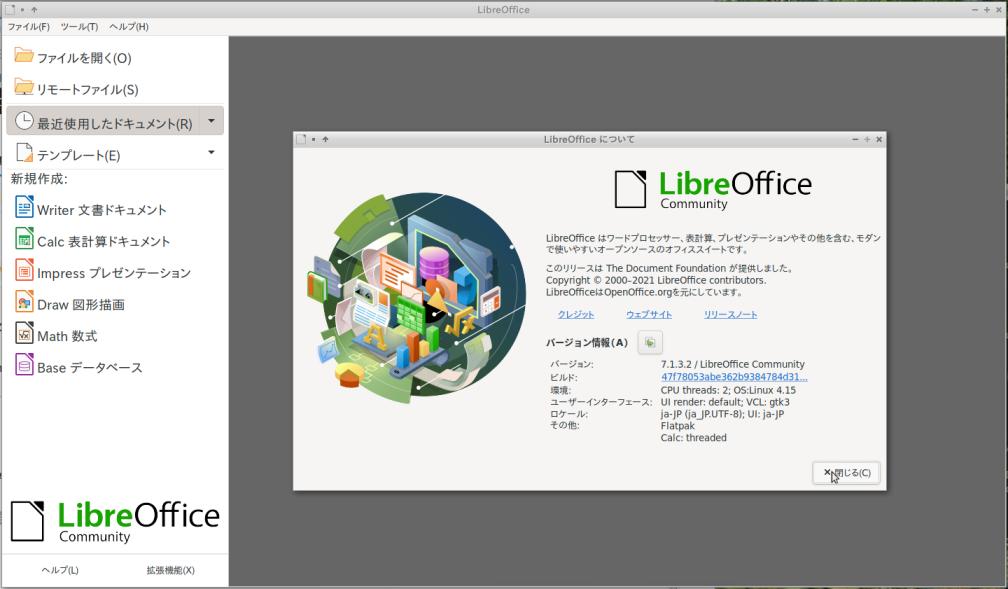
→バージョンは「7.1.3.2」です。(snap)
→日本語入力できました。
-
8). LibreOffice 7.1 の変更点:
-
-
--- - --- - --- - --- - --- - --- - --- - --- - --- - --- - --- - ----- -----
-
4. 「Geany」のプラグインをapt で追加インストール:(結果は「X」)
-
1). インストールできるプラグインの確認:
$ snap search geany
Name        Version      Publisher  Notes  Summary
geany-gtk   1.33.01+git  fehfeh1    -      A fast and lightweight IDE
chartgeany  6.2.6-1snap  lucast70   -      Technical analysis software
→プラグインのsnap はないみたい。
$ apt search geany
:
geany/bionic 1.32-2 amd64
  fast and lightweight IDE

geany-common/bionic,bionic,now 1.32-2 all [設定が残存]  ←(注目)
  fast and lightweight IDE -- common files

geany-plugin-addons/bionic 1.32+dfsg-3 amd64
  miscellaneous plugins for Geany
:
geany-plugins/bionic,bionic 1.32+dfsg-3 all ←(全部入りプラグイン)
  set of plugins for Geany
→多くのプラグイン以外に、「全部入りのプラグイン集」がありました。
-
2). プラグインの追加:
$ apt show geany-plugins
→「Depends: 」(依存)の項目に多くのプラグインが登録されています。依存 (>= 1.32+dfsg-3) として入るみたい。
-
$ sudo apt install geany-plugins
:
提案パッケージ:
  vim | nvi | vile | emacsen doc-base
以下のパッケージが新たにインストールされます:
  exuberant-ctags geany geany-common geany-plugin-addons
  geany-plugin-autoclose geany-plugin-automark geany-plugin-codenav
  geany-plugin-commander geany-plugin-ctags geany-plugin-defineformat
  geany-plugin-doc geany-plugin-extrasel geany-plugin-gendoc
  geany-plugin-geniuspaste geany-plugin-git-changebar geany-plugin-insertnum
  geany-plugin-keyrecord geany-plugin-latex geany-plugin-lineoperations
  geany-plugin-lipsum geany-plugin-lua geany-plugin-macro
  geany-plugin-miniscript geany-plugin-numberedbookmarks geany-plugin-overview
  geany-plugin-pairtaghighlighter geany-plugin-pg geany-plugin-pohelper
  geany-plugin-prettyprinter geany-plugin-prj geany-plugin-projectorganizer
  geany-plugin-sendmail geany-plugin-shiftcolumn geany-plugin-spellcheck
  geany-plugin-tableconvert geany-plugin-treebrowser
  geany-plugin-updatechecker geany-plugin-vc geany-plugin-workbench
  geany-plugin-xmlsnippets geany-plugins geany-plugins-common libctpl2
  libgit2-26 libgtkspell3-3-0 libhttp-parser2.7.1 liblua5.1-0
→プラグインだけ欲しかったけど、古いバージョンの「geany」本体も入ってしまいました。
$ apt list geany
:
geany/bionic,now 1.32-2 amd64 [インストール済み、自動]

$ geany --version
geany 1.37.1 (Jun  3 2021 以降に次を使用してビルドGTK 3.22.30, GLib 2.56.4)

$ which geany
/usr/local/bin/geany

$ whereis geany
geany: /usr/bin/geany /usr/lib/x86_64-linux-gnu/geany /usr/local/bin/geany /usr/local/lib/geany /usr/include/geany /usr/share/geany /usr/share/man/man1/geany.1.gz

$ /usr/bin/geany --version
geany 1.37.1 (Jun  3 2021 以降に次を使用してビルドGTK 3.22.30, GLib 2.56.4)

$ /usr/local/bin/geany --version
geany 1.37.1 (Jun  3 2021 以降に次を使用してビルドGTK 3.22.30, GLib 2.56.4)

$ ls -l /usr/bin/geany
-rwxr-xr-x 1 root root 6136  1月  9  2018 /usr/bin/geany

$ ls -l /usr/local/bin/geany
-rwxr-xr-x 1 root root 14888  6月  3 07:31 /usr/local/bin/geany
→バージョンが低い方「1.32-2」で上書きされると思ったら予想外。ビルドでインストールした方の「1.37.1」が使われます。サイズや日付は違うけどバージョンが同じってどういうこと?
-
(1). インストールされたプラグインの確認:
$ apt list geany* | grep インストール済み
:
geany/bionic,now 1.32-2 amd64 [インストール済み、自動]
geany-common/bionic,bionic,now 1.32-2 all [インストール済み、自動]
geany-plugin-addons/bionic,now 1.32+dfsg-3 amd64 [インストール済み、自動]
geany-plugin-autoclose/bionic,now 1.32+dfsg-3 amd64 [インストール済み、自動]
geany-plugin-automark/bionic,now 1.32+dfsg-3 amd64 [インストール済み、自動]
geany-plugin-codenav/bionic,now 1.32+dfsg-3 amd64 [インストール済み、自動]
geany-plugin-commander/bionic,now 1.32+dfsg-3 amd64 [インストール済み、自動]
geany-plugin-ctags/bionic,now 1.32+dfsg-3 amd64 [インストール済み、自動]
geany-plugin-defineformat/bionic,now 1.32+dfsg-3 amd64 [インストール済み、自動]
geany-plugin-doc/bionic,now 1.32+dfsg-3 amd64 [インストール済み、自動]
geany-plugin-extrasel/bionic,now 1.32+dfsg-3 amd64 [インストール済み、自動]
geany-plugin-gendoc/bionic,now 1.32+dfsg-3 amd64 [インストール済み、自動]
geany-plugin-geniuspaste/bionic,now 1.32+dfsg-3 amd64 [インストール済み、自動]
geany-plugin-git-changebar/bionic,now 1.32+dfsg-3 amd64 [インストール済み、自動]
geany-plugin-insertnum/bionic,now 1.32+dfsg-3 amd64 [インストール済み、自動]
geany-plugin-keyrecord/bionic,now 1.32+dfsg-3 amd64 [インストール済み、自動]
geany-plugin-latex/bionic,now 1.32+dfsg-3 amd64 [インストール済み、自動]
geany-plugin-lineoperations/bionic,now 1.32+dfsg-3 amd64 [インストール済み、自動]
geany-plugin-lipsum/bionic,now 1.32+dfsg-3 amd64 [インストール済み、自動]
geany-plugin-lua/bionic,now 1.32+dfsg-3 amd64 [インストール済み、自動]
geany-plugin-macro/bionic,now 1.32+dfsg-3 amd64 [インストール済み、自動]
geany-plugin-miniscript/bionic,now 1.32+dfsg-3 amd64 [インストール済み、自動]
geany-plugin-numberedbookmarks/bionic,now 1.32+dfsg-3 amd64 [インストール済み、自動]
geany-plugin-overview/bionic,now 1.32+dfsg-3 amd64 [インストール済み、自動]
geany-plugin-pairtaghighlighter/bionic,now 1.32+dfsg-3 amd64 [インストール済み、自動]
geany-plugin-pg/bionic,now 1.32+dfsg-3 amd64 [インストール済み、自動]
geany-plugin-pohelper/bionic,now 1.32+dfsg-3 amd64 [インストール済み、自動]
geany-plugin-prettyprinter/bionic,now 1.32+dfsg-3 amd64 [インストール済み、自動]
geany-plugin-prj/bionic,now 1.32+dfsg-3 amd64 [インストール済み、自動]
geany-plugin-projectorganizer/bionic,now 1.32+dfsg-3 amd64 [インストール済み、自動]
geany-plugin-sendmail/bionic,now 1.32+dfsg-3 amd64 [インストール済み、自動]
geany-plugin-shiftcolumn/bionic,now 1.32+dfsg-3 amd64 [インストール済み、自動]
geany-plugin-spellcheck/bionic,now 1.32+dfsg-3 amd64 [インストール済み、自動]
geany-plugin-tableconvert/bionic,now 1.32+dfsg-3 amd64 [インストール済み、自動]
geany-plugin-treebrowser/bionic,now 1.32+dfsg-3 amd64 [インストール済み、自動]
geany-plugin-updatechecker/bionic,now 1.32+dfsg-3 amd64 [インストール済み、自動]
geany-plugin-vc/bionic,now 1.32+dfsg-3 amd64 [インストール済み、自動]
geany-plugin-workbench/bionic,now 1.32+dfsg-3 amd64 [インストール済み、自動]
geany-plugin-xmlsnippets/bionic,now 1.32+dfsg-3 amd64 [インストール済み、自動]
geany-plugins/bionic,bionic,now 1.32+dfsg-3 all [インストール済み]
geany-plugins-common/bionic,now 1.32+dfsg-3 amd64 [インストール済み、自動]
→プラグインのファイルが入りました:
$ ls -1 /usr/share/geany-plugins/
geanygendoc
geanylua
geniuspaste
git-changebar
overview
pohelper
ツール→プラグインマネージャ
→これらのインストールしたプラグインが表示されません。
- バージョンが合っていないと、プラグインが表示されないのか?
-
(2). これは、apt でインストールした「geany」(1.32-2):
$ ls /usr/share/geany/
colorschemes          geany-3.0.css   geany.glade    templates
filedefs          geany-3.20.css  snippets.conf  ui_toolbar.xml
filetype_extensions.conf  geany.css   tags

$ ls /usr/share/geany/colorschemes/
alt.conf
-
(3). これは、ビルドしてインストールした「geany」(1.37.1):
$ ls /usr/local/share/geany/
GPL-2         filetype_extensions.conf  geany.css      tags
colorschemes  geany-3.0.css     geany.glade    templates
filedefs      geany-3.20.css        snippets.conf  ui_toolbar.xml

$ ls /usr/local/share/geany/colorschemes
alt.conf
-
(4). これは、snap でインストールした「geany」(1.37.1):
$ ls /snap/geany-gtk/378/share/geany/
GPL-2         filetype_extensions.conf  snippets.conf  ui_toolbar.xml
colorschemes  geany.glade       tags
filedefs      geany.gtkrc       templates

$ ls /snap/geany-gtk/378/share/geany/colorschemes
alt.conf
-
(5). 共通で使われているだろう設定ファイル:
$ ls ~/.config/geany/
colorschemes  geany.conf           keybindings.conf  templates
filedefs      geany_socket_ubn-box__0  tags

$ ls ~/.config/geany/colorschemes
bespin.conf        inkpot.conf         solarized-dark.conf
black.conf         kugel.conf          solarized-light.conf
darcula.conf           mc.conf             spyder-dark.conf
dark-colors.conf       metallic-bottle.conf    steampunk.conf
dark-fruit-salad.conf  monokai.conf        tango-dark.conf
dark.conf          notepad-plus-plus.conf  tango-light.conf
delt-dark.conf         oblivion2.conf          tinge.conf
epsilon.conf           pygments.conf           ubuntu.conf
fluffy.conf        railcasts2.conf         vibrant-ink.conf
gedit.conf         retro.conf          zenburn.conf
github.conf        sleepy-pastel.conf
himbeere.conf          slushpoppies.conf
-
apt でインストールした「geany」(1.32-2)と「geany-plugins」を削除しました:
$ sudo apt remove geany geany-plugins
$ sudo apt autoremove
確認:
$ ls /usr/share/geany/
ls: '/usr/share/geany/' にアクセスできません: そのようなファイルやディレクトリはありません

$ ls -1 /usr/share/geany-plugins/
ls: '/usr/share/geany-plugins/' にアクセスできません: そのようなファイルやディレクトリはありません

$ which geany
/usr/local/bin/geany

$ geany --version
geany 1.37.1 (Jun  3 2021 以降に次を使用してビルドGTK 3.22.30, GLib 2.56.4)

$ ls /usr/local/share/geany/
GPL-2         filetype_extensions.conf  geany.css      tags
colorschemes  geany-3.0.css     geany.glade    templates
filedefs      geany-3.20.css        snippets.conf  ui_toolbar.xml
-
-
--- - --- - --- - --- - --- - --- - --- - --- - --- - --- - --- - ----- ----- -
-
5. 「Geany」のプラグインをビルドしてインストール:(結果は「◯」)
-
snap の「Geany」の最新バージョンにプラグインを合わせるには、ビルドしかないようです。 以前ビルドしたことのある「Markdown」プラグインをビルドしてインストールしてみました。
-
参考:
Budgie(5) Ubuntu Budgie 20.04 にgeany の「Markdown」プラグインをビルド、インストール
-
使用環境:
$ cat /var/log/installer/media-info
LXLE 18.04 - Release amd64

$ cat /etc/lsb-release
DISTRIB_ID=Ubuntu
DISTRIB_RELEASE=18.04
DISTRIB_CODENAME=bionic
DISTRIB_DESCRIPTION="Ubuntu 18.04.5 LTS"

$ uname -r
4.15.0-144-generic
apt では「Geany」はインストールしていません:
$ apt list geany
:
geany/bionic 1.32-2 amd64
-
前回、 「Geany」をビルドしてインストール: しました:
→「fcitx-mozc」にて、日本語入力できることを確認しました。
-
$ geany --version
geany 1.37.1 (Jun  3 2021 以降に次を使用してビルドGTK 3.22.30, GLib 2.56.4)

$ which geany
/usr/local/bin/geany

$ whereis geany
geany: /usr/local/bin/geany /usr/local/lib/geany

$ ls /usr/local/lib/geany/
classbuilder.la  export.so   htmlchars.la    saveactions.so
classbuilder.so  filebrowser.la  htmlchars.so    splitwindow.la
export.la    filebrowser.so  saveactions.la  splitwindow.so
-
プラグインを使うには:
-
プラグイン集をインストール:
$ sudo apt update
$ sudo apt install geany-plugins
geany にて、ツール →プラグインマネージャ を起動します。 →使いたいプラグインを選択(チェック)します。
-
ビルドには webkit2gtk が必要:
「geany-plugins」にはGTK-3 に対応したプラグインのみが入っています。「geany-plugin-markdown」プラグインはGTK-2 でビルドされているため含まれません。ただし、プラグインのソースはGTK-3 に対応しており、プラグインをビルドすれば使えます。
→ビルドには webkit2gtk が必要です:
$ apt search libwebkit2gtk-4.0-dev
:
libwebkit2gtk-4.0-dev/bionic-updates,bionic-security 2.32.0-0ubuntu0.18.04.1 amd64
  Web content engine library for GTK+ - development files
-
依存パッケージのインストール:
$ sudo apt install libwebkit2gtk-4.0-dev
:
以下のパッケージが新たにインストールされます:
  libjavascriptcoregtk-4.0-dev libsoup2.4-dev libwebkit2gtk-4.0-dev
  libxml2-dev
-
プラグインのソースを入手
緑色の「Code」をクリック→「Download ZIP」→「ファイルを保存する」
-
ダウンロードした「geany-plugins-master.zip」を右クリック→「ここでファイルを展開」
$ ls ~/Downloads/geany-plugins-master
その中のREADME より抜粋(和訳):
使用法::

  ./configure [引数] または ./autogen.sh [引数]
  make
  sudo make install
autogen.sh はバックグラウンドでconfigure を呼び出し、 git リポジトリから Geany プラグインを使用している場合にのみ使用できます。
ただし、これにより、ほとんどの Geany プラグインが構成、ビルド、およびインストールされます。
ビルドの依存関係が不十分な場合、一部のプラグインを自動的に無効にする自動検出機能があります。
次の引数で、configure スクリプトの動作を調整できます。
-
「./configure」にプラグインの機能の有効/無効を指示できます:
--enable-<オプション>=auto  (デフォルト)
--enable-<オプション>
--disable-<オプション>
-
- 「--enable-<オプション>=auto」は、依存関係があるかで、機能を自動的に有効/無効にします。
→ソースがあるプラグインにて、指示がないとauto になり依存があれば入る構成に作られるということ。(フォルダを移動させることで、そのプラグインのみのビルドになります。指定せずフォルダを移動しなければほとんどがビルド?されます)
-
「--enable-<オプション>」は、機能が強制的に有効になり、依存関係が不足している場合は、エラーが表示されて失敗します。
「--disable-<オプション>」は、機能を強制的に無効にします。
-
ソースのある利用可能なプラグイン:
「addons」 → Addons プラグイン
「autoclose」 → Autoclose プラグイン
「automark」 → Automark プラグイン
「codenav」 → CodeNav プラグイン
「commander」 → Commander プラグイン
「debugger」 → Debugger プラグイン
「defineformat」 → Defineformat プラグイン
「devhelp」 → devhelp プラグイン
「geanyctags」 → GeanyCtags プラグイン
「geanydoc」 → GeanyDoc プラグイン
「geanyextrasel」 → GeanyExtraSel プラグイン
「geanygendoc」 → GeanyGenDoc プラグイン
「geanyinsertnum」 → GeanyInsertNum プラグイン
「geanylua」 → GeanyLua プラグイン
「geanymacro」 → GeanyMacro プラグイン
「geanyminiscript」 → GeanyMiniScript プラグイン
「geanynumberedbookmarks」 → GeanyNumberedBookmarks プラグイン
「geanypg」 → geanypg プラグイン
「geanyprj」 → GeanyPrj プラグイン
「geanypy」 → Geanypy プラグイン
「geanyvc」 → GeanyVC プラグイン
「geniuspaste」 → paste to a pastebin プラグイン
「gitchangebar」 → GitChangeBar プラグイン
「gtkspell」 → GeanyVC の spell-check サポート
「latex」 → LaTeX プラグイン
「lineoperations」 → 開いているファイルに適用できる単純なライン関数
「lipsum」 → Lipsum プラグイン
「markdown」 → Markdown プラグイン       ←(注目)
「multiterm」 → multiterm プラグイン
「overview」 → overview プラグイン
「pairtaghighlighter」 → PairTagHighlighter プラグイン
「peg-markdown」 → Markdown プラグインで Peg-Markdown ライブラリを使用する
「pohelper」 → PoHelper プラグイン
「pretty_printer」 → pretty-printer プラグイン
「projectorganizer」 → ProjectOrganizer プラグイン
「scope」 → Scope プラグイン
「sendmail」 → GeanySendmail プラグイン
「shiftcolumn」 → ShiftColumn プラグイン
「spellcheck」 → spellcheck プラグイン
「tableconvert」 → Tableconvert プラグイン
「treebrowser」 → Treebrowser プラグイン
「updatechecker」 → Updatechecker プラグイン
「vimode」 → Vim-mode プラグイン
「webhelper」 → WebHelper プラグイン
「xmlsnippets」 → XMLSnippets プラグイン
-
例 ::
./configure --enable-geanylua --enable-spellcheck
→「./configure」を実行した後、それぞれのプラグインディレクトリに cd して、 その中で make を実行することで、個々のプラグインをコンパイルできます。
-
使いたい「markdown」プラグインを指示して「configure」を実行:
$ cd ~/Downloads/geany-plugins-master/
$ ./autogen.sh --enable-markdown
↓ 完了時に表示:
geany-plugins-1.38

  Build Environment:
    Geany version:                1.37.1 (GTK3)   ←(注目)
    Install prefix:               /usr/local     ←(注目)
    Datadir:                      /usr/local/share/geany-plugins
    Libdir:                       /usr/local/lib/geany-plugins
    Docdir:                       /usr/local/share/doc/geany-plugins
    Plugins path:                 /usr/local/lib/geany

  Build Features:
    Unit tests:                   no
    Static code checking:         no
    Extra C compiler warnings:    yes
    Extra linker options:         yes

  Plugins:
    Addons:                       yes
    Autoclose:                    yes
    Automark:                     yes
    CodeNav:                      yes
    Commander:                    yes
    Debugger:                     no
    Defineformat:                 yes
    DevHelp:                      no
    GeanyCtags:                   yes
    GeanyDoc:                     yes
    GeanyExtraSel:                yes
    GeanyGenDoc:                  no
    GeanyInsertNum:               yes
    LaTeX:                        yes
    GeanyLua:                     no
    GeanyMacro:                   yes
    GeanyMiniScript:              yes
    GeanyNumberedBookmarks:       yes
    GeanyPrj:                     yes
    Geanypy:                      no
    GeanyVC:                      yes
    GeanyPG:                      no
    GeniusPaste:                  yes
    GitChangeBar:                 no
    Keyrecord:                    yes
    LineOperations:               yes
    Lipsum:                       yes
    Markdown:                     yes   ←(注目)今回の指示
    MultiTerm:                    no
    Overview:                     yes
    PairTagHighlighter:           yes
    PoHelper:                     yes
    Pretty Printer:               yes
    ProjectOrganizer:             yes
    Scope:                        no
    Sendmail:                     yes
    ShiftColumn:                  yes
    Spellcheck:                   no
    TreeBrowser:                  yes
    Tableconvert:                 yes
    Updatechecker:                yes
    Vimode:                       yes
    WebHelper:                    no
    Workbench:                    no
    XMLSnippets:                  yes

  Features:
    GeanyVC GtkSpell support:     no
    Markdown library:             peg-markdown
    Utility library:              yes
    Utility library VTE support:  no
-
ファイルの確認:
$ ls build/markdown*
build/markdown.m4
-
使いたい「markdown」プラグインの個別のフォルダに移動:
$ cd ~/Downloads/geany-plugins-master/markdown
$ ls
AUTHORS  ChangeLog  Makefile.am  NEWS    docs          src
COPYING  Makefile   Makefile.in  README  peg-markdown
→フォルダを移動しないとyes のプラグインが(たぶん?)すべてビルドされます。
-
使いたい「markdown」プラグインの「make」:
$ make
-
使いたい「markdown」プラグインの「make install」:
$ sudo make install
-
「markdown」プラグインが追加されたか確認:
$ ls -l /usr/local/lib/geany/
:
-rwxr-xr-x 1 root root   1144  6月  3 07:31 classbuilder.la
-rwxr-xr-x 1 root root  96000  6月  3 07:31 classbuilder.so
-rwxr-xr-x 1 root root   1112  6月  3 07:31 export.la
-rwxr-xr-x 1 root root  81288  6月  3 07:31 export.so
-rwxr-xr-x 1 root root   1138  6月  3 07:31 filebrowser.la
-rwxr-xr-x 1 root root 135264  6月  3 07:31 filebrowser.so
-rwxr-xr-x 1 root root   1126  6月  3 07:31 htmlchars.la
-rwxr-xr-x 1 root root  89456  6月  3 07:31 htmlchars.so
-rwxr-xr-x 1 root root   1189  6月  9 17:21 markdown.la   ←(注目)
-rwxr-xr-x 1 root root 750736  6月  9 17:21 markdown.so   ←(注目)
-rwxr-xr-x 1 root root   1138  6月  3 07:31 saveactions.la
-rwxr-xr-x 1 root root  89400  6月  3 07:31 saveactions.so
-rwxr-xr-x 1 root root   1138  6月  3 07:31 splitwindow.la
-rwxr-xr-x 1 root root  70984  6月  3 07:31 splitwindow.so
-
ビルドしてインストールした「Geany」にて、プラグインの動作確認:
-
ツール →プラグインマネージャ →「Markdown」が表示されました。
「Markdown」にチェック:
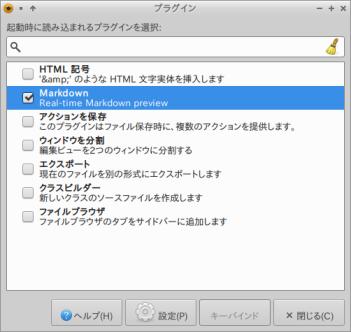
→プラグインが有効化されます。
-
Position: Sidebar
- サイドバー(画面左)
- メッセージウィンドウ(画面下)
どちらかにチェックするかで、表示する位置を選べます。
→OK
-
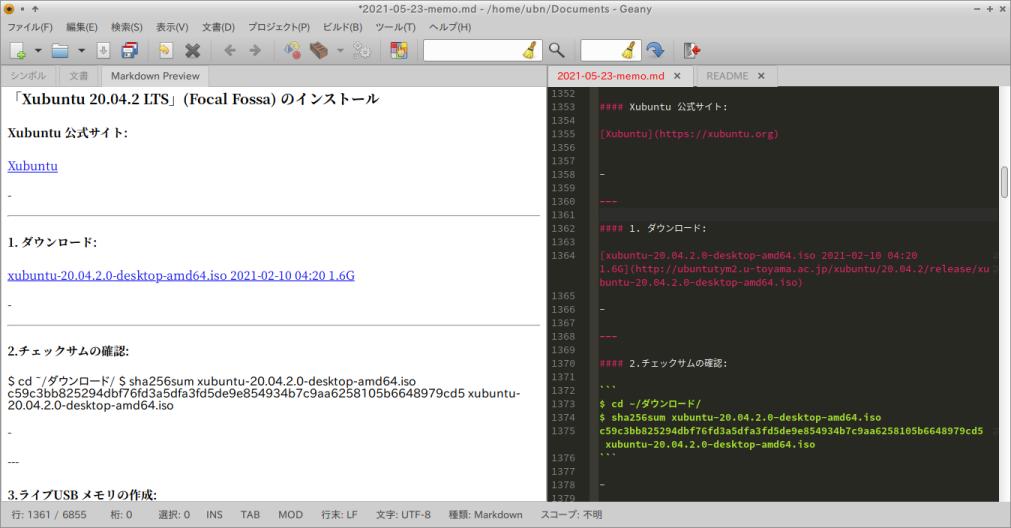
表示 →「サイドバーを表示」にチェック
画面左のサイドバーに「Markdown Preview」タブが表示されました:
-
確認:
$ ls ~/.config/geany/
colorschemes  filedefs  geany.conf  keybindings.conf  plugins  tags  templates

$ ls ~/.config/geany/plugins/
markdown
→「plugins」フォルダが作成され、「markdown」プラグインが入っています。
-
snap でインストールした「Geany」にて、プラグインの動作確認:
すでに「Markdown Preview」タブが表示されました。
多めに「空行」を入れないと思った通りのハイライトのイメージにならないケースがありました。
微妙にMarkdown の仕様(方言)が違うので、投稿できれいに表示されているMarkdown の文章でも、手を入れないときれいなレビューになりません。
-
参考: 「Markdown」プラグインの使い方:
プラグインの使い方や設定ファイルの書き方などは、 こちらを参照:
-
-
--- - --- - --- - --- - --- - --- - --- - --- - --- - --- - --- - ----- ----- --
-
snap パッケージにて気づいたところ
-
- 公式リポジトリからインストールした「Geany」で行ったテーマの組み込み設定が活きていました。
→テーマの組み込みはホームに置かれた設定ファイルが使われており、すぐにテーマが反映されました。
$ ls -1 ~/.config/geany/colorschemes/
:
monokai.conf
-
apt でインストールした「Geany」(1.32-2) では、テーマにて「Markdown のリンクのハイライトが解除されない」不具合がありましたが、snap はバージョンが(1.37.1) に上がっており、正常に表示されました。
fcitx-mozc にて、日本語入力ができました。
ビルドするより簡単にインストールできました。
起動させるにはデスクトップファイルの作成が必要ですが、それにより同じアプリを複数使えます。
-
- snap パッケージとしてインストールした場合、プラグインをビルドしてホームの設定ファイルに反映させたところ、使えるようになりました。
→apt でバージョン違いをインストールしても、認識されませんでした。
→Geany は、プラグインが豊富で、プラグインをビルドしてインストールすることができるのが利点です。
→何かしらのプラグインを使いたいときは、バージョンを合わせるためにも、プラグインのビルドしてのインストールになりそう。
-
-
まとめ
LXLE Linux には軽さを優先したアプリが入っていますが、それらにとらわれず、自分にとって使いやすいアプリをインストールすれば良いと思います。アプリを入手しやすいのがUbuntu ベースの利点です。
自分の欲しいアプリを入手するとき、リポジトリを登録してのインストールや、ソースからのビルドだけでなく、 「ユニバーサルパッケージ」と呼ばれる、依存関係に左右されない方式があります。
-
今回は、そのひとつの「snap」のインストールを試しました。 Ubuntu ベースのディストリビューションだからか、「flatpak」よりも「snap」のアプリの方が日本語入力とかは使える可能性が高いみたい。逆に、Fedora を使っていたら「flatpak」の方が調子が良いかもしれません。
ただし、どちら側にしかないアプリもあるので、色々と試すことで、今まで知らなかった便利なアプリや、欲しかったアプリが手に入るかもしれません。
-
-
-
-
-
-
目次
-
[「投稿の先頭 へ」](
https://furuya7.hatenablog.com/entry/2021/06/11/132553)
-
- 目次
- --- - --- - --- - --- - --- - --- - --- - --- - --- - --- - --- - -
- --- - --- - --- - --- - --- - --- - --- - --- - --- - --- - --- - --
- LXLE について:
- --- - --- - --- - --- - --- - --- - --- - --- - --- - --- - --- - ---
- 「LXLE Linux 18.04.3」のインストール
- --- - --- - --- - --- - --- - --- - --- - --- - --- - --- - --- - ----
- 1). snap でアプリをインストール:
- --- - --- - --- - --- - --- - --- - --- - --- - --- - --- - --- - -----
- 2). snap コマンドの使い方:
- --- - --- - --- - --- - --- - --- - --- - --- - --- - --- - --- - ----- -
- 3). 参考: snap 関連の情報:
- --- - --- - --- - --- - --- - --- - --- - --- - --- - --- - --- - ----- --
- 1. 「featherpad」をsnap でインストール:(結果は「◯」)
- 1). featherpad の検索:
- 2). 「featherpad」のインストール:
- 3). インストールされたか確認:
- 4). 警告ダイアログを非表示にしました:
- 5). ヘルプを「書き込み保護された備忘録」として使うことはできません
- 6). 履歴ファイルの更新ができなくなったとき:
- 7). インストール済みのsnap 一覧:
- 8). snap パッケージの詳細表示:
- 9). snap のマウントポイントからファイルの場所を検索:
- 10). ヘルプファイルが修正できるか確認:
- 11). メニューへの追加:
- 12). メニューにて「featherpad」を起動:
- snap パッケージを削除する場合:
- --- - --- - --- - --- - --- - --- - --- - --- - --- - --- - --- - ----- ---
- 2. 「Geany」をsnap でインストール:(結果は「◯」)
- --- - --- - --- - --- - --- - --- - --- - --- - --- - --- - --- - ----- ----
- 3. 「LibreOffice」をsnap でインストール:(結果は「◎」)
- --- - --- - --- - --- - --- - --- - --- - --- - --- - --- - --- - ----- -----
- 4. 「Geany」のプラグインをapt で追加インストール:(結果は「X」)
- --- - --- - --- - --- - --- - --- - --- - --- - --- - --- - --- - ----- ----- -
- 5. 「Geany」のプラグインをビルドしてインストール:(結果は「◯」)
- プラグインを使うには:
- プラグインのソースを入手
- 「./configure」にプラグインの機能の有効/無効を指示できます:
- ソースのある利用可能なプラグイン:
- 使いたい「markdown」プラグインを指示して「configure」を実行:
- ファイルの確認:
- 使いたい「markdown」プラグインの個別のフォルダに移動:
- 使いたい「markdown」プラグインの「make」:
- 使いたい「markdown」プラグインの「make install」:
- 「markdown」プラグインが追加されたか確認:
- ビルドしてインストールした「Geany」にて、プラグインの動作確認:
- snap でインストールした「Geany」にて、プラグインの動作確認:
- 参考: 「Markdown」プラグインの使い方:
- --- - --- - --- - --- - --- - --- - --- - --- - --- - --- - --- - ----- ----- --
- snap パッケージにて気づいたところ
- まとめ
- -
-
-
-