登録日: 2024-03-04
更新日: 2024-03-14
「Xubuntu 22.04.4 LTS」、および「Windows11」(22H2) の「VirtualBox 7.0.14」にて、「Vagrant」(ベイグラント) という仮想マシンの管理ツールを使えるようにしました。
-
(実践編8):
今回は、その環境で、公式「Box」にある「generic/fedora39」を「バージョン指定」でインストールしました。
いつものやり方だと最新のイメージのインストールですが、
以前のバージョンを使いたいとか、ダウンロード サイズを抑えたいとか、あるかもしれません。
それに合わせて、登録した「Box」の更新を行う「vagrant box update」コマンドも使ってみました。
-
また、自動で「Guest Additions」の更新やインストールをしてくれる、Vagrant の「プラグイン」があったので(ホストOS 側に)追加しました。自動でチェックして実行されるので確実だし、楽ができます。
「VirtualBox」で使うなら、最初からインストールしておくべき「プラグイン」だと思います。
-
その備忘録です。
-
-
(注)リンクを戻るときはブラウザの左上の「←」をクリック
スマホの場合は、「ホーム」ボタンの横の「<」キーをタップ
-
-
目次
-
今回の作業:
目的の「Box」を検索:
「作業フォルダ」を作成:
バージョンを指定して、「Vagrantfile」を作成:
「仮想マシン」の(初回の作成と)立ち上げ:
「vagrant box update」で「Box」を更新:
「Vagrantfile」を修正:
「仮想マシン」の再作成:
「ホスト名」を「vagrant」に変更したい場合:
作業中の「仮想マシン」で、「Box」を作成:
最終的な設定を終えた「仮想マシン」で、「Box」を作成:
最終的な「Box」の、「Vagrantfile」の修正:
「今回の作業で気づいたこと:
-
「Vagrant」コマンドについて:
「Vagrant」コマンドの使用例:
「Vagrant」コマンドの使用例:(目次)
修正版3: 使い回し可能な「Vagrantfile」:
「vagrant box update」で「Box」を更新する場合:
「vagrant box update」のヘルプを表示:
「vagrant vbguest」のヘルプを表示:
「vagrant box remove」のヘルプを表示:
Vagrant に「vagrant-vbguest」プラグインをインストールする場合:
もし、PC のディスクに余裕がない場合:
「ssh 接続」で使うテキストエディタ「nano」:
「ssh 接続」で、日本語表示にするには:
→事前に「デスクトップの日本語化」が必要です
-
「まとめ へ」
「目次詳細 へ」
-
-
- --- - --- - --- - --- - --- - --- - --- - --- - -
-
1). 公式「Box」の「generic/fedora39」を「vagrant up」で立ち上げ:
事前に「Vagrantfile」を作成:
$ cd ~/ダウンロード/vm/fedora39
$ vagrant up
-

GUI のデスクトップは組み込まれていないので、コンソール画面が表示されました:
→「コンソール画面」だと切り貼りができないので、「ssh 接続」での操作が便利です:
-
ちなみに、画面右側のグレーの領域が、VirtualBox の通知領域です:
右上もしくは右下の「オレンジ色」のアイコンをクリックすると消去できます:
-
(1). ログインのプロンプトに注目:
Fedora39 login:
→ホスト名が、デフォルトの「Vagrant」ではありません:
-
(2). 画面下のステータスバーに注目:

→「マウス統合化」機能のアイコンがグレーで無効です:
マウスを見失うので、その都度、右「Ctrl」キーが必要です。
-
(3). 「共有フォルダ」機能は無効です:
「仮想マシン」の画面の、「Devices」→「Shared Folders」→「Shared Folders Settings...」で確認:


→「共有フォルダ」は、定義されていません
-
2). 上記を使い勝手が良いようにカスタマイズ:
通常は「ssh 接続」で使うので、カスタマイズしなくても支障ありません:
-
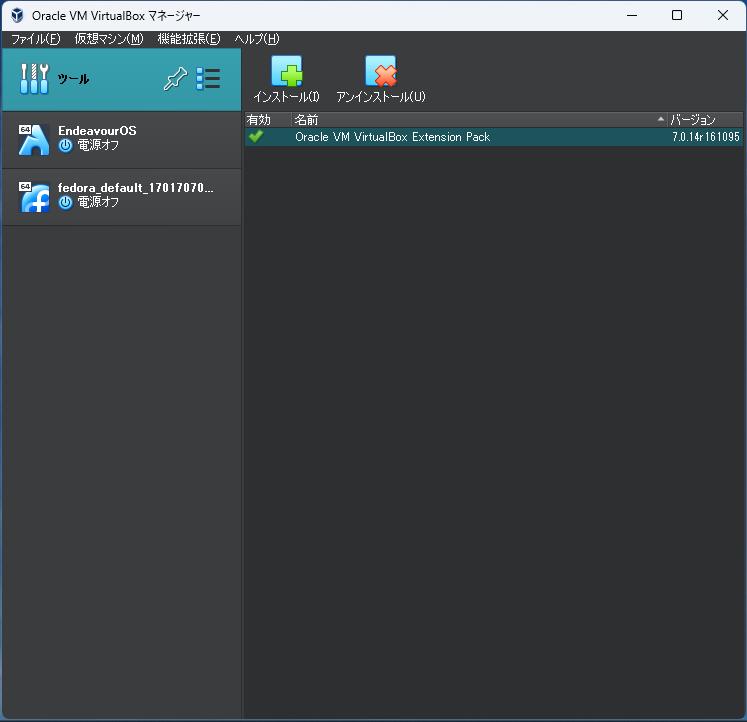
(1). カスタマイズ中の「仮想マシン」の一覧:
$ vagrant global-status
id name provider state directory
-------------------------------------------------------------------------
408fb2f default virtualbox poweroff /home/ubn/ダウンロード/vm/fedora39 ←(generic/fedora39)
a5fdb3e default virtualbox poweroff /home/ubn/ダウンロード/vm/fedora39-test ←(カスタマイズ中)
62a436d default virtualbox poweroff /home/ubn/ダウンロード/vm/fedora39-base ←(カスタマイズ後)
画面下のスクロールバーを移動して右側のコメントを確認して下さい:
-
(2). カスタマイズ中の「Box」の一覧:
$ vagrant box list
fedora39-0224 (virtualbox, 0) ←(カスタマイズ中)
fedora39-0225 (virtualbox, 0) ←(カスタマイズ後)
→カスタマイズの途中で「Box」を作成して、やり直しが楽にできるようにしました:
また、ディスク容量が足りなくなるので、不要な「Box」は削除:
-
3). カスタマイズ後の「fedora39-0225」を「vagrant up」で立ち上げ:
事前に「Vagrantfile」を作成:
$ cd ~/ダウンロード/vm/fedora39-base
$ vagrant up
-

左側のウィンドウが、ホストOS の「端末」(xfce4-terminal) 画面で、
右側のウィンドウが、「仮想マシン」の(Fedora39)の画面(自動起動)です:
-
(1). ログインのプロンプトに注目:
Vagrant login:
→ホスト名が「Vagrant」に変わりました:
-
(2). 画面下のステータスバーに注目:

→「マウス統合化」機能が有効です:
-
(3). 「共有フォルダ」機能を有効にできたので、「作業フォルダ」配下の「data」フォルダを共有に設定:
「仮想マシン」の画面の、「Devices」→「Shared Folders」→「Shared Folders Settings...」で確認:

→こちらは「Vagrantfile」にて設定しています:
-
4). その後すぐに、ジャーナル関連のメッセージが表示され、上書きされました:

-
注目すると:

→上書きされて見づらいですが、Enter を押せばプロンプトに戻ります。
-
通常は「ssh 接続」で使うのでこちらの画面が乱れても支障ありません:
解消のしかたは今のところわかりません:
-
5). 「vagrant ssh」で ssh 接続して、ホストOS の「端末」で操作:

「端末」画面にて、コマンドやメッセージの切り貼りができるので、「クリップボードの共有」機能が使えなくても便利です:
-
6). ログアウト後、「vagrant halt」で、電源オフ中:

-
7). 電源オフされました:

Vagrant では、VirtualBox の「VirtualBox マネージャ」は起動されず、
「仮想マシン」の画面のみが起動したり、閉じたりします:
つまり、「VirtualBox マネージャ」をマウスで操作する代わりに、Vagrant コマンドがあるわけです。
操作を代行しているだけなので、「VirtualBox マネージャ」で(補助的に設定などを)操作することもできます。
-
-
現在のバージョンを表示:
-
ホストOS : 「Xubuntu 22.04.4 LTS」
2024-03-04 現在
カーネル:
$ uname -r
5.15.0-97-generic
リリース:
$ cat /etc/lsb-release
:
DISTRIB_ID=Ubuntu
DISTRIB_RELEASE=22.04
DISTRIB_CODENAME=jammy
DISTRIB_DESCRIPTION="Ubuntu 22.04.4 LTS"
→ついに「22.04.4」に上がりました。
安定しているので、次のLTS が落ち着いた Ubuntu 24.04.1 LTS(noble)になる頃(1年後)までは使いたいところ。
-
「Vagrant」のバージョン:
$ vagrant --version
Vagrant 2.4.1
-
-
ゲストOS : 「Fedora 39」
2024-03-04 現在
カーネル:
$ uname -r
6.7.5-200.fc39.x86_64
リリース:
$ cat /etc/fedora-release
Fedora release 39 (Thirty Nine)
$ cat /etc/redhat-release
Fedora release 39 (Thirty Nine)
$ cat /etc/os-release
:
NAME="Fedora Linux"
VERSION="39 (Thirty Nine)"
ID=fedora
VERSION_ID=39
VERSION_CODENAME=""
PLATFORM_ID="platform:f39"
PRETTY_NAME="Fedora Linux 39 (Thirty Nine)"
ANSI_COLOR="0;38;2;60;110;180"
LOGO=fedora-logo-icon
CPE_NAME="cpe:/o:fedoraproject:fedora:39"
DEFAULT_HOSTNAME="fedora"
HOME_URL="https://fedoraproject.org/"
DOCUMENTATION_URL="https://docs.fedoraproject.org/en-US/fedora/f39/system-administrators-guide/"
SUPPORT_URL="https://ask.fedoraproject.org/"
BUG_REPORT_URL="https://bugzilla.redhat.com/"
REDHAT_BUGZILLA_PRODUCT="Fedora"
REDHAT_BUGZILLA_PRODUCT_VERSION=39
REDHAT_SUPPORT_PRODUCT="Fedora"
REDHAT_SUPPORT_PRODUCT_VERSION=39
SUPPORT_END=2024-11-12
→「サポート終了日付」が表示されています:
Fedora は約 6ヶ月ごとに新しいバージョンがリリース、リリース後 1年ちょっとでサポートが切れるスパンです。
サポート期間が短いけど、LTS 版ではない Ubuntu も似たようなものです。
-
-- -- -- -- -- -- -- -- -- -- -- -- -- -- -- -- -- -- -- -- -- -- -- --
参考: RHEL クローンのサポート期間:
RHEL クローン(100% 互換?)の「AlmaLinux 9.3」(+ EPEL リポジトリ)であれば、2032年(リリースから10年)までサポートされます。ただし、RHEL や RHEL クローンは(サーバー向けなので)Fedora に比べて安定度は増しても、リポジトリの使用に制限があるので面倒です。デスクトップで使うときは使い勝手が落ちます。
ちなみに、Vagrant の公式「Box」には、公式に「AlmaLinux 9.3」が「almalinux/9」として登録されており、安心して使え便利です。
一方の「Rocky Linux 9」は、公式の登録ではなく、個人での登録の「boxomatic/rocky-9」などを使うことになります。セキュリティ面では不利ですが、実機で使う前の確認であれば関係ありませんし、自分で「Box」を作成してもOK。
-
-
- --- - --- - --- - --- - --- - --- - --- - --- - --
-
「VirtualBox」は、Oracle が開発している「仮想マシン」を構築するためのソフトウェアです。
-
-
-
- --- - --- - --- - --- - --- - --- - --- - --- - ---
「Vagrant」 (ベイグラント) について:
-
公式サイト:
Vagrant by HashiCorp
-
「仮想マシン」の管理や操作をコマンドで行うことで、作業効率を上げてくれる「フロントエンド」のソフトウェアです:
-
→詳細は、以前に投稿した「こちら 」を参照:
-
-
- --- - --- - --- - --- - --- - --- - --- - --- - ----
-
公式サイト:
Fedora へようこそ
「Fedora」(フェドラ)は、Redhat 社が支援するコミュニティによって開発されている Linux ディストリビューションです。最新の技術を積極的に取り込む「先進性」が特徴です。以前の「CentOS」とは開発の流れが変わって、現在は、Fedora で採用された最新の技術の一部が「CentOS Stream」 で更に試された後に、Redhat 社の商用 Linux の RHEL (Red Hat Enterprise Linux) に反映されています。
-
Fedora には、サーバ向けの「Fedora Server」と、デスクトップPC 向けの「Fedora Workstation」があります:
「Server」版は、詳細なインストール設定が行えます。デスクトップ環境はインストールされず、再起動後の設定はコンソール画面(または、ssh 接続)でコマンドで行います。
「Workstation」版は、デフォルトで「GNOME」(発音: グノーム ?)デスクトップ環境(他の環境も提供あり)がインストールされます。再起動で「セットアップ」が起動されるので、「ユーザ設定」を行い、インストールが完了します。
-
-- -- -- -- -- -- -- -- -- -- -- -- -- -- -- -- -- -- -- -- -- -- -- --
インストールの参考になりそう?な投稿:
Fedora 34 GNOME をUSB メモリにインストール〈H130〉
-
投稿当時の Fedora 33 GNOME (カーネル 5.8)は、個人で持っている古いPC だと、搭載された(インテル)CPU に内蔵の「ハードウェアアクセラレータ」が未サポートで、「GNOME」デスクトップが表示(描画)しきれず使えませんでした。
ちなみに、「GNOME」デスクトップや「VSCode」アプリは重いので「ハードウェアアクセラレータ」が前提なのでもろに影響が出ました。こちらの投稿は、それが解消された辺りの Fedora 34 GNOME (カーネル 5.11)の頃なので、記事中の「ハードウェアアクセラレータ」辺りの記述は無視できます。
-
-
- --- - --- - --- - --- - --- - --- - --- - --- - -----
1. 公式の「Box」にて、目的の「Box」を検索:
-
公式の「Box」の検索サイト:
Discover Vagrant Boxes
-
「検索キー」の入れ方で、微妙に、表示される「Box」が変わります:
-
-- -- -- -- -- -- -- -- -- -- -- -- -- -- -- -- -- -- -- -- -- -- -- --
「fedora39」で検索:
-
クロスプラットフォーム開発で使用するためのビルド環境みたい:
-
(1). New: タブ
vagrant init generic/fedora39
vagrant up
→作業フォルダで上記のコマンドを実行すると、仮想マシンが作成されます
-
(2). Vagrantfile: タブ
Vagrant.configure("2") do |config|
config.vm.box = "generic/fedora39"
end
→上記の「Vagrantfile」を作業フォルダに作成して「vagrant up」すると、仮想マシンが作成されます
-
(3). 下記をクリックすると「.box」ファイルがダウンロードされますが、今回は直接のダウンロードは要りません:
-
Vagrant Cloud (707 MB) に登録
最新、1ヶ月前の登録:
-
Vagrant Cloud (605 MB) に登録
2ヶ月前の登録:
-
-
- --- - --- - --- - --- - --- - --- - --- - --- - ----- -
2. 「作業フォルダ」の作成:
-
作業フォルダに移動してコマンドを実行すると、コマンドで「仮想マシン名」や「id」番号を省略できます:
-
作業フォルダ名は分かりやすい名前にしました:
$ mkdir -p ~/ダウンロード/vm/fedora39/
-
-
- --- - --- - --- - --- - --- - --- - --- - --- - ----- --
3. バージョンを指定して、「Vagrantfile」を作成:
-
バージョンを指定を省略すると、最新のバージョンが選ばれます:
-
-
- --- - --- - --- - --- - --- - --- - --- - --- - ----- ---
3-a. 「vagrant init」コマンドで「Box」のバージョンを指定して、自動で「Vagrantfile」を作成する場合:
-
最小限の設定:
→「仮想マシン」作成後に修正が必要かも:
-
1). コマンドで「Box」のバージョンを指定して、自動で「Vagrantfile」を作成:
$ cd ~/ダウンロード/vm/fedora39/
$ vagrant init -m generic/fedora39 --box-version 4.3.10
A `Vagrantfile` has been placed in this directory. You are now
ready to `vagrant up` your first virtual environment! Please read
the comments in the Vagrantfile as well as documentation on
`vagrantup.com` for more information on using Vagrant.
→決まり文句のメッセージが表示:
-
「-m」は作成される「Vagrantfile」ファイルのコメント行を削除します
→「Vagrantfile」ファイルの使い方を知りたい場合は、「-m」は付けない方がわかりやすいかも
-
2). 確認:
$ cd ~/ダウンロード/vm/fedora39/
$ cat Vagrantfile
# -*- mode: ruby -*-
# vi: set ft=ruby :
Vagrant.configure("2") do |config|
config.vm.box = "generic/fedora39"
config.vm.box_version = "4.3.10"
end
-
-
- --- - --- - --- - --- - --- - --- - --- - --- - ----- ----
3-b. 「Vagrantfile」を作成して、「Box」のバージョンを指定する場合:
-
最小限の設定:
→「仮想マシン」作成後に修正が必要かも:
-
「Box」のバージョンを指定した「Vagrantfile」を作成:
$ cd ~/ダウンロード/vm/fedora39/
$ nano Vagrantfile
↓ すべて貼付け:
# -*- mode: ruby -*-
# vi: set ft=ruby :
Vagrant.configure("2") do |config|
config.vm.box = "generic/fedora39"
config.vm.box_version = "4.3.10"
end
→Crtl+O で、保存。保存先を確認して、Enter
→Crtl+X で、終了
-
-
- --- - --- - --- - --- - --- - --- - --- - --- - ----- -----
3-c. 「Vagrantfile」を手動で作成して、「Box」のバージョンを指定する場合:
-
個人的にオススメの設定:
→「仮想マシン」作成後に発生した問題に対応:
-
「Box」のバージョンを指定した「Vagrantfile」を作成:
$ cd ~/ダウンロード/vm/fedora39/
$ nano Vagrantfile
↓ すべて貼付け:
# -*- mode: ruby -*-
# vi: set ft=ruby :
Vagrant.configure("2") do |config|
config.vm.box = "generic/fedora39"
config.vm.box_version = "4.3.10"
#config.vm.boot_timeout = 300
config.vm.boot_timeout = 60
config.vm.provider "virtualbox" do |vb|
# Display the VirtualBox GUI when booting the machine
vb.gui = true
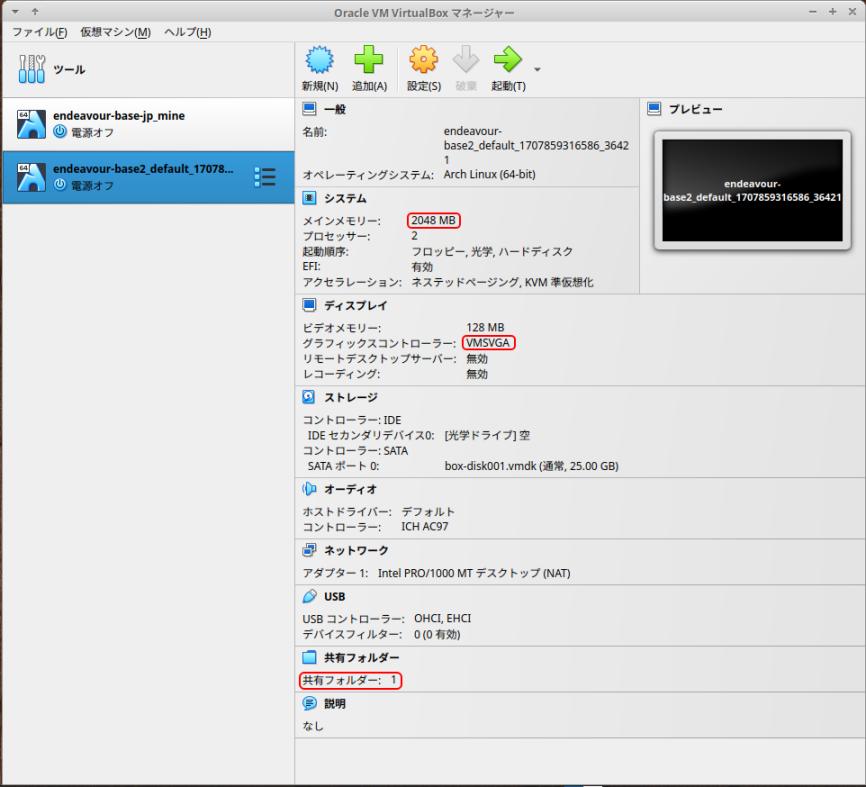
vb.memory = "2048"
#vb.memory = "4096"
vb.cpus = 2
#vb.customize ["modifyvm", :id, "--graphicscontroller", "vboxsvga"]
vb.customize ["modifyvm", :id, "--graphicscontroller", "vmsvga"]
end
end
5行目で、使用する「Box」を指定:
6行目で、使用する「Box」のバージョンを指定: ★
7、8行目で、リトライのタイムアウト値を短く変更: ←(問題点1 の取りあえずの回避)
12、13行目で、メモリ「2048」MB に変更:
15、16行目で、ディスプレイを 「vmsvga」に変更:
→Crtl+O で、保存。保存先を確認して、Enter
→Crtl+X で、終了
-
参考:
最終的な「Vagrantfile」は「こちら」を参照:
-
-
- --- - --- - --- - --- - --- - --- - --- - --- - ----- ----- -
4. 「仮想マシン」の(初回の作成と)立ち上げ:
-
1). 現時点で登録されている「Box」を確認:
$ vagrant box list
Endeav-base3 (virtualbox, 0)
-
$ vagrant global-status
id name provider state directory
--------------------------------------------------------------------
There are no active Vagrant environments on this computer! Or,
you haven't destroyed and recreated Vagrant environments that were
started with an older version of Vagrant.
-
2). 「仮想マシン」の(初回の作成と)立ち上げ:
「Vagrantfile」が置かれた「作業フォルダ」に移動して、実行:
$ cd ~/ダウンロード/vm/fedora39/
$ vagrant up
Bringing machine 'default' up with 'virtualbox' provider...
==> default: Box 'generic/fedora39' could not be found. Attempting to find and install...
default: Box Provider: virtualbox
default: Box Version: 4.3.10 ←(バージョンに注目)
==> default: Loading metadata for box 'generic/fedora39'
default: URL: https://vagrantcloud.com/api/v2/vagrant/generic/fedora39
==> default: Adding box 'generic/fedora39' (v4.3.10) for provider: virtualbox (amd64)
default: Downloading: https://vagrantcloud.com/generic/boxes/fedora39/versions/4.3.10/providers/virtualbox/amd64/vagrant.box
Progress: 7% (Rate: 9629k/s, Estimated time remaining: 0:01:30)
→初回のみ、カウントアップ:
default: Calculating and comparing box checksum...
==> default: Successfully added box 'generic/fedora39' (v4.3.10) for 'virtualbox (amd64)'!
==> default: Importing base box 'generic/fedora39'...
==> default: Matching MAC address for NAT networking...
==> default: Checking if box 'generic/fedora39' version '4.3.10' is up to date...
==> default: Setting the name of the VM: fedora39_default_1708251431977_35141
==> default: Clearing any previously set network interfaces...
==> default: Preparing network interfaces based on configuration...
default: Adapter 1: nat
==> default: Forwarding ports...
default: 22 (guest) => 2222 (host) (adapter 1)
==> default: Running 'pre-boot' VM customizations...
==> default: Booting VM...
==> default: Waiting for machine to boot. This may take a few minutes...
default: SSH address: 127.0.0.1:2222
default: SSH username: vagrant
default: SSH auth method: private key
default: Warning: Authentication failure. Retrying...
default: Warning: Authentication failure. Retrying...
認証失敗のリトライがループ:
→回避策でタイムアウトを設定したので、強制停止で、赤色の警告表示:
Timed out while waiting for the machine to boot. This means that
Vagrant was unable to communicate with the guest machine within
the configured ("config.vm.boot_timeout" value) time period.
If you look above, you should be able to see the error(s) that
Vagrant had when attempting to connect to the machine. These errors
are usually good hints as to what may be wrong.
If you're using a custom box, make sure that networking is properly
working and you're able to connect to the machine. It is a common
problem that networking isn't setup properly in these boxes.
Verify that authentication configurations are also setup properly,
as well.
If the box appears to be booting properly, you may want to increase
the timeout ("config.vm.boot_timeout") value.
ubn@ubn-box:~/ダウンロード/vm/fedora39$
→回避策として、Vagrantfile の 7行目でタイムアウトを短く設定しているので、ループせずに、プロンプトに戻りました
-
→問題点1: 「仮想マシン」の立ち上げ時に ssh 関連のリトライ。その後警告が表示されます
-
$ cd ~/ダウンロード/vm/fedora39/
$ vagrant ssh-config
Host default
HostName 127.0.0.1
User vagrant
Port 2222
UserKnownHostsFile /dev/null
StrictHostKeyChecking no
PasswordAuthentication no
IdentityFile /home/ubn/.vagrant.d/insecure_private_keys/vagrant.key.ed25519
IdentityFile /home/ubn/.vagrant.d/insecure_private_keys/vagrant.key.rsa
IdentitiesOnly yes
LogLevel FATAL
PubkeyAcceptedKeyTypes +ssh-rsa
HostKeyAlgorithms +ssh-rsa
→ssh 認証キーの設定が 2行あります
-
$ cd ~/ダウンロード/vm/fedora39/
$ vagrant ssh
vagrant@127.0.0.1's password:
→パスワードに「vagrant」を入力
Last login: Sun Feb 18 10:25:32 2024
[vagrant@fedora39 ~]$
→問題点2: ゲストOS 側のプロンプトが表示されましたが、いつもとプロンプト表示が違います:
-
5). 「仮想マシン」の状態を確認:
[vagrant@fedora39 ~]$ uname -a
Linux fedora39.localdomain 6.5.6-300.fc39.x86_64 #1 SMP PREEMPT_DYNAMIC Fri Oct 6 19:57:21 UTC 2023 x86_64 GNU/Linux
-
[vagrant@fedora39 ~]$ uname -r
6.5.6-300.fc39.x86_64
-
[vagrant@fedora39 ~]$ uname -n
fedora39.localdomain
→ユーザ名は「vagrant」ですが、ホスト名が「vagrant」ではありません。
これは好み
-
6). 「ssh 接続」を抜けました:
[vagrant@vagrant ~]$ exit
logout
ubn@ubn-box:~/ダウンロード/vm/fedora39$
-
$ cd ~/ダウンロード/vm/fedora39/
$ vagrant status
Current machine states:
default running (virtualbox)
The VM is running. To stop this VM, you can run `vagrant halt` to
shut it down forcefully, or you can run `vagrant suspend` to simply
suspend the virtual machine. In either case, to restart it again,
simply run `vagrant up`.
-
$ vagrant global-status
id name provider state directory
------------------------------------------------------------------------
66cc5fa default virtualbox running /home/ubn/ダウンロード/vm/fedora39
:
-
8). 電源オフ:
$ cd ~/ダウンロード/vm/fedora39/
$ vagrant halt
==> default: Attempting graceful shutdown of VM...
default: Guest communication could not be established! This is usually because
default: SSH is not running, the authentication information was changed,
default: or some other networking issue. Vagrant will force halt, if
default: capable.
==> default: Forcing shutdown of VM...
→問題点3: 「仮想マシン」の電源オフ時に ssh 関連の警告が表示されました
-
-
- --- - --- - --- - --- - --- - --- - --- - --- - ----- ----- --
5. 「vagrant box update」で「Box」を更新:
-
「vagrant box update」コマンドの動作を確認しました:
-
1). 「vagrant box update」のヘルプを表示:
$ vagrant box update --help
和訳:
使い方: vagrant box update [オプション]
利用可能な更新がある場合、現在の Vagrant 環境で使用されているボックスを更新します。
これによりマシンが削除/再作成されるわけではないため、変更を確認するには
それを行う必要があります。
(Vagrant 環境に関連付けられていない) 特定のボックスを更新するには、「--box」フラグを使用します。
オプション:
--box BOX 特定の box を更新
--architecture ARCHITECTURE 特定のアーキテクチャの box を更新
--provider PROVIDER 特定のプロバイダの box を更新
-f, --force 既存のボックスが存在する場合は上書きします
--insecure SSL証明書を検証しません
--cacert FILE SSLダウンロード用のCA証明書
--capath DIR SSLダウンロード用のCA証明書ディレクトリ
--cert FILE クライアント SSL 証明書 (必要な場合)
--[no-]color カラー表示を有効または無効にします
--machine-readable Enable machine readable output
-v, --version Display Vagrant version
--debug Enable debug output
--timestamp Enable timestamps on log output
--debug-timestamp Enable debug output with timestamps
--no-tty Enable non-interactive output
-h, --help このヘルプを表示
-
2). 現在、登録されている「Box」を確認:
$ vagrant box list
Endeav-base3 (virtualbox, 0)
generic/fedora39 (virtualbox, 4.3.10, (amd64)) ←(バージョンに注目)
-
$ cd ~/ダウンロード/vm/fedora39/
$ vagrant status
Current machine states:
default poweroff (virtualbox)
The VM is powered off. To restart the VM, simply run `vagrant up`
-
$ vagrant global-status
id name provider state directory
-------------------------------------------------------------------------
ea0a002 default virtualbox poweroff /home/ubn/ダウンロード/vm/fedora39
-
3). 「Box」の更新1:
$ cd
$ vagrant box update
A Vagrant environment or target machine is required to run this
command. Run `vagrant init` to create a new Vagrant environment. Or,
get an ID of a target machine from `vagrant global-status` to run
this command on. A final option is to change to a directory with a
Vagrantfile and to try again.
和訳:
このコマンドを実行するには、Vagrant 環境またはターゲット マシンが必要です。
「vagrant init」を実行して、新しい Vagrant 環境を作成します。
または、このコマンドを実行するターゲット マシンの ID を「vagrant global-status」から取得します。
最後のオプションは、Vagrantfile のあるディレクトリに変更して再試行することです。
→「仮想マシン」の ID を指定するか、「作業フォルダ」に移動して実行する必要があります。
-
4). 「Box」の更新2:
$ cd ~/ダウンロード/vm/fedora39/
$ vagrant box update
==> default: Checking for updates to 'generic/fedora39'
default: Latest installed version: 4.3.10
default: Version constraints: 4.3.10
default: Provider: virtualbox
default: Architecture: "amd64"
==> default: Box 'generic/fedora39' (v4.3.10) is running the latest version.
→このやり方だと、Vagrantfile にあるバージョン指定行が、最新のバージョンとして認識されて、更新は実行されませんでした。
-
5). 「Box」の更新3:
Vagrantfile に以前のバージョン指定行がある場合、最新に実行されないと思っていたら、
バージョン指定なしで「Box」指定したら、最新バージョンで実行されました:
$ cd
$ vagrant box update --box "generic/fedora39"
Checking for updates to 'generic/fedora39'
Latest installed version: 4.3.10
Version constraints: > 4.3.10
Provider: virtualbox
Architecture: "amd64"
Updating 'generic/fedora39' with provider 'virtualbox' from version
'4.3.10' to '4.3.12'...
Loading metadata for box 'https://vagrantcloud.com/api/v2/vagrant/generic/fedora39'
Adding box 'generic/fedora39' (v4.3.12) for provider: virtualbox (amd64)
Downloading: https://vagrantcloud.com/generic/boxes/fedora39/versions/4.3.12/providers/virtualbox/amd64/vagrant.box
Progress: 56% (Rate: 9.7M/s, Estimated time remaining: 0:00:38)
カウントアップ:
Calculating and comparing box checksum...
Successfully added box 'generic/fedora39' (v4.3.12) for 'virtualbox (amd64)'!
ubn@ubn-box:~$
→完了
-
6). 登録されている「Box」を確認:
$ vagrant box list
Endeav-base3 (virtualbox, 0)
generic/fedora39 (virtualbox, 4.3.10, (amd64))
generic/fedora39 (virtualbox, 4.3.12, (amd64)) ←(追加されました)
→「更新」(入替え)されず、ホームへの「追加」になりました:
これは「Box」の登録についてのコマンドであって、「仮想マシン」の作成で使われるバージョンは、「Vagrantfile」のバージョン指定行で指定されている(指定がない場合は最新の)バージョンになります。
-
-
- --- - --- - --- - --- - --- - --- - --- - --- - ----- ----- ---
6. ホームにバージョンがアップした「Box」が追加されたので、「Vagrantfile」を修正して使えるように対応:
-
やり方は、
「Vagrantfile」にて、バージョンの指定行を最新バージョンに修正:
もしくは、
「Vagrantfile」にて、バージョンの指定行を削除:
-
「Vagrantfile」の修正:
$ cd ~/ダウンロード/vm/fedora39/
$ nano Vagrantfile
↓ すべて貼付け:
# -*- mode: ruby -*-
# vi: set ft=ruby :
Vagrant.configure("2") do |config|
config.vm.box = "generic/fedora39"
config.vm.box_version = "4.3.12"
#config.vm.boot_timeout = 300
config.vm.boot_timeout = 60
config.vm.provider "virtualbox" do |vb|
# Display the VirtualBox GUI when booting the machine
vb.gui = true
vb.memory = "2048"
#vb.memory = "4096"
vb.cpus = 2
#vb.customize ["modifyvm", :id, "--graphicscontroller", "vboxsvga"]
vb.customize ["modifyvm", :id, "--graphicscontroller", "vmsvga"]
end
end
5行目で、使用する「Box」を指定:
6行目で、使用する「Box」のバージョンを指定: ★
7、8行目で、リトライのタイムアウト値を短く変更: ←(問題点1 の取りあえずの回避)
12、13行目で、メモリ「2048」MB に変更:
15、16行目で、ディスプレイを 「vmsvga」に変更:
→Crtl+O で、保存。保存先を確認して、Enter
→Crtl+X で、終了
-
-
- --- - --- - --- - --- - --- - --- - --- - --- - ----- ----- ----
7. 「Box」のバージョンアップに伴う、「仮想マシン」の再作成:
-
「Vagrantfile」を修正して「vagrant up」すると、既存の「仮想マシン」とは別の「仮想マシン」が追加されます。ディスクの空きが減るので、「Vagrantfile」を修正して「仮想マシン」に反映させたいときは、
「vagrant destroy」して「vagrant up」するか、「vagrant reload」を使います:
-
「仮想マシン」を初期化したいときは、「vagrant destroy」して「vagrant up」するやり方が良さそう。
また、再起動したい場合は、「sudo reboot」するのが楽です。
-
1). 「仮想マシン」を削除してから、再作成:
$ cd ~/ダウンロード/vm/fedora39/
$ vagrant destroy
default: Are you sure you want to destroy the 'default' VM? [y/N] y
==> default: Destroying VM and associated drives...
-
$ cd ~/ダウンロード/vm/fedora39/
$ vagrant up
Bringing machine 'default' up with 'virtualbox' provider...
==> default: Importing base box 'generic/fedora39'...
==> default: Matching MAC address for NAT networking...
==> default: Checking if box 'generic/fedora39' version '4.3.12' is up to date... ←(バージョンに注目)
==> default: Setting the name of the VM: fedora39_default_1708264072018_31208
==> default: Clearing any previously set network interfaces...
==> default: Preparing network interfaces based on configuration...
default: Adapter 1: nat
==> default: Forwarding ports...
default: 22 (guest) => 2222 (host) (adapter 1)
==> default: Running 'pre-boot' VM customizations...
==> default: Booting VM...
==> default: Waiting for machine to boot. This may take a few minutes...
default: SSH address: 127.0.0.1:2222
default: SSH username: vagrant
default: SSH auth method: private key
default: Warning: Authentication failure. Retrying...
default: Warning: Authentication failure. Retrying...
default: Warning: Authentication failure. Retrying...
→問題点1: ssh 認証失敗でリトライしてループ。端末にプロンプト返らず:
取りあえずの、問題点1 の回避:
短いタイムアウト値を設定したことで端末が強制停止され、
赤色の警告表示:
Timed out while waiting for the machine to boot. This means that
Vagrant was unable to communicate with the guest machine within
the configured ("config.vm.boot_timeout" value) time period.
If you look above, you should be able to see the error(s) that
Vagrant had when attempting to connect to the machine. These errors
are usually good hints as to what may be wrong.
If you're using a custom box, make sure that networking is properly
working and you're able to connect to the machine. It is a common
problem that networking isn't setup properly in these boxes.
Verify that authentication configurations are also setup properly,
as well.
If the box appears to be booting properly, you may want to increase
the timeout ("config.vm.boot_timeout") value.
ubn@ubn-box:~/ダウンロード/vm/fedora39$
→赤色の警告表示はありますがループが解除され、プロンプトに戻りました:
-
→問題点2: 「仮想マシン」の立ち上げ時に、ssh 認証のリトライの回避策で警告表示して、ループ解除:
バージョンが変わっても、改善されていません
-
$ cd ~/ダウンロード/vm/fedora39/
$ vagrant ssh
vagrant@127.0.0.1's password:
→パスワードに「vagrant」を入力
Last login: Sun Feb 18 13:56:27 2024 from 10.0.2.2
[vagrant@fedora39 ~]$
→ゲストOS 側のプロンプトが表示されましたが、「ホスト名」がいつもの「vagrant」と違います:
-
3). 「仮想マシン」の状態を確認:
[vagrant@fedora39 ~]$ uname -r
6.5.6-300.fc39.x86_64
-
[vagrant@fedora39 ~]$ uname -n
fedora39.localdomain
→問題点4: ユーザ名は「vagrant」ですが、「ホスト名」がいつもの「vagrant」と違います:
-
4). 「ssh 接続」を抜けました:
[vagrant@fedora39 ~]$ exit
logout
ubn@ubn-box:~/ダウンロード/vm/fedora39$
-
5). 電源オフ:
$ cd ~/ダウンロード/vm/fedora39/
$ vagrant halt
==> default: Attempting graceful shutdown of VM...
default: Guest communication could not be established! This is usually because
default: SSH is not running, the authentication information was changed,
default: or some other networking issue. Vagrant will force halt, if
default: capable.
==> default: Forcing shutdown of VM...
→問題点3: 「仮想マシン」の電源オフ時に、ssh 関連の警告が表示されます:
-
-
- --- - --- - --- - --- - --- - --- - --- - --- - ----- ----- -----
8. 問題点4 の回避: 「ホスト名」をいつもの「vagrant」に変更したい場合:
-
こちらの「Box」は、
問題点4: ユーザ名は「vagrant」ですが、「ホスト名」がいつもの「vagrant」と違います:
「Box」の作成者がわかりやすいようにしたと思われます。
このままでも良いし、統一しても良いかな。好みです。
-
ホスト名(コンピュータ名)を他の「Box」と同じ「vagrant」に変更:
他のホスト名に変更してもかまいません:
-
1). 「仮想マシン」の立ち上げ:
$ cd ~/ダウンロード/vm/fedora39/
$ vagrant up
-
$ cd ~/ダウンロード/vm/fedora39/
$ vagrant ssh
vagrant@127.0.0.1's password:
Last login: Sun Feb 18 14:10:13 2024 from 10.0.2.2
[vagrant@fedora39 ~]$
-
3. 現在の「ホスト名」(コンピュータ)を確認:
[vagrant@fedora39 ~]$ uname -n
fedora39.localdomain
もしくは、
[vagrant@fedora39 ~]$ sudo hostname
fedora39.localdomain
もしくは、
[vagrant@fedora39 ~]$ sudo hostnamectl
Static hostname: fedora39.localdomain
Icon name: computer-vm
Chassis: vm 🖴
Machine ID: 04aeabe8a6dc482eaa2fc9401893da6f
Boot ID: a953c1f79fa64ad585269c387321fc9a
Virtualization: oracle
Operating System: Fedora Linux 39 (Thirty Nine)
CPE OS Name: cpe:/o:fedoraproject:fedora:39
OS Support End: Tue 2024-05-14
OS Support Remaining: 2month 3w 3d
Kernel: Linux 6.5.6-300.fc39.x86_64
Architecture: x86-64
Hardware Vendor: innotek GmbH
Hardware Model: VirtualBox
Firmware Version: VirtualBox
Firmware Date: Fri 2006-12-01
Firmware Age: 17y 2month 2w 4d
-
4). 恒久的な「ホスト名」の変更:
[vagrant@fedora39 ~]$ sudo hostnamectl set-hostname vagrant
[vagrant@fedora39 ~]$
→すぐには反映されません
-
5). 「仮想マシン」を再起動:
[vagrant@fedora39 ~]$ sudo reboot
Broadcast message from root@fedora39.localdomain on pts/1 (Sun 2024-02-18 14:14:12 UTC):
The system will reboot now!
[vagrant@fedora39 ~]$ Connection to 127.0.0.1 closed by remote host.
ubn@ubn-box:~/ダウンロード/vm/fedora39$
-
6). 「仮想マシン」の画面が立ち上がるまで待ちます:
-
確認:
-
$ vagrant status
Current machine states:
default running (virtualbox)
-
$ vagrant global-status
id name provider state directory
------------------------------------------------------------------------
408fb2f default virtualbox running /home/ubn/ダウンロード/vm/fedora39
:
-
$ cd ~/ダウンロード/vm/fedora39/
$ vagrant ssh
vagrant@127.0.0.1's password:
→パスワードに「vagrant」を入力
Last login: Fri Feb 23 14:41:06 2024 from xx.xx.xx.xx
[vagrant@vagrant ~]$
→ゲストOS 側のプロンプトが、いつもの表示になりました:
-
8). 「仮想マシン」の状態を確認:
[vagrant@vagrant ~]$ uname -n
vagrant
もしくは、
[vagrant@vagrant ~]$ sudo hostname
vagrant
もしくは、
[vagrant@vagrant ~]$ sudo hostnamectl
Static hostname: vagrant
Icon name: computer-vm
Chassis: vm 🖴
Machine ID: 1e5e2c0e93a949fcb8143caccbb0dad7
Boot ID: 58d83f9a85b742e8965d8b22dca69de1
Virtualization: oracle
Operating System: Fedora Linux 39 (Thirty Nine)
CPE OS Name: cpe:/o:fedoraproject:fedora:39
OS Support End: Tue 2024-05-14
OS Support Remaining: 2month 2w 5d
Kernel: Linux 6.5.6-300.fc39.x86_64
Architecture: x86-64
Hardware Vendor: innotek GmbH
Hardware Model: VirtualBox
Firmware Version: VirtualBox
Firmware Date: Fri 2006-12-01
Firmware Age: 17y 2month 3w 2d
-
-
- --- - --- - --- - --- - --- - --- - --- - --- - ----- ----- ----- -
9. 問題点1、2、3 の回避: ssh 関連の警告表示の対応:
-
問題点1: 「仮想マシン」の立ち上げ時に、ssh 認証失敗でリトライしてループ。端末にプロンプト返らず:
問題点2: 「仮想マシン」の立ち上げ時に、ssh 認証のリトライの回避策で警告表示して、ループ解除:
問題点3: 「仮想マシン」の電源オフ時に ssh 関連の警告が表示。に対応:
-
1). sshd サービスが起動されているか確認:
[vagrant@vagrant ~]$ sudo systemctl status sshd
● sshd.service - OpenSSH server daemon
Loaded: loaded (/usr/lib/systemd/system/sshd.service; enabled; preset: enabled)
Drop-In: /usr/lib/systemd/system/service.d
└─10-timeout-abort.conf
Active: active (running) since Sun 2024-02-18 14:14:50 UTC; 16min ago
Docs: man:sshd(8)
man:sshd_config(5)
Main PID: 693 (sshd)
Tasks: 1 (limit: 2309)
Memory: 5.9M
CPU: 772ms
CGroup: /system.slice/sshd.service
└─693 "sshd: /usr/sbin/sshd -D [listener] 0 of 10-100 startups"
Feb 18 14:14:49 vagrant systemd[1]: Starting sshd.service - OpenSSH server daemon...
Feb 18 14:14:49 vagrant (sshd)[693]: sshd.service: Referenced but unset environment variable evaluat>
Feb 18 14:14:50 vagrant sshd[693]: Server listening on 0.0.0.0 port 22.
Feb 18 14:14:50 vagrant sshd[693]: Server listening on :: port 22.
Feb 18 14:14:50 vagrant systemd[1]: Started sshd.service - OpenSSH server daemon.
→「q」で、表示を終了
-
2). パスワードなしでsudo が使えるかと、ssh 関連の設定を確認:
[vagrant@vagrant ~]$ sudo ls -lAp
-rw-------. 1 vagrant vagrant 108 Feb 18 14:14 .bash_history
-rw-r--r--. 1 vagrant vagrant 18 Jul 19 2023 .bash_logout
-rw-r--r--. 1 vagrant vagrant 144 Jul 19 2023 .bash_profile
-rw-r--r--. 1 vagrant vagrant 522 Jul 19 2023 .bashrc
→「~/.ssh」がありません
-
3). 「~/.ssh」を作成して、Vagrant 用公開鍵認証キーを取得:
$ mkdir -p /home/vagrant/.ssh
$ chmod 700 /home/vagrant/.ssh
$ cd /home/vagrant/.ssh
$ curl -k -L -o authorized_keys 'https://raw.github.com/mitchellh/vagrant/master/keys/vagrant.pub'
$ chmod 600 /home/vagrant/.ssh/authorized_keys
$ chown -R vagrant:vagrant /home/vagrant/.ssh
-
4). ホームに移動:
[vagrant@vagrant ~]$ cd
-
5). 確認:
[vagrant@vagrant ~]$ ls -lAp /home/vagrant/ | grep ssh
:
drwx------. 2 vagrant vagrant 29 Feb 18 14:34 .ssh/
→ファイル属性は「700」で、「vagrant:vagrant」の所有です
-
[vagrant@vagrant ~]$ ls -lAp /home/vagrant/.ssh
:
-rw-------. 1 vagrant vagrant 409 Feb 18 14:34 authorized_keys
→ファイル属性は「600」で、「vagrant:vagrant」の所有
[vagrant@vagrant ~]$ ls -lAp
:
-rw-------. 1 vagrant vagrant 108 Feb 18 14:14 .bash_history
-rw-r--r--. 1 vagrant vagrant 18 Jul 19 2023 .bash_logout
-rw-r--r--. 1 vagrant vagrant 144 Jul 19 2023 .bash_profile
-rw-r--r--. 1 vagrant vagrant 522 Jul 19 2023 .bashrc
drwx------. 2 vagrant vagrant 29 Feb 18 14:34 .ssh/
-
6). 「仮想マシン」の再起動:
[vagrant@vagrant ~]$ sudo reboot
Broadcast message from root@vagrant on pts/1 (Sun 2024-02-18 14:38:40 UTC):
The system will reboot now!
[vagrant@vagrant ~]$ Connection to 127.0.0.1 closed by remote host.
ubn@ubn-box:~/ダウンロード/vm/fedora39$
-
「仮想マシン」が立ち上がるまで待ちます:
-
7). 電源オフ:
$ vagrant halt
==> default: Attempting graceful shutdown of VM...
default:
default: Vagrant insecure key detected. Vagrant will automatically replace
default: this with a newly generated keypair for better security.
default:
default: Inserting generated public key within guest...
default: Removing insecure key from the guest if it's present...
default: Key inserted! Disconnecting and reconnecting using new SSH key...
ubn@ubn-box:~/ダウンロード/vm/fedora39$
和訳:
==> default: 仮想マシンを正常にシャットダウンしようとしています...
default:
default: Vagrant の安全でないキーが検出されました。Vagrant はセキュリティを向上
default: させるために、これを新しく生成されたキーペアに自動的に置き換えます。
default:
default: キーが挿入されました!切断し、新しい SSH キーを使用して再接続しています...
-
8). 「仮想マシン」の立ち上げ:
$ cd ~/ダウンロード/vm/fedora39/
$ vagrant up
Bringing machine 'default' up with 'virtualbox' provider...
==> default: Checking if box 'generic/fedora39' version '4.3.12' is up to date...
==> default: Clearing any previously set forwarded ports...
==> default: Clearing any previously set network interfaces...
==> default: Preparing network interfaces based on configuration...
default: Adapter 1: nat
==> default: Forwarding ports...
default: 22 (guest) => 2222 (host) (adapter 1)
==> default: Running 'pre-boot' VM customizations...
==> default: Booting VM...
==> default: Waiting for machine to boot. This may take a few minutes...
default: SSH address: 127.0.0.1:2222
default: SSH username: vagrant
default: SSH auth method: private key
==> default: Machine booted and ready!
==> default: Checking for guest additions in VM...
default: The guest additions on this VM do not match the installed version of
default: VirtualBox! In most cases this is fine, but in rare cases it can
default: prevent things such as shared folders from working properly. If you see
default: shared folder errors, please make sure the guest additions within the
default: virtual machine match the version of VirtualBox you have installed on
default: your host and reload your VM.
default:
default: Guest Additions Version: 6.0.0 r127566
default: VirtualBox Version: 7.0
ubn@ubn-box:~/ダウンロード/vm/fedora39$
→問題点1、2、3 が解消: 「仮想マシン」の立ち上げ時の ssh 関連のリトライと、その後の警告表示が解消されました:
-
→問題点5: 「Guest Additions」のバージョンチェックで、6.0.0 と古いです:
→問題点6: 「マウスの統合化」が無効で、マウスを見失うので、右Ctrl キーが必要です:
→問題点7: 「共有フォルダ」が無効です:
-
$ cd ~/ダウンロード/vm/fedora39/
$ vagrant ssh-config
Host default
HostName 127.0.0.1
User vagrant
Port 2222
UserKnownHostsFile /dev/null
StrictHostKeyChecking no
PasswordAuthentication no
IdentityFile /home/ubn/ダウンロード/vm/fedora39/.vagrant/machines/default/virtualbox/private_key
IdentitiesOnly yes
LogLevel FATAL
PubkeyAcceptedKeyTypes +ssh-rsa
HostKeyAlgorithms +ssh-rsa
→ssh 認証キーの行が 1行に変更されました:
ssh 認証キーは「作業フォルダ」の「.vagrant」フォルダ配下に置かれています:
-
$ cd ~/ダウンロード/vm/fedora39/
$ vagrant ssh
Last login: Sun Feb 18 14:16:38 2024 from 10.0.2.2
[vagrant@vagrant ~]$
→パスワードを入れなくてもログインできました:
-
11). ssh 接続を終了:
[vagrant@vagrant ~]$ exit
logout
ubn@ubn-box:~/ダウンロード/vm/fedora39$
-
12). 「仮想マシン」を電源オフ:
$ vagrant halt
==> default: Attempting graceful shutdown of VM...
ubn@ubn-box:~/ダウンロード/vm/fedora39$
→問題点3 の解消: 「仮想マシン」の電源オフ時の ssh 関連の警告が表示されなくなりました:
-
-
- --- - --- - --- - --- - --- - --- - --- - --- - ----- ----- ----- --
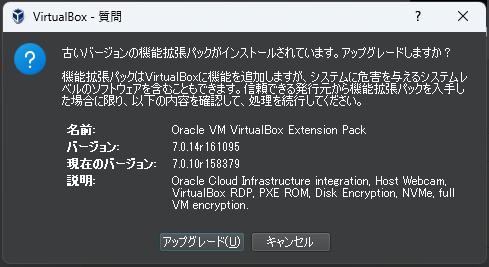
10. 問題点5、6、7 の回避: 「仮想マシン」を、最新の「Guest Additions」に更新しました:
-
問題点5: 「Guest Additions」のバージョンチェックで、6.0.0 と古いです:
問題点6: 「マウスの統合化」が無効で、マウスを見失うので、右Ctrl キーが必要です:
問題点7: 「共有フォルダ」が無効です:
-
参考:
CentOS、RHEL、Fedora に VirtualBox Guest Additions をインストールする
-
1). ホストOS を再起動:
「端末」以外のウィンドウを閉じてから、
$ reboot
-
2). 「仮想マシン」を立ち上げ:
$ cd ~/ダウンロード/vm/fedora39/
$ vagrant up
-
$ cd ~/ダウンロード/vm/fedora39/
$ vagrant ssh
Last login: Sun Feb 18 15:16:43 2024 from 10.0.2.2
[vagrant@vagrant ~]$
→パスワードなしでログインできました:
-
4). 「仮想マシン」で、システム更新:
[vagrant@vagrant ~]$ sudo dnf update
もしくは、(dnf では、どちらも同じ機能)
[vagrant@vagrant ~]$ sudo dnf upgrade
:
Transaction Summary
===========================================================================
Install 12 Packages
Upgrade 172 Packages
Total download size: 370 M
Is this ok [y/N]:
→「y」Enterで実行
「Enter」のみだと実行されないので注意。
:
Importing GPG key xxxxxxxxx:
Userid : "Fedora (39) <fedora-39-primary@fedoraproject.org>"
Fingerprint: xxxx xxxx xxxx ......xxxx xxxx
From : /etc/pki/rpm-gpg/RPM-GPG-KEY-fedora-39-x86_64
Is this ok [y/N]:
→「y」Enterで実行
:
Complete!
[vagrant@vagrant ~]$
-
5). 「仮想マシン」を再起動:
[vagrant@vagrant ~]$ sudo reboot
Broadcast message from root@vagrant on pts/1 (Fri 2024-02-23 15:35:54 UTC):
The system will reboot now!
[vagrant@vagrant ~]$ Connection to 127.0.0.1 closed by remote host.
ubn@ubn-box:~/ダウンロード/vm/fedora39$
-
6). ホストOS の端末から、「ssh 接続」:
$ cd ~/ダウンロード/vm/fedora39/
$ vagrant ssh
Last login: Fri Feb 23 14:55:12 2024 from 10.0.2.2
[vagrant@vagrant ~]$
-
7). カーネルバージョンの確認:
$ uname -r
6.7.5-200.fc39.x86_64
-
8). カーネルヘッダーと、必要なツールのインストール:
「Fedora」の場合:
$ sudo dnf install make gcc kernel-headers kernel-devel perl dkms bzip2
:
Transaction Summary
===========================================================================
Install 291 Packages
Total download size: 127 M
Installed size: 415 M
Is this ok [y/N]:
→「y」Enterで実行
:
Complete!
[vagrant@vagrant ~]$
-
9). 「仮想マシン」の電源オフ:
[vagrant@vagrant ~]$ exit
logout
ubn@ubn-box:~/ダウンロード/vm/fedora39$
-
$ vagrant halt
==> default: Attempting graceful shutdown of VM...
ubn@ubn-box:~/ダウンロード/vm/fedora39$
-
$ vagrant status
Current machine states:
default poweroff (virtualbox)
The VM is powered off. To restart the VM, simply run `vagrant up`
-
-
-
(2). ウィンドウの左側で、仮想マシンの「fedora39_default_xxxx...」をクリック
-
(3). ストレージ→「コントローラー: IDE Controller...」の右にある「光学ドライブの追加」アイコンをクリック
-
(4). 「光学ドライブ選択」画面が表示:

.iso がない場合は、右下の「空のままにする」をクリック
「VBoxGustAdditions.iso」が表示されていたら、それを選んで、右下の「選択」をクリック
→「OK」
-

-
これで「光学ドライブ」が認識されるようになります:
/dev/cdrom
/dev/sr0
どちらのドライブを使っても良いですが、これがないと、iso イメージをマウントできません:
-
(5). 「VirtualBox」マネージャを右上の「x」で閉じます:
-
11). ホストOS を再起動:
「端末」以外のウィンドウを閉じてから、
$ reboot
-
12). 「仮想マシン」の立ち上げ
$ cd ~/ダウンロード/vm/fedora39/
$ vagrant up
-
13). 「仮想マシン」の画面が立ち上がったら、操作:
マウスを見失ったら、右「Ctrl」キーを押します:
-
「仮想マシン」の画面の左上の「Devices」 →「Insert Guest Additions CD Image ...」をクリック
→ウィンドウの右下の「CD-ROM」のアイコンが表示されていることを確認:
-
14). ホストOS の「端末」から「ssh 接続」にて、「光学ドライブ」を確認:
$ vagrant ssh
Last login: Fri Feb 23 15:37:35 2024 from 10.0.2.2
[vagrant@vagrant ~]$
-
[vagrant@vagrant ~]$ ls /dev/cd*
/dev/cdrom
-
15). iso を「光学ドライブ」にマウント:
[vagrant@vagrant ~]$ sudo mount -r /dev/cdrom /media
mount: (hint) your fstab has been modified, but systemd still uses
the old version; use 'systemctl daemon-reload' to reload.
→マウントのヒントが表示されます
これは、恒久的にマウントする場合のヒントなので無視します:
-
[vagrant@vagrant ~]$ cd /media/
[vagrant@vagrant media]$ ls *.run
VBoxLinuxAdditions.run
-
[vagrant@vagrant media]$ sudo ./VBoxLinuxAdditions.run install
Verifying archive integrity... 100% MD5 checksums are OK. All good.
Uncompressing VirtualBox 7.0.14 Guest Additions for Linux 100%
VirtualBox Guest Additions installer
Copying additional installer modules ...
Installing additional modules ...
VirtualBox Guest Additions: Starting.
VirtualBox Guest Additions: Setting up modules
VirtualBox Guest Additions: Building the VirtualBox Guest Additions kernel
modules. This may take a while.
VirtualBox Guest Additions: To build modules for other installed kernels, run
VirtualBox Guest Additions: /sbin/rcvboxadd quicksetup <version>
VirtualBox Guest Additions: or
VirtualBox Guest Additions: /sbin/rcvboxadd quicksetup all
VirtualBox Guest Additions: Building the modules for kernel
6.7.5-200.fc39.x86_64.
grep: warning: stray \ before /
grep: warning: stray \ before /
grep: warning: stray \ before /
VirtualBox Guest Additions: Running kernel modules will not be replaced until
the system is restarted or 'rcvboxadd reload' triggered
VirtualBox Guest Additions: reloading kernel modules and services
VirtualBox Guest Additions: kernel modules and services 7.0.14 r161095 reloaded
VirtualBox Guest Additions: NOTE: you may still consider to re-login if some
user session specific services (Shared Clipboard, Drag and Drop, Seamless or
Guest Screen Resize) were not restarted automatically
[vagrant@vagrant media]$
→インストールが完了:
-
スクリプト実行時のログは、「/var/log/vboxadd-setup.log」に登録されています:
[vagrant@vagrant ~]$ cat /var/log/vboxadd-setup.log
Building the main Guest Additions 7.0.14 module for kernel 6.7.5-200.fc39.x86_64.
Building the shared folder support module.
Building the graphics driver module.
Could not find the X.Org or XFree86 Window System, skipping.
-
→「共有フォルダ」機能と「グラフィックドライバー」のモジュールがビルドされました。
ただし、GUI がインストールされていないとスキップされるところ?があるみたい。
エラーの登録はないみたい。
-
17). アンマウント:
[vagrant@vagrant media]$ cd
[vagrant@vagrant ~]$ sudo umount /media
-
18). 取外し:
[vagrant@vagrant ~]$ sudo eject
-
19). ssh 接続を終了:
[vagrant@vagrant ~]$ exit
logout
ubn@ubn-box:~/ダウンロード/vm/fedora39$
-
20). 「仮想マシン」の電源オフ:
$ cd ~/ダウンロード/vm/fedora39/
$ vagrant halt
==> default: Attempting graceful shutdown of VM...
ubn@ubn-box:~/ダウンロード/vm/fedora39$
-
21). ホストOS を再起動:
「端末」以外のウィンドウを閉じてから、
$ reboot
-
22). 「仮想マシン」の立ち上げ:
$ cd ~/ダウンロード/vm/fedora39/
$ vagrant up
Bringing machine 'default' up with 'virtualbox' provider...
==> default: Checking if box 'generic/fedora39' version '4.3.12' is up to date...
==> default: Clearing any previously set forwarded ports...
==> default: Clearing any previously set network interfaces...
==> default: Preparing network interfaces based on configuration...
default: Adapter 1: nat
==> default: Forwarding ports...
default: 22 (guest) => 2222 (host) (adapter 1)
==> default: Running 'pre-boot' VM customizations...
==> default: Booting VM...
==> default: Waiting for machine to boot. This may take a few minutes...
default: SSH address: 127.0.0.1:2222
default: SSH username: vagrant
default: SSH auth method: private key
==> default: Machine booted and ready!
==> default: Checking for guest additions in VM...
==> default: Machine already provisioned. Run `vagrant provision` or use the `--provision`
==> default: flag to force provisioning. Provisioners marked to run always will still run.
ubn@ubn-box:~/ダウンロード/vm/fedora39$
→問題点5: 「guest additions」のチェックが OK になりました:
→問題点6: 「マウスの統合化」機能が有効になっていません:
マウスが消えるのでマウスを見失います。
そのたびに手動で右「Ctrl」キーが必要。マウスを見失います。右Ctrl キーが必要です。マウスの統合化が効いていません:
-
→問題点7:「共有フォルダ」が有効になっておらず、「共有フォルダ」がマウントされていません
-
-
- --- - --- - --- - --- - --- - --- - --- - --- - ----- ----- ----- ---
11. 問題点6 の回避: 「マウスの統合化」機能を有効にしました:
-
問題点6: 「マウスの統合化」が無効です:
マウスが消えるのでマウスを見失います。
そのたびに手動で右「Ctrl」キーが必要。マウスを見失います。右Ctrl キーが必要です。
マウスの統合化が効いていません:
-
有効にするには、「仮想マシン」にて「Guest Additions」のインストールが必要です:
それ以外に、ポインティングデバイス:「PS/2 マウス」→「USB タブレット」に変更する必要があります:
-
1). 「仮想マシン」を電源オフ:
$ cd ~/ダウンロード/vm/fedora39
$ vagrant halt
-
2). 「VirtualBox」マネージャを起動して、右側の「システム」の文字をクリック →「マザーボード」タブ
-
→「OK」
-
4). 「VirtualBox」マネージャを右上の「x」で閉じます:
-
5). 「仮想マシン」を立ち上げ:
$ cd ~/ダウンロード/vm/fedora39
$ vagrant up
Bringing machine 'default' up with 'virtualbox' provider...
==> default: Checking if box 'generic/fedora39' version '4.3.12' is up to date...
==> default: Clearing any previously set forwarded ports...
==> default: Clearing any previously set network interfaces...
==> default: Preparing network interfaces based on configuration...
default: Adapter 1: nat
==> default: Forwarding ports...
default: 22 (guest) => 2222 (host) (adapter 1)
==> default: Running 'pre-boot' VM customizations...
==> default: Booting VM...
==> default: Waiting for machine to boot. This may take a few minutes...
default: SSH address: 127.0.0.1:2222
default: SSH username: vagrant
default: SSH auth method: private key
==> default: Machine booted and ready!
==> default: Checking for guest additions in VM...
==> default: Machine already provisioned. Run `vagrant provision` or use the `--provision`
==> default: flag to force provisioning. Provisioners marked to run always will still run.
ubn@ubn-box:~/ダウンロード/vm/fedora39$
-
6). 「仮想マシン」画面の右下の「マウスのアイコン」に緑色の「>」(マウス統合が有効)があることを確認:
→「仮想マシン」画面の中(コンソール画面)にマウスを持って行くと、マウスポインターが消えますが、
「仮想マシン」画面の上下のバーでは、マウスポインターが表示され、ホストOS 側にマウスを持っていくと、
マウスカーソルが表示されることを確認。
-
問題点6 の解消: 「マウスの統合化」が有効になりました:
→マウスを動かすたびに、手動で右「Ctrl」キーを押す必要がなくなりました:
-
-
- --- - --- - --- - --- - --- - --- - --- - --- - ----- ----- ----- ----
12. 問題点7 の回避: 「共有フォルダ」機能が使えるようにトライ:
-
参考: 「vagrant init」で作成した「Vagrantfile」のコメント行から抜粋:
# Share an additional folder to the guest VM. The first argument is
# the path on the host to the actual folder. The second argument is
# the path on the guest to mount the folder. And the optional third
# argument is a set of non-required options.
# config.vm.synced_folder "../data", "/vagrant_data"
# Disable the default share of the current code directory. Doing this
# provides improved isolation between the vagrant box and your host
# by making sure your Vagrantfile isn't accessable to the vagrant box.
# If you use this you may want to enable additional shared subfolders as
# shown above.
# config.vm.synced_folder ".", "/vagrant", disabled: true
和訳:
# ゲスト VM で追加のフォルダを共有します:
# 1 番目の引数は、ホスト上の実際のフォルダへのパスです。
# 2 番目の引数は、フォルダをマウントするゲスト上のパスです。
# 3 番目の引数は、必須ではないオプションのセットです。
# config.vm.synced_folder "../data", "/vagrant_data"
# 現在の共有ディレクトリを無効にします:
# これを行うと、Vagrantfile が vagrant box にアクセスできなくなるので、
# vagrant box とホスト間の分離が強化されます。
# これを使うと、上に示したように追加の共有サブフォルダを有効にできます。
# config.vm.synced_folder ".", "/vagrant", disabled: true
-
-
- --- - --- - --- - --- - --- - --- - --- - --- - ----- ----- ----- -----
12-1. 問題点7 の回避: 「共有フォルダ」機能が使えるように、vagrant コマンドで「共有フォルダ」を有効化する場合:
-
-
1). 「仮想マシン」が立ち上がっていたら、電源オフ:
$ cd ~/ダウンロード/vm/fedora39
$ vagrant halt
==> default: Attempting graceful shutdown of VM...
ubn@ubn-box:~/ダウンロード/vm/fedora39$
-
2). 「共有フォルダ」の利用に必要な「プラグイン」があるか確認:
$ vagrant plugin list
No plugins installed.
→「プラグイン」なし
-
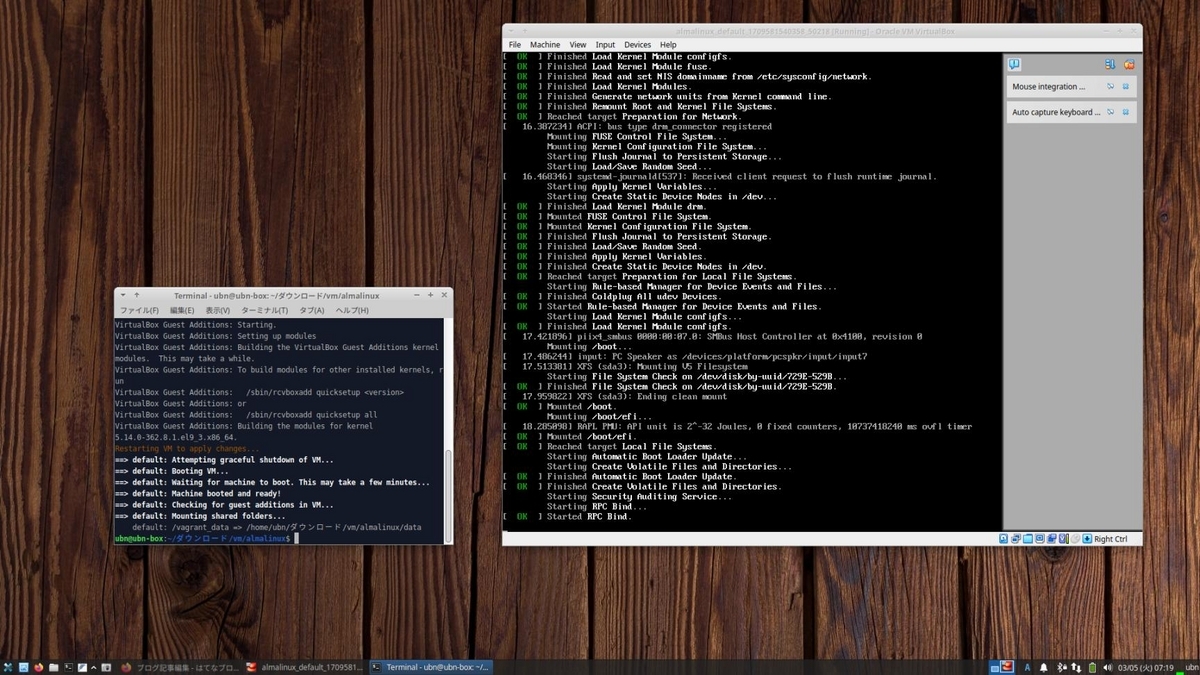
$ vagrant plugin install vagrant-vbguest
Installing the 'vagrant-vbguest' plugin. This can take a few minutes...
Fetching micromachine-3.0.0.gem
Fetching vagrant-vbguest-0.32.0.gem
Installed the plugin 'vagrant-vbguest (0.32.0)'!
-
4). 「プラグイン」がインストールされたか確認:
$ vagrant plugin list
vagrant-vbguest (0.32.0, global)
-
5). 「仮想マシン」を立ち上げ:
$ cd ~/ダウンロード/vm/fedora39
$ vagrant up
Bringing machine 'default' up with 'virtualbox' provider...
==> default: Checking if box 'generic/fedora39' version '4.3.12' is up to date...
==> default: Clearing any previously set forwarded ports...
==> default: Clearing any previously set network interfaces...
==> default: Preparing network interfaces based on configuration...
default: Adapter 1: nat
==> default: Forwarding ports...
default: 22 (guest) => 2222 (host) (adapter 1)
==> default: Running 'pre-boot' VM customizations...
==> default: Booting VM...
==> default: Waiting for machine to boot. This may take a few minutes...
default: SSH address: 127.0.0.1:2222
default: SSH username: vagrant
default: SSH auth method: private key
==> default: Machine booted and ready!
[default] GuestAdditions seems to be installed (7.0.14) correctly, but not running.
Redirecting to /bin/systemctl start vboxadd.service
Redirecting to /bin/systemctl start vboxadd-service.service
grep: warning: stray \ before /
grep: warning: stray \ before /
grep: warning: stray \ before /
VirtualBox Guest Additions: Starting.
VirtualBox Guest Additions: Setting up modules
VirtualBox Guest Additions: Building the VirtualBox Guest Additions kernel
modules. This may take a while.
VirtualBox Guest Additions: To build modules for other installed kernels, run
VirtualBox Guest Additions: /sbin/rcvboxadd quicksetup <version>
VirtualBox Guest Additions: or
VirtualBox Guest Additions: /sbin/rcvboxadd quicksetup all
VirtualBox Guest Additions: Building the modules for kernel
6.7.5-200.fc39.x86_64.
grep: warning: stray \ before /
grep: warning: stray \ before /
grep: warning: stray \ before /
Restarting VM to apply changes...
==> default: Attempting graceful shutdown of VM...
「GuestAdditions」が自動でインストールされて、再起動されました:
==> default: Booting VM...
==> default: Waiting for machine to boot. This may take a few minutes...
==> default: Machine booted and ready!
==> default: Checking for guest additions in VM...
==> default: Machine already provisioned. Run `vagrant provision` or use the `--provision`
==> default: flag to force provisioning. Provisioners marked to run always will still run.
ubn@ubn-box:~/ダウンロード/vm/fedora39$
-
$ vagrant status
Current machine states:
default running (virtualbox)
:
-
6). 「vbguest」の状態を確認:
$ vagrant vbguest --status
茶色で表示:
[default] GuestAdditions seems to be installed (7.0.14) correctly, but not running.
和訳:
[default] GuestAdditions (7.0.14) は正しくインストールされていますが、実行されていません。
-
7). 「vagrant vbguest」の実行:
ステータス表示が下記の「インストールが見つかりません」の場合:
[default] No installation found.
「vagrant vbguest」を実行すると、
vbguest の利用に必要なパッケージをインストールしてくれるみたい:
-
ステータス表示が下記の「GuestAdditions が実行されていません 」の場合:
[default] GuestAdditions seems to be installed (7.0.14) correctly, but not running.
「vagrant vbguest」を実行すると、
$ vagrant vbguest
[default] GuestAdditions seems to be installed (7.0.14) correctly, but not running.
Redirecting to /bin/systemctl start vboxadd.service
Redirecting to /bin/systemctl start vboxadd-service.service
grep: warning: stray \ before /
grep: warning: stray \ before /
grep: warning: stray \ before /
VirtualBox Guest Additions: Starting.
VirtualBox Guest Additions: Setting up modules
VirtualBox Guest Additions: Building the VirtualBox Guest Additions kernel
modules. This may take a while.
VirtualBox Guest Additions: To build modules for other installed kernels, run
VirtualBox Guest Additions: /sbin/rcvboxadd quicksetup <version>
VirtualBox Guest Additions: or
VirtualBox Guest Additions: /sbin/rcvboxadd quicksetup all
VirtualBox Guest Additions: Building the modules for kernel
6.7.5-200.fc39.x86_64.
grep: warning: stray \ before /
grep: warning: stray \ before /
grep: warning: stray \ before /
Guest Additions got installed. However, they seem not be loaded correctly. Please restart the box running `vagrant reload default`
ubn@ubn-box:~/ダウンロード/vm/fedora39$
最終行の和訳:
ゲスト追加機能がインストールされました。ただし、正しく読み込まれていないようです。
「vagrant reload default」を実行してボックスを再起動してください。
-
$ vagrant vbguest --status
[default] GuestAdditions seems to be installed (7.0.14) correctly, but not running.
ubn@ubn-box:~/ダウンロード/vm/fedora39$
-
-
- --- - --- - --- - --- - --- - --- - --- - --- - ----- ----- ----- ----- -
12-2. この時点の「仮想マシン」で、「Box」を作成:
-
「仮想マシン」が初期化されると、今までの苦労が水の泡なので、このタイミングで「Box」を作成しました:
-
次の項番にて「共有フォルダ」を使えるようにする予定ですが、事前の作業中に「作業フォルダ」の中身が消去されてしまって、イチから作業をやり直す羽目になったので、その対策です:
「共有フォルダ」を使えるようにすると、デフォルトだと「仮想マシン」の「/vagrant」に 「作業フォルダ」がマウントされます。
→何気に「/vagrant」を触っていたら、 「作業フォルダ」の中身を消してしまい、最初からやり直しになりました:
ちなみに、「作業フォルダ」そのものでなく、「作業フォルダ」の中のサブフォルダを使うようにするとリスクが低くなります:
-
1). 「仮想マシン」の電源オフ:
$ vagrant halt
==> default: Attempting graceful shutdown of VM...
ubn@ubn-box:~/ダウンロード/vm/fedora39$
-
$ vagrant global-status
id name provider state directory
-------------------------------------------------------------------------
408fb2f default virtualbox poweroff /home/ubn/ダウンロード/vm/fedora39
→id は「408fb2f」です
-
3). 「.box」ファイルを作成したい場所を準備:
すでに作成済みです:
$ mkdir -p ~/ダウンロード/vm/box-share/
-
4). 「.box」ファイルを作成する場所に移動:
$ cd ~/ダウンロード/vm/box-share/
-
$ ls -lA
-rw-rw-r-- 1 ubn ubn 2958974232 12月 20 21:30 pkg-EndeavourOS_base-inst.box
-rw-rw-r-- 1 ubn ubn 10081605005 2月 14 14:06 pkg-EndeavourOS_base3.box
-
5). 「仮想マシン」から「.box」ファイルを作成:
$ vagrant package 408fb2f --output pkg-fedora39_2024-0224.box
==> default: Clearing any previously set forwarded ports...
==> default: Exporting VM...
時間がかかります:
==> default: Compressing package to: /home/ubn/ダウンロード/vm/box-share/pkg-fedora39_2024-0224.box
ubn@ubn-box:~/ダウンロード/vm/box-share$
-
確認:
$ ls -lA
-rw-rw-r-- 1 ubn ubn 2958974232 12月 20 21:30 pkg-EndeavourOS_base-inst.box
-rw-rw-r-- 1 ubn ubn 10081605005 2月 14 14:06 pkg-EndeavourOS_base3.box
-rw-rw-r-- 1 ubn ubn 1781468080 2月 24 23:37 pkg-fedora39_2024-0224.box ←(追加)
-
6). できた「Box」ファイルをホームの「Box」一覧に追加:
$ cd ~/ダウンロード/vm/box-share/
$ vagrant box add --name fedora39-0224 pkg-fedora39_2024-0224.box
==> box: Box file was not detected as metadata. Adding it directly...
==> box: Adding box 'fedora39-0224' (v0) for provider:
box: Unpacking necessary files from: file:///home/ubn/%E3%83%80%E3%82%A6%E3%83%B3%E3%83%AD%E3%83%BC%E3%83%89/vm/box-share/pkg-fedora39_2024-0224.box
==> box: Successfully added box 'fedora39-0224' (v0) for ''!
ubn@ubn-box:~/ダウンロード/vm/box-share$
-
7). 「Box」の一覧に追加されたか確認:
$ vagrant box list
Endeav-base3 (virtualbox, 0)
fedora39-0224 (virtualbox, 0) ←(追加)
generic/fedora39 (virtualbox, 4.3.10, (amd64))
generic/fedora39 (virtualbox, 4.3.12, (amd64))
-
8). 「Box」の一覧から、古いバージョンの「Box」を削除:
$ vagrant box remove generic/fedora39 --box-version 4.3.10
Removing box 'generic/fedora39' (v4.3.10) with provider 'virtualbox'...
-
9). 「Box」の一覧を確認:
$ vagrant box list
Endeav-base3 (virtualbox, 0)
fedora39-0224 (virtualbox, 0)
generic/fedora39 (virtualbox, 4.3.12, (amd64))
-
-
- --- - --- - --- - --- - --- - --- - --- - --- - ----- ----- ----- ----- --
12-3. 問題点7 の回避: 「共有フォルダ」機能が使えるように、新しい「仮想マシン」でトライ:
-
やり直しが楽になるように、設定の途中で、「Box」(fedora39-0224)を作成したので、
この「Box」を使って、設定を継続します:
-
1). 「仮想マシン」を管理する別の「作業フォルダ」を準備:
$ mkdir -p ~/ダウンロード/vm/fedora39-test/
→「仮想マシン」を管理する場所になります
-
「作業フォルダ」は使い回すのでなく、新しい名前で作成した方が混乱しないと思います。
-
2). 「Vagrantfile」の作成:
$ cd ~/ダウンロード/vm/fedora39-test/
$ nano Vagrantfile
↓ すべて貼付け:
# -*- mode: ruby -*-
# vi: set ft=ruby :
Vagrant.configure("2") do |config|
config.vm.box = "fedora39-0224"
#config.vm.box_version = "4.3.12"
#config.vm.boot_timeout = 300
config.vm.boot_timeout = 60
# ホストの作業フォルダ内の data フォルダと
# 仮想マシン内の /vagrant_data フォルダを共有
# 指定のフォルダがない場合は、フォルダを作成
config.vm.synced_folder "./data", "/vagrant_data", create: true
config.vm.provider "virtualbox" do |vb|
# Display the VirtualBox GUI when booting the machine
vb.gui = true
vb.memory = "2048"
#vb.memory = "4096"
vb.cpus = 2
#vb.customize ["modifyvm", :id, "--graphicscontroller", "vboxsvga"]
vb.customize ["modifyvm", :id, "--graphicscontroller", "vmsvga"]
end
end
5行目で、使用する「Box」を指定:
6行目で、使用する「Box」のバージョンを指定: ★
7、8行目で、リトライのタイムアウト値を短く変更: ←(問題点1 の取りあえずの回避)
9〜12行目で、「共有フォルダ」を設定: ★
16、17行目で、メモリ「2048」MB に変更:
19、20行目で、ディスプレイを 「vmsvga」に変更:
→Crtl+O で、保存。保存先を確認して、Enter
→Crtl+X で、終了
-
参考:「config.vm.box = "fedora39-0224"」の行を変更すれば、他の「仮想マシン」でも使い回し出来ます:
6行目は、使用する「Box」のバージョンを指定しているので、行頭に「#」を付けてコメント行にするか、削除します:
-
3). 「仮想マシン」を(作成して)立ち上げ:
$ cd ~/ダウンロード/vm/fedora39-test/
$ vagrant up
Bringing machine 'default' up with 'virtualbox' provider...
==> default: Importing base box 'fedora39-0224'...
==> default: Matching MAC address for NAT networking...
==> default: Setting the name of the VM: fedora39-test_default_1708790535185_33852
==> default: Clearing any previously set network interfaces...
==> default: Preparing network interfaces based on configuration...
default: Adapter 1: nat
==> default: Forwarding ports...
default: 22 (guest) => 2222 (host) (adapter 1)
==> default: Running 'pre-boot' VM customizations...
==> default: Booting VM...
==> default: Waiting for machine to boot. This may take a few minutes...
default: SSH address: 127.0.0.1:2222
default: SSH username: vagrant
default: SSH auth method: private key
==> default: Machine booted and ready!
自動で「GuestAdditions」がインストールされました:
[default] GuestAdditions seems to be installed (7.0.14) correctly, but not running.
Redirecting to /bin/systemctl start vboxadd.service
Redirecting to /bin/systemctl start vboxadd-service.service
grep: warning: stray \ before /
grep: warning: stray \ before /
grep: warning: stray \ before /
VirtualBox Guest Additions: Starting.
VirtualBox Guest Additions: Setting up modules
VirtualBox Guest Additions: Building the VirtualBox Guest Additions kernel
modules. This may take a while.
VirtualBox Guest Additions: To build modules for other installed kernels, run
VirtualBox Guest Additions: /sbin/rcvboxadd quicksetup <version>
VirtualBox Guest Additions: or
VirtualBox Guest Additions: /sbin/rcvboxadd quicksetup all
VirtualBox Guest Additions: Building the modules for kernel
6.7.5-200.fc39.x86_64.
grep: warning: stray \ before /
grep: warning: stray \ before /
grep: warning: stray \ before /
Restarting VM to apply changes...
==> default: Attempting graceful shutdown of VM...
自動で「仮想マシン」が再起動されました:
==> default: Booting VM...
==> default: Waiting for machine to boot. This may take a few minutes...
==> default: Machine booted and ready!
==> default: Checking for guest additions in VM...
==> default: Mounting shared folders...
default: /vagrant => /home/ubn/ダウンロード/vm/fedora39-test
default: /vagrant_data => /home/ubn/ダウンロード/vm/fedora39-test/data
ubn@ubn-box:~/ダウンロード/vm/fedora39-test$
→問題点7 の解消: 「共有フォルダ」機能が使えるようになりました:
-
→問題点8: 「共有フォルダ」がマウントされましたが、 2つのフォルダがマウントされました:
VirtualBox マネージャを起動して「共有フォルダ」の設定を確認:

→「作業フォルダ」と、その「サブフォルダ」の 2つを「共有フォルダ」にする定義があります
-
-
- --- - --- - --- - --- - --- - --- - --- - --- - ----- ----- ----- ----- ---
12-4. 問題点8 の回避: 「共有フォルダ」機能でサブフォルダのみを有効にするように変更:
-
デフォルトの「作業フォルダ」(直下)を共有すると、誤操作で「作業フォルダ」内のファイルを消してしまう(vagrant up できなくなる)リスクが高いので、無効にしました:
ちなみに、「作業フォルダ」にある「サブフォルダ」の共有であればリスクが減ります:
-
指定することで「仮想マシン」側の「共有フォルダ」が自動で作成されるか確認するため、「仮想マシン」を作り直してからトライしました:
-
1). 「仮想マシン」を電源オフ:
$ cd ~/ダウンロード/vm/fedora39-test/
$ vagrant halt
==> default: Attempting graceful shutdown of VM...
ubn@ubn-box:~/ダウンロード/vm/fedora39-test$
-
2). 削除する「仮想マシン」を確認:
$ vagrant global-status
id name provider state directory
-------------------------------------------------------------------------
408fb2f default virtualbox poweroff /home/ubn/ダウンロード/vm/fedora39
99bbb9b default virtualbox running /home/ubn/ダウンロード/vm/fedora39-test
-
$ vagrant destroy 99bbb9b
default: Are you sure you want to destroy the 'default' VM? [y/N] y
==> default: Destroying VM and associated drives...
ubn@ubn-box:~/ダウンロード/vm/fedora39-test$
-
4). 「作業フォルダ」の整理:
$ cd ~/ダウンロード/vm/fedora39-test/
-
$ ls -1Ap
.vagrant/
Vagrantfile
data/
-
$ rm -r .vagrant
$ rm -r data
-
$ ls -1Ap
Vagrantfile
-
5). 「Vagrantfile」の修正:
$ cd ~/ダウンロード/vm/fedora39-test/
$ nano Vagrantfile
↓ すべて置換:
# -*- mode: ruby -*-
# vi: set ft=ruby :
Vagrant.configure("2") do |config|
config.vm.box = "fedora39-0224"
#config.vm.box_version = "4.3.12"
#config.vm.boot_timeout = 300
config.vm.boot_timeout = 60
# ホストの作業フォルダ内の data フォルダと
# 仮想マシン内の /vagrant_data フォルダを共有:
# 指定のフォルダがない場合は、フォルダを作成:
config.vm.synced_folder "./data", "/vagrant_data", create: true
# デフォルトの共有フォルダを無効にします:
config.vm.synced_folder ".", "/vagrant", disabled: true
config.vm.provider "virtualbox" do |vb|
# Display the VirtualBox GUI when booting the machine
vb.gui = true
vb.memory = "2048"
#vb.memory = "4096"
vb.cpus = 2
#vb.customize ["modifyvm", :id, "--graphicscontroller", "vboxsvga"]
vb.customize ["modifyvm", :id, "--graphicscontroller", "vmsvga"]
end
end
5行目で、使用する「Box」を指定:
6行目で、使用する「Box」のバージョンを指定: ★
7〜8行目で、リトライのタイムアウト値を短く調整: ←(問題点1 の取りあえずの回避)
9〜12行目で、共有フォルダ「/vagrant_data」を設定: ★
13〜14行目で、共有フォルダ「/vagrant」を無効化: ★
15行目で、GUI 表示を有効に設定:
16〜17行目で、メモリ「2048」MB に変更:
18行目で、プロセッサ「2」個 に変更:
19〜20行目で、ディスプレイを 「vmsvga」に変更:
→Crtl+O で、保存。保存先を確認して、Enter
→Crtl+X で、終了
-
参考:「config.vm.box = "fedora39-0224"」の行を変更すれば、他の「仮想マシン」でも使い回し出来ます:
6行目は、使用する「Box」のバージョンを指定しているので、行頭に「#」を付けてコメント行にするか、削除します:
-
6). 「仮想マシン」を(作成して)立ち上げ:
「仮想マシン」に「Guest Additions」がインストールされて、再起動されるので、いつもよりも時間がかかります:
$ cd ~/ダウンロード/vm/fedora39-test/
$ vagrant up
Bringing machine 'default' up with 'virtualbox' provider...
==> default: Importing base box 'fedora39-0224'...
==> default: Matching MAC address for NAT networking...
==> default: Setting the name of the VM: fedora39-test_default_1708794572898_69860
==> default: Clearing any previously set network interfaces...
==> default: Preparing network interfaces based on configuration...
default: Adapter 1: nat
==> default: Forwarding ports...
default: 22 (guest) => 2222 (host) (adapter 1)
==> default: Running 'pre-boot' VM customizations...
==> default: Booting VM...
==> default: Waiting for machine to boot. This may take a few minutes...
default: SSH address: 127.0.0.1:2222
default: SSH username: vagrant
default: SSH auth method: private key
==> default: Machine booted and ready!
自動で「GuestAdditions」がインストールされました:
[default] GuestAdditions seems to be installed (7.0.14) correctly, but not running.
Redirecting to /bin/systemctl start vboxadd.service
Redirecting to /bin/systemctl start vboxadd-service.service
grep: warning: stray \ before /
grep: warning: stray \ before /
grep: warning: stray \ before /
VirtualBox Guest Additions: Starting.
VirtualBox Guest Additions: Setting up modules
VirtualBox Guest Additions: Building the VirtualBox Guest Additions kernel
modules. This may take a while.
VirtualBox Guest Additions: To build modules for other installed kernels, run
VirtualBox Guest Additions: /sbin/rcvboxadd quicksetup <version>
VirtualBox Guest Additions: or
VirtualBox Guest Additions: /sbin/rcvboxadd quicksetup all
VirtualBox Guest Additions: Building the modules for kernel
6.7.5-200.fc39.x86_64.
grep: warning: stray \ before /
grep: warning: stray \ before /
grep: warning: stray \ before /
Restarting VM to apply changes...
==> default: Attempting graceful shutdown of VM...
==> default: Booting VM...
==> default: Waiting for machine to boot. This may take a few minutes...
==> default: Machine booted and ready!
==> default: Checking for guest additions in VM...
==> default: Mounting shared folders...
default: /vagrant_data => /home/ubn/ダウンロード/vm/fedora39-test/data
ubn@ubn-box:~/ダウンロード/vm/fedora39-test$
→問題点8 の解消: 使える「共有フォルダ」が 1つになりました:
-
7). VirtualBox マネージャを起動して「共有フォルダ」の設定を確認:
-
8). 「仮想マシン」のメニューバーからも「共有フォルダ」の設定が確認できます:
「Devices」→「Shared Folders」→「Shared Folders Settings...」
→「作業フォルダ」(~/ダウンロード/vm/fedora39-test/) 配下の「サブフォルダ」(data/) を「共有フォルダ」にする定義がひとつだけあります
-
$ cd ~/ダウンロード/vm/fedora39-test/
$ vagrant ssh-config
Host default
HostName 127.0.0.1
User vagrant
Port 2222
UserKnownHostsFile /dev/null
StrictHostKeyChecking no
PasswordAuthentication no
IdentityFile /home/ubn/.vagrant.d/boxes/fedora39-0224/0/virtualbox/vagrant_private_key
IdentitiesOnly yes
LogLevel FATAL
PubkeyAcceptedKeyTypes +ssh-rsa
HostKeyAlgorithms +ssh-rsa
-
10). 「仮想マシン」に ssh 接続して、「共有フォルダ」を確認:
-
$ cd ~/ダウンロード/vm/fedora39-test/
$ vagrant ssh
Last login: Fri Feb 23 16:03:28 2024 from 10.0.2.2
[vagrant@vagrant ~]$
-
[vagrant@vagrant ~]$ date
Sat Feb 24 05:43:10 PM UTC 2024
→日本語化されてません
-
[vagrant@vagrant ~]$ uname -r
6.7.5-200.fc39.x86_64
[vagrant@vagrant ~]$ ls -Ap /
afs/ dev/ lib mnt/ root/ srv/ usr/
bin etc/ lib64 opt/ run/ sys/ vagrant_data/
boot/ home/ media/ proc/ sbin tmp/ var/
→「/」がお尻に付かないのはリンクです
「仮想マシン」側の「共有フォルダ」である「/vagrant_data」フォルダがありました:
-
「/vagrant_data」フォルダを確認:
[vagrant@vagrant ~]$ ls -Ap /vagrant_data/
[vagrant@vagrant ~]$
→ファイルなし
-
ファイルを作成してみました:
[vagrant@vagrant ~]$ sudo nano /vagrant_data/test01.txt
sudo: nano: command not found
→「nano」コマンドはインストールされていません
-
「vim」の使い方を忘れないように、「nano」をインストールせずに、「vim」 で編集:
[vagrant@vagrant ~]$ sudo vim /vagrant_data/test01.txt
-
「Esc」「Esc」「i」で、挿入モード にして、
「test 」Enter
「Esc」「Esc」「:wq」で、書込み後に終了
-
編集した内容を確認:
[vagrant@vagrant ~]$ sudo cat /vagrant_data/test01.txt
test
-
[vagrant@vagrant ~]$ exit
logout
-
11). ホストOS 側で、「共有フォルダ」を確認:
$ pwd
/home/ubn/ダウンロード/vm/fedora39-test
→作業フォルダです:
-
$ ls -1Ap
.vagrant/
Vagrantfile
data/
→「data」フォルダがあります
-
「data」フォルダを確認:
$ ls -1Ap data/
test01.txt
→「仮想マシン」の「/vagrant_data」フォルダと同じファイルがあります
-
「test01.txt」の内容を確認:
$ cat data/test01.txt
test
→内容は同じです
-
-
- --- - --- - --- - --- - --- - --- - --- - --- - ----- ----- ----- ----- ----
12-5. 最終的な設定を終えた時点の「仮想マシン」で、「Box」を作成:
-
「仮想マシン」が使える状態になったので、このタイミングで「Box」を作成しました:
これ以降は、この作成した「Box」を使って、デスクトップ環境の追加などにトライの予定。
-
1). 「仮想マシン」の電源オフ:
$ cd ~/ダウンロード/vm/fedora39-test
$ vagrant halt
==> default: Attempting graceful shutdown of VM...
ubn@ubn-box:~/ダウンロード/vm/fedora39-test$
-
$ vagrant global-status
id name provider state directory
-------------------------------------------------------------------------
408fb2f default virtualbox poweroff /home/ubn/ダウンロード/vm/fedora39
a5fdb3e default virtualbox poweroff /home/ubn/ダウンロード/vm/fedora39-test
:
→id は「a5fdb3e」です
-
3). 「.box」ファイルを作成したい場所を準備:
すでに作成済みです:
$ mkdir -p ~/ダウンロード/vm/box-share/
-
4). 「.box」ファイルを作成する場所に移動:
$ cd ~/ダウンロード/vm/box-share/
-
$ ls -lA
-rw-rw-r-- 1 ubn ubn 2958974232 12月 20 21:30 pkg-EndeavourOS_base-inst.box
-rw-rw-r-- 1 ubn ubn 10081605005 2月 14 14:06 pkg-EndeavourOS_base3.box
-rw-rw-r-- 1 ubn ubn 1781468080 2月 24 23:37 pkg-fedora39_2024-0224.box
-
5). 「仮想マシン」から「.box」ファイルを作成:
$ vagrant package a5fdb3e --output pkg-fedora39_2024-0225.box
==> default: Clearing any previously set forwarded ports...
==> default: Exporting VM...
時間がかかります:
==> default: Compressing package to: /home/ubn/ダウンロード/vm/box-share/pkg-fedora39_2024-0225.box
ubn@ubn-box:~/ダウンロード/vm/box-share$
-
確認:
$ ls -lA
-rw-rw-r-- 1 ubn ubn 2958974232 12月 20 21:30 pkg-EndeavourOS_base-inst.box
-rw-rw-r-- 1 ubn ubn 10081605005 2月 14 14:06 pkg-EndeavourOS_base3.box
-rw-rw-r-- 1 ubn ubn 1781468080 2月 24 23:37 pkg-fedora39_2024-0224.box
-rw-rw-r-- 1 ubn ubn 1780229003 2月 25 10:34 pkg-fedora39_2024-0225.box ←(追加)
-
6). できた「Box」ファイルをホームの「Box」一覧に追加:
$ cd ~/ダウンロード/vm/box-share/
$ vagrant box add --name fedora39-0225 pkg-fedora39_2024-0225.box
==> box: Box file was not detected as metadata. Adding it directly...
==> box: Adding box 'fedora39-0225' (v0) for provider:
box: Unpacking necessary files from: file:///home/ubn/%E3%83%80%E3%82%A6%E3%83%B3%E3%83%AD%E3%83%BC%E3%83%89/vm/box-share/pkg-fedora39_2024-0225.box
==> box: Successfully added box 'fedora39-0225' (v0) for ''!
ubn@ubn-box:~/ダウンロード/vm/box-share$
-
7). 「Box」の一覧に追加されたか確認:
$ vagrant box list
Endeav-base3 (virtualbox, 0)
fedora39-0224 (virtualbox, 0)
fedora39-0225 (virtualbox, 0) ←(追加)
generic/fedora39 (virtualbox, 4.3.12, (amd64))
-
8). 「Box」の一覧から、不要な「Box」を削除:
$ vagrant box remove generic/fedora39
Removing box 'generic/fedora39' (v4.3.12) with provider 'virtualbox'...
-
9). 「Box」の一覧を確認:
$ vagrant box list
Endeav-base3 (virtualbox, 0)
fedora39-0224 (virtualbox, 0)
fedora39-0225 (virtualbox, 0)
→個人的にカスタマイズした「Box」のみになりました
-
-
- --- - --- - --- - --- - --- - --- - --- - --- - ----- ----- ----- ----- -----
12-6. 最終的な設定を終えた「Box」から、「仮想マシン」を作成:
-
ここで作成された「仮想マシン」を使って、次の投稿の作業をする予定です:
-
1). 「作業フォルダ」を作成:
$ mkdir -p ~/ダウンロード/vm/fedora39-base/
-
2). 「Vagrantfile」の修正:
$ cd ~/ダウンロード/vm/fedora39-base/
$ nano Vagrantfile
↓ すべて貼付け:
# -*- mode: ruby -*-
# vi: set ft=ruby :
Vagrant.configure("2") do |config|
config.vm.box = "fedora39-0225"
#config.vm.box_version = "4.3.12"
#config.vm.boot_timeout = 300
config.vm.boot_timeout = 60
# ホストの作業フォルダ内の data フォルダと
# 仮想マシン内の /vagrant_data フォルダを共有:
# 指定のフォルダがない場合は、フォルダを作成:
config.vm.synced_folder "./data", "/vagrant_data", create: true
# デフォルトの共有フォルダを無効にします:
config.vm.synced_folder ".", "/vagrant", disabled: true
config.vm.provider "virtualbox" do |vb|
# Display the VirtualBox GUI when booting the machine
vb.gui = true
vb.memory = "2048"
#vb.memory = "4096"
vb.cpus = 2
#vb.customize ["modifyvm", :id, "--graphicscontroller", "vboxsvga"]
vb.customize ["modifyvm", :id, "--graphicscontroller", "vmsvga"]
end
end
説明:
5行目で、使用する「Box」を指定:
6行目で、使用する「Box」のバージョンを指定: ★
7〜8行目で、リトライのタイムアウト値を短く調整: ←(ssh 認証時のループ回避)
9〜12行目で、共有フォルダ「/vagrant_data」を設定: ★
13〜14行目で、デフォルトの共有フォルダ「/vagrant」を無効化: ★
17行目で、GUI 表示を有効に設定:
18〜19行目で、メモリ「2048」MB に変更:
20行目で、プロセッサ「2」個 に変更:
21〜22行目で、ディスプレイを 「vmsvga」に変更:
-
→Crtl+O で、保存。保存先を確認して、Enter
→Crtl+X で、終了
-
参考:「config.vm.box = "fedora39-0225"」の行を変更すれば、他の「仮想マシン」でも使い回し出来ます:
6行目は、使用する「Box」のバージョンを指定します。最新バージョンにするときは、行頭に「#」を付けてコメント行にするか、行を削除します:
-
3). 「仮想マシン」を(作成して)立ち上げ:
「仮想マシン」に「Guest Additions」がインストールされて、再起動されるので、いつもよりも時間がかかります:
$ cd ~/ダウンロード/vm/fedora39-base/
$ vagrant up
Bringing machine 'default' up with 'virtualbox' provider...
==> default: Importing base box 'fedora39-0225'... ←(読み込む「Box」)
==> default: Matching MAC address for NAT networking...
==> default: Setting the name of the VM: fedora39-base_default_1708841405443_68193
==> default: Clearing any previously set network interfaces...
==> default: Preparing network interfaces based on configuration...
default: Adapter 1: nat
==> default: Forwarding ports...
default: 22 (guest) => 2222 (host) (adapter 1)
==> default: Running 'pre-boot' VM customizations...
==> default: Booting VM...
==> default: Waiting for machine to boot. This may take a few minutes...
default: SSH address: 127.0.0.1:2222
default: SSH username: vagrant
default: SSH auth method: private key
==> default: Machine booted and ready!
[default] GuestAdditions 7.0.14 running --- OK. ←(注目)実行確認:
==> default: Checking for guest additions in VM... ←(注目)バージョン確認:
==> default: Mounting shared folders... ←(注目)マウント:
default: /vagrant_data => /home/ubn/ダウンロード/vm/fedora39-base/data
ubn@ubn-box:~/ダウンロード/vm/fedora39-base$
→読み込まれた「Box」の「fedora39-0225」は、すでに自動で「GuestAdditions」がインストールされているので、
スッキリした立ち上げです:
また、「共有フォルダ」の設定をデフォルトと違い、「サブフォルダ」指定にしたので、
「仮想マシン」から vagrant の管理ファイルを消してしまうリスクが減ったと思います:
-
-
- --- - --- - --- - --- - --- - --- - --- - --- - ----- ----- ----- ----- ----- -
12-7. 気になるところ:「仮想マシン」の立ち上げ時のログイン画面で、メッセージが上書きされ見づらいです:
-
1). 「仮想マシン」の立ち上げ:
-
2). 「ログイン」画面が表示:
Fedora Linux 39 (Thirty Nine)
vagrant login:
-
3). ログイン画面に、下記のメッセージが続けて表示:
[ 27.010407] systemd-journald[536]: /var/log/journal/1e5e2c0e93.../user-1000.journal: Journal file uses a different sequence number ID, rotating.
-
4). 改行がないので、「項番 2)」と「項番 3)」のメッセージが重なって表示:
-
vagrant login: [ 27.010407] systemd-journald[536]: /var/log/journal/1e5e2c0e93.../user-1000.journal:
Journal file uses a different sequence number ID, rotating.
和訳:
vagrant login: [ 27.010407] systemd-journald[536]: /var/log/journal/1e5e2c0e93.../user-1000.journal:
ジャーナル ファイルは、循環する異なるシーケンス番号 ID を使用します。
-
5). →Enter を押せば良いだけですが、見づらくなります:
-
6). 「ssh 接続」:
$ cd ~/ダウンロード/vm/fedora39-base
$ vagrant ssh
Last login: Sun Feb 25 06:57:44 2024
[vagrant@vagrant ~]$
-
7). journal ファイルの確認:
[vagrant@vagrant ~]$ ls -lAp /var/log/journal/
:
drwxr-sr-x+ 2 root systemd-journal 8192 Feb 25 06:10 1e5e2c0e93a949fcb8143caccbb0dad7/
drwxr-sr-x+ 2 root systemd-journal 4096 Jan 10 11:26 a499bd5e49b54edd849c15804c9834b4/
-
[vagrant@vagrant ~]$ ls -lAp /var/log/journal/1e5e2c0e93a949fcb8143caccbb0dad7/user-1000.journal
-rw-r-----+ 1 root systemd-journal 8388608 Feb 25 07:11 /var/log/journal/1e5e2c0e93a949fcb8143caccbb0dad7/user-1000.journal
-
8). 「.journal」ファイルを確認:
-
(1). 「.journal」ファイルについて:
「systemd」環境では、ログ収集のサービスとして「systemd-journald」が動いているみたい。
-
(2). 「.journal」ファイルを確認:
[vagrant@vagrant ~]$ cat /var/log/journal/1e5e2c0e93a949fcb8143caccbb0dad7/user-1000.journal
→表示させると、バイナリファイルのようで文字化けします:
-
(3). ASCII 文字が含まれるファイルで、ASCII 文字を表示:
[vagrant@vagrant ~]$ od -Ax -tx1z /var/log/journal/1e5e2c0e93a949fcb8143caccbb0dad7/user-1000.journal
わかりやすい部分を抜粋:
3a51e0 00 00 00 00 00 00 00 00 01 00 00 00 00 00 00 00 >................<
3a51f0 00 00 00 00 00 00 00 00 5f 53 4f 55 52 43 45 5f >........_SOURCE_<
3a5200 52 45 41 4c 54 49 4d 45 5f 54 49 4d 45 53 54 41 >REALTIME_TIMESTA<
3a5210 4d 50 3d 31 37 30 38 38 34 35 30 39 38 36 38 32 >MP=1708845098682<
3a5220 38 37 30 00 00 00 00 00 03 00 00 00 00 00 00 00 >870.............<
3a5230 d0 00 00 00 00 00 00 00 32 be 00 00 00 00 00 00 >........2.......<
-
(4). 「journalctl」コマンドを使うと、「less」でジャーナルの内容を表示できます:
これが現実的な使い方:
$ journalctl
Hint: You are currently not seeing messages from other users and the system.
Users in groups 'adm', 'systemd-journal', 'wheel' can see all messages.
Pass -q to turn off this notice.
Feb 23 14:38:33 fedora39.localdomain systemd[894]: Queued start job for default target default.target.
Feb 23 14:38:33 fedora39.localdomain systemd[894]: Created slice app.slice - User Application Slice.
Feb 23 14:38:33 fedora39.localdomain systemd[894]: Started grub-boot-success.timer - Mark boot as successful after>
Feb 23 14:38:33 fedora39.localdomain systemd[894]: Started systemd-tmpfiles-clean.timer - Daily Cleanup of User's >
Feb 23 14:38:33 fedora39.localdomain systemd[894]: Reached target paths.target - Paths.
Feb 23 14:38:33 fedora39.localdomain systemd[894]: Reached target timers.target - Timers.
Feb 23 14:38:34 fedora39.localdomain systemd[894]: Starting dbus.socket - D-Bus User Message Bus Socket...
:
Feb 25 07:06:21 vagrant systemd[2605]: Startup finished in 357ms.
Feb 25 07:08:38 vagrant systemd[2605]: Starting grub-boot-success.service - Mark boot as successful...
Feb 25 07:08:38 vagrant systemd[2605]: Finished grub-boot-success.service - Mark boot as successful.
Feb 25 07:11:38 vagrant systemd[2605]: Created slice background.slice - User Background Tasks Slice.
Feb 25 07:11:38 vagrant systemd[2605]: Starting systemd-tmpfiles-clean.service - Cleanup of User's Temporary Files>
Feb 25 07:11:38 vagrant systemd[2605]: Finished systemd-tmpfiles-clean.service - Cleanup of User's Temporary Files>
lines 1379-1397/1397 (END)
「半角スペース」で、改ページ
Enter で、改行
→「q」で、表示を終了
-
(5). 「journalctl」コマンドで、日時の範囲を指定して表示:
[vagrant@vagrant ~]$ journalctl -S "2024-02-25 07:08:00" -U "2024-02-25 12:00:00"
Hint: You are currently not seeing messages from other users and the system.
Users in groups 'adm', 'systemd-journal', 'wheel' can see all messages.
Pass -q to turn off this notice.
Feb 25 07:08:38 vagrant systemd[2605]: Starting grub-boot-success.service - Mark boot as successful...
Feb 25 07:08:38 vagrant systemd[2605]: Finished grub-boot-success.service - Mark boot as successful.
Feb 25 07:11:38 vagrant systemd[2605]: Created slice background.slice - User Background Tasks Slice.
Feb 25 07:11:38 vagrant systemd[2605]: Starting systemd-tmpfiles-clean.service - Cleanup of User's Temporary Files and Directories...
Feb 25 07:11:38 vagrant systemd[2605]: Finished systemd-tmpfiles-clean.service - Cleanup of User's Temporary Files and Directories.
[vagrant@vagrant ~]$
-
9). 参考:「systemd-journald」の設定ファイルを確認:
[vagrant@vagrant ~]$ cat /etc/systemd/journald.conf
# This file is part of systemd.
#
# systemd is free software; you can redistribute it and/or modify it under the
# terms of the GNU Lesser General Public License as published by the Free
# Software Foundation; either version 2.1 of the License, or (at your option)
# any later version.
#
# Entries in this file show the compile time defaults. Local configuration
# should be created by either modifying this file, or by creating "drop-ins" in
# the journald.conf.d/ subdirectory. The latter is generally recommended.
# Defaults can be restored by simply deleting this file and all drop-ins.
#
# Use 'systemd-analyze cat-config systemd/journald.conf' to display the full config.
#
# See journald.conf(5) for details.
[Journal]
#Storage=auto
#Compress=yes
#Seal=yes
#SplitMode=uid
#SyncIntervalSec=5m
#RateLimitIntervalSec=30s
#RateLimitBurst=10000
#SystemMaxUse=
#SystemKeepFree=
#SystemMaxFileSize=
#SystemMaxFiles=100
#RuntimeMaxUse=
#RuntimeKeepFree=
#RuntimeMaxFileSize=
#RuntimeMaxFiles=100
#MaxRetentionSec=
#MaxFileSec=1month
#ForwardToSyslog=no
#ForwardToKMsg=no
#ForwardToConsole=no
#ForwardToWall=yes
#TTYPath=/dev/console
#MaxLevelStore=debug
#MaxLevelSyslog=debug
#MaxLevelKMsg=notice
#MaxLevelConsole=info
#MaxLevelWall=emerg
#LineMax=48K
#ReadKMsg=yes
#Audit=yes
和訳:
# このファイルは systemd の一部です。
#
# systemd はフリーソフトウェアです。
# Free Software Foundation によって公開されている GNU Lesser General Public License の条件に基づいて、
# 再配布したり変更したりすることができます。
# ライセンスのバージョン 2.1、または (オプションで) それ以降のバージョンのいずれか。
#
# このファイル内のエントリには、コンパイル時のデフォルトが表示されます。
# ローカル構成は、このファイルを変更するか、journald.conf.d/ サブディレクトリに
# 「ドロップイン」を作成することによって作成する必要があります。一般的には後者が推奨されます。
# このファイルとすべてのドロップインを削除するだけでデフォルトに戻すことができます。
#
# 完全な構成を表示するには、「systemd-analyze cat-config systemd/journald.conf」を使用します。
#
# 詳細については、journald.conf(5) を参照してください。
[Journal]
#ストレージ=自動
#圧縮=はい
#シール=はい
#分割モード=uid
#同期間隔秒=5m
#レート制限間隔秒=30秒
#レート制限バースト=10000
#システム最大使用量=
#システムフリーキープ=
#システム最大ファイルサイズ=
#システム最大ファイル数=100
#ランタイム最大使用量=
#ランタイムキープフリー=
#実行時の最大ファイルサイズ=
#実行時の最大ファイル数=100
#最大保持秒=
#最大ファイル秒=1か月
#Syslog に転送=いいえ
#KMsg に転送=いいえ
#コンソールに転送=いいえ ←(注目)
#壁に転送=はい
#TTY パス=/dev/console ←(注目)
#最大レベルストア=デバッグ
#最大レベル Syslog=デバッグ
#最大レベルKMsg=注意
#最大レベルコンソール=情報
#最大レベルの壁=emerg
#最大行数=48K
#KMsgの読み取り=はい
#監査=はい
-
参考:(注目)のどちらも試してみましたが、変化なし:
[vagrant@vagrant ~]$ sudo vim /etc/systemd/journald.conf
→「nano」はインストールされていませんでした
-
変更を保存したら、journald を再起動:
$ sudo systemctl restart systemd-journald
-
10). ログイン画面に、「systemd-journald」のメッセージが表示されることの回避策は、今のところ不明:
-
-
- --- - --- - --- - --- - --- - --- - --- - --- - ----- ----- ----- ----- ----- --
13. 参考:「vagrant vbguest」のヘルプを表示:
-
「プラグイン」をインストールすることで、
VirtualBox 「GuestAdditions」を Vagrant から制御するサブコマンドが追加され、使えます:
-
「vagrant vbguest」のヘルプを表示:
$ vagrant vbguest --help
和訳:
使い方: vagrant vbguest [vm-name] [--do start|rebuild|install] [--status]
[-f|--force] [-b|--auto-reboot] [-R|--no-remote]
[--iso VBoxGuestAdditions.iso] [--no-cleanup]
--do COMMAND GuestAdditions を手動で「開始」(start) 、「再構築」
(rebuild) 、または「インストール」(install) します
--status 現在の GuestAdditions ステータスを表示して終了します
-f, --force インストールを強制するかどうか(--do start|rebuild|install によって暗示されます)
-b, --auto-reboot インストール後に VM を再起動できるようにします(GuestAdditions が起動しない場合)
-R, --no-remote Web サーバーから ISO ファイルをダウンロードしません
--iso file_or_uri VBoxGuestAdditions.iso へのフルパスまたは URI
--no-cleanup インストール後にクリーンアップ タスクを実行しません(デバッグ用)
--[no-]provision プロビジョニングを有効または無効にします
--provision-with x,y,z タイプまたは名前によって、特定のプロビジョナーのみを有効にします
-h, --help このヘルプを表示
→オプションを付けずに「vagrant vbguest」を実行した場合の例は、「こちら」を参照:
-
-
- --- - --- - --- - --- - --- - --- - --- - --- - ----- ----- ----- ----- ----- ---
14. 参考:「vagrant box remove」のヘルプを表示:
-
ホームに登録した「Box」を削除します:
-
「vagrant box remove」のヘルプを表示:
$ vagrant box remove --help
和訳:
使い方: vagrant box remove <name>
オプション:
-f, --force 確認せずに削除
-a, --architecture ARCH 削除する box の特定のアーキテクチャを指定
--provider PROVIDER 削除する box の特定のプロバイダー名を指定
--box-version VERSION 削除する box の特定のバージョンを指定 ←(★ 注目)
--all box の利用可能なバージョンをすべて削除
--all-providers box のバージョン内のすべてのプロバイダーを削除
--all-architectures box のプロバイダーおよびバージョン内のすべての
アーキテクチャを削除
--[no-]color カラー出力を有効または無効にします
--machine-readable 機械可読出力を有効にします
-v, --version Vagrant のバージョンを表示
--debug デバッグ出力を有効にします
--timestamp ログ出力のタイムスタンプを有効にします
--debug-timestamp タイムスタンプ付きのデバッグ出力を有効にします
--no-tty 非対話型出力を有効にします
-h, --help このヘルプを表示
-
-
- --- - --- - --- - --- - --- - --- - --- - --- - ----- ----- ----- ----- ----- ----
15. 参考: 「共有フォルダ」機能が使えるように、VirtualBox マネージャで「共有フォルダ」を設定する場合:
-
動作が不安定ですし、「プラグイン」で使えるようになるので、こちらの作業は要りません:
-
1). 「共有フォルダ」機能を有効にするには、「仮想マシン」に「Guest Additions」のインストールが必要です:
-
2). 自動で使えるようにならないので、VirtualBox マネージャで、「仮想マシン」に「共有フォルダ」を設定しました:
「プラグイン」を使わなくても、「共有フォルダ」を設定できます。
ただし、「仮想マシン」を作成し直すと、設定が消えるので、
恒久的な設定にするなら、「共有フォルダ」を設定してから、「Box」を作成して、「仮想マシン」を作成し直す必要があります。
-
設定は、
公式「Box」にある、「nercceh/ubuntu22.04-desktop」が参考になりそう:
「nercceh/ubuntu22.04-desktop」は、「共有フォルダ」機能が有効です:
-
(1). 「vagrant up」で「仮想マシン」を立ち上げるときのメッセージより抜粋:
「Guest Additions」のバージョンの確認後に、下記のメッセージが表示:
==> default: Mounting shared folders...
default: /vagrant => /home/ubn/ダウンロード/vm/ubn2204
「作業フォルダ」が「仮想マシン」に共有フォルダ「/vagrant」としてマウントされました:
-

→画面下の「共有フォルダー」に、「共有フォルダ」の設定が 1つ登録されています:
-
(3). 「共有フォルダー」をクリックして、設定を確認:

→「共有フォルダ」が自動で登録されたというよりも、
「共有フォルダ」が登録されているイメージが「Box」として作成されたのかも?
-
3). 上記の「項番 (3).」の設定を参考に、 VirtualBox マネージャで 「共有フォルダー」を登録:
登録する作業フォルダ名: 「~/ダウンロード/vm/fedora39/」
-
ここで「ubn」はユーザ名です
デスクトップを日本語化していない場合は、「/home/ubn/Downloads/vm/fedora39/」
-
-
(2). 左で、仮想マシンの「fedora39_default_1708264072018_31208」を選択:
-
(3). 右下の「共有フォルダー」の文字をクリック
「マシンフォルダー」の文字だけが表示されています:
-
(4). 右の水色の「+」(追加)アイコンをクリック
-
(5). 「共有フォルダーの追加」画面が表示:
フォルダーのパス: ホストOS の「~/ダウンロード/vm/fedora39/」を選択
右の「▼」アイコンをクリック→「その他」→「ダウンロード」→「vm」→「fedora39」→右上の「開く」
-
フォルダー名: fedora39 →「vagrant」
マウントポイント: 「/vagrant」
「自動マウント」にチェック
-
→「OK」
-
4). VirtualBox マネージャを右上の「x」で閉じました:
-
5). 「仮想マシン」の立ち上げ:
$ cd ~/ダウンロード/vm/fedora39/
$ vagrant up
-
$ vagrant ssh
Last login: Fri Feb 23 11:34:36 2024 from 10.0.2.2
[vagrant@vagrant ~]$ ls
-
[vagrant@vagrant ~]$ sudo mkdir -p /vagrant
[vagrant@vagrant ~]$ ls -1A / | grep v
dev
srv
vagrant
var
-
8). 「仮想マシン」の電源オフ:
-
[vagrant@vagrant ~]$ exit
logout
ubn@ubn-box:~/ダウンロード/vm/fedora39$
-
ubn@ubn-box:~/ダウンロード/vm/fedora39$ vagrant halt
==> default: Attempting graceful shutdown of VM...
-
9). ホストOS を再起動:
「端末」以外のウィンドウを閉じてから、
$ reboot
-
10). 「仮想マシン」の立ち上げ:
$ cd ~/ダウンロード/vm/fedora39/
$ vagrant up
-
11). テスト用のファイルを作成:
[vagrant@vagrant ~]$ sudo touch /vagrant/test.txt
[vagrant@vagrant ~]$ ls -1A /vagrant
test.txt
ここで、「共有フォルダ」を色々といじっていたら、「作業フォルダ」内のファイルが飛んでしまいました:
おかげで(今まで行った設定は水の泡になり)、「仮想マシン」を作り直すしか手段がなくなりました:
→「共有フォルダ」は直接「作業フォルダ」を指定せず、その「サブフォルダ」を指定するのが安全です:
-
Vagrant を使うと「仮想マシン」の復旧は楽になりますが、「Vagrant の管理用ファイル」は対象外なので、それも考えておくべきです:
→「管理用ファイル」(「作業フォルダ」配下のファイル)が消えると、「仮想マシン」が Vagrant で管理できなくなります。
-
-
- --- - --- - --- - --- - --- - --- - --- - --- - ----- ----- ----- ----- ----- -----
16. 今回の作業(投稿)で気づいたこと:
-
ホストOS 側に「Vagrant」をインストールしたとき、
-
$ vagrant plugin install vagrant-vbguest
-
「Guest Additions」のバージョンをチェックして、 自動で「Guest Additions」のインストールが行われます。
-
3). これまでの作業(投稿)での問題点は、「プラグイン」をインストールしていれば楽に解消された(もしくは、気付かなかった?)かもしれません。
つまり、(デスクトップ使用であれば)簡単に「クリップボードの共有」機能などが動いたかも。
-
-
- --- - --- - --- - --- - --- - --- - --- - --- - ----- ----- ----- ----- ----- ----- -
17. 参考: 後始末:
-
確認作業が完了したので、ディスクの空きを増やすため、不要になった「Box」を削除しました:
-
1). 不要な「仮想マシン」の削除:
確認:
$ vagrant global-status
id name provider state directory
-------------------------------------------------------------------------
408fb2f default virtualbox poweroff /home/ubn/ダウンロード/vm/fedora39
a5fdb3e default virtualbox poweroff /home/ubn/ダウンロード/vm/fedora39-test
62a436d default virtualbox poweroff /home/ubn/ダウンロード/vm/fedora39-base
-
削除1:
$ vagrant destroy 408fb2f
default: Are you sure you want to destroy the 'default' VM? [y/N] y
==> default: Destroying VM and associated drives...
-
削除2:
$ vagrant destroy a5fdb3e
default: Are you sure you want to destroy the 'default' VM? [y/N] y
==> default: Destroying VM and associated drives...
-
確認:
$ vagrant global-status
id name provider state directory
-------------------------------------------------------------------------
62a436d default virtualbox poweroff /home/ubn/ダウンロード/vm/fedora39-base
-
2). 不要な「Box」の削除:
確認:
$ vagrant box list
Endeav-base3 (virtualbox, 0)
fedora39-0224 (virtualbox, 0)
fedora39-0225 (virtualbox, 0)
-
削除:
$ vagrant box remove fedora39-0224
Removing box 'fedora39-0224' (v0) with provider 'virtualbox'...
-
確認:
$ vagrant box list
Endeav-base3  (virtualbox, 0)
fedora39-0225 (virtualbox, 0)
-
3). 不要な「作業フォルダ」の削除:
作業フォルダ名の確認:
$ ls -1 ~/ダウンロード/vm/
:
box-share
endeavour-base
endeavour-base-jp
endeavour-base2
endeavour-base3
endeavour-openbox
fedora39
fedora39-base
fedora39-test
ubn2204
-
削除1:
$ rm -r ~/ダウンロード/vm/endeavour-base2
-
削除2:
$ rm -r ~/ダウンロード/vm/fedora39
-
削除3:
$ rm -r ~/ダウンロード/vm/fedora39-test
-
確認:
$ ls -1 ~/ダウンロード/vm/
:
box-share
endeavour-base
endeavour-base-jp
endeavour-base3
endeavour-openbox
fedora39-base
ubn2204
-
4). 不要な「Box」イメージの削除:
確認:
$ ls -1 ~/ダウンロード/vm/box-share
:
pkg-EndeavourOS_base-inst.box
pkg-EndeavourOS_base3.box
pkg-fedora39_2024-0224.box
pkg-fedora39_2024-0225.box
削除:
$ rm -r ~/ダウンロード/vm/box-share/pkg-fedora39_2024-0224.box
-
確認1:
$ ls -1 ~/ダウンロード/vm/box-share
:
pkg-EndeavourOS_base-inst.box
pkg-EndeavourOS_base3.box
pkg-fedora39_2024-0225.box
-
確認2:
$ ls -1 ~/ダウンロード/vm/
:
box-share
endeavour-base
endeavour-base-jp
endeavour-base3
endeavour-openbox
fedora39-base
ubn2204
→その都度消さずに、しばらく間を置いたのでどれが不要なのかわかりづらくなりました。
-
-
まとめ
今回は、最新にした「VirtualBox 7.0.14」と「Vagrant 2.4.1」の環境で、公式「Box」に登録された「generic/fedora39」をインストールしました。
個人的に(Vagrant で)使うには補完したいところがあって勉強になりました。
-
公式「Box」での推奨は、ベースとなる最小限の「Box」と思うので、どこまで手を加えるかは(サイズを抑えたい人もいるので)難しいところ。
基本のルール(慣習)?は必要だろうけど、手を加えたのが「余計なこと」なのか、「有り難いこと」なのかは、使う人次第。
好みで選べば良いだけですが、一度インストールして使ってみないとわかりません。
作り込み方は、ひとつ試してみるとわかるので、自分好みの「Box」の作り込み方をする「登録者」を見つけるのが良さそう。
-
-
-
-
-
目次
-
「投稿の先頭 へ」
-
-
-
「この目次 の先頭へ」
「本編の目次 に戻る」
-