登録日: 2024-02-02 更新日: 2024-03-14
「Xubuntu 22.04 LTS」および「Windows11」(22H2) の「VirtualBox 7.0」の仮想マシンに、色々なLinux ディストリビューションをインストールして、自分に最適なものはないか試しています。
開発環境では、それらの仮想マシン(ボックス)の管理に「Vagrant」(ベイグラント) というツールが、よく使われています。
-
実践編1 の投稿で、「Xubuntu 22.04.3 LTS」の「VirtualBox 7.0.10」にて「Vagrant」を使えるようにしました。
実践編3 と 実践編4 の投稿で、コミュニティ版のベースとなる、「EndeavourOS」(デスクトップ環境なし) の英語の環境(ユーザ名は vagrant で、日本語キーボード)の「Box」(Endeav-base-jp) を作成しました。
-
(実践編5):
今回は、その作成した「Box」(Endeav-base-jp) を使って、
コミュニティ版の「OpenBox」を追加インストールしました。
ssh 接続できる、土台となる「仮想マシン」がすでにあるので、試しながらのインストールが楽にできたと思います。
-
その備忘録です。
-
-
(注)リンクを戻るときはブラウザの左上の「←」をクリック
スマホの場合は、「ホーム」ボタンの横の「<」キーをタップ
-
-
目次
-
「Vagrant」での参考:
→事前に「デスクトップの日本語化」が必要です
-
「EndeavourOS」での参考:
-
今回の作業:
-
-
-
- --- - --- - --- - --- - --- - --- - --- - --- - -
Vagrant で「EndeavourOS」の「仮想マシン」を立ち上げ:
-
1). 「デスクトップ環境なし」でインストールしているので、コンソール画面が立ち上がりました:
-
2). 「デスクトップ環境」をインストールしてのログイン:
→英語の表示です
-
自動起動で設定されたアプリが重複して起動されています:
パネル:
![]()
→「Welcom」アプリ、「ファイアウォール」、「スピーカ」のアイコンが重複しています
-
3). 上記の問題を回避して、日本語化した「デスクトップ環境」:

-
パネル:
![]()
→パネルで選択された「1」の番号がオレンジ色に変わっていることに注目
-
-
現在のバージョンを表示:
-
ホストOS : 「Xubuntu 22.04.3 LTS」
2024-02-04 現在
カーネル:
$ uname -r
5.15.0-92-generic
リリース:
$ cat /etc/lsb-release
:
DISTRIB_ID=Ubuntu
DISTRIB_RELEASE=22.04
DISTRIB_CODENAME=jammy
DISTRIB_DESCRIPTION="Ubuntu 22.04.3 LTS"
→「22.04.3」にアップしています。
-
-
ゲストOS : 「EndeavourOS」
2024-02-04 現在
カーネル:
$ uname -r
6.7.1-arch1-1
リリース:
$ cat /etc/lsb-release
:
DISTRIB_ID="EndeavourOS"
DISTRIB_RELEASE="rolling"
DISTRIB_DESCRIPTION="EndeavourOS Linux"
DISTRIB_CODENAME="rolling"
$ cat /etc/os-release
:
NAME="EndeavourOS"
PRETTY_NAME="EndeavourOS"
ID="endeavouros"
ID_LIKE="arch"
BUILD_ID="2023.11.17"             ←(注目)
ANSI_COLOR="38;2;23;147;209"
HOME_URL="https://endeavouros.com"
DOCUMENTATION_URL="https://discovery.endeavouros.com"
SUPPORT_URL="https://forum.endeavouros.com"
BUG_REPORT_URL="https://forum.endeavouros.com/c/arch-based-related-questions/bug-reports"
PRIVACY_POLICY_URL="https://endeavouros.com/privacy-policy-2"
LOGO="endeavouros"
→注目: インストール時に使用したイメージの作成日付だったり、 「BUILD_ID=rolling」の表示だったりします。
-
「Welcome」のバージョン:
$ eos-welcome --version
:
24.2-1
→バージョン表示にて、「ログの登録」の行が表示される場合は「こちら 」を参照:
-
-
- --- - --- - --- - --- - --- - --- - --- - --- - --
「VirtualBox」について:
-
「VirtualBox」は、Oracle が開発している「仮想マシン」を構築するためのソフトウェアです。
-
- 仮想マシンを使うことで、ハードウェアで問題となりそうなPC でも、最新のLinux ディストリビューションをインストールできる可能性が高くなります。
-
-
- --- - --- - --- - --- - --- - --- - --- - --- - ---
「Vagrant」 (ベイグラント) について:
-
公式サイト:
-
「仮想マシン」の管理や操作をコマンドで使うための「フロントエンド」のソフトウェアです:
-
→詳細は、以前に投稿した「こちら 」を参照:
-
-
- --- - --- - --- - --- - --- - --- - --- - --- - ----
「EndeavorOS」について:
-
公式サイト:
-
-
→詳細は、以前に投稿した「こちら 」を参照:
-
-
- --- - --- - --- - --- - --- - --- - --- - --- - -----
「EndeavourOS」(OpenBox) について:
-
1). 公式サイト:
EndeavourOS-Community-Editions/openbox
→サイトに置かれた情報は「こちら 」を参照:
-
その他の詳細は「こちら 」を参照:
-
2). 「OpenBox」のデフォルトのアプリ:
-
3). 「OpenBox」を手動でインストールする場合:
git clone https://github.com/EndeavourOS-Community-Editions/openbox.git
cd openbox
bash openbox-install.sh
-
-
- --- - --- - --- - --- - --- - --- - --- - --- - ----- -
(前回の作業):
-
Vagrant 実践編4: 「EndeavourOS」に ssh 接続等の設定を追加して「Box」を再作成〈H170-5〉
-
「EndeavourOS」にて、「デスクトップ環境なし」 の英語の環境(日本語キーボード指定、ユーザ名は vagrant )をインストールして、ssh 接続等の設定を追加後、「Box」を作成しました。
-
-
(その続き):
-
-
- --- - --- - --- - --- - --- - --- - --- - --- - ----- --
1. ホームの「Box」一覧にて、目的の「Box」を確認:
-
前回の作業で、「Box」一覧に登録済みです:
-
確認:
$ vagrant box list
Endeav-base-00 (virtualbox, 0)
Endeav-base-jp (virtualbox, 0)         ←(注目)
-
-
- --- - --- - --- - --- - --- - --- - --- - --- - ----- ---
2. 「Vagrantfile」の修正:
-
1). 「仮想マシン」を管理する「作業フォルダ」を準備:
別の「作業フォルダ」を準備:
$ mkdir -p ~/ダウンロード/vm/endeavour-base-jp/
→「仮想マシン」を管理する場所になります
-
「作業フォルダ」は使い回すのでなく、新しい名前で作成した方が混乱しないと思います。
-
2). 念の為に、「作業マシン」を削除:
$ cd ~/ダウンロード/vm/endeavour-base-jp/
$ vagrant destroy
    default: Are you sure you want to destroy the 'default' VM? [y/N] y
==> default: Destroying VM and associated drives...
→「y」
-
3). 念の為に、「作業フォルダ」をクリア:
$ cd ~/ダウンロード/vm/endeavour-base-jp/
$ rm -r .vagrant/
$ rm Vagrantfile
-
4). 「Vagrantfile」の作成:
$ cd ~/ダウンロード/vm/endeavour-base-jp/
$ featherpad Vagrantfile
↓ すべて貼付け:
# -*- mode: ruby -*-
# vi: set ft=ruby :

Vagrant.configure("2") do |config|
  config.vm.box = "Endeav-base-jp"
  #config.vm.boot_timeout = 300
  config.vm.boot_timeout = 60
  config.vm.provider "virtualbox" do |vb|
    # Display the VirtualBox GUI when booting the machine
    vb.gui = true
    #vb.memory = "2048"
    vb.memory = "4096"
    vb.cpus = 2
    vb.customize ["modifyvm", :id, "--graphicscontroller", "vboxsvga"]
    #vb.customize ["modifyvm", :id, "--graphicscontroller", "vmsvga"]
  end
end
→ 「vboxsvga」に修正しました
Crtl+S で、保存
-
参考:「config.vm.box = "Endeav-base-jp"」の行を変更すれば、他の「仮想マシン」でも使い回し出来ます:
-
-- -- -- -- -- -- -- -- -- -- -- -- -- -- -- -- -- -- -- -- -- -- -- --
追記: GUI(デスクトップ環境)を使う場合の設定(修正版):
(1).「Ubuntu」の場合:
「vb.customize ["modifyvm", :id, "--graphicscontroller", "vmsvga"]」の行を有効にすると、
ウィンドウサイズの拡大で、リアルタイムに解像度が調整されます。
-
(2).「EndeavourOS」で、リアルタイムに解像度が調整される場合:
「vb.customize ["modifyvm", :id, "--graphicscontroller", "vmsvga"]」の行を有効にすると、
ウィンドウサイズの拡大で、リアルタイムに解像度が調整されます。
-
(3).「EndeavourOS」で、リアルタイムに解像度が調整されない場合:
「vb.customize ["modifyvm", :id, "--graphicscontroller", "vboxsvga"]」の行を有効にすると、
ログアウト直前の解像度に調整されます。つまり、仮対応と言えます。
-
リアルタイムに解像度が調整されない場合は、「GuestAdditions」のインストールで失敗している可能性があります:
→例えば、ログイン後、デスクトップ画面で、一瞬だけ下記の「エラー通知」が表示されるときは注意:
VBoxClient: the VirtualBox kernel service is not running. Exiting.
→回避策は、「GuestAdditions」の再インストールですが、 それでもダメなときは「こちら」を参照:
-
5). 作成されたか確認:
$ ls -1Ap
Vagrantfile ←(注目)
-
-
- --- - --- - --- - --- - --- - --- - --- - --- - ----- ----
3. 「仮想マシン」を作成して立ち上げ:
-
ホストOS の端末にて:
-
1). 「仮想マシン」を作成して立ち上げ:
$ cd ~/ダウンロード/vm/endeavour-base-jp/
$ vagrant up
Bringing machine 'default' up with 'virtualbox' provider...
==> default: Importing base box 'Endeav-base-jp'...
Progress: 40%
しばらく待ちます
==> default: Matching MAC address for NAT networking...
==> default: Setting the name of the VM: endeavour-base-jp_default_1706478454111_19314
==> default: Clearing any previously set network interfaces...
==> default: Preparing network interfaces based on configuration...
    default: Adapter 1: nat
==> default: Forwarding ports...
    default: 22 (guest) => 2222 (host) (adapter 1)
==> default: Running 'pre-boot' VM customizations...
==> default: Booting VM...
==> default: Waiting for machine to boot. This may take a few minutes...
    default: SSH address: 127.0.0.1:2222
    default: SSH username: vagrant
    default: SSH auth method: private key
==> default: Machine booted and ready!
==> default: Checking for guest additions in VM...
==> default: Mounting shared folders...
    default: /vagrant => /home/ubn/ダウンロード/vm/endeavour-base-jp
ubn@ubn-box:~/ダウンロード/vm/endeavour-base-jp$
→エラーなしで、プロンプトに戻りました。
-
2). 「仮想マシン」が立ち上がりました
→「デスクトップ環境なし」でインストールしているので、コンソール画面が立ち上がりました。
-
現時点では、コンソール画面には、ログインしません。
-
-
- --- - --- - --- - --- - --- - --- - --- - --- - ----- -----
4. 「仮想マシン」に「ssh 接続」:
-
ホストOS の端末にて:
-
1). 参考:「ssh 接続」の設定を確認:
$ cd ~/ダウンロード/vm/endeavour-base-jp/
$ vagrant ssh-config
Host default
  HostName 127.0.0.1
  User vagrant
  Port 2222
  UserKnownHostsFile /dev/null
  StrictHostKeyChecking no
  PasswordAuthentication no
  IdentityFile /home/ubn/.vagrant.d/boxes/Endeav-base-jp/0/virtualbox/vagrant_private_key
  IdentitiesOnly yes
  LogLevel FATAL
  PubkeyAcceptedKeyTypes +ssh-rsa
  HostKeyAlgorithms +ssh-rsa
-
2). 「ssh 接続」:
$ cd ~/ダウンロード/vm/endeavour-base-jp/
$ vagrant ssh
Last login: Thu Jan 11 17:09:57 2024 from xx.xx.xx.xx
[vagrant@vagrant ~]$
→パスワードなしで自動ログインされました。
-
3). 確認:
[vagrant@vagrant ~]$ date
2024年  1月 29日 月曜日 06:50:41 JST
→ホストOS の「端末」を使っているので、「date」コマンドが文字化けしません。
-
[vagrant@vagrant ~]$ ls -lAp
-rw------- 1 vagrant vagrant 1209  1月 11 17:11 .bash_history
-rw-r--r-- 1 vagrant vagrant   21 11月 23 00:26 .bash_logout
-rw-r--r-- 1 vagrant vagrant   57 11月 23 00:26 .bash_profile
-rwxr-xr-x 1 vagrant vagrant 2691 11月 17 20:33 .bashrc
drwxr-xr-x 3 vagrant vagrant 4096  1月 10 21:29 .config/   ←(注目)
drwxr-xr-x 2 vagrant vagrant 4096  1月 10 21:29 Desktop/
drwxr-xr-x 2 vagrant vagrant 4096  1月 10 21:29 Documents/
drwxr-xr-x 2 vagrant vagrant 4096  1月 10 21:29 Downloads/
drwxr-xr-x 2 vagrant vagrant 4096  1月 10 21:29 Music/
drwxr-xr-x 2 vagrant vagrant 4096  1月 10 21:29 Pictures/
drwxr-xr-x 2 vagrant vagrant 4096  1月 10 21:29 Public/
drwx------ 2 vagrant vagrant 4096  1月 11 01:53 .ssh/     ←(注目)
drwxr-xr-x 2 vagrant vagrant 4096  1月 10 21:29 Templates/
drwxr-xr-x 2 vagrant vagrant 4096  1月 10 21:29 Videos/
-
[vagrant@vagrant ~]$ ls -lAp .config
drwxr-xr-x 3 vagrant vagrant 4096 12月 20 17:51 systemd/
-rw------- 1 vagrant vagrant  633  1月 10 21:29 user-dirs.dirs
-rw-r--r-- 1 vagrant vagrant    5  1月 10 21:29 user-dirs.locale
→デフォルトの状態
-
-
- --- - --- - --- - --- - --- - --- - --- - --- - ----- ----- -
5. 「仮想マシン」にて、GUI のみで使うユーザ「mine」を作成
-
パスワードなしのユーザ「vagrant」を日常的に使うにはセキュリティでのリスクが高いです。
GUI のみで使うユーザを作成。そのホームで「アプリのインストール」や「GUI 環境の設定」を行いました。
今回のユーザ名は「mine」にしましたが、好みのユーザ名にしてください:
入力の機会が多いので、短めが良いです
-
1). ホストOS の端末にて、「ssh 接続」:
$ cd ~/ダウンロード/vm/endeavour-base-jp/
$ vagrant ssh
-
2). 「ユーザ」と「ホームディレクトリ」を作成:
$ sudo useradd -m mine
→「mine」はユーザ名です。ユーザ名は好みです。
「-m」はユーザの「ホームフォルダ」(の頭)を作成するオプションです
-
3). パスワードを設定:
$ sudo passwd mine
New password:            ←(任意のパスワード)
Retype new password:     ←(再入力)
passwd: password updated successfully
→「mine」はユーザ名です。作成したユーザ名にしてください。
-
確認:
$ id mine
uid=1001(mine) gid=1001(mine) groups=1001(mine)
-
4). sudo が使える「wheel」グループに参加:
-
(1).「wheel」グループに参加:
$ sudo usermod -G wheel mine
→「mine」はユーザ名です。作成したユーザ名にしてください。
-
確認:
$ id mine
uid=1001(mine) gid=1001(mine) groups=1001(mine),998(wheel)
-
「EndeavourOS」の場合は、「sys」と「rfkill」のグループも必要です:
→参加するグループを追加する場合は、操作する前に、既存の設定を id で確認しておくのがオススメ:
-
(2).「sys」グループに追加で参加:
$ sudo usermod -aG sys mine
→注意:「-aG」としています:
-
(3).「rfkill」グループに追加で参加:
$ sudo usermod -aG rfkill mine
→注意:「-aG」としています:
-
-- -- -- -- -- -- -- -- -- -- -- -- -- -- -- -- -- -- -- -- -- -- -- --
参考: 「-aG」とせずに、「-G」と誤入力した場合の操作例:
新規になるので既存の「wheel」が消えます:
確認のみで、操作しないで下さい:
$ sudo usermod -G sys mine
-
$ id mine
uid=1001(mine) gid=1001(mine) groups=1001(mine),3(sys)
既存の「wheel」が消えて、「sys」のみになりました:
→もし、「vagrant」ユーザが作成されていない場合、sudo が使えなくなり、OS の再インストールとなるので注意:
逆に、既存のグループが多すぎて、参加するグループをやり直したい場合には、使えます:
-
5). 参加しているグループを確認:
$ id mine
uid=1001(mine) gid=1001(mine) groups=1001(mine),3(sys),998(wheel),981(rfkill)
→「rfkill」は無線デバイスを使うのに必要なグループです
-
6). 「wheel」グループに所属するユーザが「sudo」を利用できるか、確認:
$ sudo ls /etc/sudoers.d
10-installer
-
設定の確認:
$ sudo cat /etc/sudoers.d/10-installer
%wheel ALL=(ALL) ALL
→ファイル名からして、OS インストール時に自動で設定されたみたい:
「%wheel」とすると、「wheel」グループを指します
-
7). 再起動:
$ sudo reboot
-
8). 「仮想マシン」が立ち上がったら、「ssh 接続」:
$ cd ~/ダウンロード/vm/endeavour-base-jp/
$ vagrant ssh
-
9). 新しく作成した「mine」ユーザで操作:
[vagrant@vagrant ~]$ su - mine
Password:     ←(mine ユーザを作成したときのパスワード)
[mine@vagrant ~]$
→プロンプトが変わりました
-
(1).「ホームフォルダ」が作成されたか確認:
[mine@vagrant ~]$ pwd
/home/mine
-
[mine@vagrant ~]$ ls -lA
-rw-r--r-- 1 mine mine   21  1月 16 19:48 .bash_logout
-rw-r--r-- 1 mine mine   57  1月 16 19:48 .bash_profile
-rwxr-xr-x 1 mine mine 2691 11月 17 20:33 .bashrc
drwxr-xr-x 3 mine mine 4096 12月 20 17:51 .config
→頭のみで、配下のフォルダは作成されません。
[mine@vagrant ~]$ ls -lA .config
drwxr-xr-x 3 mine mine 4096 12月 20 17:51 systemd
-
(2). sudo が使えるか確認:
[mine@vagrant ~]$ sudo date
[sudo] password for mine:      ←(mine ユーザを作成したときのパスワード)
2024年  1月 30日 火曜日 03:18:45 JST
-
10). mine ユーザを抜けます:
[mine@vagrant ~]$ exit
logout
[vagrant@vagrant ~]$
→プロンプトが変わりました
-
11). 「ssh 接続」を終了:
[vagrant@vagrant ~]$ exit
logout
-
-
- --- - --- - --- - --- - --- - --- - --- - --- - ----- ----- --
6. 「仮想マシン」に「Openbox」をインストール:
-
-
- --- - --- - --- - --- - --- - --- - --- - --- - ----- ----- ---
6-1. 「仮想マシン」の「mine」のホームに、「Openbox」をダウンロード(クローンの作成):
-
1). ホストOS の端末にて「ssh 接続」後に、作成した「mine」ユーザに変更:
$ cd ~/ダウンロード/vm/endeavour-base-jp/
$ vagrant ssh
-
[vagrant@vagrant ~]$ su - mine
Password:     ←(mine ユーザを作成したときのパスワード)
[mine@vagrant ~]$
→プロンプトが変わりました
-
2). ホームフォルダを作成:
$ mkdir -p {Desktop,Documents,Downloads,Music,Pictures,Public,Templates,Videos}
-
確認:
[mine@vagrant ~]$ ls -lAp
-rw------- 1 mine mine   72  1月 30 03:30 .bash_history
-rw-r--r-- 1 mine mine   21  1月 16 19:48 .bash_logout
-rw-r--r-- 1 mine mine   57  1月 16 19:48 .bash_profile
-rwxr-xr-x 1 mine mine 2691 11月 17 20:33 .bashrc
drwxr-xr-x 3 mine mine 4096 12月 20 17:51 .config/
drwxr-xr-x 2 mine mine 4096  1月 30 16:47 Desktop/
drwxr-xr-x 2 mine mine 4096  1月 30 16:47 Documents/
drwxr-xr-x 2 mine mine 4096  1月 30 16:47 Downloads/
drwxr-xr-x 2 mine mine 4096  1月 30 16:47 Music/
drwxr-xr-x 2 mine mine 4096  1月 30 16:47 Pictures/
drwxr-xr-x 2 mine mine 4096  1月 30 16:47 Public/
drwxr-xr-x 2 mine mine 4096  1月 30 16:47 Templates/
drwxr-xr-x 2 mine mine 4096  1月 30 16:47 Videos/
-
3). 「~/Downloads/」フォルダに移動:
$ cd ~/Downloads/
-
4). ダウンロード(クローンの作成):
$ git clone https://github.com/EndeavourOS-Community-Editions/openbox.git
Cloning into 'openbox'...
remote: Enumerating objects: 295, done.
remote: Counting objects: 100% (54/54), done.
remote: Compressing objects: 100% (50/50), done.
remote: Total 295 (delta 29), reused 9 (delta 4), pack-reused 241
Receiving objects: 100% (295/295), 91.35 KiB | 1.30 MiB/s, done.
Resolving deltas: 100% (152/152), done.
-
5). 作成されたフォルダに移動:
$ cd ~/Downloads/openbox/
[mine@vagrant openbox]$ ls -lAp
drwxr-xr-x 10 mine mine  4096  1月 30 16:50 .config/
drwxr-xr-x  8 mine mine  4096  1月 30 16:50 .git/
-rw-r--r--  1 mine mine   575  1月 30 16:50 .gtkrc-2.0
-rw-r--r--  1 mine mine 35149  1月 30 16:50 LICENSE
-rw-r--r--  1 mine mine  4396  1月 30 16:50 netinstall.yaml
-rw-r--r--  1 mine mine   420  1月 30 16:50 openbox-install.sh
-rw-r--r--  1 mine mine   589  1月 30 16:50 packages-repository.txt
-rw-r--r--  1 mine mine  1439  1月 30 16:50 README.md
-rwxr-xr-x  1 mine mine   660  1月 30 16:50 setup.sh
drwxr-xr-x  3 mine mine  4096  1月 30 16:50 .themes/
-rw-r--r--  1 mine mine   139  1月 30 16:50 xed.dconf
-
-
- --- - --- - --- - --- - --- - --- - --- - --- - ----- ----- ----
6-2. 「セットアップ用のスクリプト」を確認:
-
2024-02-02 現在:
-
「openbox-install.sh」の内容を確認:
$ cd ~/Downloads/openbox/
$ cat openbox-install.sh
#!/bin/bash

# Easy setup for testing

mkdir -p ~/.config
mkdir -p ~/.themes
cp -R .config/* ~/.config/
cp -R .themes/* ~/.themes/
cp .gtkrc-2.0 ~/.gtkrc-2.0
chmod -R +x ~/.config/openbox/scripts
chmod +x ~/.config/rofi/powermenu.sh
sudo pacman -Syu --needed --noconfirm - < packages-repository.txt
sudo systemctl enable lightdm.service
# eos-packagelist --install "Openbox Edition"
dbus-launch dconf load / < xed.dconf
→テスト用の簡単なセットアップ:
パッケージ管理に「pacman」を使う(公式リポジトリのアプリをインストールする)ように修正されました:
-
スクリプトの実行で、システム更新がされた後に、 「packages-repository.txt」にある(EndeavourOS の)公式アプリの一覧がインストールされます。
その後、GUI のログイン画面が有効になります。
-
-
- --- - --- - --- - --- - --- - --- - --- - --- - ----- ----- -----
6-3. インストールを行うアプリの一覧を確認:
-
2024-02-02 現在:
-
「packages-repository.txt」の内容を確認:
$ cd ~/Downloads/openbox/
$ cat packages-repository.txt
acpi
arandr
arc-gtk-theme-eos
archlinux-xdg-menu
default-cursors
dex
dmenu
dunst
eos-lightdm-slick-theme
eos-qogir-icons
feh
gtk-engine-murrine
gvfs
gvfs-afc
gvfs-gphoto2
gvfs-mtp
gvfs-nfs
gvfs-smb
jgmenu
jq
lightdm
lightdm-slick-greeter
lxappearance-gtk3
mpv
network-manager-applet
nitrogen
obconf
openbox
pasystray
picom
polkit-gnome
rofi
scrot
slock
sysstat
thunar
thunar-archive-plugin
thunar-media-tags-plugin
thunar-volman
tint2
tumbler
xbindkeys
xdg-user-dirs-gtk
xed
xfce4-terminal
xorg-xbacklight
capitaine-cursors
python-pyxdg
ttf-nerd-fonts-symbols
xcursor-themes
xorg-xdpyinfo
→つい先日まで、一覧にあるパッケージで多くの重複がありましたが、修正されました:
重複は無駄なだけで問題ありませんが、(AUR に降格したり削除されて)公式リポジトリにないパッケージや、コメント行(#)がひとつでもあるとエラーして、すべてのインストールが実行されません。
「Arch Linux」等でインストールする場合は、「eos-」が付いたパッケージは「EndeavourOS」の公式パッケージなので、その行の削除か、代わりのパッケージに変更が必要です。
-
-
- --- - --- - --- - --- - --- - --- - --- - --- - ----- ----- ----- -
6-4. 「セットアップ用のスクリプト」を実行:
-
「ssh 接続」にて、「Openbox」をインストール:
-
1). 「openbox-install.sh」を実行:
$ cd ~/Downloads/openbox/
$ bash openbox-install.sh
[sudo] password for mine:

:: Synchronizing package databases...
 endeavouros            21.4 KiB  64.8 KiB/s 00:00 [-----------------] 100%
 core is up to date
 extra                   8.3 MiB  5.37 MiB/s 00:02 [-----------------] 100%
 multilib              140.0 KiB   284 KiB/s 00:00 [-----------------] 100%
:
システム更新が含まれているので、時間がかかりました:
:
downloading required keys...
:: Import PGP key B8AC08600F108CDF, "Jan Alexander Steffens (heftig) <heftig@archlinux.org>"? [Y/n]
:: Import PGP key 001CF4810BE8D911, "Jakub Klinkovský <lahwaacz@archlinux.org>"? [Y/n]
自動応答され、続行されました:
:
Created symlink /etc/systemd/system/display-manager.service → /usr/lib/systemd/system/lightdm.service.
[mine@vagrant openbox]$
→正常終了。プロンプトに戻りました。
-
2). 参考: インストールされたアプリのバージョンを確認:
確認のみで、作業は要りません:
-
(1). ソート:
$ cd ~/Downloads/openbox/
$ sort -u packages-repository.txt > packages-repository.txt-SORT
→「-u」: 重複を排除して昇順で並び変え
-
(2). 再インストールを利用して、バージョン確認:
$ sudo pacman -Syu --needed --noconfirm - < packages-repository.txt-SORT
パッケージがインストール済みだと警告が表示して、スキップされます:
[sudo] password for mine:

:: Synchronizing package databases...
 endeavouros is up to date
 core is up to date
 extra is up to date
 multilib is up to date
warning: acpi-1.7-3 is up to date -- skipping
warning: arandr-0.1.11-2 is up to date -- skipping
warning: arc-gtk-theme-eos-20221218-1 is up to date -- skipping
warning: archlinux-xdg-menu-0.7.6.6-1 is up to date -- skipping
warning: capitaine-cursors-4-2 is up to date -- skipping
warning: default-cursors-2-1 is up to date -- skipping
warning: dex-0.9.0-1 is up to date -- skipping
warning: dmenu-5.2-1 is up to date -- skipping
warning: dunst-1.9.2-1 is up to date -- skipping
warning: eos-lightdm-slick-theme-3.2-1 is up to date -- skipping
warning: eos-qogir-icons-5-1 is up to date -- skipping
warning: feh-3.10.2-1 is up to date -- skipping
warning: gtk-engine-murrine-0.98.2-4 is up to date -- skipping
warning: gvfs-1.52.2-2 is up to date -- skipping
warning: gvfs-afc-1.52.2-2 is up to date -- skipping
warning: gvfs-gphoto2-1.52.2-2 is up to date -- skipping
warning: gvfs-mtp-1.52.2-2 is up to date -- skipping
warning: gvfs-nfs-1.52.2-2 is up to date -- skipping
warning: gvfs-smb-1.52.2-2 is up to date -- skipping
warning: jgmenu-4.4.1-1 is up to date -- skipping
warning: jq-1.7.1-1 is up to date -- skipping
warning: lightdm-1:1.32.0-5 is up to date -- skipping
warning: lightdm-slick-greeter-2.0.3-1 is up to date -- skipping
warning: lxappearance-gtk3-0.6.3-4 is up to date -- skipping
warning: mpv-1:0.37.0-2 is up to date -- skipping
warning: network-manager-applet-1.36.0-1 is up to date -- skipping
warning: nitrogen-1.6.1-4 is up to date -- skipping
warning: obconf-2.0.4-8 is up to date -- skipping
warning: openbox-3.6.1-10 is up to date -- skipping
warning: pasystray-0.8.2-1 is up to date -- skipping
warning: picom-11-4 is up to date -- skipping
warning: polkit-gnome-0.105-10 is up to date -- skipping
warning: python-pyxdg-0.28-2 is up to date -- skipping
warning: rofi-1.7.5-2 is up to date -- skipping
warning: scrot-1.10-1 is up to date -- skipping
warning: slock-1.5-1 is up to date -- skipping
warning: sysstat-12.7.5-1 is up to date -- skipping
warning: thunar-4.18.10-1 is up to date -- skipping
warning: thunar-archive-plugin-0.5.2-1 is up to date -- skipping
warning: thunar-media-tags-plugin-0.4.0-1 is up to date -- skipping
warning: thunar-volman-4.18.0-1 is up to date -- skipping
warning: tint2-17.0.2-3 is up to date -- skipping
warning: ttf-nerd-fonts-symbols-3.1.1-1 is up to date -- skipping
warning: tumbler-4.18.2-1 is up to date -- skipping
warning: xbindkeys-1.8.7-4 is up to date -- skipping
warning: xcursor-themes-1.0.7-1 is up to date -- skipping
warning: xdg-user-dirs-gtk-0.11-2 is up to date -- skipping
warning: xed-3.4.5-1 is up to date -- skipping
warning: xfce4-terminal-1.1.1-2 is up to date -- skipping
warning: xorg-xbacklight-1.2.3-3 is up to date -- skipping
warning: xorg-xdpyinfo-1.3.4-1 is up to date -- skipping
:: Starting full system upgrade...
 there is nothing to do
システム更新があると、その他のパッケージも更新されます。
ちなみに、「eos-」が付いたパッケージは「endeavouros」リポジトリにある公式パッケージです。
-
3). システム更新したので、再起動:
-
(1). ログアウト(ssh 接続を中断):
[mine@vagrant openbox]$ exit
logout
[vagrant@vagrant ~]$ exit
logout
ubn@ubn-box:~/ダウンロード/vm/endeavour-base-jp$
→ログアウトが 2回必要です
-
(2). 電源オフ:
ubn@ubn-box:~/ダウンロード/vm/endeavour-base-jp$ vagrant halt
==> default: Attempting graceful shutdown of VM...
ubn@ubn-box:~/ダウンロード/vm/endeavour-base-jp$
-
(3). ホストOS を再起動:
ホストOS で、端末以外のすべてのウィンドウを閉じてから、
ubn@ubn-box:~/ダウンロード/vm/endeavour-base-jp$ reboot
→「共有フォルダ」を有効にします
-
-
- --- - --- - --- - --- - --- - --- - --- - --- - ----- ----- ----- --
6-5. 「仮想マシン」の立ち上げ:
-
ホストOS の端末にて:
-
1). 「仮想マシン」を立ち上げ:
$ cd ~/ダウンロード/vm/endeavour-base-jp/
$ vagrant up
Bringing machine 'default' up with 'virtualbox' provider...
==> default: Clearing any previously set forwarded ports...
==> default: Clearing any previously set network interfaces...
==> default: Preparing network interfaces based on configuration...
    default: Adapter 1: nat
==> default: Forwarding ports...
    default: 22 (guest) => 2222 (host) (adapter 1)
==> default: Running 'pre-boot' VM customizations...
==> default: Booting VM...
==> default: Waiting for machine to boot. This may take a few minutes...
    default: SSH address: 127.0.0.1:2222
    default: SSH username: vagrant
    default: SSH auth method: private key
==> default: Machine booted and ready!
==> default: Checking for guest additions in VM...
==> default: Mounting shared folders...
    default: /vagrant => /home/ubn/ダウンロード/vm/endeavour-base-jp
==> default: Machine already provisioned. Run `vagrant provision` or use the `--provision`
==> default: flag to force provisioning. Provisioners marked to run always will still run.
ubn@ubn-box:~/ダウンロード/vm/endeavour-base-jp$
-
2). 「仮想マシン」が立ち上がり、GUI のログイン画面が表示:

→あれれ、以前と壁紙が違います:
-
3). 「仮想マシン」のログイン画面にて、パスワード入力してみる:
ユーザ名: vagrant (自動で選ばれています)
-
「↑」キーにて、
→「mine」を選んで、
パスワード: 「mine」のパスワードを入力
-
4). デスクトップ画面が表示:
→デスクトップ画面が表示され、「Welcome」画面も起動:
気になるのは、パネルのアイコンが 2ずつあること:
「Welcome」x2 、「ファイヤーウォール」x2 、「スピーカ」x2
-
つまり、「Welcome」アプリが 2つ起動しています:
→アプリの自動起動が重複しているみたい。
-
-
- --- - --- - --- - --- - --- - --- - --- - --- - ----- ----- ----- ---
6-6. 参考: インストール用のスクリプトがすべて実行されたか、確認:
-
1). ホストOS の端末にて「ssh 接続」後に、作成した「mine」ユーザに変更:
$ cd ~/ダウンロード/vm/endeavour-base-jp/
$ vagrant ssh
-
[vagrant@vagrant ~]$ su - mine
Password:          ←(mine ユーザを作成したときのパスワード)
[mine@vagrant ~]$
→プロンプトが変わりました
-
1). フォルダが追加されたか確認:
[mine@vagrant ~]$ ls -lAp ~/
-rw-------  1 mine mine   599  1月 30 17:04 .bash_history
-rw-r--r--  1 mine mine    21  1月 16 19:48 .bash_logout
-rw-r--r--  1 mine mine    57  1月 16 19:48 .bash_profile
-rwxr-xr-x  1 mine mine  2691 11月 17 20:33 .bashrc
drwx------  5 mine mine  4096  1月 30 17:24 .cache/
drwxr-xr-x 13 mine mine  4096  1月 30 17:24 .config/
drwxr-xr-x  2 mine mine  4096  1月 30 16:47 Desktop/
-rw-r--r--  1 mine mine    26  1月 30 17:24 .dmrc
drwxr-xr-x  2 mine mine  4096  1月 30 16:47 Documents/
drwxr-xr-x  3 mine mine  4096  1月 30 16:50 Downloads/
-rw-r--r--  1 mine mine   575  1月 30 16:55 .gtkrc-2.0 ←(追加)
drwx------  3 mine mine  4096  1月 30 17:24 .local/
drwxr-xr-x  2 mine mine  4096  1月 30 16:47 Music/
drwxr-xr-x  2 mine mine  4096  1月 30 16:47 Pictures/
drwxr-xr-x  2 mine mine  4096  1月 30 16:47 Public/
drwxr-xr-x  2 mine mine  4096  1月 30 16:47 Templates/
drwxr-xr-x  3 mine mine  4096  1月 30 16:55 .themes/   ←(追加)
drwxr-xr-x  2 mine mine  4096  1月 30 16:47 Videos/
-rw-------  1 mine mine    52  1月 30 17:24 .Xauthority
-rw-------  1 mine mine 11478  1月 30 17:30 .xsession-errors
→新規のフォルダも作成されています。
-
2). 「~/.config」の確認:
[mine@vagrant ~]$ ls -lAp ~/.config/
drwx------ 2 mine mine 4096  1月 30 16:56 dconf/
drwxr-xr-x 2 mine mine 4096  1月 30 16:55 dunst/
-rw-r--r-- 1 mine mine  290  1月 30 17:24 EOS-greeter.conf
-rw-r--r-- 1 mine mine   75  1月 30 17:24 eos-update-notifier.first_init
drwxr-xr-x 2 mine mine 4096  1月 30 17:24 gtk-3.0/
drwxr-xr-x 2 mine mine 4096  1月 30 16:55 jgmenu/
drwxr-xr-x 2 mine mine 4096  1月 30 16:55 nitrogen/
drwxr-xr-x 3 mine mine 4096  1月 30 16:55 openbox/
-rw-r--r-- 1 mine mine 7888  1月 30 16:55 picom.conf.example
drwx------ 2 mine mine 4096  1月 30 17:24 pulse/
drwxr-xr-x 2 mine mine 4096  1月 30 16:55 rofi/
drwxr-xr-x 3 mine mine 4096 12月 20 17:51 systemd/           ←(既存)
drwxr-xr-x 2 mine mine 4096  1月 30 16:55 tint2/
-rw------- 1 mine mine  633  1月 30 17:24 user-dirs.dirs     ←(既存)
-rw-r--r-- 1 mine mine    5  1月 30 17:24 user-dirs.locale   ←(既存)
drwxr-xr-x 4 mine mine 4096  1月 30 16:55 xfce4/
→「設定ファイル」等は落ちています。
-
3). 「chmod -R +x ~/.config/openbox/scripts」の確認:
[mine@vagrant ~]$ ls -lA ~/.config/openbox/scripts
-rwxr-xr-x 1 mine mine  208  1月 30 16:55 brightness-control
-rwxr-xr-x 1 mine mine 1419  1月 30 16:55 low_bat_notifier.sh
-rwxr-xr-x 1 mine mine  496  1月 30 16:55 screenshot.sh
-rwxr-xr-x 1 mine mine  495  1月 30 16:55 volume-control
→ファイル属性は変更されています。
-
4). 「chmod +x ~/.config/rofi/powermenu.sh」の確認:
[mine@vagrant ~]$ ls -lA ~/.config/rofi/powermenu.sh
-rwxr-xr-x 1 mine mine 1010 1月 30 16:55 /home/mine/.config/rofi/powermenu.sh
→ファイル属性は変更されています。
-
5). アプリがインストールされているか確認:
抜粋:
[mine@vagrant ~]$ pacman -Ss xed
extra/xed 3.4.5-1 (x-apps) [installed]
    A small and lightweight text editor. X-Apps Project.
→アプリはインストールされています:
-
6). スクリプトの最終行が実行されて、設定が反映されているか確認:
確認する行なので、実行は要りません:
dbus-launch dconf load / < xed.dconf
→最終行は、「xed」がインストールされていれば確認できます:
-
7). 「~/Downloads/openbox/xed.dconf」の確認:
[mine@vagrant ~]$ cd ~/Downloads/openbox/
[mine@vagrant ~]$ cat  xed.dconf
[org/x/editor/preferences/editor]
bracket-matching=false
display-line-numbers=true
prefer-dark-theme=true
scheme='cobalt'
wrap-mode='none'
→「xed」の設定項目です
-
8). デスクトップで起動しないと、「ssh 接続」では、アプリは起動できません:
[mine@vagrant openbox]$ xed
(xed:3635): Gtk-WARNING **: 17:36:52.829: cannot open display:
display の指定が必要みたい。
-
9). 仮想マシンのデスクトップで「端末」を起動:
「xed」を起動:
[mine@vagrant ~]$ xed
-
→行番号が表示され、背景が「コバルトブルー」であることを確認しました:
-
-
- --- - --- - --- - --- - --- - --- - --- - --- - ----- ----- ----- ----
7. 任意: 「AUR ヘルパー」をメッセージ表示が自然な「paru」に変更:
-
「Arch Linux」は、コミュニティで管理されている非公式のリポジトリ(AUR)が使えるのが特徴です。 そのAUR パッケージを含めた管理を行える「AUR ヘルパー」のひとつが「paru」です。
「paru」はメッセージ表示が自然なので、違和感なく使えます。 また、「paru」は、「EndeavourOS」の公式リポジトリに登録があるのでインストールも楽です。
-
-
- --- - --- - --- - --- - --- - --- - --- - --- - ----- ----- ----- -----
7-1. 「paru」のインストール:
-
1). ホストOS の端末にて「ssh 接続」後に、作成した「mine」ユーザに変更:
$ cd ~/ダウンロード/vm/endeavour-base-jp/
$ vagrant ssh
-
[vagrant@vagrant ~]$ su - mine
Password:          ←(mine ユーザを作成したときのパスワード)
[mine@vagrant ~]$
→プロンプトが変わりました
-
2). 公式リポジトリにあるか確認:
[mine@vagrant ~]$ pacman -Ss yay
endeavouros/yay 12.2.0-1 [installed]
    Yet another yogurt. Pacman wrapper and AUR helper written in go.
extra/ruby-yard 0.9.34-1
    YARD is a Ruby Documentation tool. The Y stands for "Yay!"
→「yay」がインストール済みです
-
[mine@vagrant ~]$ pacman -Ss paru
endeavouros/paru 2.0.1-1
    Feature packed AUR helper
→「paru」は公式リポジトリからインストールできます
-
3). 「paru」のインストール:
[mine@vagrant ~]$ sudo pacman -S paru
Package (1)       New Version  Net Change  Download Size
endeavouros/paru  2.0.1-1        8.59 MiB       2.79 MiB
-
-
- --- - --- - --- - --- - --- - --- - --- - --- - ----- ----- ----- ----- -
7-2. 「paru」で、システム更新:
-
使用時に「sudo」もパラメータ指定の「-Syu」も要りません(付けても OK):
-
1). システム更新:
[mine@vagrant ~]$ paru
[sudo] password for mine:
-
2). システム更新がないときの表示:
[mine@vagrant ~]$ paru
[sudo] password for mine:
:: Synchronizing package databases... ←(データベースの同期中)
 endeavouros is up to date            ←(endeavouros: EndeavourOSの公式リポジトリ)
 core is up to date                   ←(core/extra/multilib: ArchLinuxの公式リポジトリ)
 extra            8.3 MiB  3.70 MiB/s 00:02 [-----------------] 100%
 multilib is up to date
:: Starting full system upgrade...
 there is nothing to do               ←(pacman では: 何も行うことがありません)
:: Looking for PKGBUILD upgrades...   ←(PKGBUILD の更新を確認)
:: Looking for AUR upgrades...        ←(AUR の更新を確認)
:: Looking for devel upgrades...      ←(開発の更新を確認)
 there is nothing to do               ←(paru では: 何も行うことがありません)
→「EndeavourOS」の公式リポジトリの更新をチェック後、AUR リポジトリの更新がチェックされます。
「pacman」を補完する形で「paru」が動きます。
-
3). システム更新後の再起動:
[mine@vagrant ~]$ sudo reboot
:
ubn@ubn-box:~/ダウンロード/vm/endeavour-base-jp$
→「ssh 接続」で「仮想マシン」を再起動するには「sudo」が必要です
「ssh 接続」は切断されますが、「仮想マシン」は自動で再立ち上げされるので、 立ち上がるまで待ちます。
-
4). ログイン画面が表示:
→ログインせずに、「ssh 接続」します
-
-
- --- - --- - --- - --- - --- - --- - --- - --- - ----- ----- ----- ----- --
7-3. 「Welcome」アプリで「paru」を使うように修正:
-
GUI の「Welcome」画面の「システムの更新」メニューでは「AUR ヘルパー」の機能が使われています。
「eos-update-notifier 」スクリプトで、「paru」を使うように変更しました:
-
1). ホストOS の端末にて「ssh 接続」後に、作成した「mine」ユーザに変更:
$ cd ~/ダウンロード/vm/endeavour-base-jp/
$ vagrant ssh
-
[vagrant@vagrant ~]$ su - mine
Password:          ←(mine ユーザを作成したときのパスワード)
[mine@vagrant ~]$
→プロンプトが変わりました
-
1). 「/etc/eos-script-lib-yad.conf」を修正:
「ssh 接続」で修正できるように、「nano」を使いました:
[mine@vagrant ~]$ sudo nano /etc/eos-script-lib-yad.conf
[sudo] password for mine:
-
Ctrl+W で検索 →Search:「EOS_AUR_HELPER」Enter
## EOS_AUR_HELPER contains the AUR helper program name.
## Supported values are yay and paru, but other helpers may work as well.
## The program must support options -Qua and -Sua.
## For the Welcome app you can also set another AUR helper with
## variable EOS_AUR_HELPER_OTHER.
## Both apps must support the options mentioned above.
#
EOS_AUR_HELPER="yay"
EOS_AUR_HELPER_OTHER=""   # for example: "paru"
-
一番下から 2行目を修正:
EOS_AUR_HELPER="yay"
EOS_AUR_HELPER_OTHER=""   # for example: "paru"
↓ 修正:
EOS_AUR_HELPER="paru"
EOS_AUR_HELPER_OTHER=""   # for example: "paru"
Ctrl+O (小文字のオー)で、保存
Ctrl+X で、終了
-
2). 再起動:
[mine@vagrant ~]$ sudo reboot
-
3). GUI の「ログイン」画面が表示:
→「mine」を選んで、パスワード入力
-
4). 「Welcome」画面が表示:
起動されないとき:
Windows+ Enter で、端末を起動:
[mine@vagrant ~]$ eos-welcome --once
-
5). 「After Install」(インストール後)タブ
「システムの更新」のメニューが、「paru」に変更されました:
-
こちらは日本語化された場合の画面ですが、同じです
抜粋:
「システムの更新 (paru)」 ←(変更されました)
英語なら、
「Update System (paru)」 ←(変更されました)
-
Windows+Q で、アプリを閉じます。
「Welcome」画面は 2つ起動されているので、2つとも閉じました。
-
6). ホストOS の端末にて「ssh 接続」後に、作成した「mine」ユーザに変更:
$ cd ~/ダウンロード/vm/endeavour-base-jp/
$ vagrant ssh
-
[vagrant@vagrant ~]$ su - mine
Password:          ←(mine ユーザを作成したときのパスワード)
[mine@vagrant ~]$
→プロンプトが変わりました
-
7). 「yay」を削除:
[mine@vagrant ~]$ paru -R yay
Package (1)  Old Version  Net Change
yay          12.2.0-1      -9.12 MiB
-
-
- --- - --- - --- - --- - --- - --- - --- - --- - ----- ----- ----- ----- ---
8. 任意: テキストエディタの「featherpad」をインストール:
-
1). ホストOS の端末にて「ssh 接続」後に、作成した「mine」ユーザに変更:
$ cd ~/ダウンロード/vm/endeavour-base-jp/
$ vagrant ssh
-
[vagrant@vagrant ~]$ su - mine
Password:          ←(mine ユーザを作成したときのパスワード)
[mine@vagrant ~]$
→プロンプトが変わりました
-
2). インストール:
[mine@vagrant ~]$ paru -S featherpad
[sudo] password for mine:

Package (1)       New Version  Net Change
extra/featherpad  1.4.1-1        3.60 MiB
-
3). 参考: 「ssh 接続」でバージョンを確認すると、コアダンプに落ちるので注意:
「ssh 接続」の場合:
[mine@vagrant ~]$ featherpad --version
:
Aborted (core dumped)
-
デスクトップ画面にて、Windows+Enter で「端末」を起動:
[mine@vagrant ~]$ featherpad --version
Featerpad 1.4.1
-
4). 「featherpad」の設定:
GUI のログイン画面で「mine」を選んで、パスワード入力:
-
デスクトップ画面にて、Windows+Enter で「端末」を起動:
-
設定メニューが英語だと難しいので、下記のようにして日本語で起動:
[mine@vagrant ~]$ LANG=ja_JP.UTF-8 featerpad
-
設定:
→「こちら 」を参照:
-
5). 設定後に起動して確認:
[mine@vagrant ~]$ featerpad

-
6). パネルのランチャーを「featherpad」に変更:
[mine@vagrant ~]$ nano ~/.config/tint2/tint2rc
Ctrl+W で検索 →Search: 「xed」Enter で検索:
launcher_item_app = /usr/share/applications/xed.desktop
↓ 下記のように修正:
#launcher_item_app = /usr/share/applications/xed.desktop
launcher_item_app = /usr/share/applications/featherpad.desktop
もし、どちらも表示したいときは、行頭の「#」を削除します
-
-
- --- - --- - --- - --- - --- - --- - --- - --- - ----- ----- ----- ----- ----
9. 任意: ESR 版の「Firefox」をインストール:
-
「仮想マシン」のデスクトップ環境でダウンロード後、「ssh 接続」でインストールします:
-
参考:
Boxes に「EndeavourOS」(Xfce) をインストールして「Worm」wm を追加(1/2)〈H160-2〉
-
1). 「仮想マシン」を立ち上げ:
-
2). ログイン画面で、「mine」ユーザにログイン:
-
3). ブラウザにて、「Firefox ESR」をダウンロード:
-
(1). 「仮想マシン」のブラウザで「firefox esr download」で検索:
-
(2). 画面下のリンク「Firefox ESR のダウンロードページ からダウンロードできます。」をクリック
-
(3). 言語の選択で、「English (US)」もしくは、「Japanese ー 日本語」を選択:
-
(4). 「Downlod Now」(今すぐダウンロード)をクリック
→「~/Downloads/firefox-115.7.0esr.tar.bz2」
-
4). ホストOS の端末にて「ssh 接続」後に、作成した「mine」ユーザに変更:
$ cd ~/ダウンロード/vm/endeavour-base-jp/
$ vagrant ssh
-
[vagrant@vagrant ~]$ su - mine
Password:          ←(mine ユーザを作成したときのパスワード)
[mine@vagrant ~]$
→プロンプトが変わりました
-
5). ダウンロードしたファイルを展開:
[mine@vagrant ~]$ cd ~/Downloads/
[mine@vagrant Downloads]$ tar xjf firefox-*.tar.bz2
→少し時間がかかります。
-
6). 展開した Firefox フォルダを「/opt」に移動:
[mine@vagrant Downloads]$ sudo mv firefox /opt
[mine@vagrant Downloads]$ ls /opt
firefox
-
7). Firefox の実行ファイルへのシンボリックリンクを作成:
[mine@vagrant ~]$ sudo mkdir -p /usr/local/bin/
[sudo] password for mine:
-
[mine@vagrant ~]$ sudo ln -s /opt/firefox/firefox /usr/local/bin/firefox
-
8). 「firefox」のデスクトップファイルを置くフォルダを作成:
[mine@vagrant ~]$ sudo mkdir -p /usr/local/share/applications/
[sudo] password for mine:
-
9). 「firefox」の「デスクトップファイル」を作成:
[mine@vagrant ~]$ sudo nano /usr/local/share/applications/firefox.desktop
[Desktop Entry]
Version=1.0
Name=Firefox Web Browser
Comment=Browse the World Wide Web
GenericName=Web Browser
Keywords=Internet;WWW;Browser;Web;Explorer
Exec=firefox %u
Terminal=false
X-MultipleArgs=false
Type=Application
Icon=/opt/firefox/browser/chrome/icons/default/default128.png
Categories=GNOME;GTK;Network;WebBrowser;
MimeType=text/html;text/xml;application/xhtml+xml;application/xml;application/rss+xml;application/rdf+xml;image/gif;image/jpeg;image/png;x-scheme-handler/http;x-scheme-handler/https;x-scheme-handler/ftp;x-scheme-handler/chrome;video/webm;application/x-xpinstall;
StartupNotify=true
→Ctrl+O で「保存」: 保存先を確認して、Enter
→Ctrl+X で、終了
-
10). 問題点: ESR 版の firefox をインストールしても、起動しません:
端末から起動してみると、エラー:
[mine@vagrant ~]$ which firefox
/usr/local/bin/firefox
-
[mine@vagrant ~]$ firefox
XPCOMGlueLoad error for file /opt/firefox/libxul.so:
libdbus-glib-1.so.2: cannot open shared object file: No such file or directory
Couldn't load XPCOM.
→共有ライブラリが足りないみたい。
-
回避策:
(1). ファイルデータベースを同期:
[mine@vagrant ~]$ sudo pacman -Fy
-
(2). ファイルを含むパッケージを検索:
[mine@vagrant ~]$ pacman -F libdbus-glib-1.so.2
extra/dbus-glib 0.112-3
    usr/lib/libdbus-glib-1.so.2
multilib/lib32-dbus-glib 0.112-2
    usr/lib32/libdbus-glib-1.so.2
-
(3). インストール:
[mine@vagrant ~]$ sudo pacman -S dbus-glib
Package (1)      New Version  Net Change  Download Size
extra/dbus-glib  0.112-3        0.80 MiB       0.13 MiB
-
(4). 再起動:
[mine@vagrant ~]$ sudo reboot
-
11). ログイン画面で、「mine」ユーザにログイン:
-
12). Ctrl+Enter にて、「端末」を起動:
「firefox」を起動して確認:
[mine@vagrant ~]$ firefox
→日本語のESR版の「firefox」が起動
-
13). 問題点: アプリメニューやパネルのアイコンをクリックすると、以前の「firefox」が起動します:
-
回避策:
(1). パネルの設定ファイルを修正:
パネルのランチャーにある「firefox」を ESR 版に修正:
[mine@vagrant ~]$ nano ~/.config/tint2/tint2rc
Ctrl+W で検索 →Search:「firefox」Enter
launcher_item_app = firefox.desktop
↓ 下記のように修正:
launcher_item_app = /usr/local/share/applications/firefox.desktop
→Ctrl+O で「保存」: 保存先を確認して、Enter
→Ctrl+X で、終了
-
(2). 再起動:
[mine@vagrant ~]$ sudo reboot
-
(3). パネルから起動して、ヘルプで「ESR」の正式名称「Extended Support Release」が含まれていることを確認:
-
14). 参考: 以前の「Firefox」を削除:
-
(1). インストールの確認:
[mine@vagrant ~]$ paru -Ss firefox | grep Installed
extra/firefox 122.0-1 [0 B 229.65 MiB] [Installed]
(2). 削除:
[mine@vagrant ~]$ paru -R firefox
Package (1)  Old Version  Net Change
firefox      122.0-1      -229.65 MiB
-
15). 問題点: 以前の「Firefox」アプリを削除すると、パネルの「Firefox」のアイコンが表示されません:
以前使われていたアイコン:
「/usr/share/icons/hicolor/scalable/apps/firefox.svg」
-
ESR 版の「Firefox」アプリのアイコンは下記にあるので、パスの指定がないと認識されません:
「/opt/firefox/browser/chrome/icons/default/default128.png」
-
回避策:
→「項番 9). 」で、「デスクトップファイル」にパスを指定しました:
-
デスクトップ画面で確認:
パネル:
![]()
→パネルに「firefox」のアイコンが表示されていることに注目
-
-
- --- - --- - --- - --- - --- - --- - --- - --- - ----- ----- ----- ----- -----
10. デスクトップ周りの設定:
-
使い勝手が良くなるように変更:
-
-
- --- - --- - --- - --- - --- - --- - --- - --- - ----- ----- ----- ----- ----- -
10-1. 問題点:「仮想マシン」の起動で、パネルのアイコンが重複するので対応:
-
デスクトップを追加したら、自動起動のアプリが重複して起動されます:
実際のパネルの表示:
![]()
→「Welcom」アプリ、「ファイアウォール」、「スピーカ」のアイコンが重複して表示:
というか、重複してアプリが起動しています
-
1). ホストOS の端末にて「ssh 接続」後に、作成した「mine」ユーザに変更:
$ cd ~/ダウンロード/vm/endeavour-base-jp/
$ vagrant ssh
-
[vagrant@vagrant ~]$ su - mine
Password:          ←(mine ユーザを作成したときのパスワード)
[mine@vagrant ~]$
→プロンプトが変わりました
-
2). 自動起動アプリの設定ファイルを修正:
たぶん、下記以外に自動起動の設定があるのですが、どこかわからないので下記で対応:
[mine@vagrant ~]$ nano ~/.config/openbox/autostart
-
抜粋:
# Autostart
dex -a -s /etc/xdg/autostart/:~/.config/autostart/ &
↓ 下記のように、コメント行に変更:
# Autostart
# dex -a -s /etc/xdg/autostart/:~/.config/autostart/ &
→Ctrl+O で「保存」: 保存先を確認して、Enter
→Ctrl+X で、終了
-
3). 再起動:
[mine@vagrant ~]$ sudo reboot
-
4). GUI の「ログイン」画面にて、「mine」を「↑」キーで選んで、パスワード入力:
-
5). デスクトップ画面にて、パネルが正常か確認:
パネルの表示:
![]()
→パネルにて、アプリの重複がなくなりました
-
-
- --- - --- - --- - --- - --- - --- - --- - --- - ----- ----- ----- ----- ----- --
10-2. 「端末」で表示されるディレクトリの色が「暗い紺色」で見づらいので対応:
-
1). 「仮想マシン」を立ち上げ:
-
2). ログイン画面で、「mine」ユーザを選んで、パスワード入力:
-
3). Windows + Enter で、「端末」を起動:
[mine@vagrant ~]$ ls -1
Desktop
Documents
Downloads
Music
Pictures
Public
Templates
Videos
-
実際の画面:

→見づらいです
-
4). 「端末」のウィンドウの空きで、右クリック→「Preferences…」(設定...)
「Colors」(配色)タブ
Palette(パレット)
「Show bold text in bright colors:」(ボールドのテキストを明るい色で表示する:)にチェック
-
→「Close」(閉じる)
-
5). 「端末」の表示を確認:
変更後:

→マシになりました
-
-
- --- - --- - --- - --- - --- - --- - --- - --- - ----- ----- ----- ----- ----- ---
10-3. パネルの時計の表示を変更:
-
1). パネルの設定ファイルを修正:
[mine@vagrant ~]$ nano ~/.config/tint2/tint2rc
Ctrl+W で検索 →Search:「Clock」Enter で検索:
# Clock
time1_format = %H:%M
time2_format = %a %d %b
↓ 置換:
# Clock
time1_format = %H:%M
time2_format = %m/%d %a
→Ctrl+O で「保存」: 保存先を確認して、Enter
→Ctrl+X で「終了」
-
2). 再起動:
[mine@vagrant ~]$ sudo reboot
[sudo] password for mine:
-
3). 「仮想マシン」のログイン画面で、「mine」ユーザを選んで、パスワード入力:
-
4). デスクトップ画面で確認:
パネルの表示:
![]()
→パネルにて、右にある「時計」の表示に違和感がありません
-
-
- --- - --- - --- - --- - --- - --- - --- - --- - ----- ----- ----- ----- ----- ----
10-4. 任意: パネルで、アクティブな「ディスクトップの番号」を見やすいようにカラー化:
-
1). パネルの設定ファイルを修正:
-
[mine@vagrant ~]$ nano ~/.config/tint2/tint2rc
Ctrl+W で検索 →Search:「taskbar_name_active_font_color」Enter で検索:
-
169 行目:(Ctrl+C で現在のカーソル位置を表示)
taskbar_name_active_font_color = #ffffff 100
↓ 置換: Ctrl+K 後、Ctrl+U を 2回、「↑」キーで行に戻って修正
# taskbar_name_active_font_color = #ffffff 100
taskbar_name_active_font_color = #f57900 100
→Ctrl+O で「保存」: 保存先を確認して、Enter
→Ctrl+X で「終了」
-
2). 再起動:
[mine@vagrant ~]$ sudo reboot
[sudo] password for mine:
-
3). 「仮想マシン」のログイン画面で、「mine」ユーザを選んで、パスワード入力:
-
4). デスクトップ画面で確認:
パネルの表示:
![]()
→パネルの左の「選択」されている「1」の番号が「白色」から「オレンジ色」になりました
-
-
- --- - --- - --- - --- - --- - --- - --- - --- - ----- ----- ----- ----- ----- -----
10-5. 「スクリーンショット」が使えるか確認:
-
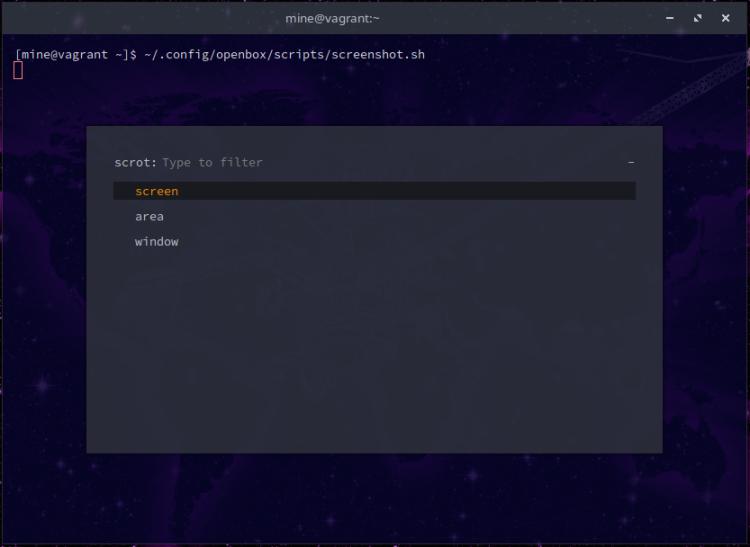
1). 対応するスクリプトの内容を確認:
[mine@vagrant ~]$ cat ~/.config/openbox/scripts/screenshot.sh
#!/bin/bash

# options to be displayed
option0="screen"
option1="area"
option2="window"

# options to be displyed
options="$option0\n$option1\n$option2"

selected="$(echo -e "$options" | rofi -lines 3 -dmenu -p "scrot")"
filename="Screenshot-%Y-%m-%d_%H:%M:%S.png"
case $selected in
    $option0)
        cd ~/Pictures/ && sleep 1 && scrot "$filename";;
    $option1)
        cd ~/Pictures/ && scrot -s "$filename";;
    $option2)
        cd ~/Pictures/ && sleep 1 && scrot -u "$filename";;
esac
-
2). ショートカットキーの割当を確認:
[mine@vagrant ~]$ nano ~/.config/openbox/rc.xml
Ctrl+W で検索 →Search:「scrot」Enter で検索:
    <!-- Take a screenshot, say "Cheeeese!" -->
    <keybind key="Print">
      <action name="Execute">
        <command>scrot ~/Pictures/Screenshot-%Y-%m-%d_%H:%M:%S.png</command>
      </action>
    </keybind>
    <keybind key="W-Print">
      <action name="Execute">
        <command>~/.config/openbox/scripts/screenshot.sh</command>
      </action>
    </keybind>
→Ctrl+X で、終了
-
2つのショートカットキーが定義されています:
「PrintScreen」→ダイアログなしで、全画面の保存:
Windows+「PrintScreen」→ダイアログ表示からモードを選んで、保存:
-
3). 「仮想マシン」のログイン画面で、「mine」ユーザを選んで、パスワード入力:
-
4). デスクトップ画面が表示:
-
5). Windows + Enter で、「端末」を起動:
-
6). スクリプトが動作するか確認:
[mine@vagrant ~]$ ~/.config/openbox/scripts/screenshot.sh
ダイアログが表示:
screen
area
window
→Enter(「screen」指定になります)
-
実際の画面:
-
7). 「PrintScreen」や、 Windows+「PrintScreen」のキーを押してみます:
→手応えがないのが難点:
-
8). ファイルが保存されたか確認:
[mine@vagrant ~]$ ls -1 ~/Pictures/
Screenshot-2024-01-31_13:43:15.png
Screenshot-2024-01-31_13:43:30.png
Screenshot-2024-01-31_13:43:31.png
Screenshot-2024-01-31_13:46:25.png
-
-
- --- - --- - --- - --- - --- - --- - --- - --- - ----- ----- ----- ----- ----- ----- -
10-6. 「ショートカットキー」の割当を「i3-wm」と同じキーに変更:
-
残りの設定:
-
1). 「ショートカットキー」の割当を修正:
$ nano ~/.config/openbox/rc.xml
Ctrl+W で検索 →Search:「thunar」Enter で検索:
    <keybind key="W-e">
      <action name="Execute">
        <command>thunar</command>  ←(注目)
      </action>
    </keybind>
↓ 置換: 最初に下の部分に数行の改行をしてから、コピー後に修正すると楽。
    <keybind key="W-e">
      <action name="Execute">
        <command>featherpad</command>
      </action>
    </keybind>

    <keybind key="W-n">
      <action name="Execute">
        <command>thunar</command>
      </action>
    </keybind>
余分な空行を Ctrl+K で削除:
→Ctrl+O(小文字のオー)で保存: 保存先を確認して、Enter
-
2). 修正後の「ショートカットキー」の割当を確認:
Ctrl+W で検索 →Search:「applications -->」Enter で検索:
    <!-- Keybindings for running applications -->
    <keybind key="W-Return">
      <action name="Execute">
        <command>xfce4-terminal</command>
      </action>
    </keybind>
    <keybind key="W-w">
      <action name="Execute">
        <command>firefox</command>
      </action>
    </keybind>
    <keybind key="W-e">
      <action name="Execute">
        <command>featherpad</command>
      </action>
    </keybind>
    <keybind key="W-n">
      <action name="Execute">
        <command>thunar</command>
      </action>
    </keybind>
    <keybind key="W-g">
      <action name="Execute">
        <command>geany</command>
      </action>
    </keybind>
    <keybind key="W-v">
      <action name="Execute">
        <command>pavucontrol</command>
      </action>
    </keybind>
    <!-- Take a screenshot, say "Cheeeese!" -->
→Ctrl+X で終了
セーブするか聞いてきたら、Y
保存先を確認して、Enter
-
4). 再起動:
[mine@vagrant ~]$ sudo reboot
[sudo] password for mine:
-
5). 「仮想マシン」のログイン画面で、「mine」ユーザを選んで、パスワード入力:
-
6). デスクトップ画面が表示:
-
-- -- -- -- -- -- -- -- -- -- -- -- -- -- -- -- -- -- -- -- -- -- -- --
7).「ショートカットキー」の割当を確認:
-
(1). Windows+Enter で、「端末」が起動するか確認:
→Windows+Q で、閉じます
-
(2). Windows+W で、「firefox」が起動するか確認:
→Windows+Q で、閉じます
-
(3). Windows+E で、「featherpad」が起動するか確認:
→Windows+Q で、閉じます
-
(4). Windows+N で、「ファイルマネージャ」が起動するか確認:
→Windows+Q で、閉じます
-
-
- --- - --- - --- - --- - --- - --- - --- - --- - ----- ----- ----- ----- ----- ----- --
11. 任意: 個人的によく使う「フォント」や「アプリ」をインストール:
-
設定の修正に使った「テキストエディタ」:
「ssh 接続」で修正できるように、端末画面で使える「nano」を使いました:
-
大昔の互換アプリが元で、馴染みのないショートカットキーなのが難点ですが、
「ssh 接続」であれば、マウスで範囲指定して、マウスの「中央ボタン」で貼付けできます:
-
-- -- -- -- -- -- -- -- -- -- -- -- -- -- -- -- -- -- -- -- -- -- -- --
インストール手順:
Boxes に「EndeavourOS」(Xfce) をインストールして「Worm」wm を追加(1/2)〈H160-2〉より抜粋:
-
18.「フォント」のインストール:
→「MiguMix」フォントは、サイトからダウンロードできないのでインストール出来なくなりました:
「源ノ角ゴシック Code JP」フォントは、インストールできます:
-
19.「アプリ」のインストール:
→「Featherpad」は「項番 8.」で、ESR版の「Firefox」は「項番 9.」でインストールしました:
-
20.「ゲーム」のインストール:
→以前は成功したけど、現時点では、パッケージのアップデートや、AUR から依存が削除されたりで、状況が変わっているかも:
-
-
- --- - --- - --- - --- - --- - --- - --- - --- - ----- ----- ----- ----- ----- ----- ---
12. 参考: デスクトップの日本語化:
-
システム全体の日本語化はせず、GUI ユーザのみ日本語化しました:
-
1). ホストOS の端末にて「ssh 接続」してから、作成した「mine」ユーザに変更:
$ cd ~/ダウンロード/vm/endeavour-base-jp/
$ vagrant ssh
-
[vagrant@vagrant ~]$ su - mine
Password:          ←(mine ユーザを作成したときのパスワード)
[mine@vagrant ~]$
→プロンプトが変わりました
-
2). 作業前のロケールの確認:
[mine@vagrant ~]$ locale
LANG=en_US.UTF-8               ←(注目)
LC_CTYPE="en_US.UTF-8"
LC_NUMERIC=ja_JP.UTF-8
LC_TIME=ja_JP.UTF-8
LC_COLLATE="en_US.UTF-8"
LC_MONETARY=ja_JP.UTF-8
LC_MESSAGES="en_US.UTF-8"
LC_PAPER=ja_JP.UTF-8
LC_NAME=ja_JP.UTF-8
LC_ADDRESS=ja_JP.UTF-8
LC_TELEPHONE=ja_JP.UTF-8
LC_MEASUREMENT=ja_JP.UTF-8
LC_IDENTIFICATION=ja_JP.UTF-8
LC_ALL=
→OS のインストール時に「英語」と「日本語キーボード」としたら、上記に設定されました
ロケールが混在しています
-
[mine@vagrant ~]$ cat /etc/locale.conf
LANG=en_US.UTF-8
LC_ADDRESS=ja_JP.UTF-8
LC_IDENTIFICATION=ja_JP.UTF-8
LC_MEASUREMENT=ja_JP.UTF-8
LC_MONETARY=ja_JP.UTF-8
LC_NAME=ja_JP.UTF-8
LC_NUMERIC=ja_JP.UTF-8
LC_PAPER=ja_JP.UTF-8
LC_TELEPHONE=ja_JP.UTF-8
LC_TIME=ja_JP.UTF-8
-
[mine@vagrant ~]$ cat /etc/default/locale
LANG=en_US.UTF-8
LC_ADDRESS=ja_JP.UTF-8
LC_IDENTIFICATION=ja_JP.UTF-8
LC_MEASUREMENT=ja_JP.UTF-8
LC_MONETARY=ja_JP.UTF-8
LC_NAME=ja_JP.UTF-8
LC_NUMERIC=ja_JP.UTF-8
LC_PAPER=ja_JP.UTF-8
LC_TELEPHONE=ja_JP.UTF-8
LC_TIME=ja_JP.UTF-8
-
3). 日本語関連のパッケージをインストール:
日本語フォントの確認:
[mine@vagrant ~]$ pacman -Ss noto-font
extra/noto-fonts 1:24.1.1-1 [installed]
    Google Noto TTF fonts
extra/noto-fonts-cjk 20230817-1 [installed]
    Google Noto CJK fonts
extra/noto-fonts-emoji 1:2.042-1 [installed]
    Google Noto emoji fonts
extra/noto-fonts-extra 1:24.1.1-1 [installed]
    Google Noto TTF fonts - additional variants
→インストール済みです
-
4). 「~/.xprofile」の作成:
[mine@vagrant ~]$ nano ~/.xprofile
下記を追記:
export LANG=ja_JP.UTF-8
Ctrl+O (小文字のオー)で、「保存」: 保存先を確認して、Enter
Ctrl+X で、終了
-
5). 再起動:
[mine@vagrant ~]$ sudo reboot
[sudo] password for mine:
-
6). 「仮想マシン」のログイン画面で、「mine」ユーザを選んで、パスワード入力:
-
7). 「デスクトップ」画面が表示:
-
GUI でログインすると、日本語化されました:
→「Welcome」画面が日本語で表示されました:
-
-- -- -- -- -- -- -- -- -- -- -- -- -- -- -- -- -- -- -- -- -- -- -- --
「ssh 接続」の場合に、日本語化するには:
「ssh 接続」だと「.xprofile」ファイルが読み込まれないので、日本語化されません:
なので、「.xprofile」ファイルを読み込みます:
[mine@vagrant ~]$ source ~/.xprofile
または、
[mine@vagrant ~]$ source .xprofile
→ピリオド「.」があるので注意
-
ロケールの確認:
[mine@vagrant ~]$ locale
LANG=ja_JP.UTF-8          ←(注目)
LC_CTYPE="ja_JP.UTF-8"
LC_NUMERIC=ja_JP.UTF-8
LC_TIME=ja_JP.UTF-8
LC_COLLATE="ja_JP.UTF-8"
LC_MONETARY=ja_JP.UTF-8
LC_MESSAGES="ja_JP.UTF-8"
LC_PAPER=ja_JP.UTF-8
LC_NAME=ja_JP.UTF-8
LC_ADDRESS=ja_JP.UTF-8
LC_TELEPHONE=ja_JP.UTF-8
LC_MEASUREMENT=ja_JP.UTF-8
LC_IDENTIFICATION=ja_JP.UTF-8
LC_ALL=
-
日本語化されたか確認:
[mine@vagrant ~]$ pacman -Ss paru
endeavouros/paru 2.0.1-1 [インストール済み]
    Feature packed AUR helper
→「Installed」の部分が日本語表示になりました
-
なので、日本語化したときに検索するときは:
[mine@vagrant ~]$ paru -Ss paru | grep 済
endeavouros/paru 2.0.1-1 [0 B 8.59 MiB] [インストール済み]
aur/paru 2.0.1-1 [+847 ~28.08] [インストール済み]
→「公式リポジトリ」と「AUR リポジトリ」の両方に登録があります
-
-
- --- - --- - --- - --- - --- - --- - --- - --- - ----- ----- ----- ----- ----- ----- ----
13. 参考: 日本語入力:
-
「ssh 接続」であれば、ホストOS の入力メソッドが使われるので、 デスクトップ環境で「日本語入力」しないなら作業は要りません。
デスクトップ環境で「日本語入力」する場合は、好みや使用頻度で入力メソッドを選べます。
-
-
- --- - --- - --- - --- - --- - --- - --- - --- - ----- ----- ----- ----- ----- ----- -----
13-a. 日本語入力に、「ibus-anthy」を使う場合:
-
「ibus-anthy」は「公式リポジトリ」に登録がある(ビルド済みのバイナリな)ので、簡単にインストールできます。 ただし、ヒット率はそこそこです:
-
検索:
[mine@vagrant ~]$ pacman -Ss ibus-anthy
extra/ibus-anthy 1.5.15-1
    Japanese input method Anthy IMEngine for IBus Framework
→日本語入力が少ないときにオススメ
-
1). 表示メッセージの日本語化:
[mine@vagrant ~]$ source .xprofile
-
2). インストール:
[mine@vagrant ~]$ paru -S ibus-anthy
パッケージ (2)    新しいバージョン  最終的な変化  ダウンロード容量
extra/anthy       9100h-6              23.58 MiB          5.31 MiB
extra/ibus-anthy  1.5.15-1              9.09 MiB          0.97 MiB
-
3). 設定ファイルの作成:
-
(1). 「~/.xprofile」の作成:
[mine@vagrant ~]$ nano ~/.xprofile
↓ ファイルの最後に下記の 3行を追記:
export GTK_IM_MODULE=ibus
export XMODIFIERS=@im=ibus
export QT_IM_MODULE=ibus
→Ctrl+O (小文字のオー)で「保存」: 保存先を確認して、Enter
→Ctrl+X で終了:
-
(2). 自動起動に設定:
[mine@vagrant ~]$ nano ~/.config/openbox/autostart
↓ ファイルの最後に下記の 2行を追記:
# Start Japanese Input Daemon
ibus-daemon -r -d -x &
→Ctrl+O (小文字のオー)で「保存」: 保存先を確認して、Enter
→Ctrl+X で終了:
-
4). 再起動:
[mine@vagrant ~]$ sudo reboot
[sudo] mine のパスワード:
-
5). 「仮想マシン」のログイン画面にて、「mine」ユーザを選んで、パスワード入力:
GUI でログインすると、日本語化されました:
-
6). 「ibus-anthy」の設定:
-
6-1). デフォルトの入力メソッドを切り替えるキーを「半角/全角」キーに割当て:
-
(1). メニュー →設定 →「IBus の設定」
→「IBus の設定」画面表示:
-
(2). 設定の変更:
-
「一般」タブ
次の入力メソッド: 「
その右の「…」→「削除」をクリック
-
「Super」のチェックを外します
「space」の右の「…」→「無効」をクリック→「新しいアクセレータ」→「半角/全角」キー
→「Zenkaku_Hankaku」に変わりました
→「追加」→「OK」
次の入力メソッド: 「Zenkaku_Hankaku」に変わりました
-
「閉じる」をクリックせずに、下記の作業へ:
-
6-2). 日本語オンとオフを別々のキーに割り当て:
- 「ひらがな」にて日本語オン(日本語入力)
- 「無変換」にて日本語オフ(英文字入力)
-
(1). 「入力メソッド」タブ
→青色の「日本語 - Anthy」を選んで、「設定」ボタンをクリック
-
(2). 「半角英数」キーの割り当て:
「キー割り当て」タブ
-
latin_mode [] を選んで、「編集」
キーコード右の「…」→「無変換」キー→「Muhenkan」→「追加」→「OK」
-
下記の表示に変わりました:
latin_mode [Muhenkan]
-
(3). 「ひらがな」キーの割り当て
hiragana_mode [] を選んで、「編集」
キーコード右の「…」→「ひらがな」キー→「Hiragana_Katakana」→「追加」→「OK」
-
下記の表示に変わりました:
hiragana_mode [Hiragana_Katakana]
→「閉じる」
-
「ibus-anthy」は、パネルのアイコン「あ」が水色です
-
-
- --- - --- - --- - --- - --- - --- - --- - --- - ----- ----- ----- ----- ----- ----- ----- -
13-b. 日本語入力に、「ibus-mozc」を使う場合:
-
「EndeavourOS」だと「公式リポジトリ」でなく、「AUR リポジトリ」で提供されています:
-
AUR パッケージで、依存パッケージの「mozc」も含めてビルドが実行されるので、インストールに時間がかかります:
ヒット率は上がりますが、インストールや更新に 2時間?ほどかかるのが難点です:
なので、自動更新しない設定にして、手動で更新する運用にしています:
-
個人的に思うこと:
「mozc」は google の技術を利用しており、google なのでセキュリティでの更新が多く、なかなかバイナリ化できないみたい。 使用される頻度がもっと上がれば「公式リポジトリ」への登録がありそうですが、更新のたびに時間をかけてまでビルドする人は少ないので、それは期待できません。
ちなみに、他のLinux ディストリビューションでパッケージ化(バイナリ化)されているのは、依存が複雑で、簡単にビルドできないから。
-
検索:
[mine@vagrant ~]$ paru -Ss ibus-mozc
aur/ibus-mozc 2.29.5346.102-2 [+16 ~0.03]
    Mozc module for IBus
→日本語入力が多いときや、「mozc」が好みの人にオススメ
-
「ibus-mozc」のインストールは、
CPU パワーと時間がかかるので、PC を使わない、時間に余裕があるときに実施:
-
1). メッセージの日本語化:
[mine@vagrant ~]$ source .xprofile
-
2). 応答を省略してインストール:
[mine@vagrant ~]$ paru -S --noconfirm ibus-mozc
途中の、数字の入力、「Y/n」と PKGBUILD のレビューはスキップされます。
ただし、パスワード入力は必要です:
-
3). 途中のパスワード入力を見逃した場合:
:
[sudo] mine のパスワード:
sudo: パスワードの読み込みがタイムしました
sudo: パスワードが必要です
エラー: パッケージのビルドに失敗しました: ibus-mozc-2.29.5346.102-2
-
再実行:
[mine@vagrant ~]$ paru -S --noconfirm ibus-mozc
パスワード入力は、3回あるので、
2回ほど見逃して、何度か再実行しています。少しづつ時間は短くなります。
-
完了後の確認:
[mine@vagrant ~]$ paru -Ss ibus-mozc | grep 済
aur/ibus-mozc 2.29.5346.102-2 [+16 ~0.03] [インストール済み]
-
4). 設定ファイルの作成:
-
(1). 「~/.xprofile」の作成:
[mine@vagrant ~]$ nano ~/.xprofile
↓ ファイルの最後に下記の 3行を追記:
export GTK_IM_MODULE=ibus
export XMODIFIERS=@im=ibus
export QT_IM_MODULE=ibus
→Ctrl+O (小文字のオー)で「保存」: 保存先を確認して、Enter
→Ctrl+X で終了:
-
(2). 自動起動に設定:
[mine@vagrant ~]$ nano ~/.config/openbox/autostart
↓ ファイルの最後に下記の行を追記:
# Start Japanese Input Daemon
ibus-daemon -r -d -x &
→Ctrl+O (小文字のオー)で「保存」: 保存先を確認して、Enter
→Ctrl+X で終了:
-
5). 再起動:
[mine@vagrant ~]$ sudo reboot
[sudo] mine のパスワード:
-
6). 「仮想マシン」のログイン画面で、「mine」ユーザを選んで、パスワード入力:
GUI でログインすると、日本語化されました:
-
7). 「ibus-mozc」の設定:
-
7-1). パネルのキーボードアイコン「JA」をクリックすると、ゴミが表示されるので修正:
日本語 - Mozc 日本語 - Mozc:あ ←ゴミ表示 日本語 - Japanese
-
(1). メニュー →「設定」→「IBus の設定」→「IBus の設定」画面:
-
「入力メソッド」タブ
日本語 - Mozc 日本語 - Mozc:あ ←(ゴミ: これ以外もあったりします) 日本語 - 日本語
-
(2). 「日本語 - Mozc:あ」を選んで、「削除」
最終的に下記だけ残します:
日本語 - Mozc
日本語 - 日本語
-
7-2). 任意:「Windows+スペース」では面倒なので、「半角/全角」キーに割当てを変更:
-
(1). 引き続き、
-
「一般」タブ
「キーボードショートカット」
-
(2). 「次の入力メソッド: space」の右にある「…」をクリック
「Super」のチェックを外して、キーコード「space」の右にある「…」をクリック
→「無効」をクリック→「新しいアクセレータ」で「半角/全角」キーを押します。
「追加」ボタンを押します。
-
→「Zenkaku_Hankaku」に変わりました。
→「OK」
→「閉じる」
-
もし、「 space」が残っていたら、「削除」
-
(3). これで、「半角/全角」キーで、「JA」、「あ」の切り替えができます。
-
7-3). 任意:「日本語 キーボード」の個別のキーに割当てを定義:
「半角/全角」キーだけで日本語オン・オフするなら、この作業は不要です。
-
(1). パネルの「JA」または、「あ」を左クリック → ツール →プロパティ →「Mozc プロパティ」画面
-
「一般」タブ
-
(2). 左下の「初期値に戻す」 →OK
-
(3). キー設定の選択: →「カスタム」を選んで右の「編集…」
→「Mozc キー設定」画面
-
(4). 左下の「編集」→「定義済みのキーマップからインポート」→「MS-IME」
-
(5). 「Mozc キー設定」画面(ウィンドウはマウスで縦に広げておくと、作業しやすいです)
上段にある表題の「入力キー」の項目名をクリックして、ソート
-
(6). 下記のキーのコマンドを修正:
| モード | 入力キー | コマンド | 備考 |
|---|---|---|---|
| 変換前入力中 | Hiragana | IME を有効化 | |
| 変換中 | Hiragana | IME を有効化 | |
| 直接入力 | Hiragana | IME を有効化 | |
| 入力文字なし | Hiragana | IME を有効化 | |
| : | |||
| 変換前入力中 | Muhenkan | IME を無効化 | |
| 変換中 | Muhenkan | IME を無効化 | |
| 直接入力 | Muhenkan | IME を無効化 | エントリーの追加が必要 |
| 入力文字なし | Muhenkan | IME を無効化 |
-
→OK →OK
→適用 →OK
→「閉じる」
-
(7). これで「あ」を見なくても操作できます:
(mozc は入力メソッドのオン、オフを別々のキーに簡単に割当てできるので便利です)
-
「ibus-mozc」は、パネルのアイコン「あ」がオレンジ色です
-
8). システム更新から「ibus-mozc」を除外:
→手順は「こちら」を参照:
-
9). システム更新から除外している「ibus-mozc」を、3ヶ月ぶりに手動で更新:
-
「ibus-mozc」の更新がありました:
$ paru
[sudo] パスワード:
:: パッケージデータベースの同期中...
 endeavouros は最新です
 core は最新です
 extra は最新です
 multilib は最新です
:: システム全体の更新を開始...
 何も行うことがありません
:: AUR の更新を確認しています...
:: 開発の更新を確認しています...
警告: ibus-mozc: パッケージのアップグレードを無視 (2.29.5160.102-1 => 2.29.5268.102-1) ←(注目)
警告: mozc: パッケージのアップグレードを無視 (2.29.5160.102-1 => 2.29.5268.102-1)      ←(注目)
 何も行うことがありません
→警告があっても 3ヶ月ほど無視。使い勝手は変わりません。
-
時間がかかるので、時間の余裕があるときに実施:
[mine@vagrant ~]$ paru
[mine@vagrant ~]$ paru -S --noconfirm ibus-mozc
→たぶん、パスワード入力を見逃すと思います。再実行。
-
-
- --- - --- - --- - --- - --- - --- - --- - --- - ----- ----- ----- ----- ----- ----- ----- --
14. 任意:「Welcome」画面に、「個人用コマンド」(Personal Commands) タブを追加:
-
手順は「こちら 」を参照:
-
-
- --- - --- - --- - --- - --- - --- - --- - --- - ----- ----- ----- ----- ----- ----- ----- ---
15. 参考: 「Openbox」のファイルの構成を確認:
-
確認のみ。修正前の設定です:
2024-02-02 現在:
-
1). 「ホーム」フォルダの確認:
[mine@vagrant ~]$ ls -1Ap
.bash_history
.bash_logout
.bash_profile
.bashrc
.cache/
.config/
Desktop/
.dmrc
Documents/
Downloads/
.gtkrc-2.0
.local/
Music/
Pictures/
Public/
Templates/
.themes/
Videos/
.Xauthority
.xsession-errors
.xsession-errors.old
-
2). 「.config」フォルダの確認:
[mine@vagrant ~]$ ls -1Ap .config/
dconf/
dunst/
EOS-greeter.conf
eos-update-notifier.first_init
featherpad/
gtk-3.0/
jgmenu/
nitrogen/
openbox/
picom.conf.example
pulse/
rofi/
systemd/
tint2/
user-dirs.dirs
user-dirs.locale
xed/
xfce4/
-
3). 「openbox」の設定ファイルを確認:
-
(1).「~/.config/openbox/」フォルダの確認:
[mine@vagrant ~]$ ls -1Ap .config/openbox/
autostart
menu.xml
menu.xml.bak
rc.xml
scripts/
-
(2).「openbox/scripts/」の確認:
[mine@vagrant ~]$ ls -1Ap ~/.config/openbox/scripts/
brightness-control
low_bat_notifier.sh
screenshot.sh
volume-control
-
(3).「openbox/autostart」の確認:
自動起動アプリの設定:
Openbox セッションが開始したときにどのアプリケーションを起動するか記述:
コマンドはアンパサンド (&) を付けて終了する必要があります:
[mine@vagrant ~]$ cat ~/.config/openbox/autostart
# compositor - background process + disable shadowing effects during session
#picom -CGb &
# edit: (27 nov. 2022) picom now starts automatic vie xdg autostart (dex is enabled here)
# it will read config under:
# ~/.config/picom.conf  see ~/.config/picom.conf.example for reference or copy default one there
# and edit to your needs:
# cp /etc/xdg/picom.conf.example ~/.config/picom.conf

# notifications
/usr/bin/dunst &

# panel - taskbar, system tray, battery, clock
tint2 &

# network manager
nm-applet &

# Autostart
dex -a -s /etc/xdg/autostart/:~/.config/autostart/ &

# Set display from arandr saved script
sh ~/.screenlayout/monitor.sh &

# Polkit
/usr/lib/polkit-gnome/polkit-gnome-authentication-agent-1 &

# Wallpaper
nitrogen --restore &

# Low battery notifier
~/.config/openbox/scripts/low_bat_notifier.sh &
-
(4).「openbox/menu.xml」の確認:
右クリック「メニュー」の設定:
[mine@vagrant ~]$ cat ~/.config/openbox/menu.xml
<?xml version="1.0" encoding="UTF-8"?>
<openbox_menu
    xmlns="http://openbox.org/"
    xmlns:xsi="http://www.w3.org/2001/XMLSchema-instance"
    xsi:schemaLocation="http://openbox.org/
    file:///usr/share/openbox/menu.xsd">
    <menu id="root-menu" label="Openbox 3">
        <item label="Terminal emulator">
            <action name="Execute">
                <execute>xfce4-terminal</execute>
            </action>
        </item>
        <item label="Web browser">
            <action name="Execute">
                <execute>firefox</execute>
            </action>
        </item>
        <separator />
        <menu execute="xdg_menu --format openbox3-pipe --root-menu /etc/xdg/menus/arch-applications.menu" id="apps" label="Applications"/>
        <menu id="client-list-menu" />
        <separator />
        <item label="Configurations">
            <action name="Execute">
                <execute>obconf</execute>
            </action>
        </item>
        <item label="Reconfigure">
            <action name="Reconfigure" />
        </item>
        <separator />
        <menu id="exit" label="Exit" >
            <item label="Logout">
                <action name="Exit" />
            </item>
            <item label="Suspend">
                <action name="Execute">
                    <execute>systemctl suspend</execute>
                </action>
            </item>
            <item label="Hibernate">
                <action name="Execute">
                    <execute>systemctl hibernate</execute>
                </action>
            </item>
            <item label="Reboot">
                <action name="Execute">
                    <execute>systemctl reboot</execute>
                </action>
            </item>
            <item label="Shutdown">
                <action name="Execute">
                    <execute>systemctl poweroff</execute>
                </action>
            </item>
        </menu>
    </menu>
</openbox_menu>
-
(5).「openbox/rc.xml」の確認:
[mine@vagrant ~]$ cat ~/.config/openbox/rc.xml
<?xml version="1.0" encoding="UTF-8"?>
<openbox_config xmlns="http://openbox.org/3.4/rc" xmlns:xi="http://www.w3.org/2001/XInclude">
<resistance>
<strength>5</strength>
<screen_edge_strength>5</screen_edge_strength>
</resistance>
<focus>
<focusNew>yes</focusNew>
<!-- Always try to focus new windows when they appear. other rules do apply -->
<followMouse>no</followMouse>
<!-- Move focus to a window when you move the mouse into it -->
<focusLast>yes</focusLast>
<!-- Focus the last used window when changing desktops, instead of the one
under the mouse pointer. when followMouse is enabled -->
<underMouse>no</underMouse>
<!-- Move focus under the mouse, even when the mouse is not moving -->
<focusDelay>200</focusDelay>
<!-- When followMouse is enabled, the mouse must be inside the window for
this many milliseconds (1000 = 1 sec) before moving focus to it -->
<raiseOnFocus>yes</raiseOnFocus>
<!-- When followMouse is enabled, and a window is given focus by moving the
mouse into it, also raise the window -->
</focus>
<placement>
<policy>Smart</policy>
<!-- 'Smart' or 'UnderMouse' -->
<center>yes</center>
<!-- Whether to place windows in the center of the free area found or
the top left corner -->
<monitor>Primary</monitor>
<!-- With Smart placement on a multi-monitor system, try to place new windows
on: 'Any' - any monitor, 'Mouse' - where the mouse is, 'Active' - where
the active window is, 'Primary' - only on the primary monitor -->
<primaryMonitor>1</primaryMonitor>
<!-- The monitor where Openbox should place popup dialogs such as the
focus cycling popup, or the desktop switch popup. It can be an index
from 1, specifying a particular monitor. Or it can be one of the
following: 'Mouse' - where the mouse is, or 'Active' - where
the active window is -->
</placement>
<theme>
<name>Arc-Darker</name>
<titleLayout>LIMC</titleLayout>
<!--
Available characters are NDSLIMC, each can occur at most once.
N: window icon
L: window label (AKA title).
I: iconify
M: maximize
C: close
S: shade (roll up/down)
D: omnipresent (on all desktops).
-->
<keepBorder>yes</keepBorder>
<animateIconify>yes</animateIconify>
<font place="ActiveWindow">
<name>UbuntuMono</name>
<size>10</size>
<!-- font size in points -->
<weight>Normal</weight>
<!-- 'bold' or 'normal' -->
<slant>Normal</slant>
<!-- 'italic' or 'normal' -->
</font>
<font place="InactiveWindow">
<name>UbuntuMono</name>
<size>10</size>
<!-- font size in points -->
<weight>Normal</weight>
<!-- 'bold' or 'normal' -->
<slant>Normal</slant>
<!-- 'italic' or 'normal' -->
</font>
<font place="MenuHeader">
<name>UbuntuMono</name>
<size>10</size>
<!-- font size in points -->
<weight>Normal</weight>
<!-- 'bold' or 'normal' -->
<slant>Normal</slant>
<!-- 'italic' or 'normal' -->
</font>
<font place="MenuItem">
<name>UbuntuMono</name>
<size>10</size>
<!-- font size in points -->
<weight>Normal</weight>
<!-- 'bold' or 'normal' -->
<slant>Normal</slant>
<!-- 'italic' or 'normal' -->
</font>
<font place="ActiveOnScreenDisplay">
<name>UbuntuMono</name>
<size>10</size>
<!-- font size in points -->
<weight>Normal</weight>
<!-- 'bold' or 'normal' -->
<slant>Normal</slant>
<!-- 'italic' or 'normal' -->
</font>
<font place="InactiveOnScreenDisplay">
<name>UbuntuMono</name>
<size>10</size>
<!-- font size in points -->
<weight>Normal</weight>
<!-- 'bold' or 'normal' -->
<slant>Normal</slant>
<!-- 'italic' or 'normal' -->
</font>
</theme>
<desktops>
<!-- this stuff is only used at startup, pagers allow you to change them
during a session. these are default values to use when other ones are not
already set by other applications, or saved in your session.
Use obconf if you want to change these without having to log out
and back in -->
<number>9</number>
<firstdesk>1</firstdesk>
<names>
<name>1</name>
<name>2</name>
<name>3</name>
<name>4</name>
<name>5</name>
<name>6</name>
<name>7</name>
<name>8</name>
<name>9</name>
</names>
<popupTime>1000</popupTime>
<!-- The number of milliseconds to show the popup for when switching
desktops. Set this to 0 to disable the popup. -->
</desktops>
<resize>
<drawContents>yes</drawContents>
<popupShow>Nonpixel</popupShow>
<!-- 'Always', 'Never', or 'Nonpixel' (xterms and such) -->
<popupPosition>Center</popupPosition>
<!-- 'Center', 'Top', or 'Fixed' -->
<popupFixedPosition>
<!-- these are used if popupPosition is set to 'Fixed' -->
<x>10</x>
<!-- positive number for distance from left edge, negative number for
distance from right edge, or 'Center' -->
<y>10</y>
<!-- positive number for distance from top edge, negative number for
distance from bottom edge, or 'Center' -->
</popupFixedPosition>
</resize>
<!-- You can reserve a portion of your screen where windows will not cover when
they are maximized, or when they are initially placed.
Many programs reserve space automatically, but you can use this in other
cases. -->
<margins>
<top>0</top>
<bottom>0</bottom>
<left>0</left>
<right>0</right>
</margins>
<dock>
<position>Bottom</position>
<!-- (Top|Bottom)(Left|Right|)|Top|Bottom|Left|Right|Floating -->
<floatingX>0</floatingX>
<floatingY>0</floatingY>
<noStrut>no</noStrut>
<stacking>Above</stacking>
<!-- 'Above', 'Normal', or 'Below' -->
<direction>Horizontal</direction>
<!-- 'Vertical' or 'Horizontal' -->
<autoHide>no</autoHide>
<hideDelay>300</hideDelay>
<!-- in milliseconds (1000 = 1 second) -->
<showDelay>300</showDelay>
<!-- in milliseconds (1000 = 1 second) -->
<moveButton>Middle</moveButton>
<!-- 'Left', 'Middle', 'Right' -->
</dock>
<keyboard>
<chainQuitKey>C-g</chainQuitKey>
<!-- Keybindings for desktop switching -->
<keybind key="C-A-Left">
<action name="GoToDesktop">
<to>left</to>
<wrap>no</wrap>
</action>
</keybind>
<keybind key="C-A-Right">
<action name="GoToDesktop">
<to>right</to>
<wrap>no</wrap>
</action>
</keybind>
<!-- Sent window to next or previous workspace -->
<keybind key="W-S-Left">
<action name="SendToDesktop">
<to>left</to>
<wrap>no</wrap>
</action>
</keybind>
<keybind key="W-S-Right">
<action name="SendToDesktop">
<to>right</to>
<wrap>no</wrap>
</action>
</keybind>
<!-- Switch to another workspace -->
<keybind key="W-1">
<action name="GoToDesktop">
<to>1</to>
</action>
</keybind>
<keybind key="W-2">
<action name="GoToDesktop">
<to>2</to>
</action>
</keybind>
<keybind key="W-3">
<action name="GoToDesktop">
<to>3</to>
</action>
</keybind>
<keybind key="W-4">
<action name="GoToDesktop">
<to>4</to>
</action>
</keybind>
<keybind key="W-4">
<action name="GoToDesktop">
<to>4</to>
</action>
</keybind>
<keybind key="W-5">
<action name="GoToDesktop">
<to>5</to>
</action>
</keybind>
<keybind key="W-6">
<action name="GoToDesktop">
<to>6</to>
</action>
</keybind>
<keybind key="W-7">
<action name="GoToDesktop">
<to>7</to>
</action>
</keybind>
<keybind key="W-8">
<action name="GoToDesktop">
<to>8</to>
</action>
</keybind>
<keybind key="W-9">
<action name="GoToDesktop">
<to>9</to>
</action>
</keybind>
<!-- Sent window to worspace number -->
<keybind key="W-S-1">
<action name="SendToDesktop">
<to>1</to>
<wrap>no</wrap>
</action>
</keybind>
<keybind key="W-S-2">
<action name="SendToDesktop">
<to>2</to>
<wrap>no</wrap>
</action>
</keybind>
<keybind key="W-S-3">
<action name="SendToDesktop">
<to>3</to>
<wrap>no</wrap>
</action>
</keybind>
<keybind key="W-S-4">
<action name="SendToDesktop">
<to>4</to>
<wrap>no</wrap>
</action>
</keybind>
<keybind key="W-S-5">
<action name="SendToDesktop">
<to>5</to>
<wrap>no</wrap>
</action>
</keybind>
<keybind key="W-S-6">
<action name="SendToDesktop">
<to>6</to>
<wrap>no</wrap>
</action>
</keybind>
<keybind key="W-S-7">
<action name="SendToDesktop">
<to>7</to>
<wrap>no</wrap>
</action>
</keybind>
<keybind key="W-S-8">
<action name="SendToDesktop">
<to>8</to>
<wrap>no</wrap>
</action>
</keybind>
<keybind key="W-S-9">
<action name="SendToDesktop">
<to>9</to>
<wrap>no</wrap>
</action>
</keybind>
<!-- Keybindings for Aero Snap -->
<keybind key="W-Right">
<action name="UnmaximizeFull"/>
<action name="MoveResizeTo">
<x>-0</x>
<y>+0</y>
<width>50/100</width>
<height>100/100</height>
</action>
</keybind>
<keybind key="W-Left">
<action name="UnmaximizeFull"/>
<action name="MoveResizeTo">
<x>+0</x>
<y>+0</y>
<width>50/100</width>
<height>100/100</height>
</action>
</keybind>
<keybind key="W-Up">
<action name="UnmaximizeFull"/>
<action name="MoveResizeTo">
<width>75/100</width>
<height>75/100</height>
</action>
<action name="MoveToCenter"/>
</keybind>
<keybind key="W-Down">
<action name="UnmaximizeFull"/>
<action name="MoveResizeTo">
<width>50/100</width>
<height>50/100</height>
</action>
<action name="MoveToCenter"/>
</keybind>
<keybind key="W-S-Up">
<action name="UnmaximizeFull"/>
<action name="MoveResizeTo">
<width>75/100</width>
<height>75/100</height>
</action>
<action name="MoveToCenter"/>
</keybind>
<!-- Keybindings for moving window to edge -->
<keybind key="W-C-Right">
<action name="MoveToEdge">
<direction>east</direction>
</action>
</keybind>
<keybind key="W-C-Left">
<action name="MoveToEdge">
<direction>west</direction>
</action>
</keybind>
<keybind key="W-C-Up">
<action name="MoveToEdge">
<direction>north</direction>
</action>
</keybind>
<keybind key="W-C-Down">
<action name="MoveToEdge">
<direction>south</direction>
</action>
</keybind>
<keybind key="W-a">
<action name="MoveToCenter"/>
</keybind>
<!-- Keybindings for undecorate, fullscreen, minimize,
roll-up, stick, resize, move, close, and window menu -->
<keybind key="W-t">
<action name="ToggleDecorations"/>
</keybind>
<keybind key="W-f">
<action name="ToggleMaximize"/>
</keybind>
<keybind key="W-z">
<action name="Iconify"/>
</keybind>
<keybind key="W-u">
<action name="ToggleShade"/>
</keybind>
<keybind key="W-s">
<action name="ToggleOmnipresent"/>
</keybind>
<keybind key="W-r">
<action name="Resize"/>
</keybind>
<keybind key="W-m">
<action name="Move"/>
</keybind>
<keybind key="A-F4">
<action name="Close"/>
</keybind>
<keybind key="W-q">
<action name="Close"/>
</keybind>
<keybind key="A-space">
<action name="ShowMenu">
<menu>client-menu</menu>
</action>
</keybind>
<!-- Keybindings for window switching -->
<keybind key="A-Tab">
<action name="NextWindow">
<dialog>list</dialog>
<bar>no</bar>
<finalactions>
<action name="Focus"/>
<action name="Raise"/>
<action name="Unshade"/>
</finalactions>
</action>
</keybind>
<keybind key="A-S-Tab">
<action name="PreviousWindow">
<dialog>list</dialog>
<bar>no</bar>
<finalactions>
<action name="Focus"/>
<action name="Raise"/>
<action name="Unshade"/>
</finalactions>
</action>
</keybind>
<keybind key="C-A-Down">
<action name="NextWindow">
<dialog>list</dialog>
<bar>yes</bar>
<raise>yes</raise>
<finalactions>
<action name="Focus"/>
<action name="Raise"/>
<action name="Unshade"/>
</finalactions>
</action>
</keybind>
<keybind key="C-A-Up">
<action name="NextWindow">
<dialog>list</dialog>
<bar>yes</bar>
<raise>yes</raise>
<finalactions>
<action name="Focus"/>
<action name="Raise"/>
<action name="Unshade"/>
</finalactions>
</action>
</keybind>
<!-- Keybindings for window switching with the arrow keys -->
<keybind key="W-A-Right">
<action name="DirectionalCycleWindows">
<direction>right</direction>
<dialog>no</dialog>
</action>
</keybind>
<keybind key="W-A-Left">
<action name="DirectionalCycleWindows">
<direction>left</direction>
<dialog>no</dialog>
</action>
</keybind>
<keybind key="W-A-Up">
<action name="DirectionalCycleWindows">
<direction>up</direction>
<dialog>no</dialog>
</action>
</keybind>
<keybind key="W-A-Down">
<action name="DirectionalCycleWindows">
<direction>down</direction>
<dialog>no</dialog>
</action>
</keybind>
<!-- Keybindings for startmenu -->
<keybind key="W-d">
<action name="Execute">
<command>rofi -modi drun -show drun -line-padding 4 \
-columns 2 -padding 50 -hide-scrollbar -terminal termite \
-show-icons -drun-icon-theme "Arc-X-D" -font "Droid Sans Regular 10"</command>
</action>
</keybind>
<keybind key="W-Tab">
<action name="Execute">
<command>rofi -modi drun -show window -line-padding 4 \
-columns 2 -padding 50 -hide-scrollbar -terminal termite \
-show-icons -drun-icon-theme "Arc-X-D" -font "Droid Sans Regular 10"</command>
</action>
</keybind>
<keybind key="W-space">
<action name="ShowMenu">
<menu>root-menu</menu>
</action>
</keybind>
<!-- Keybindings for running applications -->
<keybind key="W-Return">
<action name="Execute">
<command>xfce4-terminal</command>
</action>
</keybind>
<keybind key="W-w">
<action name="Execute">
<command>firefox</command>
</action>
</keybind>
<keybind key="W-e">
<action name="Execute">
<command>thunar</command>
</action>
</keybind>
<keybind key="W-g">
<action name="Execute">
<command>geany</command>
</action>
</keybind>
<keybind key="W-v">
<action name="Execute">
<command>pavucontrol</command>
</action>
</keybind>
<!-- Take a screenshot, say "Cheeeese!" -->
<keybind key="Print">
<action name="Execute">
<command>scrot ~/Pictures/Screenshot-%Y-%m-%d_%H:%M:%S.png</command>
</action>
</keybind>
<keybind key="W-Print">
<action name="Execute">
<command>~/.config/openbox/scripts/screenshot.sh</command>
</action>
</keybind>
<!-- Multimedia keys-->
<keybind key="XF86AudioStop">
<action name="Execute">
<command>mpc stop</command>
</action>
</keybind>
<keybind key="XF86AudioPlay">
<action name="Execute">
<command>mpc toggle</command>
</action>
</keybind>
<keybind key="XF86AudioPrev">
<action name="Execute">
<command>mpc prev</command>
</action>
</keybind>
<keybind key="XF86AudioNext">
<action name="Execute">
<command>mpc next</command>
</action>
</keybind>
<keybind key="XF86MonBrightnessDown">
<action name="Execute">
<command>~/.config/openbox/scripts/brightness-control down</command>
</action>
</keybind>
<keybind key="XF86MonBrightnessUp">
<action name="Execute">
<command>~/.config/openbox/scripts/brightness-control up</command>
</action>
</keybind>
<keybind key="XF86AudioRaiseVolume">
<action name="Execute">
<command>~/.config/openbox/scripts/volume-control up</command>
</action>
</keybind>
<keybind key="XF86AudioLowerVolume">
<action name="Execute">
<command>~/.config/openbox/scripts/volume-control down</command>
</action>
</keybind>
<keybind key="XF86AudioMute">
<action name="Execute">
<command>~/.config/openbox/scripts/volume-control toggle</command>
</action>
</keybind>
<!-- Reload and Exit keybinds -->
<keybind key="W-S-e">
<action name="Execute">
<command>bash -c ~/.config/rofi/scripts/powermenu.sh</command>
</action>
</keybind>
<keybind key="W-S-r">
<action name="Reconfigure"/>
</keybind>
<keybind key="W-F1">
<action name="Execute">
<command>slock</command>
</action>
</keybind>
</keyboard>
<mouse>
<dragThreshold>1</dragThreshold>
<!-- number of pixels the mouse must move before a drag begins -->
<doubleClickTime>500</doubleClickTime>
<!-- in milliseconds (1000 = 1 second) -->
<screenEdgeWarpTime>0</screenEdgeWarpTime>
<!-- Time before changing desktops when the pointer touches the edge of the
screen while moving a window, in milliseconds (1000 = 1 second).
Set this to 0 to disable warping -->
<screenEdgeWarpMouse>false</screenEdgeWarpMouse>
<!-- Set this to TRUE to move the mouse pointer across the desktop when
switching due to hitting the edge of the screen -->
<context name="Desktop">
<mousebind button="W-Down" action="Click">
<action name="GoToDesktop">
<to>right</to>
<wrap>no</wrap>
</action>
</mousebind>
<mousebind button="W-Up" action="Click">
<action name="GoToDesktop">
<to>left</to>
<wrap>no</wrap>
</action>
</mousebind>
</context>
<context name="Frame">
<mousebind button="W-Down" action="Click">
<action name="GoToDesktop">
<to>right</to>
<wrap>no</wrap>
</action>
</mousebind>
<mousebind button="W-Up" action="Click">
<action name="GoToDesktop">
<to>left</to>
<wrap>no</wrap>
</action>
</mousebind>
</context>
<context name="Frame">
<!--
<mousebind button="W-Left" action="Drag">
<action name="Move"/>
</mousebind>
//-->
<mousebind button="W-Left" action="Drag">
<action name="if">
<maximized>yes</maximized>
<then>
<action name="UnmaximizeFull"/>
<action name="MoveResizeTo">
<x>center</x>
<y>current</y>
</action>
<action name="Move"/>
</then>
<else>
<action name="Move"/>
</else>
</action>
</mousebind>
<mousebind button="W-Right" action="Drag">
<action name="Resize"/>
</mousebind>
</context>
<context name="Titlebar">
<!--
<mousebind button="Left" action="Drag">
<action name="Move"/>
</mousebind>
//-->
<mousebind button="Left" action="Drag">
<action name="if">
<maximized>yes</maximized>
<then>
<action name="UnmaximizeFull"/>
<action name="MoveResizeTo">
<x>center</x>
<y>current</y>
</action>
<action name="Move"/>
</then>
<else>
<action name="Move"/>
</else>
</action>
</mousebind>
<mousebind button="Left" action="DoubleClick">
<action name="ToggleMaximizeFull"/>
</mousebind>
<mousebind button="Up" action="Click">
<action name="if">
<shaded>no</shaded>
<then>
<action name="Shade"/>
</then>
</action>
</mousebind>
<mousebind button="Down" action="Click">
<action name="if">
<shaded>yes</shaded>
<then>
<action name="Unshade"/>
<action name="Raise"/>
</then>
</action>
</mousebind>
</context>
<context name="Titlebar Top Right Bottom Left TLCorner TRCorner BRCorner BLCorner">
<mousebind button="Left" action="Press">
<action name="Focus"/>
<action name="Raise"/>
</mousebind>
<mousebind button="Right" action="Press">
<action name="Focus"/>
<action name="Raise"/>
<action name="ShowMenu">
<menu>client-menu</menu>
</action>
</mousebind>
</context>
<context name="Top">
<mousebind button="Left" action="Drag">
<action name="Resize">
<edge>top</edge>
</action>
</mousebind>
</context>
<context name="Left">
<mousebind button="Left" action="Drag">
<action name="Resize">
<edge>left</edge>
</action>
</mousebind>
</context>
<context name="Right">
<mousebind button="Left" action="Drag">
<action name="Resize">
<edge>right</edge>
</action>
</mousebind>
</context>
<context name="Bottom">
<mousebind button="Left" action="Drag">
<action name="Resize">
<edge>bottom</edge>
</action>
</mousebind>
<mousebind button="Right" action="Press">
<action name="Focus"/>
<action name="Raise"/>
<action name="ShowMenu">
<menu>client-menu</menu>
</action>
</mousebind>
</context>
<context name="TRCorner BRCorner TLCorner BLCorner">
<mousebind button="Left" action="Press">
<action name="Focus"/>
<action name="Raise"/>
<action name="Unshade"/>
</mousebind>
<mousebind button="Left" action="Drag">
<action name="Resize"/>
</mousebind>
</context>
<context name="Client">
<mousebind button="Left" action="Press">
<action name="Focus"/>
<action name="Raise"/>
</mousebind>
<mousebind button="Right" action="Press">
<action name="Focus"/>
<action name="Raise"/>
</mousebind>
</context>
<context name="Icon">
<mousebind button="Left" action="Press">
<action name="Focus"/>
<action name="Raise"/>
<action name="Unshade"/>
<action name="ShowMenu">
<menu>client-menu</menu>
</action>
</mousebind>
<mousebind button="Right" action="Press">
<action name="Focus"/>
<action name="Raise"/>
<action name="ShowMenu">
<menu>client-menu</menu>
</action>
</mousebind>
</context>
<context name="AllDesktops">
<mousebind button="Left" action="Press">
<action name="Focus"/>
<action name="Raise"/>
<action name="Unshade"/>
</mousebind>
<mousebind button="Left" action="Click">
<action name="ToggleOmnipresent"/>
</mousebind>
</context>
<context name="Shade">
<mousebind button="Left" action="Press">
<action name="Focus"/>
<action name="Raise"/>
</mousebind>
<mousebind button="Left" action="Click">
<action name="ToggleShade"/>
</mousebind>
</context>
<context name="Iconify">
<mousebind button="Left" action="Press">
<action name="Focus"/>
<action name="Raise"/>
</mousebind>
<mousebind button="Left" action="Click">
<action name="Iconify"/>
</mousebind>
</context>
<context name="Maximize">
<mousebind button="Left" action="Press">
<action name="Focus"/>
<action name="Raise"/>
<action name="Unshade"/>
</mousebind>
<mousebind button="Left" action="Click">
<action name="ToggleMaximize"/>
</mousebind>
</context>
<context name="Close">
<mousebind button="Left" action="Press">
<action name="Focus"/>
<action name="Raise"/>
<action name="Unshade"/>
</mousebind>
<mousebind button="Left" action="Click">
<action name="Close"/>
</mousebind>
</context>
<context name="Desktop">
<mousebind action="Click" button="Left">
<action name="Focus"/>
</mousebind>
<mousebind action="Click" button="A-Up">
<action name="GoToDesktop">
<to>previous</to>
</action>
</mousebind>
<mousebind action="Click" button="A-Down">
<action name="GoToDesktop">
<to>next</to>
</action>
</mousebind>
<!-- Mouse Middle Scroll to Switch Workspace on Desktop //-->
<mousebind action="Click" button="Up">
<action name="GoToDesktop">
<to>previous</to>
</action>
</mousebind>
<mousebind action="Click" button="Down">
<action name="GoToDesktop">
<to>next</to>
</action>
</mousebind>
</context>
<context name="Root">
<!-- Menus -->
<mousebind button="Right" action="Press">
<action name="ShowMenu">
<menu>root-menu</menu>
</action>
</mousebind>
<mousebind button="Left" action="DoubleClick">
<action name="ShowMenu">
<menu>client-list-combined-menu</menu>
</action>
</mousebind>
<mousebind action="Press" button="Middle">
<action name="ToggleShowDesktop"/>
</mousebind>
</context>
</mouse>
<menu>
<file>menu.xml</file>
<hideDelay>200</hideDelay>
<!-- if a press-release lasts longer than this setting (in milliseconds),
the menu is hidden again -->
<middle>no</middle>
<!-- center submenus vertically about the parent entry -->
<submenuShowDelay>100</submenuShowDelay>
<!-- time to delay before showing a submenu after hovering over the parent entry.
if this is a negative value, then the delay is infinite and the
submenu will not be shown until it is clicked on -->
<submenuHideDelay>400</submenuHideDelay>
<!-- time to delay before hiding a submenu when selecting another entry in parent menu
if this is a negative value, then the delay is infinite and the
submenu will not be hidden until a different submenu is opened -->
<showIcons>Yes</showIcons>
<!-- controls if icons appear in the client-list-(combined-)menu -->
<manageDesktops>yes</manageDesktops>
<!-- show the manage desktops section in the client-list-(combined-)menu -->
</menu>
</openbox_config>
ウィンドウ画面のタイトルバーの設定:
-
(6).「~/.config/tint2/tint2rc」の確認:
パネルの設定:
[mine@vagrant ~]$ cat ~/.config/tint2/tint2rc
#---- Generated by tint2conf 6077 ----
# See https://gitlab.com/o9000/tint2/wikis/Configure for
# full documentation of the configuration options.
#-------------------------------------
# Gradients
# Gradient 1
gradient = vertical
start_color = #000000 80
end_color = #000000 80
color_stop = 70.000000 #1c1c1c 80

#-------------------------------------
# Backgrounds
# Background 1: Active desktop name, Battery, Default task, Panel, Systray, Tooltip
rounded = 0
border_width = 0
border_sides =
border_content_tint_weight = 0
background_content_tint_weight = 0
background_color = #383c4a 100
border_color = #3b1cb2 0
gradient_id = 0
background_color_hover = #553078 80
border_color_hover = #9242da 80
gradient_id_hover = 0
background_color_pressed = #1500ce 80
border_color_pressed = #0004e4 80
gradient_id_pressed = 1

# Background 2: Inactive taskbar, Normal task
rounded = 0
border_width = 2
border_sides = B
border_content_tint_weight = 100
background_content_tint_weight = 25
background_color = #777777 0
border_color = #777777 100
background_color_hover = #464646 100
border_color_hover = #cccccc 30
background_color_pressed = #1e1e1e 100
border_color_pressed = #777777 30

# Background 3: Active task
rounded = 0
border_width = 2
border_sides = B
border_content_tint_weight = 100
background_content_tint_weight = 100
background_color = #ffffff 100
border_color = #d9d9d9 100
background_color_hover = #ffffff 73
border_color_hover = #d9d9d9 100
background_color_pressed = #989898 73
border_color_pressed = #d9d9d9 100

# Background 4: Urgent task
rounded = 0
border_width = 0
border_sides = TBLR
border_content_tint_weight = 0
background_content_tint_weight = 0
background_color = #aa4400 100
border_color = #aa7733 100
background_color_hover = #aa4400 100
border_color_hover = #aa7733 100
background_color_pressed = #aa4400 100
border_color_pressed = #aa7733 100

# Background 5:
rounded = 2
border_width = 1
border_sides = TBLR
border_content_tint_weight = 0
background_content_tint_weight = 0
background_color = #ffffaa 100
border_color = #999999 100
background_color_hover = #ffffaa 100
border_color_hover = #999999 100
background_color_pressed = #ffffaa 100
border_color_pressed = #999999 100

# Background 6: Iconified task
rounded = 0
border_width = 2
border_sides = B
border_content_tint_weight = 0
background_content_tint_weight = 0
background_color = #777777 0
border_color = #777777 0
background_color_hover = #bdbdbd 21
border_color_hover = #cccccc 100
background_color_pressed = #777777 21
border_color_pressed = #777777 100

# Background 7:
rounded = 0
border_width = 2
border_sides = B
border_content_tint_weight = 0
background_content_tint_weight = 0
background_color = #ffffff 21
border_color = #d9d9d9 100
background_color_hover = #ffffff 21
border_color_hover = #d9d9d9 100
background_color_pressed = #a9a9a9 21
border_color_pressed = #d9d9d9 100

# Background 8: Active taskbar, Launcher, Launcher icon
rounded = 0
border_width = 0
border_sides =
border_content_tint_weight = 0
background_content_tint_weight = 0
background_color = #383c4a 100
border_color = #3b1cb2 0
gradient_id = 0
background_color_hover = #503434 0
border_color_hover = #bf3f3f 0
gradient_id_hover = 0
background_color_pressed = #1500ce 80
border_color_pressed = #0004e4 80
gradient_id_pressed = 0

#-------------------------------------
# Panel
panel_items = PFLTSBCP
panel_size = 100% 35
panel_margin = 0 0
panel_padding = 0 0 15
panel_background_id = 1
wm_menu = 1
panel_dock = 1
panel_pivot_struts = 1
panel_position = bottom center horizontal
panel_layer = top
panel_monitor = all
panel_shrink = 0
autohide = 0
autohide_show_timeout = 10
autohide_hide_timeout = 0.5
autohide_height = 1
strut_policy = follow_size
panel_window_name = tint2
disable_transparency = 0
mouse_effects = 1
font_shadow = 0
mouse_hover_icon_asb = 100 0 35
mouse_pressed_icon_asb = 100 10 14
scale_relative_to_dpi = 4
scale_relative_to_screen_height = 1

#-------------------------------------
# Taskbar
taskbar_mode = multi_desktop
taskbar_hide_if_empty = 0
taskbar_padding = 0 0 0
taskbar_background_id = 2
taskbar_active_background_id = 8
taskbar_name = 1
taskbar_hide_inactive_tasks = 0
taskbar_hide_different_monitor = 0
taskbar_hide_different_desktop = 0
taskbar_always_show_all_desktop_tasks = 0
taskbar_name_padding = 4 0
taskbar_name_background_id = 0
taskbar_name_active_background_id = 1
taskbar_name_font = Cantarell 9
taskbar_name_font_color = #dddddd 100
taskbar_name_active_font_color = #ffffff 100
taskbar_distribute_size = 1
taskbar_sort_order = none
task_align = left

#-------------------------------------
# Task
task_text = 1
task_icon = 1
task_centered = 1
urgent_nb_of_blink = 100000
task_maximum_size = 120 35
task_padding = 4 3 4
task_font = Sans 8
task_tooltip = 1
task_thumbnail = 1
task_thumbnail_size = 210
task_font_color = #c6c6c6 100
task_active_font_color = #ffffff 100
task_urgent_font_color = #ffd3d3 100
task_icon_asb = 100 0 5
task_normal_icon_asb = 100 0 -10
task_iconified_icon_asb = 100 0 0
task_background_id = 1
task_normal_background_id = 2
task_active_background_id = 3
task_urgent_background_id = 4
task_iconified_background_id = 6
mouse_left = toggle_iconify
mouse_middle = none
mouse_right = close
mouse_scroll_up = prev_task
mouse_scroll_down = next_task

#-------------------------------------
# System tray (notification area)
systray_padding = 2 0 4
systray_background_id = 1
systray_sort = ascending
systray_icon_size = 22
systray_icon_asb = 100 0 0
systray_monitor = 1
systray_name_filter =

#-------------------------------------
# Launcher
launcher_padding = 4 0 8
launcher_background_id = 8
launcher_icon_background_id = 8
launcher_icon_size = 22
launcher_icon_asb = 100 0 0
launcher_icon_theme_override = 0
startup_notifications = 1
launcher_tooltip = 1
launcher_item_app = firefox.desktop
launcher_item_app = /usr/share/applications/thunar.desktop
launcher_item_app = /usr/share/applications/xed.desktop
launcher_item_app = /usr/share/applications/xfce4-terminal.desktop
launcher_apps_dir = rofi

#-------------------------------------
# Clock
time1_format = %H:%M
time2_format = %a %d %b
time1_font = sans Bold 8
time1_timezone =
time2_timezone =
time2_font = sans 7
clock_font_color = #eeeeee 100
clock_padding = 1 0
clock_background_id = 0
clock_tooltip =
clock_tooltip_timezone =
clock_lclick_command = zenity --calendar --text ""
clock_rclick_command =
clock_mclick_command =
clock_uwheel_command =
clock_dwheel_command =

#-------------------------------------
# Battery
battery_tooltip = 1
battery_low_status = 0
battery_low_cmd =
battery_full_cmd =
bat1_font = sans 8
bat2_font = sans 6
battery_font_color = #eeeeee 100
bat1_format =
bat2_format =
battery_padding = 1 0
battery_background_id = 1
battery_hide = 101
battery_lclick_command =
battery_rclick_command =
battery_mclick_command =
battery_uwheel_command =
battery_dwheel_command =
ac_connected_cmd =
ac_disconnected_cmd =

#-------------------------------------
# Button 1
button = new
button_icon = /usr/share/endeavouros/EndeavourOS-icon.png
button_text =
button_tooltip = Launch jgmenu
button_lclick_command = jgmenu
button_rclick_command = jgmenu
button_mclick_command = jgmenu
button_uwheel_command =
button_dwheel_command =
button_font_color = #000000 100
button_padding = 8 1
button_background_id = 2
button_centered = 0
button_max_icon_size = 0

#-------------------------------------
# Button 2
button = new
button_icon = /usr/share/icons/Qogir/scalable/apps/gnome-logout.svg
button_text =
button_tooltip = Powemenu
button_lclick_command = bash -c ~/.config/rofi/powermenu.sh
button_rclick_command = bash -c ~/.config/rofi/powermenu.sh
button_mclick_command = bash -c ~/.config/rofi/powermenu.sh
button_uwheel_command =
button_dwheel_command =
button_font_color = #000000 100
button_padding = 6 6
button_background_id = 0
button_centered = 0
button_max_icon_size = 0

#-------------------------------------
# Tooltip
tooltip_show_timeout = 0.5
tooltip_hide_timeout = 0.1
tooltip_padding = 2 2
tooltip_background_id = 1
tooltip_font_color = #fffafa 100
tooltip_font = sans 9
-
-
- --- - --- - --- - --- - --- - --- - --- - --- - ----- ----- ----- ----- ----- ----- ----- ----
16. 回避策1:「仮想マシン」で「クリップボードの共有」機能が使えないので「spice-vdagent」を試す:(失敗)
-
「GNOME Boxes」ではこの手順で回避できました:
「spice-vdagent」のデーモンが動作していないのが原因か、確認:
→今回の「クリップボードの共有」機能の回避策としては、失敗
-
参考:
Boxes の「クリップボードの共有」機能を「一時的に」使えるように設定:
-
1). 「spice-vdagent」をインストール:
$ sudo pacman -S spice-vdagent
→「-S」は大文字です
Package (1)          New Version  Net Change  Download Size
extra/spice-vdagent  0.22.1-3       0.14 MiB       0.05 MiB
-
2). ホストOS まで再起動:
[mine@vagrant ~]$ exit
logout
[vagrant@vagrant ~]
[vagrant@vagrant ~]$ exit
logout
ubn@ubn-box:~/ダウンロード/vm/endeavour-base-jp$
ubn@ubn-box:~/ダウンロード/vm/endeavour-base-jp$ vagrant halt
==> default: Attempting graceful shutdown of VM...
-
ホストOS で、端末以外のすべてのウィンドウを閉じてから、
ubn@ubn-box:~/ダウンロード/vm/endeavour-base-jp$ reboot
-
3). ホストOS の端末にて、「仮想マシン」を起動:
$ cd ~/ダウンロード/vm/endeavour-base-jp/
$ vagrant up
-
4). ホストOS の端末にて「ssh 接続」後に、作成した「mine」ユーザに変更:
$ cd ~/ダウンロード/vm/endeavour-base-jp/
$ vagrant ssh
-
[vagrant@vagrant ~]$ su - mine
Password:          ←(mine ユーザを作成したときのパスワード)
[mine@vagrant ~]$
→プロンプトが変わりました
-
5). 「spice-vdagentd」デーモンの起動:
[mine@vagrant ~]$ spice-vdagent
[mine@vagrant ~]$
→「spice-vdagent」はデーモンを起動するトリガーのコマンドです。
手動でデーモンを起動したので、ログアウトしない限り、「クリップボードの共有」機能が有効のはずです。
-
6). GUI の「ログイン」画面にて、「mine」を選んで、パスワード入力:
→デスクトップ画面が表示
-
7). Windows+Enter で「端末」を起動:
→「クリップボードの共有」機能が(一時的に)有効になるはずでしたが、貼付けできませんでした。
もし、成功なら、自動起動ファイルに定義すれば解決できたのに、残念。
-
似たような「仮想環境」ですが、「GNOME Boxes」と「VirtualBox 」では仕組みが異なるようです:
-
8). 参考: 以前、CD イメージからインストールした「EndeavourOS」(OpenBox) では「クリップボードの共有」機能は有効です:
[ubn@ubn-box ~]$ ls -1Ap
.Xauthority
.bash_history
.bash_logout
.bash_profile
.bashrc
.cache/
.config/
.dmrc
.fehbg
.gtkrc-2.0
.local/
.mozilla/
.themes/
.vboxclient-clipboard-tty7-control.pid     ←(注目)
.vboxclient-clipboard-tty7-service.pid     ←(注目)
.vboxclient-draganddrop-tty7-control.pid   ←(注目)
.vboxclient-draganddrop-tty7-service.pid   ←(注目)
.vboxclient-hostversion-tty7-control.pid   ←(注目)
.vboxclient-seamless-tty7-control.pid      ←(注目)
.vboxclient-seamless-tty7-service.pid      ←(注目)
.xdg_menu_cache/
.xprofile
.xsession-errors
.xsession-errors.old
LANG-select-run.sh
LANG-select.dat
LANG-select.sh
LANG-select01.sh
xed.dconf
ダウンロード/
テンプレート/
デスクトップ/
ドキュメント/
ビデオ/
音楽/
画像/
公開/
→注目: 「クリップボードの共有」機能がうまく動いている場合は、これらのファイルが作られます:
これを見ると、Virtualbox の「GuestAdditions」の機能であることがわかります。
「GuestAdditions」の再インストールが必要かも。
-
-
- --- - --- - --- - --- - --- - --- - --- - --- - ----- ----- ----- ----- ----- ----- ----- -----
16-2. 回避策2:「仮想マシン」にて「GuestAdditions」を再インストール:
-
今回の「クリップボードの共有」機能の回避策としては、失敗
-
1). 「仮想マシン」を立ち上げ:
$ cd ~/ダウンロード/vm/endeavour-base-jp/
$ vagrant up
-
2). ホストOS の端末にて「ssh 接続」後に、作成した「mine」ユーザに変更:
$ cd ~/ダウンロード/vm/endeavour-base-jp/
$ vagrant ssh
-
[vagrant@vagrant ~]$ su - mine
Password:          ←(mine ユーザを作成したときのパスワード)
[mine@vagrant ~]$
→プロンプトが変わりました
-
3). システム更新:
[mine@vagrant ~]$ paru
:: Synchronizing package databases...
 endeavouros is up to date
 core is up to date
 extra is up to date
 multilib is up to date
:: Starting full system upgrade...
 there is nothing to do
:: Looking for PKGBUILD upgrades...
:: Looking for AUR upgrades...
:: Looking for devel upgrades...
 there is nothing to do
-
4). 再起動:
[mine@vagrant ~]$ sudo reboot
-
5). ホストOS の端末にて「ssh 接続」後に、作成した「mine」ユーザに変更:
$ cd ~/ダウンロード/vm/endeavour-base-jp/
$ vagrant ssh
-
[vagrant@vagrant ~]$ su - mine
Password:          ←(mine ユーザを作成したときのパスワード)
[mine@vagrant ~]$
→プロンプトが変わりました
-
6). カーネルバージョンの確認:
[mine@vagrant ~]$ uname -r
6.7.2-arch1-2
-
7). カーネルヘッダーのインストールを確認:
[mine@vagrant ~]$ pacman -Ss linux-headers
core/linux-headers 6.7.2.arch1-2 [installed]
    Headers and scripts for building modules for the Linux kernel
→カーネルとバージョンが合っていることを確認
-
8). 必要なツールの再インストール:
「EndeavourOS」の場合:
[mine@vagrant ~]$ sudo pacman -S dkms gcc make perl
Package (4)  Old Version  New Version  Net Change
extra/dkms   3.0.12-1     3.0.12-1       0.00 MiB
core/gcc     13.2.1-4     13.2.1-4       0.00 MiB
core/make    4.4.1-2      4.4.1-2        0.00 MiB
core/perl    5.38.1-1     5.38.1-1       0.00 MiB
-
追加で確認:
[mine@vagrant ~]$ pacman -Ss bzip2
core/bzip2 1.0.8-5 [installed]
    A high-quality data compression program
-
9). 「仮想マシン」のログイン画面で、「mine」ユーザを選んで、パスワード入力:
GUI でログインすると、日本語化されました:
-
10). 「仮想マシン」の画面にて操作:
-
(1). 「Devices」 →「Insert Guest Additions Upgrade CD Image ...」をクリック
-
(2). Windows+N にて、「ファイルマネージャ」を起動:
左側のデバイス「VBox_GAs7.0....」をクリック
→「/run/media/mine/VBox_GAs7.0.10/」がマウントされて開きます:
-
(3). 「ファイルマネージャ」の空きで右クリック→「Open Treminal Here」
-
(4). スクリプトの確認:
[mine@vagrant VBox_GAs7.0.10]$ ls -1 *.run
VBoxLinuxAdditions.run
-
(5). スクリプトの実行:
上記にてファイル名だけ、マウスでクリックしてから、中央ボタンで貼付けできます:
[mine@vagrant VBox_GAs7.0.10]$ sudo ./VBoxLinuxAdditions.run install
[sudo] mine のパスワード:
(6). FATAL メッセージがなく、プロンプトに戻ったら完了:
[mine@vagrant VBox_GAs7.0.10]$
-
(7). Windows+Q で「端末」を閉じます:
-
参考:
スクリプトの実行を「sudo ./VBoxLinuxAdditions.run」でなく、
「sudo ./VBoxLinuxAdditions.run install」にしてみましたが、結果は同じでした:
-
スクリプト実行時のログは、「/var/log/vboxadd-setup.log」に登録されるみたい。
-
(8). 「ファイルマネージャ」の左側のデバイス「VBox_GAs7.0....」のイジェクトボタンをクリック
→ [光学ドライブ]に挿入した「Guest Additions のCD イメージ(.iso)」を取り外し:
-
(9). Windows+Q で「ファイルマネージャ」を閉じます:
-
11). 「ssh 接続」を終了:
「ssh 接続」の端末にて、
[mine@vagrant ~]$ exit
[vagrant@vagrant ~]$ exit
-
12). 電源オフ:
ubn@ubn-box:~/ダウンロード/vm/endeavour-base-jp$ vagrant halt
-
13). ホストOS を再起動:
「端末」以外のウィンドウを閉じてから、
ubn@ubn-box:~/ダウンロード/vm/endeavour-base-jp$ reboot
-
14). 「仮想マシン」を立ち上げ:
$ cd ~/ダウンロード/vm/endeavour-base-jp/
$ vagrant up
-
15). 「仮想マシン」のログイン画面で、「mine」ユーザを選んで、パスワード入力:
GUI でログインすると、日本語化されました:
-
16). 問題点: 「クリップボードの共有」機能が有効になりません:
もしかしたら、下記の影響かも。
-
17). 問題点: ログインしてデスクトップが表示された時に、下記の通知が右下隅に一瞬表示されます:
VBoxClient: the VirtualBox kernel service is not running. Exiting.
和訳:
VBoxClient: VirtualBox カーネル サービスが実行されていません。終了中。
-
考えられる原因:
Guest Additions のインストールに失敗した
必要なパッケージが不足している
インストール後、Kernel を update した
前のバージョンの VirtualBox のサービス起動スクリプト等が残っている(完全削除 purge が必要)
-
18). 今のところ、回避策は見つかりません:
「共有フォルダ」は有効なので、それを使うか、ブラウザ経由、ネット経由も使えます。
もしくは、「ssh 接続」であればクリップボード経由が使えます。
-
以前の「EndeavourOS」(OpenBox) であれば「共有フォルダ」は有効なので、設定の違いや、アプリの不足とか、どこかに違いがあるはずですが、わかりません。
「EndeavourOS」(xfce) をインストール後に、「OpenBox」を追加するのが、一番確実かも。 でも、それだと「xfce」を使えばいいとなりそう。
-
どちらにしても「仮想マシン」でなく、「実機」へのインストールであれば関係ありません。
-
19). スクリプト実行後のログを確認:
[mine@vagrant ~]$ cat /var/log/vboxadd-setup.log
Building the main Guest Additions 7.0.10 module for kernel 6.7.2-arch1-2.
Building the shared folder support module.
: (省略)
      |
/tmp/vbox.0/utils.c:747:9: error: too few arguments to function ‘generic_fillattr’
  747 |         generic_fillattr(idmap, dentry->d_inode, kstat);
      |         ^~~~~~~~~~~~~~~~
./include/linux/fs.h:3085:6: note: declared here
 3085 | void generic_fillattr(struct mnt_idmap *, u32, struct inode *, struct kstat *);
      |      ^~~~~~~~~~~~~~~~
cc1: some warnings being treated as errors
make[2]: *** [scripts/Makefile.build:243: /tmp/vbox.0/utils.o] Error 1
make[2]: *** Waiting for unfinished jobs....
make[1]: *** [Makefile:1911: /tmp/vbox.0] Error 2
make: *** [/tmp/vbox.0/Makefile-footer.gmk:133: vboxsf] Error 2
kernel modules and services were not reloaded
→カーネルモジュールとサービスはリロードされていません:
「utils.c」ファイルに注目
-
-
20). 追記: Linux 起動時のエラーの確認:
-
(1). カーネルによる初期化処理までなら、「dmesg」コマンドで確認:
$ sudo dmesg | less
または、
$ sudo dmesg > boot-msg.txt
→テキストエディタで確認:
$ nano boot-msg.txt
→Ctrl+X で表示を終了
-
(2). カーネルによる初期化処理が終了した後は、「/var/log/」にあるファイルを確認:
本日の日付で抜粋:
[mine@vagrant ~]$ ls -l /var/log/ | grep "2月 4"
-rw-rw-r--  1 root utmp        292292  2月  4 19:02 lastlog
drwx--x--x  2 root lightdm       4096  2月  4 19:02 lightdm
-rw-r--r--  1 root root         18426  2月  4 19:02 vboxadd-setup.log
-rw-rw-r--  1 root utmp        113280  2月  4 19:02 wtmp
-rw-r--r--  1 root root         27581  2月  4 19:02 Xorg.0.log
-
表示関連のログ:
$ sudo cat /var/log/Xorg.0.log | less
→「q」で表示を終了
-
Guest Additions 関連のログ:
$ sudo cat /var/log/vboxadd-setup.log | less
:
cc1: some warnings being treated as errors
make[2]: *** [scripts/Makefile.build:243: /tmp/vbox.0/utils.o] Error 1
make[2]: *** Waiting for unfinished jobs....
make[1]: *** [Makefile:1911: /tmp/vbox.0] Error 2
make: *** [/tmp/vbox.0/Makefile-footer.gmk:133: vboxsf] Error 2
kernel modules and services were not reloaded
(END)
→「スペース」で改ページ
→「q」で表示を終了
-
-
21). 次回の投稿では、ホストOS 側の「virtualbox」と「vagrant」のバージョンを最新に上げてみる予定:
- 「virtualbox」:「7.0.10」 →「7.0.14」
- 「vagrant」 :「2.4.0」→「2.4.1」
-
2024-02-04 現在:
ゲストOS 側のバージョンを確認:
[mine@vagrant ~]$ pacman -Ss virtualbox | grep install
core/linux 6.7.2.arch1-2 [installed]
extra/virtualbox-guest-utils 7.0.14-2 [installed]    ←(バージョンに注目)
-
[mine@vagrant ~]$ pacman -Ss linux-headers | grep install
core/linux-headers 6.7.2.arch1-2 [installed]
-
ホストOS 側のバージョンを確認:
$ apt list virtualbox* | grep 済
virtualbox-7.0/now 7.0.10-158379~Ubuntu~jammy amd64 [インストール済み、ローカル]
→ゲストOS 側のバージョンが先行しています。
ホストOS 側の「virtualbox」のバージョンを「7.0.14」に上げて、双方のバージョンを合わせた方が良さそう。
-
ちなみに、「ssh 接続」時に、vagrant のバージョンアップの通知が来ています:
$ vagrant ssh
==> vagrant: A new version of Vagrant is available: 2.4.1 (installed version: 2.4.0)!
==> vagrant: To upgrade visit: https://www.vagrantup.com/downloads.html

Last login: Tue Jan 30 17:55:23 2024 from xx.xx.xx.xx
[vagrant@vagrant ~]$
→いつも表示されるわけでなく、時々表示されます
-
-
- --- - --- - --- - --- - --- - --- - --- - --- - ----- ----- ----- ----- ----- ----- ----- ----- -
16-3. 追記: 「仮想マシン」にて、ログイン時の「エラー通知」の解消、および、「クリップボード共有」機能が改善:
-
詳細は、下記を参照:
「Xubuntu 22.04 LTS」で、「VirtualBox 7.0.14」と「Vagrant 2.4.1」にアップデート〈H170-7〉
-
抜粋:
-
-
まとめ
今回は、前回作成した「Box」(Endeav-base-jp) から作成した「仮想マシン」に、コミュニティ版の「OpenBox」を追加でインストールしました。
-
普段あまりやらない、デスクトップ環境の追加作業につき、何度かやり直しました。
Vagrant だと、「ssh 接続」でクリップボード経由の貼付けができることと、ホスト側の「端末」が使えるので文字化けしないこと、やり直したいときに簡単に初期状態に戻せることが便利でした。
-
GUI がなかったり、「クリップボードの共有」ができない「Linux ディストリビューション」、例えば、Arch Linux 等のインストール時の設定のときに、公式の「Box」を利用するか、インストール直後に「ssh 接続」の設定を行って「Box」を作成すれば、作業効率がアップ しそうです。
-
-
-
-
-
目次
-
-
- 目次
- - --- - --- - --- - --- - --- - --- - --- - --- - -
- Vagrant で「EndeavourOS」の「仮想マシン」を立ち上げ:
- - --- - --- - --- - --- - --- - --- - --- - --- - --
- 「VirtualBox」について:
- - --- - --- - --- - --- - --- - --- - --- - --- - ---
- 「Vagrant」 (ベイグラント) について:
- - --- - --- - --- - --- - --- - --- - --- - --- - ----
- 「EndeavorOS」について:
- - --- - --- - --- - --- - --- - --- - --- - --- - -----
- 「EndeavourOS」(OpenBox) について:
- - --- - --- - --- - --- - --- - --- - --- - --- - ----- -
- (前回の作業):
- - --- - --- - --- - --- - --- - --- - --- - --- - ----- --
- 1. ホームの「Box」一覧にて、目的の「Box」を確認:
- - --- - --- - --- - --- - --- - --- - --- - --- - ----- ---
- 2. 「Vagrantfile」の修正:
- - --- - --- - --- - --- - --- - --- - --- - --- - ----- ----
- 3. 「仮想マシン」を作成して立ち上げ:
- - --- - --- - --- - --- - --- - --- - --- - --- - ----- -----
- 4. 「仮想マシン」に「ssh 接続」:
- - --- - --- - --- - --- - --- - --- - --- - --- - ----- ----- -
- 5. 「仮想マシン」にて、GUI のみで使うユーザ「mine」を作成
- - --- - --- - --- - --- - --- - --- - --- - --- - ----- ----- --
- 6. 「仮想マシン」に「Openbox」をインストール:
- - --- - --- - --- - --- - --- - --- - --- - --- - ----- ----- ---
- 6-1. 「仮想マシン」の「mine」のホームに、「Openbox」をダウンロード(クローンの作成):
- - --- - --- - --- - --- - --- - --- - --- - --- - ----- ----- ----
- 6-2. 「セットアップ用のスクリプト」を確認:
- - --- - --- - --- - --- - --- - --- - --- - --- - ----- ----- -----
- 6-3. インストールを行うアプリの一覧を確認:
- - --- - --- - --- - --- - --- - --- - --- - --- - ----- ----- ----- -
- 6-4. 「セットアップ用のスクリプト」を実行:
- - --- - --- - --- - --- - --- - --- - --- - --- - ----- ----- ----- --
- 6-5. 「仮想マシン」の立ち上げ:
- - --- - --- - --- - --- - --- - --- - --- - --- - ----- ----- ----- ---
- 6-6. 参考: インストール用のスクリプトがすべて実行されたか、確認:
- 1). ホストOS の端末にて「ssh 接続」後に、作成した「mine」ユーザに変更:
- 1). フォルダが追加されたか確認:
- 2). 「~/.config」の確認:
- 3). 「chmod -R +x ~/.config/openbox/scripts」の確認:
- 4). 「chmod +x ~/.config/rofi/powermenu.sh」の確認:
- 5). アプリがインストールされているか確認:
- 6). スクリプトの最終行が実行されて、設定が反映されているか確認:
- 7). 「~/Downloads/openbox/xed.dconf」の確認:
- 8). デスクトップで起動しないと、「ssh 接続」では、アプリは起動できません:
- 9). 仮想マシンのデスクトップで「端末」を起動:
- - --- - --- - --- - --- - --- - --- - --- - --- - ----- ----- ----- ----
- 7. 任意: 「AUR ヘルパー」をメッセージ表示が自然な「paru」に変更:
- - --- - --- - --- - --- - --- - --- - --- - --- - ----- ----- ----- -----
- 7-1. 「paru」のインストール:
- - --- - --- - --- - --- - --- - --- - --- - --- - ----- ----- ----- ----- -
- 7-2. 「paru」で、システム更新:
- - --- - --- - --- - --- - --- - --- - --- - --- - ----- ----- ----- ----- --
- 7-3. 「Welcome」アプリで「paru」を使うように修正:
- - --- - --- - --- - --- - --- - --- - --- - --- - ----- ----- ----- ----- ---
- 8. 任意: テキストエディタの「featherpad」をインストール:
- - --- - --- - --- - --- - --- - --- - --- - --- - ----- ----- ----- ----- ----
- 9. 任意: ESR 版の「Firefox」をインストール:
- 1). 「仮想マシン」を立ち上げ:
- 2). ログイン画面で、「mine」ユーザにログイン:
- 3). ブラウザにて、「Firefox ESR」をダウンロード:
- 4). ホストOS の端末にて「ssh 接続」後に、作成した「mine」ユーザに変更:
- 5). ダウンロードしたファイルを展開:
- 6). 展開した Firefox フォルダを「/opt」に移動:
- 7). Firefox の実行ファイルへのシンボリックリンクを作成:
- 8). 「firefox」のデスクトップファイルを置くフォルダを作成:
- 9). 「firefox」の「デスクトップファイル」を作成:
- 10). 問題点: ESR 版の firefox をインストールしても、起動しません:
- 11). ログイン画面で、「mine」ユーザにログイン:
- 12). Ctrl+Enter にて、「端末」を起動:
- 13). 問題点: アプリメニューやパネルのアイコンをクリックすると、以前の「firefox」が起動します:
- 14). 参考: 以前の「Firefox」を削除:
- 15). 問題点: 以前の「Firefox」アプリを削除すると、パネルの「Firefox」のアイコンが表示されません:
- - --- - --- - --- - --- - --- - --- - --- - --- - ----- ----- ----- ----- -----
- 10. デスクトップ周りの設定:
- - --- - --- - --- - --- - --- - --- - --- - --- - ----- ----- ----- ----- ----- -
- 10-1. 問題点:「仮想マシン」の起動で、パネルのアイコンが重複するので対応:
- - --- - --- - --- - --- - --- - --- - --- - --- - ----- ----- ----- ----- ----- --
- 10-2. 「端末」で表示されるディレクトリの色が「暗い紺色」で見づらいので対応:
- - --- - --- - --- - --- - --- - --- - --- - --- - ----- ----- ----- ----- ----- ---
- 10-3. パネルの時計の表示を変更:
- - --- - --- - --- - --- - --- - --- - --- - --- - ----- ----- ----- ----- ----- ----
- 10-4. 任意: パネルで、アクティブな「ディスクトップの番号」を見やすいようにカラー化:
- - --- - --- - --- - --- - --- - --- - --- - --- - ----- ----- ----- ----- ----- -----
- 10-5. 「スクリーンショット」が使えるか確認:
- - --- - --- - --- - --- - --- - --- - --- - --- - ----- ----- ----- ----- ----- ----- -
- 10-6. 「ショートカットキー」の割当を「i3-wm」と同じキーに変更:
- - --- - --- - --- - --- - --- - --- - --- - --- - ----- ----- ----- ----- ----- ----- --
- 11. 任意: 個人的によく使う「フォント」や「アプリ」をインストール:
- - --- - --- - --- - --- - --- - --- - --- - --- - ----- ----- ----- ----- ----- ----- ---
- 12. 参考: デスクトップの日本語化:
- - --- - --- - --- - --- - --- - --- - --- - --- - ----- ----- ----- ----- ----- ----- ----
- 13. 参考: 日本語入力:
- - --- - --- - --- - --- - --- - --- - --- - --- - ----- ----- ----- ----- ----- ----- -----
- 13-a. 日本語入力に、「ibus-anthy」を使う場合:
- - --- - --- - --- - --- - --- - --- - --- - --- - ----- ----- ----- ----- ----- ----- ----- -
- 13-b. 日本語入力に、「ibus-mozc」を使う場合:
- 「EndeavourOS」だと「公式リポジトリ」でなく、「AUR リポジトリ」で提供されています:
- 「ibus-mozc」のインストールは、
- 1). メッセージの日本語化:
- 2). 応答を省略してインストール:
- 3). 途中のパスワード入力を見逃した場合:
- 4). 設定ファイルの作成:
- 5). 再起動:
- 6). 「仮想マシン」のログイン画面で、「mine」ユーザを選んで、パスワード入力:
- 7). 「ibus-mozc」の設定:
- 7-1). パネルのキーボードアイコン「JA」をクリックすると、ゴミが表示されるので修正:
- 7-2). 任意:「Windows+スペース」では面倒なので、「半角/全角」キーに割当てを変更:
- 7-3). 任意:「日本語 キーボード」の個別のキーに割当てを定義:
- 8). システム更新から「ibus-mozc」を除外:
- 9). システム更新から除外している「ibus-mozc」を、3ヶ月ぶりに手動で更新:
- - --- - --- - --- - --- - --- - --- - --- - --- - ----- ----- ----- ----- ----- ----- ----- --
- 14. 任意:「Welcome」画面に、「個人用コマンド」(Personal Commands) タブを追加:
- - --- - --- - --- - --- - --- - --- - --- - --- - ----- ----- ----- ----- ----- ----- ----- ---
- 15. 参考: 「Openbox」のファイルの構成を確認:
- - --- - --- - --- - --- - --- - --- - --- - --- - ----- ----- ----- ----- ----- ----- ----- ----
- 16. 回避策1:「仮想マシン」で「クリップボードの共有」機能が使えないので「spice-vdagent」を試す:(失敗)
- - --- - --- - --- - --- - --- - --- - --- - --- - ----- ----- ----- ----- ----- ----- ----- -----
- 16-2. 回避策2:「仮想マシン」にて「GuestAdditions」を再インストール:
- 1). 「仮想マシン」を立ち上げ:
- 2). ホストOS の端末にて「ssh 接続」後に、作成した「mine」ユーザに変更:
- 3). システム更新:
- 4). 再起動:
- 5). ホストOS の端末にて「ssh 接続」後に、作成した「mine」ユーザに変更:
- 6). カーネルバージョンの確認:
- 7). カーネルヘッダーのインストールを確認:
- 8). 必要なツールの再インストール:
- 9). 「仮想マシン」のログイン画面で、「mine」ユーザを選んで、パスワード入力:
- 10). 「仮想マシン」の画面にて操作:
- (1). 「Devices」 →「Insert Guest Additions Upgrade CD Image ...」をクリック
- (2). Windows+N にて、「ファイルマネージャ」を起動:
- (3). 「ファイルマネージャ」の空きで右クリック→「Open Treminal Here」
- (4). スクリプトの確認:
- (5). スクリプトの実行:
- (6). FATAL メッセージがなく、プロンプトに戻ったら完了:
- (7). Windows+Q で「端末」を閉じます:
- (8). 「ファイルマネージャ」の左側のデバイス「VBox_GAs7.0....」のイジェクトボタンをクリック
- (9). Windows+Q で「ファイルマネージャ」を閉じます:
- 11). 「ssh 接続」を終了:
- 12). 電源オフ:
- 13). ホストOS を再起動:
- 14). 「仮想マシン」を立ち上げ:
- 15). 「仮想マシン」のログイン画面で、「mine」ユーザを選んで、パスワード入力:
- 16). 問題点: 「クリップボードの共有」機能が有効になりません:
- 17). 問題点: ログインしてデスクトップが表示された時に、下記の通知が右下隅に一瞬表示されます:
- 18). 今のところ、回避策は見つかりません:
- 19). スクリプト実行後のログを確認:
- 20). 追記: Linux 起動時のエラーの確認:
- 21). 次回の投稿では、ホストOS 側の「virtualbox」と「vagrant」のバージョンを最新に上げてみる予定:
- - --- - --- - --- - --- - --- - --- - --- - --- - ----- ----- ----- ----- ----- ----- ----- ----- -
- 16-3. 追記: 「仮想マシン」にて、ログイン時の「エラー通知」の解消、および、「クリップボード共有」機能が改善:
- まとめ
- -
-
-
-