登録日: 2022-01-09 更新日: 2022-03-09
「Xubuntu 20.04.4 LTS」をホストOS にした「VirtualBox」に、公開はまだの「Ubuntu 22.04 LTS」のDaily 版(日々更新版)をインストールしました。
-
その環境で、「Meson を使ったビルド」の勉強に、gnome の次のテキストエディタの候補で開発中の「gnome-text-editor」を(途中まで)ビルドしてみました。その備忘録です。
-
すぐに試したいときは 「flatpak」でインストール できます。
-
-
ホストOS : Xubuntu 20.04.4 LTS
ゲストOS : Ubuntu 22.04 LTS ←(今回の作業)
-
-
使用したPC は「ASUS Chromebox CN60 」で、 プロセッサは第4世代の「Intel Celeron 2955U 」です。UEFI 立ち上げです。
-
(注)リンクを戻るときはブラウザの左上の「←」をクリック
-
-
目次
-
以前の作業:
ホストOS に「VirtualBox をインストール」
-
今回の作業:
「gnome-text-editor を flatpak でインストール:」
-
-
-
--- - --- - --- - --- - --- - --- - --- - --- - --- - --- - --- - --- - --- - --- - -
「Ubuntu 22.04 LTS」の画面:
-
デスクトップは使いやすいようにカスタマイズ:

→ドックのアイコンを小さくして、右に移動したぐらい。 デフォルトの壁紙も悪くありません。
-
flatpak 版の「gnome-text-editor」を起動したところ:
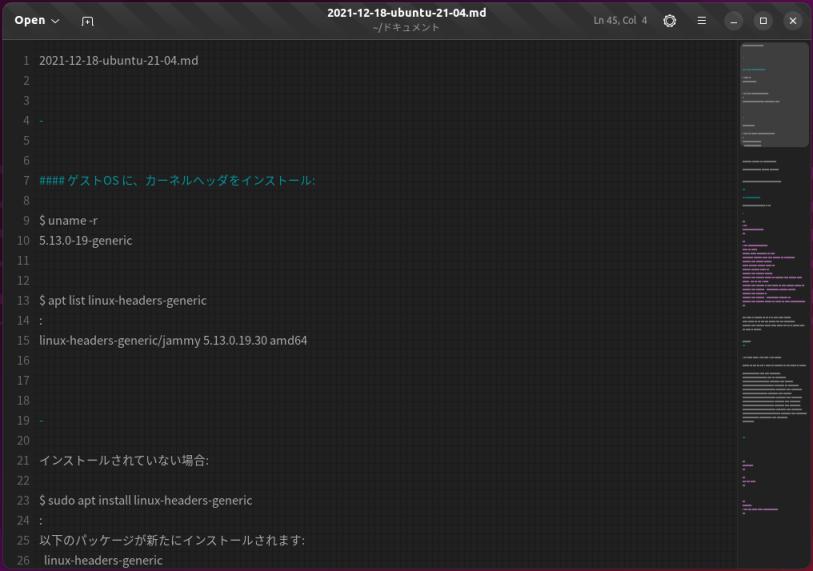
→テーマをダーク系に変更して、背景に格子を入れ、赤い下線がうるさいのでスペルチェックをなしに設定しています。gedit では廃止された右側のミニマップが復活しました。タイトルバーに薄いストライプが入っていてクール。
メニューはまだ、日本語化されていません。また、(メンテを難しくしていた)プラグインの機能は実装されていないみたい。時刻の挿入の機能は欲しいところ。
-
-
--- - --- - --- - --- - --- - --- - --- - --- - --- - --- - --- - --- - --- - --- - --
「Ubuntu 22.04 LTS」について
-
リリース:
$ cat /etc/lsb-release
DISTRIB_ID=Ubuntu
DISTRIB_RELEASE=22.04
DISTRIB_CODENAME=jammy
DISTRIB_DESCRIPTION="Ubuntu Jammy Jellyfish (development branch)"
→「Alpha 版」ですが、内部エラーも少なく安定しています。
-
現在のバージョンを表示:
2022-01-20 現在
カーネル:
$ uname -r
5.15.0-17-generic
-
-
--- - --- - --- - --- - --- - --- - --- - --- - --- - --- - --- - --- - --- - --- - ---
Meson について
-
参考:
-
抜粋:
GNOME 系のソフトウェア(つまり、Fedora)を中心に、「Meson」というビルドシステムの利用が広がっています。 シェルを呼び出さず、チェックやビルド設定の処理は高速で、短時間で終了します。 プログラム開発において、ビルドのたびに待たされる時間が短縮できるのが大きな利点です。
-
CMake の代わりに「Meson」を使い、Make の代わりに「Ninja」を使うと考えればわかりやすいかも。なので既存からの移行がしやすいシステムだと思います。
-
Meson は、ビルドを自動化するためのソフトウェアで、Python で書かれています。 Meson の目標は、プログラマの生産性を向上させることです。
Meson を用いているプロジェクトはソースツリーに「meson.build」ファイルを置いています。サブディレクトリの処理にも対応しているため、開発者はこの名前のファイルを複数記述することになります。サブディレクトリの記述はどちらかというと、そのフォルダのファイル構造の定義になるみたい。
-
Meson は直接ソフトウェアをビルドせずに、コンパイルの前準備を扱う処理を行います。 Linux では低レベルなビルドシステム(Meson ではNinja 用)のビルド用の定義ファイルを生成する点で、 CMake、autotools (+automake)、などに似ていますし、依存パッケージが足りないときの一覧の表示も似ています。
-
Meson によってNinja のビルドファイルが生成され、それをNinja で使って実際のビルドを行います。 Ninja はMake の代わりになるもので、より高速です。
-
Meson では、ビルドによって生成されたものの全ては、ビルド用のディレクトリにだけ出力されます。 そのフォルダにはNinja 用のビルドファイルも生成されるわけで、(Meson の初期のバージョンなら)そのフォルダに移動して、Ninja でビルドすることになります。
-
Meson の設定ファイル (meson.build) はPython に似た構文です。
Meson の設定ファイルは強い型付けがあり、リスト型は空白で文字列を分割することはありません。 従って、ファイル名やコマンドライン引数に空白やその他の文字が含まれていても適切に処理されます。
-
Meson は Python で書かれているので、pip でもインストールできます。 ただし、管理者権限でNinja を使いたい(システムにアプリを配置したい)ときは、apt でインストールする方がパスとかの設定をしなくてすむので楽です。
pip でインストールするときは、必ず Python 3 バージョンのpip を使うことになります。
-
-
--- - --- - --- - --- - --- - --- - --- - --- - --- - --- - --- - --- - --- - --- - ----
1. 開発ツールのインストール
-
プロジェクト(プログラム開発の単位)を「Meson を使ってビルド」して開発する環境を整えました。
-
参考:
-
-
開発ツールのインストール
$ sudo apt install build-essential
:
以下のパッケージが新たにインストールされます:
  build-essential dpkg-dev fakeroot g++ g++-11 libalgorithm-diff-perl libalgorithm-diff-xs-perl
  libalgorithm-merge-perl libdpkg-perl libfakeroot libfile-fcntllock-perl libstdc++-11-dev lto-disabled-list
-
-
--- - --- - --- - --- - --- - --- - --- - --- - --- - --- - --- - --- - --- - --- - -----
2. Meson をpip でインストールする場合:
-
管理者権限でMeson と ninja のコマンドを使いたいときは、項番3. のapt でインストールした方が楽です。 項番2. (pip) と項番3. (apt) の両方を実施した場合は、今回のやり方だとパスの並び順で項番3. の方が優先されます。
-
1). python の確認:
$ python3
Python 3.9.9 (main, Dec 16 2021, 23:13:29)
[GCC 11.2.0] on linux
Type "help", "copyright", "credits" or "license" for more information.
>>>
→Ctrl+D で終了
$ pip3 --version
コマンド 'pip3' が見つかりません。次の方法でインストールできます:
sudo apt install python3-pip
-
2). pip のインストール:
$ sudo apt install python3-pip
:
以下のパッケージが新たにインストールされます:
  javascript-common libexpat1-dev libjs-jquery libjs-sphinxdoc libjs-underscore libpython3-dev libpython3.9-dev
  python-pip-whl python3-dev python3-distutils python3-pip python3-setuptools python3-wheel python3.9-dev
  zlib1g-dev
-
3). meson のインストール:
$ pip3 install meson

WARNING: Keyring is skipped due to an exception: Failed to open keyring: org.freedesktop.DBus.Error.NoReply: Did not receive a reply. Possible causes include: the remote application did not send a reply, the message bus security policy blocked the reply, the reply timeout expired, or the network connection was broken..
Collecting meson
  Downloading meson-0.60.3-py3-none-any.whl (838 kB)
     |████████████████████████████████| 838 kB 1.4 MB/s
Installing collected packages: meson
  WARNING: The script meson is installed in '/home/ubn/.local/bin' which is not on PATH.
  Consider adding this directory to PATH or, if you prefer to suppress this warning, use --no-warn-script-location.
Successfully installed meson-0.60.3
-
「KDE ウォレットシステム」画面表示:
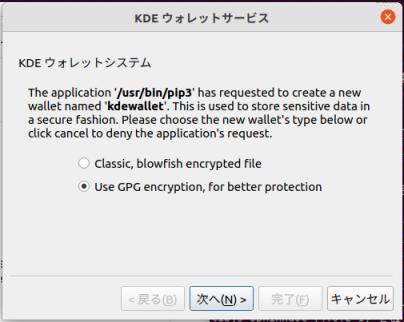
→classic を選んでからキャンセルしました。
-
4). ninja のインストール:
$ pip3 install ninja

WARNING: Keyring is skipped due to an exception: Failed to unlock the keyring!
Collecting ninja
  Downloading ninja-1.10.2.3-py2.py3-none-manylinux_2_5_x86_64.manylinux1_x86_64.whl (108 kB)
     |████████████████████████████████| 108 kB 1.4 MB/s
Installing collected packages: ninja
  WARNING: The script ninja is installed in '/home/ubn/.local/bin' which is not on PATH.
  Consider adding this directory to PATH or, if you prefer to suppress this warning, use --no-warn-script-location.
Successfully installed ninja-1.10.2.3
-
「KDE ウォレットシステム」画面表示:

→classic を選んでからキャンセルしました。
-
5). システムが機能していることを確認:
$ meson --version
コマンド 'meson' が見つかりません。次の方法でインストールできます:
sudo apt install meson

$ /home/ubn/.local/bin/meson --version
0.60.3

$ /home/ubn/.local/bin/ninja --version
1.10.2.git.kitware.jobserver-1

$ pip --version
pip 20.3.4 from /usr/lib/python3/dist-packages/pip (python 3.9)

$ pip3 --version
pip 20.3.4 from /usr/lib/python3/dist-packages/pip (python 3.9)

$ echo $PATH
/usr/local/sbin:/usr/local/bin:/usr/sbin:/usr/bin:/sbin:/bin:/usr/games:/usr/local/games:/snap/bin:/snap/bin
-
6). パスを通しました:
$ cd

$ echo 'export PATH="${PATH}:/home/ubn/.local/bin"' >> .bash_profile

$ ls .bash_profile
.bash_profile

$ cat .bash_profile
export PATH="${PATH}:/home/ubn/.local/bin"
→「/home/ubn/」の部分は自分のユーザ名に書き換えてください。 わざと後ろに記述して優先度を下げていますが、逆に優先度を上げることもできます。
-
7). 再起動
-
8). 確認:
$ echo $PATH
/usr/local/sbin:/usr/local/bin:/usr/sbin:/usr/bin:/sbin:/bin:/usr/games:/usr/local/games:/snap/bin:/snap/bin:/home/ubn/.local/bin

$ meson --version
0.60.3

$ ninja --version
1.10.2.git.kitware.jobserver-1
→apt よりもpip インストールする方が少しだけ「ninja」のバージョンが高いです。
-
-
--- - --- - --- - --- - --- - --- - --- - --- - --- - --- - --- - --- - --- - --- - ----- -
3. Meson をapt でインストールする場合:
-
管理者権限でMeson と ninja のコマンドを使いたいときは、こちらのapt でインストールします。 項番2. (pip) と項番3. (apt) の両方を実施した場合は、今回のやり方だとパスの並び順で項番3. の方が優先されます。
-
1). Meson のインストール:
$ sudo apt install meson
:
以下のパッケージが新たにインストールされます:
  meson ninja-build
→「ninja」も依存でインストールされました。
-
2). Meson がインストールされたかの確認:
$ apt search meson
:
meson/jammy,jammy,now 0.60.3-1 all [インストール済み]
  high-productivity build system
→和訳: 生産性の高いビルドシステム
-
3). ninja がインストールされたかの確認:
$ apt search ninja-build
:
ninja-build/jammy,now 1.10.1-1 amd64 [インストール済み、自動]
  small build system closest in spirit to Make
→和訳: Make に最も近い小さなビルドシステム
-
4). 確認:
-
(1). 実行ファイルのパスの確認:
$ echo $PATH
/usr/local/sbin:/usr/local/bin:/usr/sbin:/usr/bin:/sbin:/bin:/usr/games:/usr/local/games:/snap/bin:/snap/bin:/home/ubn/.local/bin
-
(2). 実行ファイルの場所の確認:
$ which meson
/usr/bin/meson

$ which ninja
/usr/bin/ninja
-
(3). バージョンの確認:
$ meson --version
0.60.3

$ ninja --version
1.10.1
→「ninja」のバージョンを見れば、apt でインストールしたパッケージかがわかります。
-
(4). 管理者権限で使えるかを確認:
$ sudo meson --version
0.60.3

$ sudo ninja --version
1.10.1
-
-
--- - --- - --- - --- - --- - --- - --- - --- - --- - --- - --- - --- - --- - --- - ----- --
4. Meson で、新しい見本となるプロジェクトを作成して、それをビルドしてみます
-
1). プロジェクトを保存する新しいディレクトリを作成:
$ cd
$ mkdir -p testproject
-
2). Meson を使用して、新しいサンプルプロジェクトを作成、およびビルド:
$ cd testproject

$ meson init --name testproject --build

Using "testproject" (project name) as name of executable to build.
Defaulting to generating a C language project.
Sample project created. To build it run the
following commands:

meson setup builddir
meson compile -C builddir

Building...
The Meson build system
Version: 0.60.3
Source dir: /home/ubn/testproject
Build dir: /home/ubn/testproject/build
Build type: native build
Project name: testproject
Project version: 0.1
C compiler for the host machine: cc (gcc 11.2.0 "cc (Ubuntu 11.2.0-13ubuntu1) 11.2.0")
C linker for the host machine: cc ld.bfd 2.37
Host machine cpu family: x86_64
Host machine cpu: x86_64
Build targets in project: 1

Found ninja-1.10.2.git.kitware.jobserver-1 at /home/ubn/.local/bin/ninja
ninja: Entering directory `build'
[2/2] Linking target testproject
→指定した名前で、C で作られたプログラムのプロジェクトの見本が作成されます。 これをテンプレートにして、自分のプログラムを記述して行けます。
-
3). 生成されたファイルの確認:
$ pwd
/home/ubn/testproject     ←(プロジェクト用のフォルダ)

$ ls -1
build               ←(ビルド用のフォルダ)
meson.build       ←(meson のビルドの定義ファイル)
testproject.c       ←(指定した名前の、プログラムのソースファイル)
→meson init では、スケルトン(見本)となるファイルやフォルダが作成されて、そのビルドまで確認できます。
-
(1). 「testproject.c」ファイルの確認:
$ cat testproject.c
#include <stdio.h>

#define PROJECT_NAME "testproject"

int main(int argc, char **argv) {
    if(argc != 1) {
        printf("%s takes no arguments.\n", argv[0]);
        return 1;
    }
    printf("This is project %s.\n", PROJECT_NAME);
    return 0;
}
-
(2). 「meson.build」ファイルの確認:
$ cat meson.build
project('testproject', 'c',
  version : '0.1',
  default_options : ['warning_level=3'])

exe = executable('testproject', 'testproject.c',
  install : true)

test('basic', exe)
-
(3). ビルド用のフォルダ:
$ ls -1 build/
build.ninja       ←(meson で生成されたninja のビルド用の定義ファイル)
compile_commands.json
meson-info
meson-logs
meson-private
testproject       ←(ninja のビルドで生成された実行ファイル)
testproject.p
→meson init により、プロジェクトスケルトン(プロジェクトの見本)が作成されて、コンパイルされます。 結果は build サブディレクトリに置かれ、そこから直接実行ができます。
-
4). アプリの実行:
$ cd ~/testproject/

$ build/testproject
This is project testproject.
→コンパイルされた結果は build サブディレクトリに置かれ、そこから直接実行できます。
-
これで、プロジェクトを開発する準備が整いました。
コードは任意のエディタで編集でき、次回からは「meson compile」コマンドを実行するだけで再ビルドできます。
Meson のバージョンが古すぎる場合は、代わりにbuild サブディレクトリに移動してから、コマンド「ninja」を実行してプロジェクトをコンパイルできます。
-
5). 参考: test の実行:
$ cd ~/testproject/build/

$ meson test
ninja: Entering directory `/home/ubn/testproject/build'
ninja: no work to do.
1/1 basic        OK              0.01s


Ok:                 1
Expected Fail:      0     ←(予想される失敗)
Fail:               0        ←(失敗)
Unexpected Pass:    0        ←(予期しないパス)
Skipped:            0          ←(スキップ)
Timeout:            0            ←(タイムアウト)

Full log written to /home/ubn/testproject/build/meson-logs/testlog.txt
-
6). 参考: ログの確認:
$ cat /home/ubn/testproject/build/meson-logs/testlog.txt
-
-
--- - --- - --- - --- - --- - --- - --- - --- - --- - --- - --- - --- - --- - --- - ----- ---
5. Meson を使ってビルドしてみます:
-
1).「Hello world」を出力するプログラムを作成:
-
(1). プロジェクトを保存する新しいディレクトリを作成:
$ cd
$ mkdir -p hello-project
-
(2).「hello.c」を作成:
$ cd ~/hello-project/
$ gedit hello.c
#include <stdio.h>

int main() {
    printf("hello world\n");
}
-
(3).「meson.build」を作成:
$ gedit meson.build
# プロジェクト名の指定
project('helloworld', 'c')

# hello.c をコンパイル、hello という名の実行ファイルを作成
executable('hello', 'hello.c')
-
(4). meson でビルド:
$ ls ~/hello-project/
hello.c  meson.build
$ cd ~/hello-project/

$ meson setup builddir
The Meson build system
Version: 0.60.3
Source dir: /home/ubn/hello-project
Build dir: /home/ubn/hello-project/builddir
Build type: native build
Project name: helloworld
Project version: undefined
C compiler for the host machine: cc (gcc 11.2.0 "cc (Ubuntu 11.2.0-13ubuntu1) 11.2.0")
C linker for the host machine: cc ld.bfd 2.37
Host machine cpu family: x86_64
Host machine cpu: x86_64
Build targets in project: 1

Found ninja-1.10.2.git.kitware.jobserver-1 at /home/ubn/.local/bin/ninja
→プロジェクト名とプロジェクトフォルダ名は同じにした方が、後々わかりやすいかも。
-
ビルド用のフォルダの確認:
$ ls
builddir  hello.c  meson.build

$ ls builddir/
build.ninja            hello.p     meson-logs
compile_commands.json  meson-info  meson-private
-
ninja でビルド:
$ meson compile -C builddir
ninja: Entering directory `/home/ubn/hello-project/builddir'
[2/2] Linking target hello
-
ビルド用のフォルダの確認:
$ ls
builddir  hello.c  meson.build

$ ls builddir/
build.ninja            hello    meson-info  meson-private
compile_commands.json  hello.p  meson-logs

$ ls -l builddir/hello
-rwxrwxr-x 1 ubn ubn 17024  1月  6 10:06 builddir/hello
→「hello」が生成されました。
-
(5). 古いバージョンのmeson でも使えるビルドのやり方:
まずはお掃除:
$ cd ~/hello-project/
$ rm -r builddir
-
ビルド用のフォルダを確認:
$ ls ~/hello-project/
hello.c  meson.build
-
meson でビルド:
$ cd ~/hello-project/

$ meson builddir/
The Meson build system
Version: 0.60.3
Source dir: /home/ubn/hello-project
Build dir: /home/ubn/hello-project/builddir
Build type: native build
Project name: helloworld
Project version: undefined
C compiler for the host machine: cc (gcc 11.2.0 "cc (Ubuntu 11.2.0-13ubuntu1) 11.2.0")
C linker for the host machine: cc ld.bfd 2.37
Host machine cpu family: x86_64
Host machine cpu: x86_64
Build targets in project: 1

Found ninja-1.10.2.git.kitware.jobserver-1 at /home/ubn/.local/bin/ninja
→最終行にて、ninja のバージョン、またはバイナリの置き場所を見ると、pip でインストールしたninja が使われています。
-
ninja でビルド:
$ cd builddir/
$ ls
build.ninja            hello.p     meson-logs
compile_commands.json  meson-info  meson-private

$ ninja
[2/2] Linking target hello
→「build.ninja」がninja でビルドするときに使われる定義ファイルです。
-
(6). アプリの実行
$ cd ~/hello-project/

$ builddir/hello
hello world
または、
$ cd builddir/

$ ./hello
hello world
-
2). プログラム(ソースコード)を修正してみます
-
(1).「hello.c」を修正:
$ gedit ~/hello-project/hello.c
↓ printf に「!!」を追加:
#include <stdio.h>

int main() {
    printf("Hello world!!\n");
}
-
(2). 再ビルド
- 再ビルドでは「meson setup builddir」コマンドの実行は必要ありません
-
ninja でビルド:
$ cd ~/hello-project/

$ meson compile -C builddir
→フォルダ移動しなくてもビルド操作できます。
-
または、
$ cd ~/hello-project/builddir/

$ meson compile
[2/2] Linking target hello
→ビルド用のフォルダに移動すれば、パラメータは要りません。
-
または、古いバージョンのmeson でも使えるビルド:
$ cd ~/hello-project/builddir/
$ ninja
-
アプリの実行:
$ ./hello
Hello world!!
-
-
--- - --- - --- - --- - --- - --- - --- - --- - --- - --- - --- - --- - --- - --- - ----- ----
6. 「gnome-text-editor」をビルドしてみます:
-
GNOME42 の標準のテキストエディタとして、gedit と代わるかもしれない「gnome-text-editor」が現在開発中です。
-
公式サイト:
こちらのサイトは、ビルドシステムとして「Meson」が使われています。
-
1). ソースのダウンロード:
公式サイトにて、「Download」ボタンをクリック→「tar.gz」→「ファイルを保存する」
ダウンロードした「gnome-text-editor-main.tar.gz」を右クリック→「ここで展開」
-
2). 展開したソースファイルの確認:
$ cd ~/ダウンロード/gnome/gnome-text-editor-main/

$ ls -1
CONTRIBUTING.md
COPYING
NEWS
README.md
data
gnome-text-editor.doap
help
meson.build                         ←(注目)
meson_options.txt
org.gnome.TextEditor.Devel.json
po                                  ←(注目)
src
-
3). メインの「meson.build」を確認:
$ cat meson.build
-
4). 管理者権限でツールが使えるかを確認:
$ sudo meson --version
0.60.3

$ sudo ninja --version
1.10.1
-
-
--- - --- - --- - --- - --- - --- - --- - --- - --- - --- - --- - --- - --- - --- - ----- -----
7. 「gnome-text-editor」をビルドするための依存を補う:
-
Meson で「gnome-text-editor」をビルドしますが、その前に、依存パッケージの不足を補います。 エラーが出なくなるまで、 Meson のビルドを繰り返します。
ビルド用のフォルダを使うので、ソースツリーが汚れません。
-
1). プロジェクト(ソース)のディレクトリに移動:
$ cd ~/ダウンロード/gnome/gnome-text-editor-main/
-
2). meson でビルド:(1回目)
$ meson setup builddir
The Meson build system
Version: 0.60.3
Source dir: /home/ubn/ダウンロード/gnome/gnome-text-editor-main
Build dir: /home/ubn/ダウンロード/gnome/gnome-text-editor-main/builddir
Build type: native build
Project name: gnome-text-editor
Project version: 42.alpha1
C compiler for the host machine: cc (gcc 11.2.0 "cc (Ubuntu 11.2.0-13ubuntu1) 11.2.0")
C linker for the host machine: cc ld.bfd 2.37
Host machine cpu family: x86_64
Host machine cpu: x86_64
Did not find pkg-config by name 'pkg-config'   ←(依存パッケージなし)
Found Pkg-config: NO
Did not find CMake 'cmake'                ←(依存パッケージなし)
Found CMake: NO
Run-time dependency gio-unix-2.0 found: NO    ←(依存パッケージなし)

meson.build:29:0: ERROR: Pkg-config binary for machine MachineChoice.HOST not found. Giving up.

A full log can be found at /home/ubn/ダウンロード/gnome/gnome-text-editor-main/builddir/meson-logs/meson-log.txt
→ビルド用のフォルダとして「builddir」の名前を使っています。「build」とするよりもわかりやすい名前です。
-
依存 (1). 「pkg-config」のインストール:
$ sudo apt install pkg-config
:
以下のパッケージが新たにインストールされます:
  pkg-config
-
依存 (2). 「cmake」のインストール:
$ sudo apt install cmake
:
以下のパッケージが新たにインストールされます:
  cmake cmake-data dh-elpa-helper libjsoncpp25 librhash0
-
依存 (3). 「gio-unix-2.0」のインストール:
$ sudo apt install libglib2.0-dev
:
以下のパッケージが新たにインストールされます:
  libblkid-dev libffi-dev libglib2.0-dev libglib2.0-dev-bin libmount-dev
  libpcre16-3 libpcre2-dev libpcre2-posix3 libpcre3-dev libpcre32-3
  libpcrecpp0v5 libselinux1-dev libsepol-dev uuid-dev
→足りない「機能名」が表示されますが、インストールで指示すべき「パッケージ名」はディストリビューションで違います。また、その機能が複数のパッケージで実現されていたり、バージョンの指示もあるわけで、更に依存を補うことを難しくしています。
-
3). meson でビルド:(2回目)
$ meson setup builddir
:
Found CMake: /usr/bin/cmake (3.22.1)
Run-time dependency gtk4 found: NO (tried pkgconfig and cmake)   ←(依存なし)

meson.build:30:0: ERROR: Dependency "gtk4" not found, tried pkgconfig and cmake
-
依存 (4). 「gtk4」のパッケージをインストール:
$ sudo apt install libgtk-4-dev
:
以下のパッケージが新たにインストールされます:
  gobject-introspection icu-devtools libbrotli-dev libcairo2-dev libdatrie-dev
  libdeflate-dev libegl-dev libegl1-mesa-dev libepoxy-dev libfontconfig-dev
  libfontconfig1-dev libfreetype-dev libfreetype6-dev libfribidi-dev
  libgdk-pixbuf-2.0-dev libgirepository1.0-dev libgl-dev libgles-dev libgles1
  libglvnd-core-dev libglvnd-dev libglx-dev libgraphene-1.0-dev
  libgraphite2-dev libgtk-4-dev libharfbuzz-dev libharfbuzz-gobject0
  libice-dev libicu-dev libjbig-dev libjpeg-dev libjpeg-turbo8-dev
  libjpeg8-dev liblzma-dev libopengl-dev libopengl0 libpango1.0-dev
  libpixman-1-dev libpng-dev libpng-tools libpthread-stubs0-dev libsm-dev
  libthai-dev libtiff-dev libtiffxx5 libvulkan-dev libwayland-bin
  libwayland-dev libx11-dev libxau-dev libxcb-render0-dev libxcb-shm0-dev
  libxcb1-dev libxcomposite-dev libxcursor-dev libxdamage-dev libxdmcp-dev
  libxext-dev libxfixes-dev libxft-dev libxi-dev libxinerama-dev
  libxkbcommon-dev libxrandr-dev libxrender-dev pango1.0-tools
  wayland-protocols x11proto-dev xorg-sgml-doctools xtrans-dev
-
$ apt search libgtk-4
:
libgtk-4-1/jammy,now 4.4.1+ds1-3 amd64 [インストール済み、自動]
  GTK graphical user interface library

libgtk-4-bin/jammy,now 4.4.1+ds1-3 amd64 [インストール済み、自動]
  programs for the GTK graphical user interface library

libgtk-4-common/jammy,jammy,now 4.4.1+ds1-3 all [インストール済み、自動]
  common files for the GTK graphical user interface library

libgtk-4-dev/jammy,now 4.4.1+ds1-3 amd64 [インストール済み]
  development files for the GTK library

libgtk-4-doc/jammy,jammy 4.4.1+ds1-3 all
  documentation for the GTK graphical user interface library

libgtk-4-media-gstreamer/jammy 4.4.1+ds1-3 amd64
  GStreamer media backend for the GTK graphical user interface library
-
4). meson でビルド:(3回目)
$ meson setup builddir
:
Found CMake: /usr/bin/cmake (3.22.1)
Run-time dependency gtksourceview-5 found: NO (tried pkgconfig and cmake)   ←(依存なし)

meson.build:31:0: ERROR: Dependency "gtksourceview-5" not found, tried pkgconfig and cmake
-
依存 (5). 「gtksourceview-5」のパッケージをインストール:
$ sudo apt install libgtksourceview-5-dev
:
以下のパッケージが新たにインストールされます:
  gir1.2-gtksource-5 libgtksourceview-5-0 libgtksourceview-5-common
  libgtksourceview-5-dev libxml2-dev
-
$ apt search libgtksourceview-5
:
libgtksourceview-5-0/jammy,now 5.2.0-2 amd64 [インストール済み、自動]
  shared libraries for the GTK 4 syntax highlighting widget

libgtksourceview-5-common/jammy,jammy,now 5.2.0-2 all [インストール済み、自動]
  common files for the GTK 4 syntax highlighting widget

libgtksourceview-5-dev/jammy,now 5.2.0-2 amd64 [インストール済み]
  development files for the GTK 4 syntax highlighting widget

libgtksourceview-5-doc/jammy,jammy 5.2.0-2 all
  documentation for the GTK 4 syntax highlighting widget
-
5). meson でビルド:(4回目)
$ meson setup builddir
:
Run-time dependency gtk4 found: YES 4.4.1
Dependency gtksourceview-5 found: NO found 5.2.0 but need: '>= 5.3'   ←(依存のバージョンが低い)
Found CMake: /usr/bin/cmake (3.22.1)
Run-time dependency gtksourceview-5 found: NO (tried cmake)

meson.build:31:0: ERROR: Invalid version of dependency, need 'gtksourceview-5' ['>= 5.3'] found '5.2.0'.
→これがバージョンが指定されている場合です。
必要とするパッケージはapt でインストール可能でしたが、バージョンが低くて使えないみたい。 バージョンが低いかは、インストールしてビルドしてみないとわかりません。
-
削除の前に「gtksourceview-5」のパッケージの配置場所を確認:
手動でファイルを配置する可能性も残っているので、事前確認
-
バージョンが低い「libgtksourceview-5-dev」(5.2.0) をインストールした場合の配置:
$ ls -l /usr/lib/x86_64-linux-gnu/libgtks*
lrwxrwxrwx 1 root root     27 12月 18 17:55 /usr/lib/x86_64-linux-gnu/libgtksourceview-4.so.0 -> libgtksourceview-4.so.0.0.0
-rw-r--r-- 1 root root 641280  9月 10 08:34 /usr/lib/x86_64-linux-gnu/libgtksourceview-4.so.0.0.0
lrwxrwxrwx 1 root root     23 11月 28 06:38 /usr/lib/x86_64-linux-gnu/libgtksourceview-5.so -> libgtksourceview-5.so.0
lrwxrwxrwx 1 root root     27 11月 28 06:38 /usr/lib/x86_64-linux-gnu/libgtksourceview-5.so.0 -> libgtksourceview-5.so.0.0.0
-rw-r--r-- 1 root root 780616 11月 28 06:38 /usr/lib/x86_64-linux-gnu/libgtksourceview-5.so.0.0.0
-
「gtksourceview-5」のパッケージを削除:
$ sudo apt remove libgtksourceview-5-dev
:
以下のパッケージは「削除」されます:
  libgtksourceview-5-dev
$ sudo apt autoremove
:
以下のパッケージは「削除」されます:
  gir1.2-gtksource-5 libgtksourceview-5-0 libgtksourceview-5-common
  libxml2-dev
-
削除されたことを確認:
$ apt search libgtksourceview-5
:
libgtksourceview-5-0/jammy 5.2.0-2 amd64
  shared libraries for the GTK 4 syntax highlighting widget

libgtksourceview-5-common/jammy,jammy 5.2.0-2 all
  common files for the GTK 4 syntax highlighting widget

libgtksourceview-5-dev/jammy 5.2.0-2 amd64
  development files for the GTK 4 syntax highlighting widget

libgtksourceview-5-doc/jammy,jammy 5.2.0-2 all
  documentation for the GTK 4 syntax highlighting widget
-
$ ls -l /usr/lib/x86_64-linux-gnu/libgtks*
lrwxrwxrwx 1 root root     27 12月 18 17:55 /usr/lib/x86_64-linux-gnu/libgtksourceview-4.so.0 -> libgtksourceview-4.so.0.0.0
-rw-r--r-- 1 root root 641280  9月 10 08:34 /usr/lib/x86_64-linux-gnu/libgtksourceview-4.so.0.0.0
-
-
--- - --- - --- - --- - --- - --- - --- - --- - --- - --- - --- - --- - --- - --- - ----- ----- -
8. 依存の「gtksourceview-5 (5.3.0)」をビルドするための依存を補う:
-
「gnome-text-editor」をビルドするのに必要な「gtksourceview-5' (>= 5.3)」をビルドして入手するために、その依存の不足を補いました。
-
1). 「gtksourceview-5 (5.3.0)」のソースのダウンロード:
→「ファイルを保存」
「gtksourceview-5.3.0.tar.gz」を右クリック→「ここで展開」
-
2). プロジェクトのフォルダへ移動:
$ cd /home/ubn/ダウンロード/gnome/gtksourceview-5.3.0/

$ ls
AUTHORS       docs                  msvc
COPYING       gtksourceview         org.gnome.GtkSourceView.TestWidget.json
HACKING       gtksourceview.doap    po
NEWS          gtksourceview.pc.in   subprojects
README.md     meson.build           tests
README.win32  meson_options.txt     testsuite
data          meson_postinstall.py
-
3). meson でビルド:(5回目)
$ meson setup builddir
:
Run-time dependency gtk4-quartz found: NO (tried pkgconfig and cmake) ←(依存パッケージなし)
Run-time dependency gobject-introspection-1.0 found: YES 1.70.0
Run-time dependency vapigen found: NO (tried pkgconfig and cmake)  ←(依存パッケージなし)

meson.build:104:2: ERROR: Dependency "vapigen" not found, tried pkgconfig and cmake
$ apt search vapigen
:
valac/jammy 0.54.5-1 amd64
  C# like language for the GObject system

valac-0.54-vapi/jammy,jammy 0.54.5-1 all
  C# like language for the GObject system - vapi files
-
依存 (6). 「valac」のパッケージをインストール:
$ sudo apt install valac
:
以下のパッケージが新たにインストールされます:
  libvala-0.54-0 libvalacodegen-0.54-0 valac valac-0.54-vapi valac-bin
-
$ apt search vapigen
:
valac/jammy,now 0.54.5-1 amd64 [インストール済み]
  C# like language for the GObject system

valac-0.54-vapi/jammy,jammy,now 0.54.5-1 all [インストール済み、自動]
  C# like language for the GObject system - vapi files
-
-
--- - --- - --- - --- - --- - --- - --- - --- - --- - --- - --- - --- - --- - --- - ----- ----- --
9. 依存の「gtksourceview-5 (5.3.0)」をビルド:
-
「gtksourceview-5 (5.3.0)」をビルドするための依存が解決したので、最初からやり直し:
-
1). まずは、ビルド用のフォルダを削除:
$ cd ~/ダウンロード/gnome/gtksourceview-5.3.0
$ rm -r builddir
-
2). meson でビルド:(6回目)
$ meson setup builddir
:
gtksourceview 5.3.0

    Documentation: NO
    Install tests: NO
    Introspection: YES
    Vala vapi    : YES

  Subprojects
    libxml2      : YES

Found ninja-1.10.2.git.kitware.jobserver-1 at /home/ubn/.local/bin/ninja
→いくつかのエラー表示はありますが、最後までビルドできました。
-
-
3). ninja でビルド:
$ cd /home/ubn/ダウンロード/gnome/gtksourceview-5.3.0/
$ meson compile -C builddir

$ ls builddir/
build.ninja            docs           meson-private      tests
compile_commands.json  gtksourceview  meson-uninstalled  testsuite
config.h               meson-info     po
data                   meson-logs     subprojects
$ ls -l builddir/gtksourceview/
:
-rw-rw-r-- 1 ubn ubn  888541  1月  6 21:55 GtkSource-5.gir
-rw-rw-r-- 1 ubn ubn   73204  1月  6 21:55 GtkSource-5.typelib
drwxrwxr-x 4 ubn ubn    4096  1月  6 21:50 completion-providers
-rw-rw-r-- 1 ubn ubn   14427  1月  6 21:53 gtksource-enumtypes.c
-rw-rw-r-- 1 ubn ubn    3619  1月  6 21:53 gtksource-enumtypes.h
-rw-rw-r-- 1 ubn ubn   49186  1月  6 21:53 gtksource-marshal.c
-rw-rw-r-- 1 ubn ubn   13007  1月  6 21:53 gtksource-marshal.h
-rw-rw-r-- 1 ubn ubn    7061  1月  6 21:50 gtksourceversion.h
-rw-rw-r-- 1 ubn ubn   52454  1月  6 21:55 gtksourceview-5.vapi
-rw-rw-r-- 1 ubn ubn  111523  1月  6 21:53 gtksourceview-gresources.c
-rw-rw-r-- 1 ubn ubn     166  1月  6 21:53 gtksourceview-gresources.h
lrwxrwxrwx 1 ubn ubn      23  1月  6 21:50 libgtksourceview-5.so -> libgtksourceview-5.so.0
lrwxrwxrwx 1 ubn ubn      27  1月  6 21:50 libgtksourceview-5.so.0 -> libgtksourceview-5.so.0.0.0
-rwxrwxr-x 1 ubn ubn 4707952  1月  6 21:54 libgtksourceview-5.so.0.0.0
drwxrwxr-x 2 ubn ubn    4096  1月  6 21:54 libgtksourceview-5.so.0.0.0.p
-rw-rw-r-- 1 ubn ubn 9547392  1月  6 21:54 libgtksourceview-5core.a
drwxrwxr-x 2 ubn ubn    4096  1月  6 21:54 libgtksourceview-5core.a.p
drwxrwxr-x 2 ubn ubn    4096  1月  6 21:50 vim
-
参考: libgtksourceview-5 5.2.0-2 のインストール後の配置:
$ ls -l /usr/lib/x86_64-linux-gnu/libgtks*
lrwxrwxrwx 1 root root     27 12月 18 17:55 /usr/lib/x86_64-linux-gnu/libgtksourceview-4.so.0 -> libgtksourceview-4.so.0.0.0
-rw-r--r-- 1 root root 641280  9月 10 08:34 /usr/lib/x86_64-linux-gnu/libgtksourceview-4.so.0.0.0
lrwxrwxrwx 1 root root     23 11月 28 06:38 /usr/lib/x86_64-linux-gnu/libgtksourceview-5.so -> libgtksourceview-5.so.0
lrwxrwxrwx 1 root root     27 11月 28 06:38 /usr/lib/x86_64-linux-gnu/libgtksourceview-5.so.0 -> libgtksourceview-5.so.0.0.0
-rw-r--r-- 1 root root 780616 11月 28 06:38 /usr/lib/x86_64-linux-gnu/libgtksourceview-5.so.0.0.0
-
参考: libgtksourceview-5 5.2.0-2 の削除後の配置:
$ ls -l /usr/lib/x86_64-linux-gnu/libgtks*
lrwxrwxrwx 1 root root     27 12月 18 17:55 /usr/lib/x86_64-linux-gnu/libgtksourceview-4.so.0 -> libgtksourceview-4.so.0.0.0
-rw-r--r-- 1 root root 641280  9月 10 08:34 /usr/lib/x86_64-linux-gnu/libgtksourceview-4.so.0.0.0
-
手動で配置しなくてもいいように、「~/ダウンロード/gnome/gtksourceview-5.3.0/README.md」を参照:
$ cat ~/ダウンロード/gnome/gtksourceview-5.3.0/README.md
抜粋:
Installation
------------

Simple install procedure from a tarball:  ←(tarballからの簡単なインストール手順 )

  $ mkdir build
  $ meson build
  $ cd build
  [ Become root if necessary ]  ←(必要に応じてルートになります )
  $ ninja install
-
-
4). ninja でビルドしてインストール:
-
依存 (7). gtksourceview-5.3.0 のインストール:
$ cd /home/ubn/ダウンロード/gnome/gtksourceview-5.3.0/
$ cd builddir/

$ ninja --version
1.10.1

$ sudo ninja install
[sudo] パスワード:
:
Installing /home/ubn/ダウンロード/gnome/gtksourceview-5.3.0/builddir/meson-private/gtksourceview-5.pc to /usr/local/lib/x86_64-linux-gnu/pkgconfig
Running custom install script '/usr/bin/gtk4-update-icon-cache -q -t -f /usr/local/share/icons/hicolor'
-
参考: libgtksourceview-5 5.2.0-2 の削除後の配置:
$ ls -l /usr/lib/x86_64-linux-gnu/libgtks*
:
lrwxrwxrwx 1 root root     27 12月 18 17:55 /usr/lib/x86_64-linux-gnu/libgtksourceview-4.so.0 -> libgtksourceview-4.so.0.0.0
-rw-r--r-- 1 root root 641280  9月 10 08:34 /usr/lib/x86_64-linux-gnu/libgtksourceview-4.so.0.0.0
-
「gtksourceview-5.3.0」のインストール後の配置:
$ ls -l /usr/local/lib/x86_64-linux-gnu/
:
drwxr-xr-x 2 root root    4096  1月  6 22:01 girepository-1.0
lrwxrwxrwx 1 root root      23  1月  6 22:01 libgtksourceview-5.so -> libgtksourceview-5.so.0
lrwxrwxrwx 1 root root      27  1月  6 22:01 libgtksourceview-5.so.0 -> libgtksourceview-5.so.0.0.0
-rwxr-xr-x 1 root root 4707952  1月  6 22:01 libgtksourceview-5.so.0.0.0
-rwxr-xr-x 1 root root 5308352  1月  6 21:53 libxml2.so
drwxr-xr-x 2 root root    4096  1月  6 22:01 pkgconfig
-
-
--- - --- - --- - --- - --- - --- - --- - --- - --- - --- - --- - --- - --- - --- - ----- ----- ---
10. 「gnome-text-editor」をビルドするための依存を補う(続き):
-
1). プロジェクト(ソース)のディレクトリに移動:
$ cd ~/ダウンロード/gnome/gnome-text-editor-main/
-
2). meson でビルド:(7回目)
$ meson setup builddir
The Meson build system
Version: 0.60.3
Source dir: /home/ubn/ダウンロード/gnome/gnome-text-editor-main
Build dir: /home/ubn/ダウンロード/gnome/gnome-text-editor-main/builddir
Build type: native build
Project name: gnome-text-editor
Project version: 42.alpha1
C compiler for the host machine: cc (gcc 11.2.0 "cc (Ubuntu 11.2.0-13ubuntu1) 11.2.0")
C linker for the host machine: cc ld.bfd 2.37
Host machine cpu family: x86_64
Host machine cpu: x86_64
Found pkg-config: /usr/bin/pkg-config (0.29.2)
Run-time dependency gio-unix-2.0 found: YES 2.70.2
Run-time dependency gtk4 found: YES 4.4.1
Run-time dependency gtksourceview-5 found: YES 5.3.0
Found CMake: /usr/bin/cmake (3.22.1)
Run-time dependency libadwaita-1 found: NO (tried pkgconfig and cmake) ←(依存パッケージなし)

meson.build:32:0: ERROR: Dependency "libadwaita-1" not found, tried pkgconfig and cmake

A full log can be found at /home/ubn/ダウンロード/gnome/gnome-text-editor-main/builddir/meson-logs/meson-log.txt
-
依存 (8). 「libadwaita-1-dev」のパッケージをインストール:
$ sudo apt install libadwaita-1-dev
:
以下のパッケージが新たにインストールされます:
  gir1.2-adw-1 libadwaita-1-0 libadwaita-1-dev
-
3). meson でビルド:(8回目)
$ meson setup builddir
:
Run-time dependency libadwaita-1 found: YES 1.0.0-alpha.2
Found CMake: /usr/bin/cmake (3.22.1)
Run-time dependency enchant-2 found: NO (tried pkgconfig and cmake) ←(依存パッケージなし)


meson.build:33:0: ERROR: Dependency "enchant-2" not found, tried pkgconfig and cmake
$ apt search enchant-2
:
enchant-2/jammy,now 2.3.1-1 amd64 [インストール済み、自動]
  各種スペルチェッカエンジンへのラッパー (バイナリプログラム)

libenchant-2-2/jammy,now 2.3.1-1 amd64 [インストール済み、自動]
  Wrapper library for various spell checker engines (runtime libs)

libenchant-2-dev/jammy 2.3.1-1 amd64
  Wrapper library for various spell checker engines (development)

libenchant-2-voikko/jammy 2.3.1-1 amd64
  Voikko spell-checker libenchant plugin
-
依存 (9). 「libenchant-2-dev」のパッケージをインストール:
$ sudo apt install libenchant-2-dev
:
以下のパッケージが新たにインストールされます:
  libenchant-2-dev
-
4). meson でビルド:(9回目)
$ meson setup builddir
:
Compiler for C supports link arguments -Wl,-z,relro: YES
Configuring org.gnome.TextEditor.desktop.in using configuration
WARNING: Gettext not found, all translation targets will be ignored. ←(警告)

data/meson.build:12:0: ERROR: Can not assign None to variable. ←(エラー)

A full log can be found at /home/ubn/ダウンロード/gnome/gnome-text-editor-main/builddir/meson-logs/meson-log.txt
警告:Gettextが見つかりません。すべての翻訳ターゲットが無視されます。
エラー:変数にNoneを割り当てることはできません。
-
依存 (10). 「gettext」のパッケージをインストール:
$ sudo apt install gettext
:
以下のパッケージが新たにインストールされます:
  gettext
-
5). meson でビルド:(10回目)
$ meson setup builddir
:
Configuring org.gnome.TextEditor.appdata.xml.in using configuration
Program appstream-util found: NO               ←(依存パッケージなし)
Program glib-compile-schemas found: YES (/usr/bin/glib-compile-schemas)
Configuring org.gnome.TextEditor.service using configuration
Library m found: YES
Found pkg-config: /usr/bin/pkg-config (0.29.2)
Program glib-compile-resources found: YES (/usr/bin/glib-compile-resources)
Program glib-mkenums found: YES (/usr/bin/glib-mkenums)
Program glib-mkenums found: YES (/usr/bin/glib-mkenums)
Program /usr/bin/meson found: YES (/usr/bin/meson)
Run-time dependency libpcre found: YES 8.39
Configuring config.h using configuration
Build-time dependency gio-2.0 found: YES 2.70.2
Program glib-compile-schemas found: YES (/usr/bin/glib-compile-schemas)
Found CMake: /usr/bin/cmake (3.22.1)
Build-time dependency gtk-4.0 found: NO (tried pkgconfig and cmake)  ←(依存パッケージなし)
Program gtk4-update-icon-cache found: YES (/usr/bin/gtk4-update-icon-cache)
Build-time dependency desktop-file-utils found: NO (tried pkgconfig and cmake) ←(依存パッケージなし)
Program update-desktop-database found: YES (/usr/bin/update-desktop-database)
Build targets in project: 33

Found ninja-1.10.1 at /usr/bin/ninja
$ apt search desktop-file-utils
:
desktop-file-utils/jammy,now 0.26-1ubuntu2 amd64 [インストール済み、自動]
  desktop ファイル用ユーティリティ
-
依存 (11). 「appstream-util」のパッケージをインストール:
$ sudo apt install appstream-util
:
以下のパッケージが新たにインストールされます:
  appstream-util libappstream-glib8
-
依存 (12). 「libwebkit2gtk-4.0-dev」のパッケージをインストール:
$ sudo apt install libwebkit2gtk-4.0-dev
:
以下のパッケージが新たにインストールされます:
  libatk-bridge2.0-dev libatk1.0-dev libatspi2.0-dev libdbus-1-dev libgtk-3-dev libjavascriptcoregtk-4.0-dev
  libpsl-dev libsoup2.4-dev libsqlite3-dev libwebkit2gtk-4.0-dev libxml2-dev libxtst-dev
-
6). meson でビルド:(11回目)
$ meson setup builddir
Directory already configured.

Just run your build command (e.g. ninja) and Meson will regenerate as necessary.
If ninja fails, run "ninja reconfigure" or "meson --reconfigure"
to force Meson to regenerate.

If build failures persist, run "meson setup --wipe" to rebuild from scratch
using the same options as passed when configuring the build.
To change option values, run "meson configure" instead.
→成功するとチェック一覧が表示されません。
-
やり直し:
$ cd /home/ubn/ダウンロード/gnome/gnome-text-editor-main
$ rm -r builddir
$ meson setup builddir
The Meson build system
Version: 0.60.3
:
-
端末画面:
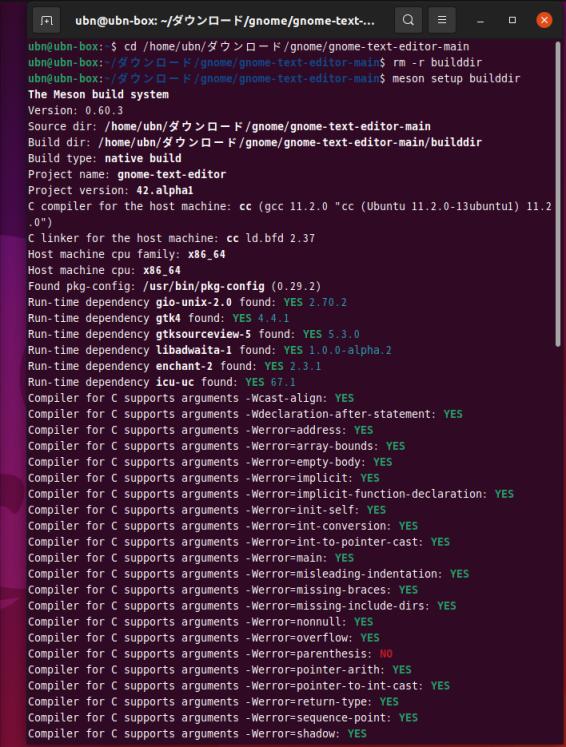
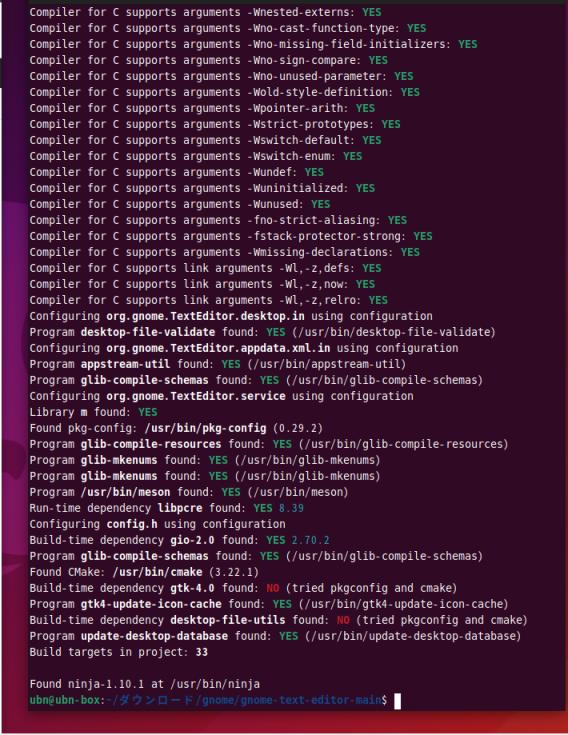
→結果がカラー表示なのでわかりやすいです。
-
だいぶ、エラーも減ったので、
-
-
7). ninja でビルドしてみると:
$ cd ~/ダウンロード/gnome/gnome-text-editor-main/

$ meson compile -C builddir
:
-
端末画面:
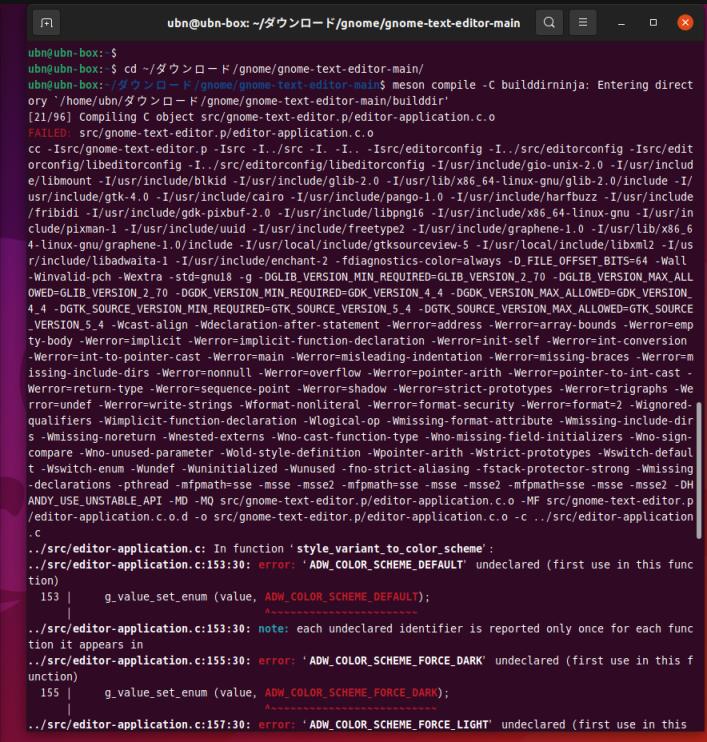
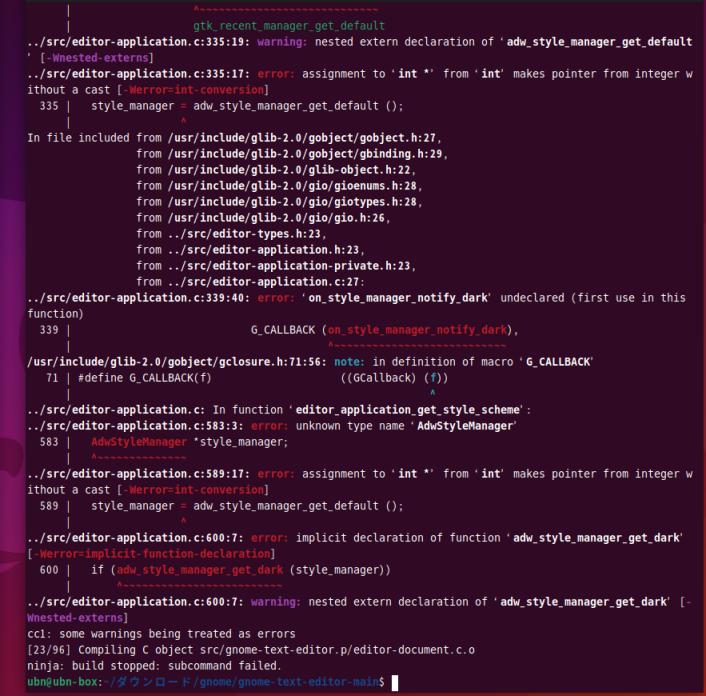
→やはり、エラーが残っているのでビルドは成功しません。 23/96 の途中でエラーしています。ビルドの依存を補う作業はまだまだ続きそう。根気が必要。
-
-
--- - --- - --- - --- - --- - --- - --- - --- - --- - --- - --- - --- - --- - --- - ----- ----- ----
11. 追加: 最新の「gtksourceview-5 (5.3.3)」があったのでビルド:
-
「gnome-text-editor」をビルドするのに必要な「gtksourceview-5' (>= 5.3)」を入手するために、 「gtksourceview-5 (5.3.0)」をビルドしましたが、それよりも新しい「gtksourceview-5 (5.3.3)」を見つけたので、ビルドしてみました。
-
1). 「gtksourceview-5 (5.3.0)」をアンインストール
-
「gtksourceview-5.3.0」の配置の確認:
$ ls -l /usr/local/lib/x86_64-linux-gnu/
:
drwxr-xr-x 2 root root    4096  1月  6 22:01 girepository-1.0
lrwxrwxrwx 1 root root      23  1月  6 22:01 libgtksourceview-5.so -> libgtksourceview-5.so.0
lrwxrwxrwx 1 root root      27  1月  6 22:01 libgtksourceview-5.so.0 -> libgtksourceview-5.so.0.0.0
-rwxr-xr-x 1 root root 4707952  1月  6 22:01 libgtksourceview-5.so.0.0.0
-rwxr-xr-x 1 root root 5308352  1月  6 21:53 libxml2.so
drwxr-xr-x 2 root root    4096  1月  6 22:01 pkgconfig
-
「gtksourceview-5.3.0」のアンインストール:
$ cd ~/ダウンロード/gnome/gtksourceview-5.3.0/
$ cd builddir/
$ sudo ninja uninstall
-
「gtksourceview-5.3.0」の配置の確認:
$ ls -l /usr/local/lib/x86_64-linux-gnu/
ls: '/usr/local/lib/x86_64-linux-gnu/' にアクセスできません: そのようなファイルやディレクトリはありません
-
2). 「gtksourceview」の最新のソースをダウンロード
青い「Clone」の左隣りの「↓」(Download) をクリック→「tar.gz」→「ファイルを保存する」
「gtksourceview-master.tar.gz」を右クリック→「ここで展開」
-
3). プロジェクトのフォルダへ移動:
$ cd /home/ubn/ダウンロード/gnome/gtksourceview-master/

$ ls
AUTHORS       docs                  msvc
COPYING       gtksourceview         org.gnome.GtkSourceView.TestWidget.json
HACKING       gtksourceview.doap    po
NEWS          gtksourceview.pc.in   subprojects
README.md     meson.build           tests
README.win32  meson_options.txt     testsuite
data          meson_postinstall.py
-
4). まずは、ビルド用のフォルダを削除:
$ cd ~/ダウンロード/gnome/gtksourceview-master/
$ rm -r builddir
-
5). meson でビルド:(12回目)
$ cd /home/ubn/ダウンロード/gnome/gtksourceview-master/

$ meson setup builddir
The Meson build system
Version: 0.60.3
Source dir: /home/ubn/ダウンロード/gnome/gtksourceview-master
Build dir: /home/ubn/ダウンロード/gnome/gtksourceview-master/builddir
Build type: native build
Project name: gtksourceview
Project version: 5.3.3
C compiler for the host machine: cc (gcc 11.2.0 "cc (Ubuntu 11.2.0-13ubuntu1) 11.2.0")
C linker for the host machine: cc ld.bfd 2.37
Host machine cpu family: x86_64
Host machine cpu: x86_64
Program g-ir-scanner found: YES (/usr/bin/g-ir-scanner)
Library m found: YES
Found pkg-config: /usr/bin/pkg-config (0.29.2)
Run-time dependency glib-2.0 found: YES 2.70.2
Run-time dependency gobject-2.0 found: YES 2.70.2
Run-time dependency gio-2.0 found: YES 2.70.2
Run-time dependency gtk4 found: YES 4.4.1
Run-time dependency libxml-2.0 found: YES 2.9.12
Run-time dependency fribidi found: YES 1.0.8
Run-time dependency fontconfig found: YES 2.13.1
Run-time dependency pangoft2 found: YES 1.48.10
Run-time dependency libpcre2-8 found: YES 10.39
Found CMake: /usr/bin/cmake (3.22.1)
Run-time dependency gtk4-quartz found: NO (tried pkgconfig and cmake)  ←(依存パッケージなし)
Run-time dependency gobject-introspection-1.0 found: YES 1.70.0
Run-time dependency vapigen found: YES 0.54.5
Program xmllint found: YES (/usr/bin/xmllint)
Has header "unistd.h" : YES
Checking for function "memalign" : YES
Compiler for C supports arguments -Wcast-align: YES
Compiler for C supports arguments -Wdeclaration-after-statement: YES
Compiler for C supports arguments -Werror=address: YES
Compiler for C supports arguments -Werror=array-bounds: YES
Compiler for C supports arguments -Werror=empty-body: YES
Compiler for C supports arguments -Werror=implicit: YES
Compiler for C supports arguments -Werror=implicit-function-declaration: YES
Compiler for C supports arguments -Werror=init-self: YES
Compiler for C supports arguments -Werror=int-conversion: YES
Compiler for C supports arguments -Werror=int-to-pointer-cast: YES
Compiler for C supports arguments -Werror=main: YES
Compiler for C supports arguments -Werror=misleading-indentation: YES
Compiler for C supports arguments -Werror=missing-braces: YES
Compiler for C supports arguments -Werror=missing-include-dirs: YES
Compiler for C supports arguments -Werror=nonnull: YES
Compiler for C supports arguments -Werror=overflow: YES
Compiler for C supports arguments -Werror=parenthesis: NO             ←(なし)
Compiler for C supports arguments -Werror=pointer-arith: YES
Compiler for C supports arguments -Werror=pointer-to-int-cast: YES
Compiler for C supports arguments -Werror=return-type: YES
Compiler for C supports arguments -Werror=sequence-point: YES
Compiler for C supports arguments -Werror=shadow: YES
Compiler for C supports arguments -Werror=strict-prototypes: YES
Compiler for C supports arguments -Werror=trigraphs: YES
Compiler for C supports arguments -Werror=undef: YES
Compiler for C supports arguments -Werror=write-strings: YES
Compiler for C supports arguments -Wformat-nonliteral: YES
Compiler for C supports arguments -Werror=format-security -Werror=format=2: YES
Compiler for C supports arguments -Wignored-qualifiers: YES
Compiler for C supports arguments -Wimplicit-function-declaration: YES
Compiler for C supports arguments -Wlogical-op: YES
Compiler for C supports arguments -Wmissing-format-attribute: YES
Compiler for C supports arguments -Wmissing-include-dirs: YES
Compiler for C supports arguments -Wmissing-noreturn: YES
Compiler for C supports arguments -Wnested-externs: YES
Compiler for C supports arguments -Wno-cast-function-type: YES
Compiler for C supports arguments -Wno-missing-field-initializers: YES
Compiler for C supports arguments -Wno-sign-compare: YES
Compiler for C supports arguments -Wno-unused-parameter: YES
Compiler for C supports arguments -Wno-typedef-redefinition: NO         ←(なし)
Compiler for C supports arguments -Wold-style-definition: YES
Compiler for C supports arguments -Wpointer-arith: YES
Compiler for C supports arguments -Wstrict-prototypes: YES
Compiler for C supports arguments -Wswitch-default: YES
Compiler for C supports arguments -Wswitch-enum: YES
Compiler for C supports arguments -Wundef: YES
Compiler for C supports arguments -Wuninitialized: YES
Compiler for C supports arguments -Wunused: YES
Compiler for C supports arguments -fno-strict-aliasing: YES
Compiler for C supports arguments -fstack-protector-strong: YES
Compiler for C supports arguments -Wmissing-declarations: YES
Compiler for C supports arguments -fvisibility=hidden: YES
Compiler for C supports link arguments -Wl,-z,defs: YES
Compiler for C supports link arguments -Wl,-z,now: YES
Compiler for C supports link arguments -Wl,-z,relro: YES
Configuring config.h using configuration
Found pkg-config: /usr/bin/pkg-config (0.29.2)
Program glib-genmarshal found: YES (/usr/bin/glib-genmarshal)
Program glib-mkenums found: YES (/usr/bin/glib-mkenums)
Program glib-mkenums found: YES (/usr/bin/glib-mkenums)
Configuring gtksourceversion.h using configuration
Program glib-compile-resources found: YES (/usr/bin/glib-compile-resources)
Dependency gobject-introspection-1.0 found: YES 1.70.0 (cached)
Dependency gobject-introspection-1.0 found: YES 1.70.0 (cached)
Program g-ir-scanner found: YES (/usr/bin/g-ir-scanner)
Dependency gobject-introspection-1.0 found: YES 1.70.0 (cached)
Program g-ir-compiler found: YES (/usr/bin/g-ir-compiler)
Program vapigen found: YES (/usr/bin/vapigen)
Program gi-docgen found: NO                                   ←(パッケージなし)
Program glib-compile-resources found: YES (/usr/bin/glib-compile-resources)
Program glib-compile-resources found: YES (/usr/bin/glib-compile-resources)
Program glib-compile-resources found: YES (/usr/bin/glib-compile-resources)
Found CMake: /usr/bin/cmake (3.22.1)
Build-time dependency gtk-4.0 found: NO (tried pkgconfig and cmake)  ←(依存パッケージなし)
Program gtk4-update-icon-cache found: YES (/usr/bin/gtk4-update-icon-cache)
Build targets in project: 138

gtksourceview 5.3.3

    Documentation: NO
    Install tests: NO
    Introspection: YES
    Vala vapi    : YES

Found ninja-1.10.1 at /usr/bin/ninja
-
依存 (13). 「gi-docgen」のインストール:
$ sudo apt install gi-docgen
:
以下のパッケージが新たにインストールされます:
  gi-docgen python-babel-localedata python3-babel python3-jinja2
  python3-smartypants python3-toml python3-typogrify
-
依存 (14). 「libjavascriptcoregtk-4.0-bin」のインストール:
$ sudo apt install libjavascriptcoregtk-4.0-bin
:
以下のパッケージが新たにインストールされます:
  libjavascriptcoregtk-4.0-bin
→これは効果なし
-
6). まずは、ビルド用のフォルダを削除:
$ cd ~/ダウンロード/gnome/gtksourceview-master/
$ rm -r builddir
-
7). meson でビルド:(13回目)
$ cd /home/ubn/ダウンロード/gnome/gtksourceview-master/
$ meson setup builddir
:
Program vapigen found: YES (/usr/bin/vapigen)
Program gi-docgen found: YES (/usr/bin/gi-docgen)         ←(パッケージなしが解決)
Program glib-compile-resources found: YES (/usr/bin/glib-compile-resources)
Program glib-compile-resources found: YES (/usr/bin/glib-compile-resources)
Program glib-compile-resources found: YES (/usr/bin/glib-compile-resources)
Found CMake: /usr/bin/cmake (3.22.1)
Build-time dependency gtk-4.0 found: NO (tried pkgconfig and cmake)  ←(依存パッケージなし)
Program gtk4-update-icon-cache found: YES (/usr/bin/gtk4-update-icon-cache)
Build targets in project: 138

gtksourceview 5.3.3

    Documentation: NO
    Install tests: NO
    Introspection: YES
    Vala vapi    : YES

Found ninja-1.10.1 at /usr/bin/ninja
-
-
8). ninja でビルド:
$ cd /home/ubn/ダウンロード/gnome/gtksourceview-master/
$ meson compile -C builddir

$ ls builddir/
build.ninja            docs           meson-private      testsuite
compile_commands.json  gtksourceview  meson-uninstalled
config.h               meson-info     po
data                   meson-logs     tests
$ ls -l builddir/gtksourceview/
:
-rw-rw-r-- 1 ubn ubn  889927  1月 10 17:08 GtkSource-5.gir
-rw-rw-r-- 1 ubn ubn   73204  1月 10 17:08 GtkSource-5.typelib
drwxrwxr-x 4 ubn ubn    4096  1月 10 16:57 completion-providers
-rw-rw-r-- 1 ubn ubn   14427  1月 10 17:06 gtksource-enumtypes.c
-rw-rw-r-- 1 ubn ubn    3619  1月 10 17:06 gtksource-enumtypes.h
-rw-rw-r-- 1 ubn ubn   49186  1月 10 17:06 gtksource-marshal.c
-rw-rw-r-- 1 ubn ubn   13007  1月 10 17:06 gtksource-marshal.h
-rw-rw-r-- 1 ubn ubn    7061  1月 10 16:57 gtksourceversion.h
-rw-rw-r-- 1 ubn ubn   52462  1月 10 17:08 gtksourceview-5.vapi
-rw-rw-r-- 1 ubn ubn  111776  1月 10 17:06 gtksourceview-gresources.c
-rw-rw-r-- 1 ubn ubn     166  1月 10 17:06 gtksourceview-gresources.h
lrwxrwxrwx 1 ubn ubn      23  1月 10 16:57 libgtksourceview-5.so -> libgtksourceview-5.so.0
lrwxrwxrwx 1 ubn ubn      27  1月 10 16:57 libgtksourceview-5.so.0 -> libgtksourceview-5.so.0.0.0
-rwxrwxr-x 1 ubn ubn 4724864  1月 10 17:08 libgtksourceview-5.so.0.0.0
drwxrwxr-x 2 ubn ubn    4096  1月 10 17:08 libgtksourceview-5.so.0.0.0.p
-rw-rw-r-- 1 ubn ubn 9579622  1月 10 17:08 libgtksourceview-5core.a
drwxrwxr-x 2 ubn ubn    4096  1月 10 17:08 libgtksourceview-5core.a.p
drwxrwxr-x 2 ubn ubn    4096  1月 10 16:57 vim
-
9). ninja でインストール:
-
依存 (15). 「gtksourceview-5.3.3」のインストール:
$ cd /home/ubn/ダウンロード/gnome/gtksourceview-master/
$ cd builddir/

$ sudo ninja install
[sudo] パスワード:
:
Installing /home/ubn/ダウンロード/gnome/gtksourceview-master/builddir/meson-private/gtksourceview-5.pc to /usr/local/lib/x86_64-linux-gnu/pkgconfig
Running custom install script '/usr/bin/gtk4-update-icon-cache -q -t -f /usr/local/share/icons/hicolor'
-
「gtksourceview-5.3.3」の配置を確認:
$ ls -l /usr/local/lib/x86_64-linux-gnu/
:
drwxr-xr-x 2 root root    4096  1月 10 17:28 girepository-1.0
lrwxrwxrwx 1 root root      23  1月 10 17:28 libgtksourceview-5.so -> libgtksourceview-5.so.0
lrwxrwxrwx 1 root root      27  1月 10 17:28 libgtksourceview-5.so.0 -> libgtksourceview-5.so.0.0.0
-rwxr-xr-x 1 root root 4724864  1月 10 17:08 libgtksourceview-5.so.0.0.0
drwxr-xr-x 2 root root    4096  1月 10 17:28 pkgconfig
-
-
--- - --- - --- - --- - --- - --- - --- - --- - --- - --- - --- - --- - --- - --- - ----- ----- -----
12. 「gnome-text-editor」をビルド(その 2):
-
「gnome-text-editor」のバージョンが(42.alpha2)に上がったので、ダウンロードし直しました。
-
1). お掃除
ダウンロードした以前の「gnome-text-editor-main.tar.gz」と「gnome-text-editor-main」フォルダを削除
-
2). 最新のソースをダウンロード:
公式サイトの gnome-text-editor - GitLab にて、「Download」ボタンをクリック→「tar.gz」→「ファイルを保存する」
ダウンロードした「gnome-text-editor-main.tar.gz」を任意のフォルダに移動後、右クリック→「ここで展開」
→「/home/ubn/ダウンロード/gnome/gtksourceview-master/」フォルダが生成
-
3). プロジェクト(ソース)のディレクトリに移動:
$ cd ~/ダウンロード/gnome/gnome-text-editor-main/
-
4). meson でビルド:(14回目)
$ meson setup builddir
The Meson build system
Version: 0.60.3
Source dir: /home/ubn/ダウンロード/gnome/gnome-text-editor-main
Build dir: /home/ubn/ダウンロード/gnome/gnome-text-editor-main/builddir
Build type: native build
Project name: gnome-text-editor
Project version: 42.alpha2                   ←(最新にアップ)
C compiler for the host machine: cc (gcc 11.2.0 "cc (Ubuntu 11.2.0-13ubuntu1) 11.2.0")
C linker for the host machine: cc ld.bfd 2.37
Host machine cpu family: x86_64
Host machine cpu: x86_64
Found pkg-config: /usr/bin/pkg-config (0.29.2)
Run-time dependency gio-unix-2.0 found: YES 2.70.2
Run-time dependency gtk4 found: YES 4.4.1
Run-time dependency gtksourceview-5 found: YES 5.3.3          ←(最新にアップ)
Run-time dependency libadwaita-1 found: YES 1.0.0-alpha.2
Run-time dependency enchant-2 found: YES 2.3.1
Run-time dependency icu-uc found: YES 67.1
Compiler for C supports arguments -Wcast-align: YES
Compiler for C supports arguments -Wdeclaration-after-statement: YES
Compiler for C supports arguments -Werror=address: YES
Compiler for C supports arguments -Werror=array-bounds: YES
Compiler for C supports arguments -Werror=empty-body: YES
Compiler for C supports arguments -Werror=implicit: YES
Compiler for C supports arguments -Werror=implicit-function-declaration: YES
Compiler for C supports arguments -Werror=init-self: YES
Compiler for C supports arguments -Werror=int-conversion: YES
Compiler for C supports arguments -Werror=int-to-pointer-cast: YES
Compiler for C supports arguments -Werror=main: YES
Compiler for C supports arguments -Werror=misleading-indentation: YES
Compiler for C supports arguments -Werror=missing-braces: YES
Compiler for C supports arguments -Werror=missing-include-dirs: YES
Compiler for C supports arguments -Werror=nonnull: YES
Compiler for C supports arguments -Werror=overflow: YES
Compiler for C supports arguments -Werror=parenthesis: NO          ←(なし)
Compiler for C supports arguments -Werror=pointer-arith: YES
Compiler for C supports arguments -Werror=pointer-to-int-cast: YES
Compiler for C supports arguments -Werror=return-type: YES
Compiler for C supports arguments -Werror=sequence-point: YES
Compiler for C supports arguments -Werror=shadow: YES
Compiler for C supports arguments -Werror=strict-prototypes: YES
Compiler for C supports arguments -Werror=trigraphs: YES
Compiler for C supports arguments -Werror=undef: YES
Compiler for C supports arguments -Werror=write-strings: YES
Compiler for C supports arguments -Wformat-nonliteral: YES
Compiler for C supports arguments -Werror=format-security -Werror=format=2: YES
Compiler for C supports arguments -Wignored-qualifiers: YES
Compiler for C supports arguments -Wimplicit-function-declaration: YES
Compiler for C supports arguments -Wlogical-op: YES
Compiler for C supports arguments -Wmissing-format-attribute: YES
Compiler for C supports arguments -Wmissing-include-dirs: YES
Compiler for C supports arguments -Wmissing-noreturn: YES
Compiler for C supports arguments -Wnested-externs: YES
Compiler for C supports arguments -Wno-cast-function-type: YES
Compiler for C supports arguments -Wno-missing-field-initializers: YES
Compiler for C supports arguments -Wno-sign-compare: YES
Compiler for C supports arguments -Wno-unused-parameter: YES
Compiler for C supports arguments -Wold-style-definition: YES
Compiler for C supports arguments -Wpointer-arith: YES
Compiler for C supports arguments -Wstrict-prototypes: YES
Compiler for C supports arguments -Wswitch-default: YES
Compiler for C supports arguments -Wswitch-enum: YES
Compiler for C supports arguments -Wundef: YES
Compiler for C supports arguments -Wuninitialized: YES
Compiler for C supports arguments -Wunused: YES
Compiler for C supports arguments -fno-strict-aliasing: YES
Compiler for C supports arguments -fstack-protector-strong: YES
Compiler for C supports arguments -Wmissing-declarations: YES
Compiler for C supports link arguments -Wl,-z,defs: YES
Compiler for C supports link arguments -Wl,-z,now: YES
Compiler for C supports link arguments -Wl,-z,relro: YES
Configuring org.gnome.TextEditor.desktop.in using configuration
Program desktop-file-validate found: YES (/usr/bin/desktop-file-validate)
Configuring org.gnome.TextEditor.appdata.xml.in using configuration
Program appstream-util found: YES (/usr/bin/appstream-util)
Program glib-compile-schemas found: YES (/usr/bin/glib-compile-schemas)
Configuring org.gnome.TextEditor.service using configuration
Library m found: YES
Found pkg-config: /usr/bin/pkg-config (0.29.2)
Program glib-compile-resources found: YES (/usr/bin/glib-compile-resources)
Program glib-mkenums found: YES (/usr/bin/glib-mkenums)
Program glib-mkenums found: YES (/usr/bin/glib-mkenums)
Program /usr/bin/meson found: YES (/usr/bin/meson)
Run-time dependency libpcre found: YES 8.39
Configuring config.h using configuration
Build-time dependency gio-2.0 found: YES 2.70.2
Program glib-compile-schemas found: YES (/usr/bin/glib-compile-schemas)
Found CMake: /usr/bin/cmake (3.22.1)
Build-time dependency gtk-4.0 found: NO (tried pkgconfig and cmake)  ←(依存パッケージなし)
Program gtk4-update-icon-cache found: YES (/usr/bin/gtk4-update-icon-cache)
Build-time dependency desktop-file-utils found: NO (tried pkgconfig and cmake)  ←(依存パッケージなし)
Program update-desktop-database found: YES (/usr/bin/update-desktop-database)
Build targets in project: 33

Found ninja-1.10.1 at /usr/bin/ninja
→「gtk-4.0」と「desktop-file-utils」が不足のメッセージがあります。
-
→「desktop-file-utils」を検索:
$ apt search desktop-file-utils
:
desktop-file-utils/jammy,now 0.26-1ubuntu2 amd64 [インストール済み、自動]
  desktop ファイル用ユーティリティ
→インストールされています。
-
→「gtk-4.0」を検索:
$ apt search libgtk-4
:
libgtk-4-1/jammy,now 4.4.1+ds1-3 amd64 [インストール済み、自動]
  GTK graphical user interface library

libgtk-4-bin/jammy,now 4.4.1+ds1-3 amd64 [インストール済み、自動]
  programs for the GTK graphical user interface library

libgtk-4-common/jammy,jammy,now 4.4.1+ds1-3 all [インストール済み、自動]
  common files for the GTK graphical user interface library

libgtk-4-dev/jammy,now 4.4.1+ds1-3 amd64 [インストール済み]
  development files for the GTK library

libgtk-4-doc/jammy,jammy 4.4.1+ds1-3 all
  documentation for the GTK graphical user interface library

libgtk-4-media-gstreamer/jammy 4.4.1+ds1-3 amd64
  GStreamer media backend for the GTK graphical user interface library
→インストールされていますが、これは最初にある「Run-time dependency gtk4 found: YES 4.4.1」の行の依存で、「gtk-4.0」のことではありません。
$ apt search gtk-4.0
:
gir1.2-gtk-4.0/jammy,now 4.4.1+ds1-3 amd64 [インストール済み、自動]
  GTK graphical user interface library -- gir bindings

gir1.2-javascriptcoregtk-4.0/jammy,now 2.34.3-1 amd64 [インストール済み、自動]
  JavaScript engine library from WebKitGTK - GObject introspection data

libjavascriptcoregtk-4.0-18/jammy,now 2.34.3-1 amd64 [インストール済み、自動]
  JavaScript engine library from WebKitGTK

libjavascriptcoregtk-4.0-bin/jammy,now 2.34.3-1 amd64 [インストール済み]
  JavaScript engine library from WebKitGTK - command-line interpreter

libjavascriptcoregtk-4.0-dev/jammy,now 2.34.3-1 amd64 [インストール済み、自動]
  JavaScript engine library from WebKitGTK - development files

libwebkit2gtk-4.0-37/jammy,now 2.34.3-1 amd64 [インストール済み、自動]
  Web content engine library for GTK

libwebkit2gtk-4.0-dev/jammy,now 2.34.3-1 amd64 [インストール済み]
  Web content engine library for GTK - development files

libwebkit2gtk-4.0-doc/jammy,jammy 2.34.3-1 all
  Web content engine library for GTK - documentation
→インストールされていますが、これらなのかはわかりません。
探しようがありませんね。
-
-
5). ninja でビルドしてみると:
$ cd ~/ダウンロード/gnome/gnome-text-editor-main/

$ meson compile -C builddir
:
ninja: Entering directory `/home/ubn/ダウンロード/gnome/gnome-text-editor-main/builddir'
[20/96] Compiling C object src/gnome-t...ditor.p/editor-application-actions.c.o
FAILED: src/gnome-text-editor.p/editor-application-actions.c.o
→やはり変化なし。ダメでした。
-
-
6). →「gtk-4.0」と「desktop-file-utils」が不足のメッセージが残りました
インストールされているように見えるけど、認識されていません。バージョン違いかな。
「gtk4」 (4.4.1) は認識されています。「gtk-4.0」は認識されていません。違いがわかりません。
-
「GTK 4.0」を検索すると、下記がヒット
12月16日に GTK 4.0 が公開をされました。 GTK は C 言語で記述されたクロスプラットフォーム対応の GUI ツールキットです。
→入手先: https://download.gnome.org/sources/gtk/4.0
ここでは、gtk-4.0.3 が最新みたい (2021-02-07) ←日付が古い?
-
「gtk4」を検索すると、下記がヒット
The official download location
https://download.gnome.org/sources/gtk/
→上記の「GTK 4.0」のダウンロード先と同じです。ただし、こちらは上位のフォルダ(バージョン)です。
最新は「4.6」です。つまり、バージョン違い。インストールされているのは「4.4.1」。高すぎ?
-
現在のインストールを再確認:
$ apt list libgtk-4-bin libgtk-4-common libgtk-4-dev libgtk-4-doc
libgtk-4-bin/jammy,now 4.4.1+ds1-3 amd64 [インストール済み、自動]
libgtk-4-bin/jammy 4.4.1+ds1-3 i386
libgtk-4-common/jammy,jammy,now 4.4.1+ds1-3 all [インストール済み、自動]
libgtk-4-dev/jammy,now 4.4.1+ds1-3 amd64 [インストール済み]
libgtk-4-dev/jammy 4.4.1+ds1-3 i386
libgtk-4-doc/jammy,jammy 4.4.1+ds1-3 all
-
依存 (--). 「libgtk-4-doc」は要らないと思うけどインストール: ←(変わらなかったので削除)
$ sudo apt install libgtk-4-doc
:
以下のパッケージが新たにインストールされます:
  libgtk-4-doc
-
gtk4 をビルドしてインストールするときの必要条件:
$ apt list glib pango gdk-pixbuf gtk-doc
$
→バイナリがインストールできるので不要かな。もしビルドするときは、これらもビルドが必要。
-
バージョン違いでも表示させてみると:
$ apt search libgtk-4
:
libgtk-4-1/jammy,now 4.4.1+ds1-3 amd64 [インストール済み、自動]
  GTK graphical user interface library

libgtk-4-bin/jammy,now 4.4.1+ds1-3 amd64 [インストール済み、自動]
  programs for the GTK graphical user interface library

libgtk-4-common/jammy,jammy,now 4.4.1+ds1-3 all [インストール済み、自動]
  common files for the GTK graphical user interface library

libgtk-4-dev/jammy,now 4.4.1+ds1-3 amd64 [インストール済み]
  development files for the GTK library

libgtk-4-doc/jammy,jammy,now 4.4.1+ds1-3 all [インストール済み]
  documentation for the GTK graphical user interface library

libgtk-4-media-gstreamer/jammy 4.4.1+ds1-3 amd64
  GStreamer media backend for the GTK graphical user interface library
→バージョンは「4.4.1」がインストールされています。「GTK 4.0」の不足というのが何を指しているのか不明。
-
依存 (--). 「libgtk-4-media-gstreamer」は要らないと思うけどインストール: ←(変わらなかったので削除)
$ sudo apt install libgtk-4-media-gstreamer
:
以下のパッケージが新たにインストールされます:
  libgstreamer-plugins-bad1.0-0 libgtk-4-media-gstreamer
-
-
--- - --- - --- - --- - --- - --- - --- - --- - --- - --- - --- - --- - --- - --- - ----- ----- ----- -
13. 今までのインストールを整理
-
1). 最初からインストールする場合:
(1). 開発ツールと Meson をインストール
$ sudo apt install build-essential meson ninja-build
-
(2). 最新の「gtksourceview-5」のビルドが必要です
apt コマンドでインストールできますが、バージョンが低いです:
$ apt search libgtksourceview-5-dev
:
libgtksourceview-5-dev/jammy 5.3.1-1 amd64
  development files for the GTK 4 syntax highlighting widget
→最新の「gnome-text-editor」では、5.4 以上が必要
-
ビルドのやり方は「こちら 」
ただし、その都度、バージョン番号を修正してください。
-
(3). apt でインストールできる「gnome-text-editor」の依存パッケージ:
$ apt list pkg-config cmake libglib2.0-dev libgtk-4-dev valac libadwaita-1-dev libenchant-2-dev gettext appstream-util libwebkit2gtk-4.0-dev gi-docgen libjavascriptcoregtk-4.0-bin
→「i386」のパッケージは無視。判明している依存パッケージのみです。追加が必要。
-
(4). 上記の依存をapt でインストールする場合:
$ sudo apt install pkg-config cmake libglib2.0-dev libgtk-4-dev valac libadwaita-1-dev libenchant-2-dev gettext appstream-util libwebkit2gtk-4.0-dev gi-docgen libjavascriptcoregtk-4.0-bin
→判明している依存パッケージのみです。追加が必要。
-
-
2). またまた、GNOME Text Editor のバージョンが上がりました
それに伴い、必要とする依存するパッケージのバージョンも上がっています。
    GTK 4.4 以上
    GtkSourceView 5.4 以上    ←(再度ビルドが必要)
    Libadwaita
    libpcre (.editorconfig サポート用)
    icu (言語コード ids 用)
→イタチごっこですね。
-
-
… ビルドの作業は、ここまで。
-
不足している(apt で指定する)パッケージ名とバージョンがわかる人がいたら、教えてもらえるとうれしいです。
-
-
--- - --- - --- - --- - --- - --- - --- - --- - --- - --- - --- - --- - --- - --- - ----- ----- ----- --
14. 依存の参考資料:
追記: 最新が出たので、そちらでの確認が必要になりました。
-
1). 参考: 依存を補うなら、事前にソースツリーの「meson.build」を確認しておくのがベター
依存関連の部分を抜粋:
gnome-text-editor-main/meson.build
# Check dependencies
glib_req_version = '2.69'
gtk_req_version = '4.4'                      ←「libgtk-4」(4.4.1)
gtksourceview_req_version = '5.3'
enchant_req_version = '2.2.0'

glib_req = '>= @0@'.format(glib_req_version)
gtk_req = '>= @0@'.format(gtk_req_version)
gtksourceview_req = '>= @0@'.format(gtksourceview_req_version)
enchant_req = '>= @0@'.format(enchant_req_version)

libglib_dep = dependency('gio-unix-2.0', version: glib_req)
libgtk_dep = dependency('gtk4', version: gtk_req)
libgtksourceview_dep = dependency('gtksourceview-5', version: gtksourceview_req)
libadwaita_dep = dependency('libadwaita-1')
libenchant_dep = dependency('enchant-2', version: enchant_req)
libicu_dep = dependency('icu-uc')
→14 個の依存が指定されています。なので、もう少し解決が足りないかな。
-
上記から、
libgtksourceview-5-dev → 5.2.0-2 でバージョン低し 、代わりに5.3.3 をビルド(dev だったかは不明)
libglib2.0-dev →インストール済み
libenchant-2-dev →インストール済み
libicu-dev →インストール済み
-
2). 参考: ソースツリーに添付のREADME.md を確認:
gnome-text-editor-main/README.md
依存の抜粋:
 * GTK 4.4 以上
 * GtkSourceView 5.4 以上      ←気になるけど、5.3.3
 * Libadwaita
 * libpcre ( .editorconfig サポート用)
 * icu (for language code ids)
-
3). 参考: 「flatpak」でインストールした「gnome-text-editor」のヘルプ表示から抜粋:
-
ヘルプの About で表示される「System」タブの情報:
Text Editor (42.alpha2-16-g4c4ac87) Development

Flatpak: yes
GLib: 2.71.0 (2.71.0)
GTK: 4.6.0 (4.6.0)
GtkSourceView: 5.3.2 (5.3.2)
Libadwaita: 1.0.1 (1.0.1)
Enchant2: 2.2.15
gtk-theme-name: Adwaita-empty
GTK_THEME: unset

org.gnome.TextEditor recolor-window = true
org.gnome.TextEditor restore-session = true
org.gnome.TextEditor show-map = true [default=false]
org.gnome.TextEditor custom-font = 'Noto Sans CJK JP 11' [default='Monospace 11']
org.gnome.TextEditor show-grid = true [default=false]
org.gnome.TextEditor style-variant = 'dark' [default='follow']
org.gnome.TextEditor style-scheme = 'Adwaita'
org.gnome.TextEditor indent-style = 'tab'
org.gnome.TextEditor show-right-margin = false
org.gnome.TextEditor spellcheck = false [default=true]
org.gnome.TextEditor auto-indent = true
org.gnome.TextEditor use-system-font = false [default=true]
org.gnome.TextEditor keybindings = 'default'
org.gnome.TextEditor highlight-current-line = true [default=false]
org.gnome.TextEditor last-save-directory = ''
org.gnome.TextEditor show-line-numbers = true [default=false]
org.gnome.TextEditor discover-settings = true
org.gnome.TextEditor auto-save-delay = uint32 3
org.gnome.TextEditor wrap-text = true
org.gnome.TextEditor indent-width = -1
org.gnome.TextEditor enable-snippets = false
org.gnome.TextEditor draw-spaces = @as []
org.gnome.TextEditor right-margin-position = uint32 80
org.gnome.TextEditor tab-width = uint32 4 [default=uint32 8]
→最初の方に、依存パッケージのバージョンが表示されています。実際に動いている値なので貴重です。
→後ろの方に、フォントの変更と、スペルチェックのオフ、など。メニューから設定を変更した値までのぞけます。便利。
-
-
--- - --- - --- - --- - --- - --- - --- - --- - --- - --- - --- - --- - --- - --- - ----- ----- ----- ---
15. 「gnome-text-editor」を「flatpak」でインストール:
-
ビルドしなくても、「flatpak」の環境を整えれば「gnome-text-editor」を簡単にインストールできます。
-
参考:
「Flatpak」でUbuntuに最新アプリをインストールする方法
-
1). Flatpak 公式のPPA にて「flatpak」パッケージをインストール:
$ sudo add-apt-repository -y ppa:alexlarsson/flatpak
:
PPA publishes dbgsym, you may need to include 'main/debug' component
Repository: 'deb http://ppa.launchpad.net/alexlarsson/flatpak/ubuntu/ jammy main'
Description:
 Linux application sandboxing and distribution framework
More info: https://launchpad.net/~alexlarsson/+archive/ubuntu/flatpak
Adding repository.
Adding deb entry to /etc/apt/sources.list.d/alexlarsson-ubuntu-flatpak-jammy.list
Adding disabled deb-src entry to /etc/apt/sources.list.d/alexlarsson-ubuntu-flatpak-jammy.list
Adding key to /etc/apt/trusted.gpg.d/alexlarsson-ubuntu-flatpak.gpg with fingerprint 690951F1A4DE0F905496E8C6C793BFA2FA577F07
:
エラー:8 http://ppa.launchpad.net/alexlarsson/flatpak/ubuntu jammy Release
  404  Not Found [IP: 91.189.95.85 80]

E: リポジトリ http://ppa.launchpad.net/alexlarsson/flatpak/ubuntu jammy Release には Release ファイルがありません。
N: このようなリポジトリから更新を安全に行うことができないので、デフォルトでは更新が無効になっています。
N: リポジトリの作成とユーザ設定の詳細は、apt-secure(8) man ページを参照してください。
→登録したflatpak のリポジトリでエラー
-
登録したflatpak のリポジトリを確認:
$ cat /etc/apt/sources.list.d/alexlarsson-ubuntu-flatpak-jammy.list
deb http://ppa.launchpad.net/alexlarsson/flatpak/ubuntu/ jammy main
# deb-src http://ppa.launchpad.net/alexlarsson/flatpak/ubuntu/ jammy main
→「jammy」用はまだ登録されていないみたい。
-
登録したflatpak のリポジトリを手動で修正:
$ sudo gedit /etc/apt/sources.list.d/alexlarsson-ubuntu-flatpak-jammy.list
deb http://ppa.launchpad.net/alexlarsson/flatpak/ubuntu/ focal main

# deb http://ppa.launchpad.net/alexlarsson/flatpak/ubuntu/ jammy main
# deb-src http://ppa.launchpad.net/alexlarsson/flatpak/ubuntu/ jammy main
システム更新を数回:
$ sudo apt update
ヒット:1 http://jp.archive.ubuntu.com/ubuntu jammy InRelease
ヒット:2 http://jp.archive.ubuntu.com/ubuntu jammy-updates InRelease
ヒット:3 http://jp.archive.ubuntu.com/ubuntu jammy-backports InRelease
ヒット:4 http://packages.microsoft.com/repos/code stable InRelease
ヒット:5 http://ppa.launchpad.net/alexlarsson/flatpak/ubuntu focal InRelease   ←(矛盾してるけど)
ヒット:6 http://security.ubuntu.com/ubuntu jammy-security InRelease
パッケージリストを読み込んでいます... 完了
依存関係ツリーを作成しています... 完了
状態情報を読み取っています... 完了
アップグレードできるパッケージが 2 個あります。表示するには 'apt list --upgradable' を実行してください。
$ sudo apt upgrade
パッケージリストを読み込んでいます... 完了
依存関係ツリーを作成しています... 完了
状態情報を読み取っています... 完了
アップグレードパッケージを検出しています... 完了
以下のパッケージは保留されます:
  open-vm-tools open-vm-tools-desktop
アップグレード: 0 個、新規インストール: 0 個、削除: 0 個、保留: 2 個。
→なぜか保留されているパッケージがありました。 保留された時の対処は、依存関係の確認が必要。
$ apt search open-vm-tools
:
open-vm-tools/jammy 2:11.3.5-1 amd64 [2:11.3.0-2ubuntu2 からアップグレード可]
  Open VMware Tools for virtual machines hosted on VMware (CLI)

open-vm-tools-desktop/jammy 2:11.3.5-1 amd64 [2:11.3.0-2ubuntu2 からアップグレード可]
  Open VMware Tools for virtual machines hosted on VMware (GUI)

open-vm-tools-dev/jammy 2:11.3.5-1 amd64
  Open VMware Tools for virtual machines hosted on VMware (development)

open-vm-tools-sdmp/jammy 2:11.3.5-1 amd64
  Open VMware Tools for VMs hosted on VMware (Service Discovery Plugin)
→表示を消すには、パッケージを再インストールすればいいのだけど、 VirtualBox のゲストOS を使っていて、VMware のホスト側のパッケージが(依存として)必要なのかはわかりません。
-
消すなら依存がある場合は影響しそうだけど、再インストールなら支障はなさそう。
$ sudo apt install open-vm-tools open-vm-tools-desktop

$ sudo apt update
$ sudo apt upgrade
→「保留」が消えました。
-
2). 「flatpak」をインストール:
$ sudo apt install flatpak
:
以下のパッケージが新たにインストールされます:
  flatpak libmalcontent-0-0 libostree-1-1
$ flatpak --version
Flatpak 1.12.2
-
3). 「Ubuntuソフトウェア」にて「gnome-software-plugin-flatpak」をインストール:
$ sudo apt install gnome-software-plugin-flatpak
:
以下のパッケージが新たにインストールされます:
  gnome-software gnome-software-common gnome-software-plugin-flatpak
  gnome-software-plugin-snap libflatpak0
-
4). Flathub をリポジトリとして登録:
$ flatpak remote-add --if-not-exists flathub https://flathub.org/repo/flathub.flatpakrepo
-
5). 再起動
-
6). 「ソフトウェア」を起動してみます
オレンジ色のアイコンの「Ubuntuソフトウェア」(Ubuntu Software)ではなく、白色のアイコンの「ソフトウェア」(Software 41.2)が追加されました。
-
2つの「ソフトウェア」の画面を並べてみると:

-
似ていますが、レイアウトやアイコンが少し違います。
左: 「Ubuntuソフトウェア」 (Ubuntu Software 3.38.1)
右: 「ソフトウェア」(Software 41.2)
-
アプリのアイコン:
![]()
上: 「Ubuntuソフトウェア」   ←(アプリのアイコン: オレンジ色)
下: 「ソフトウェア」         ←(アプリのアイコン: 白色)
「ソフトウェア」はGNOME で使われており、Flatpak 対応版です。
よく見ると、右のウィンドウの「アップデート」に赤い点が付いています。 Flatpak アプリの更新が来ているみたい。
-
7). 「gnome-text-editor」のソースツリーにあるREADME.md を参照:
-
やってみて!
org.gnome.TextEditor.Devel.flatpakref をクリック →「ファイルを保存する」
- Flatpak から Nightly ビルドをインストールできます
-
8). ダウンロードした「org.gnome.TextEditor.Devel.flatpakref」を右クリック→「ソフトウェアのインストールで開く」
-
9). 「ソフトウェア」が起動→「Text Editor」のページが表示:
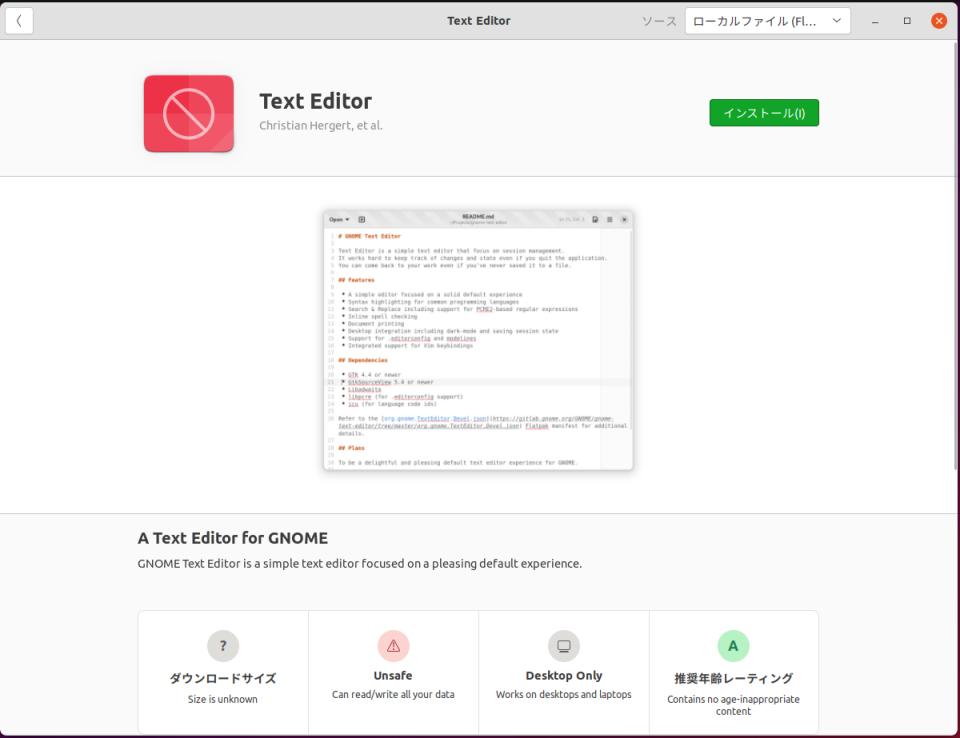
→緑色の「インストール」をクリック
-
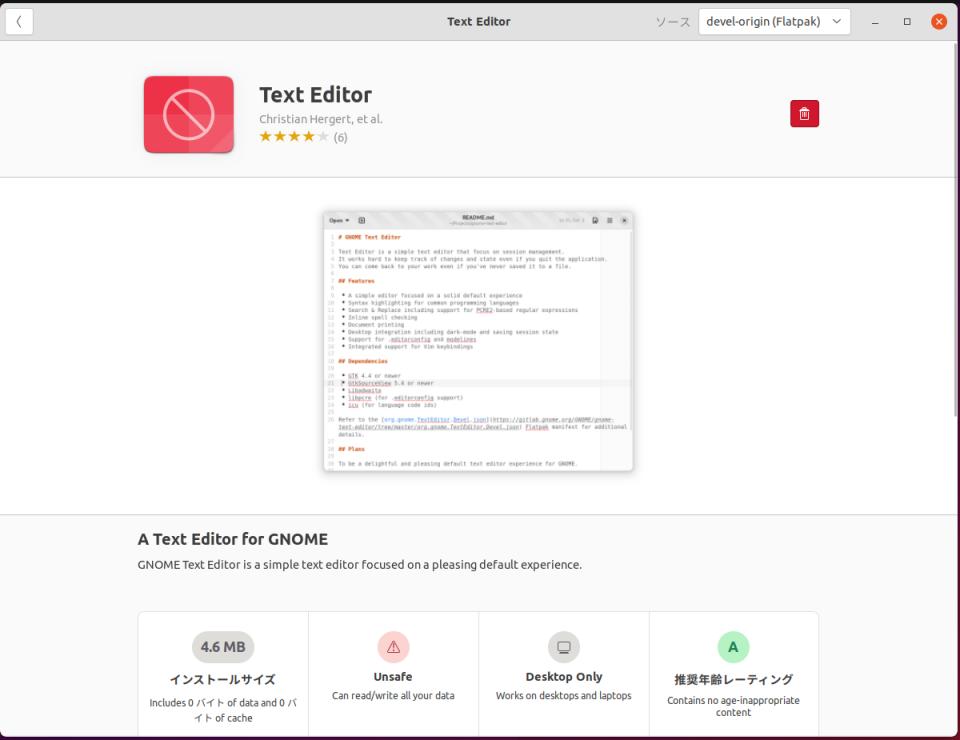
→赤い「ゴミ箱」アイコンが表示されればインストール完了です。
-
10). アプリを起動:
デフォルトの画面:

カスタマイズした画面:

→普通に使えます。
-
-
まとめ
個人的には初めて使う「Meson」のシステムをVirtualBox に入れて、アプリをソースからビルドできる環境にしてみました。依存するパッケージを補完しながら、エラーがなくなるまで、「Meson」でのビルドを何回も繰り返します。
ビルドの待ち時間はCmake よりも大幅に短縮されています。これは、プログラム開発では大きな利点です。 依存で必要なパッケージのビルドの方も「Meson」でビルドできれば更に効果が高まります。
また、ビルド用のフォルダが必ず必要なので、ビルドでソースのフォルダを汚さないし、何回もトライするにはいいかも。わからなくなったら、ログだけは別に保存しておいて、フォルダをごっそり削除してやり直すだけです。
また、インストールした依存も含めてのやり直しには、VirtualBox のスナップショットを事前に保存しておけば、簡単にやり直しできます。
-
ビルドのシステムが変わっても、やはり、ビルドで必要なのは「依存を探す」ためのトライと根気でした。
-
新しめの(依存の)パッケージを要求されるので、Ubuntu よりもFedora で試した方がうまくビルドできるかも。 また、苦労せずにすぐに試したいときは flatpak 版が便利。
-
-
-
-
目次
-
-
- 目次
- --- - --- - --- - --- - --- - --- - --- - --- - --- - --- - --- - --- - --- - --- - -
- 「Ubuntu 22.04 LTS」の画面:
- --- - --- - --- - --- - --- - --- - --- - --- - --- - --- - --- - --- - --- - --- - --
- 「Ubuntu 22.04 LTS」について
- --- - --- - --- - --- - --- - --- - --- - --- - --- - --- - --- - --- - --- - --- - ---
- Meson について
- --- - --- - --- - --- - --- - --- - --- - --- - --- - --- - --- - --- - --- - --- - ----
- 1. 開発ツールのインストール
- --- - --- - --- - --- - --- - --- - --- - --- - --- - --- - --- - --- - --- - --- - -----
- 2. Meson をpip でインストールする場合:
- --- - --- - --- - --- - --- - --- - --- - --- - --- - --- - --- - --- - --- - --- - ----- -
- 3. Meson をapt でインストールする場合:
- --- - --- - --- - --- - --- - --- - --- - --- - --- - --- - --- - --- - --- - --- - ----- --
- 4. Meson で、新しい見本となるプロジェクトを作成して、それをビルドしてみます
- --- - --- - --- - --- - --- - --- - --- - --- - --- - --- - --- - --- - --- - --- - ----- ---
- 5. Meson を使ってビルドしてみます:
- --- - --- - --- - --- - --- - --- - --- - --- - --- - --- - --- - --- - --- - --- - ----- ----
- 6. 「gnome-text-editor」をビルドしてみます:
- --- - --- - --- - --- - --- - --- - --- - --- - --- - --- - --- - --- - --- - --- - ----- -----
- 7. 「gnome-text-editor」をビルドするための依存を補う:
- --- - --- - --- - --- - --- - --- - --- - --- - --- - --- - --- - --- - --- - --- - ----- ----- -
- 8. 依存の「gtksourceview-5 (5.3.0)」をビルドするための依存を補う:
- --- - --- - --- - --- - --- - --- - --- - --- - --- - --- - --- - --- - --- - --- - ----- ----- --
- 9. 依存の「gtksourceview-5 (5.3.0)」をビルド:
- --- - --- - --- - --- - --- - --- - --- - --- - --- - --- - --- - --- - --- - --- - ----- ----- ---
- 10. 「gnome-text-editor」をビルドするための依存を補う(続き):
- --- - --- - --- - --- - --- - --- - --- - --- - --- - --- - --- - --- - --- - --- - ----- ----- ----
- 11. 追加: 最新の「gtksourceview-5 (5.3.3)」があったのでビルド:
- --- - --- - --- - --- - --- - --- - --- - --- - --- - --- - --- - --- - --- - --- - ----- ----- -----
- 12. 「gnome-text-editor」をビルド(その 2):
- --- - --- - --- - --- - --- - --- - --- - --- - --- - --- - --- - --- - --- - --- - ----- ----- ----- -
- 13. 今までのインストールを整理
- --- - --- - --- - --- - --- - --- - --- - --- - --- - --- - --- - --- - --- - --- - ----- ----- ----- --
- 14. 依存の参考資料:
- --- - --- - --- - --- - --- - --- - --- - --- - --- - --- - --- - --- - --- - --- - ----- ----- ----- ---
- 15. 「gnome-text-editor」を「flatpak」でインストール:
- 1). Flatpak 公式のPPA にて「flatpak」パッケージをインストール:
- 2). 「flatpak」をインストール:
- 3). 「Ubuntuソフトウェア」にて「gnome-software-plugin-flatpak」をインストール:
- 4). Flathub をリポジトリとして登録:
- 5). 再起動
- 6). 「ソフトウェア」を起動してみます
- 7). 「gnome-text-editor」のソースツリーにあるREADME.md を参照:
- 8). ダウンロードした「org.gnome.TextEditor.Devel.flatpakref」を右クリック→「ソフトウェアのインストールで開く」
- 9). 「ソフトウェア」が起動→「Text Editor」のページが表示:
- 10). アプリを起動:
- まとめ
- -
-
-
-
-