登録日: 2022-04-15 更新日: 2022-05-01
前回、「Python」の開発で使われるIDE の「PyCharm」コードエディタをインストールして日本語化 しました。
-
残念ながら、Python の学習のために追加した「EduTools」プラグインは日本語化の対象外 でした。
英語のままでは学習が進まないので、まずは基本的なコース の「Introduction to Python」(Python の基本)を翻訳してみました。その備忘録です。
-
-
ホストOS : Xubuntu 20.04.4 LTS
ゲストOS : Lubuntu 22.04 LTS ←(今回の作業)
-
-
使用したPC は「ASUS Chromebox CN60 」で、 プロセッサは第4世代の「Intel Celeron 2955U 」です。UEFI 立ち上げです。
-
(注)リンクを戻るときはブラウザの左上の「←」をクリック
-
-
目次
-
前回の作業:
-
2. 学習用の「Edu Tools」プラグインのインストール:
3. 学習コース(プロジェクト)として、「Introduction to Python」を選択:
-
今回の作業:
-
1. パッチの適用: A.「新規でファイルを作成する」手順: ←(オススメ)
A で使うファイル: Delete-md-File.sh
A で使うファイル: pycharm-ja.patch ←(差分がありません。新規)
-
2. パッチの適用: B. 初期に作成した、通常の手順:
B で使うファイル: pycharm-ja.patch
-
3. パッチの適用: C. エラー回避を考えた手順:
C で使うファイル: Delete-LineEnd.sh
C で使うファイル: pycharm-ja.patch ←(B と同じです)
-
-
4. プルリクエストで提案した手順:
使うファイル: Delete-md-File.sh ←(A と同じですが、警告表示に含まれる日本語は省略)
使うファイル: ja.patch ←(A と同じですが、ファイル名を変えました)
-
-
-
-
--- - --- - --- - --- - --- - --- - --- - --- - --- - --- - --- - --- - --- - --- - -
「Lubuntu 22.04 LTS」:
-
「PyCharm」の「Edu Tools」プラグインを使って、Python の学習:

→今回、基礎コースの「Introduction to Python」を日本語化しました。
右にあるパネルが「Toolbox」ツールです。「JetBrains」社製アプリのパッケージ管理や起動ができます。 ここではプロジェクトファイルを指定しての「PyCharm」の起動(つまり、ランチャー)に使っています。
-
「Edu Tools」プラグインの学習コースの選択画面:

→「Introduction to Python」以外の学習コースも選べます。ただし、今のところ英語です。
-
現在のバージョンを表示:
-
Lubuntu 22.04 LTS
2022-04-06 現在
カーネル:
$ uname -r
5.15.0-25-generic
リリース:
$ cat /etc/lsb-release
DISTRIB_ID=Ubuntu
DISTRIB_RELEASE=22.04
DISTRIB_CODENAME=jammy
DISTRIB_DESCRIPTION="Ubuntu Jammy Jellyfish (development branch)"
→「Jellyfish」とはクラゲのことです。公開前の開発版です。
-
-
--- - --- - --- - --- - --- - --- - --- - --- - --- - --- - --- - --- - --- - --- - --
1. 参考: 学習に使う「~/PycharmProjects」のファイルを確認:
-
1). 「PyCharm」(または、Welcome 画面)を起動:
画面下パネルの右の「ギア」アイコンをクリック→「Toolbox」画面→「PyCharm Community」をクリック。
もしくは、「プロジェクト」タブ→「Introduction to Python」をクリック。
-
または、手動でインストールしてパスを通した のなら、
$ pycharm.sh
-
→「PyCharm」で前回開いていた ファイル(タブ)が開きます。
つまり、学習コースの続きが表示されます。「英語」です
→Pycharm で学習が始まることを確認して、右上の「x」で閉じます。
-
2). 下記のファイルができていることを確認:
$ ls -1 ~/PycharmProjects/'Introduction to Python'/
:
'Classes and objects'
'Condition expressions'
'Data structures'
'File input output'
Functions
Introduction
LICENSE
Loops
'Modules and packages'
README.md
Strings
Variables
course-info.yaml
course-remote-info.yaml
→フォルダ名に「半角スペース」が含まれていることに注目
-
非表示のファイルも表示:
$ ls -1a ~/PycharmProjects/'Introduction to Python'/
:
.idea
'Classes and objects'
'Condition expressions'
'Data structures'
Delete-md-File.sh
'File input output'
Functions
Introduction
LICENSE
Loops
'Modules and packages'
README.md
Strings
Variables
course-info.yaml
course-remote-info.yaml
$ ls -1a ~/PycharmProjects/'Introduction to Python'/.idea
:
.gitignore
'Introduction to Python.iml'
VirtualEnvironment
externalDependencies.xml
inspectionProfiles
misc.xml
modules.xml
workspace.xml
→「.idea」に管理ファイルがまとめられています。
-
3).「GitHub: introduction_to_python 」サイトに置かれたファイルとの比較
Condition expressions
Data structures
File input output
Functions
Introduction
Loops
Modules and packages
Strings
Variables
.gitignore
LICENSE
README.md
course-info.yaml
course-remote-info.yaml
→ほとんどのファイルが、そのままホームフォルダに落ちています。
-
4). オリジナルを退避(重要):
$ cd
$ cp -r PycharmProjects PycharmProjects-ORG
-
5). 退避後、すぐに日本語化したい場合は「こちら 」
-
-
--- - --- - --- - --- - --- - --- - --- - --- - --- - --- - --- - --- - --- - --- - ---
2. 参考: 学習に使う「~/PycharmProjects」のファイルツリーを表示:
-
~/PycharmProjects$ tree
.
└── Introduction to Python ←Python の基本の学習(プロジェクト)
├── Classes and objects ←クラスとオブジェクト
│ ├── Class and Instance Variables
│ │ ├── class_instance_variables.py
│ │ ├── task-info.yaml
│ │ ├── task-remote-info.yaml
│ │ ├── task.md ←(注目)クラス変数とインスタンス変数
│ │ └── tests
│ │ ├── __init__.py
│ │ └── test_task.py
│ ├── Definition
│ │ ├── class_definition.py
│ │ ├── task-info.yaml
│ │ ├── task-remote-info.yaml
│ │ ├── task.md ←(注目)意味
│ │ └── tests
│ │ ├── __init__.py
│ │ └── test_task.py
│ ├── Special __init__ method
│ │ ├── init_method.py
│ │ ├── task-info.yaml
│ │ ├── task-remote-info.yaml
│ │ ├── task.md ←(注目)
│ │ └── tests
│ │ ├── __init__.py
│ │ └── test_task.py
│ ├── The self parameter
│ │ ├── self_parameter.py
│ │ ├── task-info.yaml
│ │ ├── task-remote-info.yaml
│ │ ├── task.md ←(注目)自己パラメータ
│ │ └── tests
│ │ ├── __init__.py
│ │ └── test_task.py
│ ├── Update variable
│ │ ├── task-info.yaml
│ │ ├── task-remote-info.yaml
│ │ ├── task.md ←(注目)変数を更新
│ │ ├── tests
│ │ │ ├── __init__.py
│ │ │ └── test_task.py
│ │ └── update_variable.py
│ ├── Variable access
│ │ ├── access_variable.py
│ │ ├── task-info.yaml
│ │ ├── task-remote-info.yaml
│ │ ├── task.md ←(注目)可変アクセス
│ │ └── tests
│ │ ├── __init__.py
│ │ └── test_task.py
│ ├── __str__ vs __repr__
│ │ ├── str_and_repr.py
│ │ ├── task-info.yaml
│ │ ├── task-remote-info.yaml
│ │ ├── task.md ←(注目)
│ │ └── tests
│ │ ├── __init__.py
│ │ └── test_task.py
│ ├── lesson-info.yaml
│ └── lesson-remote-info.yaml
├── Condition expressions ←条件式
│ ├── Boolean operators
│ │ ├── boolean_operators.py
│ │ ├── task-info.yaml
│ │ ├── task-remote-info.yaml
│ │ ├── task.md ←(注目)条件式
│ │ └── tests
│ │ ├── __init__.py
│ │ └── test_task.py
│ ├── Boolean operators order
│ │ ├── boolean_order.py
│ │ ├── task-info.yaml
│ │ ├── task-remote-info.yaml
│ │ ├── task.md ←(注目)ブール演算子の順序
│ │ └── tests
│ │ ├── __init__.py
│ │ └── test_task.py
│ ├── Else and elif parts in if statement
│ │ ├── else_elif.py
│ │ ├── task-info.yaml
│ │ ├── task-remote-info.yaml
│ │ ├── task.md ←(注目)ifステートメントのElseとelifの部分
│ │ └── tests
│ │ ├── __init__.py
│ │ └── test_task.py
│ ├── If statement
│ │ ├── if_statement.py
│ │ ├── task-info.yaml
│ │ ├── task-remote-info.yaml
│ │ ├── task.md ←(注目)If ステートメント
│ │ └── tests
│ │ ├── __init__.py
│ │ └── test_task.py
│ ├── lesson-info.yaml
│ └── lesson-remote-info.yaml
├── Data structures ←データ構造
│ ├── Dictionaries
│ │ ├── dicts.py
│ │ ├── task-info.yaml
│ │ ├── task-remote-info.yaml
│ │ ├── task.md ←(注目)辞書
│ │ └── tests
│ │ ├── __init__.py
│ │ └── test_task.py
│ ├── Dictionary keys() and values()
│ │ ├── dict_key_value.py
│ │ ├── task-info.yaml
│ │ ├── task-remote-info.yaml
│ │ ├── task.md ←(注目)辞書 keys() と values()
│ │ └── tests
│ │ ├── __init__.py
│ │ └── test_task.py
│ ├── In keyword
│ │ ├── in_keyword.py
│ │ ├── task-info.yaml
│ │ ├── task-remote-info.yaml
│ │ ├── task.md ←(注目)In keyword
│ │ └── tests
│ │ ├── __init__.py
│ │ └── test_task.py
│ ├── Join method
│ │ ├── join_method.py
│ │ ├── task-info.yaml
│ │ ├── task-remote-info.yaml
│ │ ├── task.md ←(注目)結合方法
│ │ └── tests
│ │ ├── __init__.py
│ │ └── test_task.py
│ ├── List items
│ │ ├── list_items.py
│ │ ├── task-info.yaml
│ │ ├── task-remote-info.yaml
│ │ ├── task.md ←(注目)リストアイテム
│ │ └── tests
│ │ ├── __init__.py
│ │ └── test_task.py
│ ├── Lists introduction
│ │ ├── lists.py
│ │ ├── task-info.yaml
│ │ ├── task-remote-info.yaml
│ │ ├── task.md ←(注目)リスト紹介
│ │ └── tests
│ │ ├── __init__.py
│ │ └── test_task.py
│ ├── Lists operations
│ │ ├── list_operations.py
│ │ ├── task-info.yaml
│ │ ├── task-remote-info.yaml
│ │ ├── task.md ←(注目)操作を一覧表示
│ │ └── tests
│ │ ├── __init__.py
│ │ └── test_task.py
│ ├── Nested Lists
│ │ ├── task-info.yaml
│ │ ├── task-remote-info.yaml
│ │ ├── task.md ←(注目)ネストされたリスト
│ │ ├── task.py
│ │ └── tests
│ │ ├── __init__.py
│ │ └── test_task.py
│ ├── Tuples
│ │ ├── task-info.yaml
│ │ ├── task-remote-info.yaml
│ │ ├── task.md ←(注目)タプル
│ │ ├── tests
│ │ │ ├── __init__.py
│ │ │ └── test_task.py
│ │ └── tuples.py
│ ├── lesson-info.yaml
│ └── lesson-remote-info.yaml
├── File input output ←ファイル入出力
│ ├── Open file
│ │ ├── input.txt
│ │ ├── input1.txt
│ │ ├── open_file.py
│ │ ├── task-info.yaml
│ │ ├── task-remote-info.yaml
│ │ ├── task.md ←(注目)ファイルを開く
│ │ └── tests
│ │ ├── __init__.py
│ │ └── test_task.py
│ ├── Read file
│ │ ├── input.txt
│ │ ├── input1.txt
│ │ ├── read_file.py
│ │ ├── task-info.yaml
│ │ ├── task-remote-info.yaml
│ │ ├── task.md ←(注目)ファイルを読む
│ │ └── tests
│ │ ├── __init__.py
│ │ └── test_task.py
│ ├── What next
│ │ ├── main.py
│ │ ├── task-info.yaml
│ │ ├── task-remote-info.yaml
│ │ └── task.md ←(注目)次は何
│ ├── Write to file
│ │ ├── output.txt
│ │ ├── task-info.yaml
│ │ ├── task-remote-info.yaml
│ │ ├── task.md ←(注目)ファイルに書き込む
│ │ ├── tests
│ │ │ ├── __init__.py
│ │ │ └── test_task.py
│ │ └── write_to_file.py
│ ├── lesson-info.yaml
│ └── lesson-remote-info.yaml
├── Functions ←関数
│ ├── Args and kwargs
│ │ ├── args_kwargs.py
│ │ ├── task-info.yaml
│ │ ├── task-remote-info.yaml
│ │ ├── task.md ←(注目)Argsとkwargs
│ │ └── tests
│ │ └── test_task.py
│ ├── Default parameters
│ │ ├── default_parameter.py
│ │ ├── task-info.yaml
│ │ ├── task-remote-info.yaml
│ │ ├── task.md ←(注目)デフォルトパラメータ
│ │ └── tests
│ │ └── test_task.py
│ ├── Definition
│ │ ├── functions.py
│ │ ├── task-info.yaml
│ │ ├── task-remote-info.yaml
│ │ ├── task.md ←(注目)意味
│ │ └── tests
│ │ └── test_task.py
│ ├── Keyword Arguments
│ │ ├── keyword_args.py
│ │ ├── task-info.yaml
│ │ ├── task-remote-info.yaml
│ │ ├── task.md ←(注目)キーワード引数
│ │ └── tests
│ │ └── test_task.py
│ ├── Parameters and call arguments
│ │ ├── param_args.py
│ │ ├── task-info.yaml
│ │ ├── task-remote-info.yaml
│ │ ├── task.md ←(注目)パラメータと呼び出し引数
│ │ └── tests
│ │ └── test_task.py
│ ├── Recursion
│ │ ├── recursion.py
│ │ ├── task-info.yaml
│ │ ├── task-remote-info.yaml
│ │ ├── task.md ←(注目)再帰
│ │ └── tests
│ │ └── test_task.py
│ ├── Return value
│ │ ├── return_keyword.py
│ │ ├── task-info.yaml
│ │ ├── task-remote-info.yaml
│ │ ├── task.md ←(注目)戻り値
│ │ └── tests
│ │ └── test_task.py
│ ├── lesson-info.yaml
│ └── lesson-remote-info.yaml
├── Introduction ←序章
│ ├── About
│ │ ├── main.py
│ │ ├── task-info.yaml
│ │ ├── task-remote-info.yaml
│ │ └── task.md ←(注目)コースについて
│ ├── Comments
│ │ ├── comments.py
│ │ ├── task-info.yaml
│ │ ├── task-remote-info.yaml
│ │ ├── task.md ←(注目)コメント
│ │ └── tests
│ │ └── test_task.py
│ ├── Course View
│ │ ├── edu_course_view.png
│ │ ├── main.py
│ │ ├── task-info.yaml
│ │ ├── task-remote-info.yaml
│ │ └── task.md ←(注目)コースビュー
│ ├── Editor
│ │ ├── edu_context_menu_run.png
│ │ ├── edu_editor.png
│ │ ├── main.py
│ │ ├── task-info.yaml
│ │ ├── task-remote-info.yaml
│ │ └── task.md ←(注目)エディタ
│ ├── Navigating Around
│ │ ├── edu_course_overview.png
│ │ ├── main.py
│ │ ├── task-info.yaml
│ │ ├── task-remote-info.yaml
│ │ └── task.md ←(注目)ナビゲート
│ ├── Our first program
│ │ ├── execute.svg
│ │ ├── hello_world.py
│ │ ├── task-info.yaml
│ │ ├── task-remote-info.yaml
│ │ └── task.md ←(注目)最初のプログラム
│ ├── Task Description
│ │ ├── images
│ │ │ ├── back.svg
│ │ │ ├── commentTask.svg
│ │ │ ├── edu_next_button.png
│ │ │ ├── edu_peek_solution.png
│ │ │ ├── edu_task_description_window_settings.png
│ │ │ ├── forward.svg
│ │ │ ├── gear.svg
│ │ │ ├── hideToolWindow.svg
│ │ │ └── reset.svg
│ │ ├── main.py
│ │ ├── task-info.yaml
│ │ ├── task-remote-info.yaml
│ │ └── task.md ←(注目)課題の説明
│ ├── lesson-info.yaml
│ └── lesson-remote-info.yaml
├── LICENSE
├── Loops ←ループ
│ ├── Break keyword
│ │ ├── break_keyword.py
│ │ ├── task-info.yaml
│ │ ├── task-remote-info.yaml
│ │ ├── task.md ←(注目)Break keyword
│ │ └── tests
│ │ ├── __init__.py
│ │ └── test_task.py
│ ├── Continue keyword
│ │ ├── continue_keyword.py
│ │ ├── task-info.yaml
│ │ ├── task-remote-info.yaml
│ │ ├── task.md ←(注目) Continue keyword
│ │ └── tests
│ │ ├── __init__.py
│ │ └── test_task.py
│ ├── Else with loops
│ │ ├── else_with_loops.py
│ │ ├── task-info.yaml
│ │ ├── task-remote-info.yaml
│ │ ├── task.md ←(注目)それ以外の場合はループ
│ │ └── tests
│ │ ├── __init__.py
│ │ └── test_task.py
│ ├── For loop
│ │ ├── for_loop.py
│ │ ├── task-info.yaml
│ │ ├── task-remote-info.yaml
│ │ ├── task.md ←(注目)For ループ
│ │ └── tests
│ │ ├── __init__.py
│ │ └── test_task.py
│ ├── List Comprehension
│ │ ├── __init__.py
│ │ ├── task-info.yaml
│ │ ├── task-remote-info.yaml
│ │ ├── task.md ←(注目)リスト内包
│ │ ├── task.py
│ │ └── tests
│ │ ├── __init__.py
│ │ └── test_task.py
│ ├── Loop over a string
│ │ ├── for_string.py
│ │ ├── task-info.yaml
│ │ ├── task-remote-info.yaml
│ │ ├── task.md ←(注目)文字列をループする
│ │ └── tests
│ │ ├── __init__.py
│ │ └── test_task.py
│ ├── Nested List Comprehension
│ │ ├── __init__.py
│ │ ├── task-info.yaml
│ │ ├── task-remote-info.yaml
│ │ ├── task.md ←(注目)ネストされたリスト内包
│ │ ├── task.py
│ │ └── tests
│ │ ├── __init__.py
│ │ └── test_task.py
│ ├── Nested for Loop
│ │ ├── __init__.py
│ │ ├── task-info.yaml
│ │ ├── task-remote-info.yaml
│ │ ├── task.md ←(注目)ネストされたforループ
│ │ ├── task.py
│ │ └── tests
│ │ ├── __init__.py
│ │ └── test_task.py
│ ├── While loop
│ │ ├── task-info.yaml
│ │ ├── task-remote-info.yaml
│ │ ├── task.md ←(注目)while ループ
│ │ ├── tests
│ │ │ ├── __init__.py
│ │ │ └── test_task.py
│ │ └── while_loop.py
│ ├── lesson-info.yaml
│ └── lesson-remote-info.yaml
├── Modules and packages ←モジュールとパッケージ
│ ├── Built-in modules
│ │ ├── builtin_modules.py
│ │ ├── task-info.yaml
│ │ ├── task-remote-info.yaml
│ │ ├── task.md ←(注目)内蔵モジュール
│ │ └── tests
│ │ ├── __init__.py
│ │ └── test_task.py
│ ├── Executing modules as scripts
│ │ ├── __init__.py
│ │ ├── some_module.py
│ │ ├── task-info.yaml
│ │ ├── task-remote-info.yaml
│ │ ├── task.md ←(注目)モジュールをスクリプトとして実行
│ │ ├── task.py
│ │ └── tests
│ │ ├── __init__.py
│ │ └── test_task.py
│ ├── From import
│ │ ├── calculator.py
│ │ ├── from_import.py
│ │ ├── my_module.py
│ │ ├── task-info.yaml
│ │ ├── task-remote-info.yaml
│ │ ├── task.md ←(注目)From import
│ │ └── tests
│ │ ├── __init__.py
│ │ └── test_task.py
│ ├── Import module
│ │ ├── calculator.py
│ │ ├── imports.py
│ │ ├── my_module.py
│ │ ├── task-info.yaml
│ │ ├── task-remote-info.yaml
│ │ ├── task.md ←(注目)モジュールのインポート
│ │ └── tests
│ │ ├── __init__.py
│ │ └── test_task.py
│ ├── Packages
│ │ ├── classes
│ │ │ ├── __init__.py
│ │ │ └── calculator.py
│ │ ├── functions
│ │ │ ├── __init__.py
│ │ │ ├── goodbye.py
│ │ │ └── greeting
│ │ │ ├── __init__.py
│ │ │ ├── hello.py
│ │ │ └── official.py
│ │ ├── packages.py
│ │ ├── task-info.yaml
│ │ ├── task-remote-info.yaml
│ │ ├── task.md ←(注目)パッケージ
│ │ └── tests
│ │ ├── __init__.py
│ │ └── test_task.py
│ ├── __init__.py
│ ├── lesson-info.yaml
│ └── lesson-remote-info.yaml
├── README.md ←(注目)
├── Strings ←文字列
│ ├── Basic string methods
│ │ ├── string_methods.py
│ │ ├── task-info.yaml
│ │ ├── task-remote-info.yaml
│ │ ├── task.md ←(注目)基本的な文字列メソッド
│ │ └── tests
│ │ ├── __init__.py
│ │ └── test_task.py
│ ├── Character escaping
│ │ ├── character_escaping.py
│ │ ├── task-info.yaml
│ │ ├── task-remote-info.yaml
│ │ ├── task.md ←(注目)キャラクターエスケープ
│ │ └── tests
│ │ ├── __init__.py
│ │ └── test_task.py
│ ├── Concatenation
│ │ ├── concatenation.py
│ │ ├── task-info.yaml
│ │ ├── task-remote-info.yaml
│ │ ├── task.md ←(注目)連結
│ │ └── tests
│ │ ├── __init__.py
│ │ └── test_task.py
│ ├── F-strings
│ │ ├── f_strings.py
│ │ ├── task-info.yaml
│ │ ├── task-remote-info.yaml
│ │ ├── task.md ←(注目)Fストリング
│ │ └── tests
│ │ ├── __init__.py
│ │ └── test_task.py
│ ├── In operator
│ │ ├── in_operator.py
│ │ ├── task-info.yaml
│ │ ├── task-remote-info.yaml
│ │ ├── task.md ←(注目)演算子
│ │ └── tests
│ │ ├── __init__.py
│ │ └── test_task.py
│ ├── String formatting
│ │ ├── string_formatting.py
│ │ ├── task-info.yaml
│ │ ├── task-remote-info.yaml
│ │ ├── task.md ←(注目)文字列のフォーマット
│ │ └── tests
│ │ ├── __init__.py
│ │ └── test_task.py
│ ├── String indexing
│ │ ├── string_indexing.py
│ │ ├── task-info.yaml
│ │ ├── task-remote-info.yaml
│ │ ├── task.md ←(注目)文字列のインデックス作成
│ │ └── tests
│ │ ├── __init__.py
│ │ └── test_task.py
│ ├── String length
│ │ ├── len_function.py
│ │ ├── task-info.yaml
│ │ ├── task-remote-info.yaml
│ │ ├── task.md ←(注目)文字列の長さ
│ │ └── tests
│ │ ├── __init__.py
│ │ └── test_task.py
│ ├── String multiplication
│ │ ├── string_multiplication.py
│ │ ├── task-info.yaml
│ │ ├── task-remote-info.yaml
│ │ ├── task.md ←(注目)文字列の乗算
│ │ └── tests
│ │ ├── __init__.py
│ │ └── test_task.py
│ ├── String negative indexing
│ │ ├── negative_indexing.py
│ │ ├── task-info.yaml
│ │ ├── task-remote-info.yaml
│ │ ├── task.md ←(注目)文字列の負のインデックス
│ │ └── tests
│ │ ├── __init__.py
│ │ └── test_task.py
│ ├── String slicing
│ │ ├── slicing.py
│ │ ├── task-info.yaml
│ │ ├── task-remote-info.yaml
│ │ ├── task.md ←(注目)文字列のスライス
│ │ └── tests
│ │ ├── __init__.py
│ │ └── test_task.py
│ ├── lesson-info.yaml
│ └── lesson-remote-info.yaml
├── Variables ←変数
│ ├── Arithmetic operators
│ │ ├── arithmetic_operators.py
│ │ ├── task-info.yaml
│ │ ├── task-remote-info.yaml
│ │ ├── task.md ←(注目)算術演算子
│ │ └── tests
│ │ └── test_task.py
│ ├── Assignments
│ │ ├── assignments.py
│ │ ├── task-info.yaml
│ │ ├── task-remote-info.yaml
│ │ ├── task.md ←(注目)割り当て
│ │ └── tests
│ │ └── test_task.py
│ ├── Boolean operators
│ │ ├── boolean_operators.py
│ │ ├── task-info.yaml
│ │ ├── task-remote-info.yaml
│ │ ├── task.md ←(注目)ブール演算子
│ │ └── tests
│ │ └── test_task.py
│ ├── Comparison operators
│ │ ├── comparison_operators.py
│ │ ├── task-info.yaml
│ │ ├── task-remote-info.yaml
│ │ ├── task.md ←(注目)比較演算子
│ │ └── tests
│ │ └── test_task.py
│ ├── Type conversion
│ │ ├── task-info.yaml
│ │ ├── task-remote-info.yaml
│ │ ├── task.md ←(注目)型変換
│ │ ├── tests
│ │ │ └── test_task.py
│ │ └── type_cast.py
│ ├── Undefined variable
│ │ ├── task-info.yaml
│ │ ├── task-remote-info.yaml
│ │ ├── task.md ←(注目)未定義の変数
│ │ ├── tests
│ │ │ └── test_task.py
│ │ └── undefined_variable.py
│ ├── Variable definition
│ │ ├── task-info.yaml
│ │ ├── task-remote-info.yaml
│ │ ├── task.md ←(注目)変数の定義
│ │ ├── tests
│ │ │ └── test_task.py
│ │ └── variable_definition.py
│ ├── Variable types
│ │ ├── task-info.yaml
│ │ ├── task-remote-info.yaml
│ │ ├── task.md ←(注目)変数タイプ
│ │ ├── tests
│ │ │ └── test_task.py
│ │ └── variable_type.py
│ ├── lesson-info.yaml
│ └── lesson-remote-info.yaml
├── course-info.yaml
└── course-remote-info.yaml
→各課題ごとに存在する「task.md」ファイルを翻訳します。
-
-
--- - --- - --- - --- - --- - --- - --- - --- - --- - --- - --- - --- - --- - --- - ----
3. 試しに、日本語の翻訳にトライ:
-
作業は要りません。確認のみ。
-
1). 参考: 試しに、ひとつの課題のファイルを翻訳してみました:
$ featherpad ~/PycharmProjects/'Introduction to Python'/Introduction/About/task.md
→ファイル指定時は、フォルダ名に「半角スペース」が含まれているので注意。
-
翻訳:
## コースについて

Python プログラミングの基礎のコースへようこそ!

#### なぜ Python を学ぶのですか?

Python は、世界で最も人気のあるプログラミング言語の1つです。
Python は、データサイエンス、ML、AI で広く使用されており、最も急速に成長している主要なプログラミング言語です。

これは、プログラミングに精通するための完璧な出発点です。
Python は、他のほとんどのプログラミング言語よりも読み取り、書き込み、学習が簡単です。
Python を使用すると、単純な初心者の課題にとらわれることはありません。
多数のPython フォーラムとQ&A プラットフォーム、およびサポートを提供するオープンソースコミュニティは、学習意欲を維持するのに役立つ貴重なリソースです。

#### コースの目的

このコースを完了すると、次のことができるようになります。

- 変数、データ構造、関数、クラスなどの基本的なプログラミングの概念を理解して利用できます。
- Python コードを読めます。
- Python で簡単なプログラムを作成できます。
- Python モジュールおよびパッケージを操作できます。
- 他のコースで Python を学び続け、より複雑な資料を提供します。

#### 前提条件

このコースを完了するために、Python やプログラミング全般の経験は必要ありません。

頑張って!
-
2). 翻訳されたか確認:
-
(1).「PyCharm へようこそ」(Welcome 画面)を起動:
$ pycharm.sh
→パスを通していれば、どこでも実行できます。
-
(2).「PyCharm」で前回開いていた ファイル(タブ)が開きます
つまり、学習コースの続きになります。
→英語表示のままです:
-
(3). 左の各項目の四角いアイコンがある「課題名」をダブルクリック →翻訳が反映
→再読込みされ、日本語で表示されました。
何かしらの修正を行ったら、再読込みが必要です。
-
-
--- - --- - --- - --- - --- - --- - --- - --- - --- - --- - --- - --- - --- - --- - -----
4. 翻訳すべきファイルを抽出:
-
作業は要りません。確認のみ。
-
各課題フォルダにある「task.md」ファイルが、課題の説明のようです。 ファイル名を日本語化するのは別にして、ファイルの内容を翻訳するだけでも、学習が楽になります。
-
「.md」ファイルを抽出:
$ sudo find ~/PycharmProjects/ -name "*.md" | sort
/home/ubn/PycharmProjects/Introduction to Python/Classes and objects/Class and Instance Variables/task.md
/home/ubn/PycharmProjects/Introduction to Python/Classes and objects/Definition/task.md
/home/ubn/PycharmProjects/Introduction to Python/Classes and objects/Special __init__ method/task.md
/home/ubn/PycharmProjects/Introduction to Python/Classes and objects/The self parameter/task.md
/home/ubn/PycharmProjects/Introduction to Python/Classes and objects/Update variable/task.md
/home/ubn/PycharmProjects/Introduction to Python/Classes and objects/Variable access/task.md
/home/ubn/PycharmProjects/Introduction to Python/Classes and objects/__str__ vs __repr__/task.md
/home/ubn/PycharmProjects/Introduction to Python/Condition expressions/Boolean operators order/task.md
/home/ubn/PycharmProjects/Introduction to Python/Condition expressions/Boolean operators/task.md
/home/ubn/PycharmProjects/Introduction to Python/Condition expressions/Else and elif parts in if statement/task.md
/home/ubn/PycharmProjects/Introduction to Python/Condition expressions/If statement/task.md
/home/ubn/PycharmProjects/Introduction to Python/Data structures/Dictionaries/task.md
/home/ubn/PycharmProjects/Introduction to Python/Data structures/Dictionary keys() and values()/task.md
/home/ubn/PycharmProjects/Introduction to Python/Data structures/In keyword/task.md
/home/ubn/PycharmProjects/Introduction to Python/Data structures/Join method/task.md
/home/ubn/PycharmProjects/Introduction to Python/Data structures/List items/task.md
/home/ubn/PycharmProjects/Introduction to Python/Data structures/Lists introduction/task.md
/home/ubn/PycharmProjects/Introduction to Python/Data structures/Lists operations/task.md
/home/ubn/PycharmProjects/Introduction to Python/Data structures/Nested Lists/task.md
/home/ubn/PycharmProjects/Introduction to Python/Data structures/Tuples/task.md
/home/ubn/PycharmProjects/Introduction to Python/File input output/Open file/task.md
/home/ubn/PycharmProjects/Introduction to Python/File input output/Read file/task.md
/home/ubn/PycharmProjects/Introduction to Python/File input output/What next/task.md
/home/ubn/PycharmProjects/Introduction to Python/File input output/Write to file/task.md
/home/ubn/PycharmProjects/Introduction to Python/Functions/Args and kwargs/task.md
/home/ubn/PycharmProjects/Introduction to Python/Functions/Default parameters/task.md
/home/ubn/PycharmProjects/Introduction to Python/Functions/Definition/task.md
/home/ubn/PycharmProjects/Introduction to Python/Functions/Keyword Arguments/task.md
/home/ubn/PycharmProjects/Introduction to Python/Functions/Parameters and call arguments/task.md
/home/ubn/PycharmProjects/Introduction to Python/Functions/Recursion/task.md
/home/ubn/PycharmProjects/Introduction to Python/Functions/Return value/task.md
/home/ubn/PycharmProjects/Introduction to Python/Introduction/About/task.md
/home/ubn/PycharmProjects/Introduction to Python/Introduction/Comments/task.md
/home/ubn/PycharmProjects/Introduction to Python/Introduction/Course View/task.md
/home/ubn/PycharmProjects/Introduction to Python/Introduction/Editor/task.md
/home/ubn/PycharmProjects/Introduction to Python/Introduction/Navigating Around/task.md
/home/ubn/PycharmProjects/Introduction to Python/Introduction/Our first program/task.md
/home/ubn/PycharmProjects/Introduction to Python/Introduction/Task Description/task.md
/home/ubn/PycharmProjects/Introduction to Python/Loops/Break keyword/task.md
/home/ubn/PycharmProjects/Introduction to Python/Loops/Continue keyword/task.md
/home/ubn/PycharmProjects/Introduction to Python/Loops/Else with loops/task.md
/home/ubn/PycharmProjects/Introduction to Python/Loops/For loop/task.md
/home/ubn/PycharmProjects/Introduction to Python/Loops/List Comprehension/task.md
/home/ubn/PycharmProjects/Introduction to Python/Loops/Loop over a string/task.md
/home/ubn/PycharmProjects/Introduction to Python/Loops/Nested List Comprehension/task.md
/home/ubn/PycharmProjects/Introduction to Python/Loops/Nested for Loop/task.md
/home/ubn/PycharmProjects/Introduction to Python/Loops/While loop/task.md
/home/ubn/PycharmProjects/Introduction to Python/Modules and packages/Built-in modules/task.md
/home/ubn/PycharmProjects/Introduction to Python/Modules and packages/Executing modules as scripts/task.md
/home/ubn/PycharmProjects/Introduction to Python/Modules and packages/From import/task.md
/home/ubn/PycharmProjects/Introduction to Python/Modules and packages/Import module/task.md
/home/ubn/PycharmProjects/Introduction to Python/Modules and packages/Packages/task.md
/home/ubn/PycharmProjects/Introduction to Python/README.md
/home/ubn/PycharmProjects/Introduction to Python/Strings/Basic string methods/task.md
/home/ubn/PycharmProjects/Introduction to Python/Strings/Character escaping/task.md
/home/ubn/PycharmProjects/Introduction to Python/Strings/Concatenation/task.md
/home/ubn/PycharmProjects/Introduction to Python/Strings/F-strings/task.md
/home/ubn/PycharmProjects/Introduction to Python/Strings/In operator/task.md
/home/ubn/PycharmProjects/Introduction to Python/Strings/String formatting/task.md
/home/ubn/PycharmProjects/Introduction to Python/Strings/String indexing/task.md
/home/ubn/PycharmProjects/Introduction to Python/Strings/String length/task.md
/home/ubn/PycharmProjects/Introduction to Python/Strings/String multiplication/task.md
/home/ubn/PycharmProjects/Introduction to Python/Strings/String negative indexing/task.md
/home/ubn/PycharmProjects/Introduction to Python/Strings/String slicing/task.md
/home/ubn/PycharmProjects/Introduction to Python/Variables/Arithmetic operators/task.md
/home/ubn/PycharmProjects/Introduction to Python/Variables/Assignments/task.md
/home/ubn/PycharmProjects/Introduction to Python/Variables/Boolean operators/task.md
/home/ubn/PycharmProjects/Introduction to Python/Variables/Comparison operators/task.md
/home/ubn/PycharmProjects/Introduction to Python/Variables/Type conversion/task.md
/home/ubn/PycharmProjects/Introduction to Python/Variables/Undefined variable/task.md
/home/ubn/PycharmProjects/Introduction to Python/Variables/Variable definition/task.md
/home/ubn/PycharmProjects/Introduction to Python/Variables/Variable types/task.md
→一部のフォルダ名に「半角スペース」が含まれています。ファイル指定時は注意が必要。
学習するコース(プロジェクト名)のひとつが、「Introduction to Python」です。
コースを選んで「Start」することで、これらのファイルがホームにロードされ、作られます。
-
追記: もし、プルリクエストした ? 「Translation」フォルダが追加された場合は、そこにあるmd ファイルは除外することになります。
-
-
--- - --- - --- - --- - --- - --- - --- - --- - --- - --- - --- - --- - --- - --- - ----- -
5. md ファイルを翻訳:
-
「課題の説明」部分はmd ファイル(Markdown ファイル)です。その翻訳作業はすでに完了 させました。 なので、こちらの作業は要りません。
-
↓ 日本語化は、次に作成するパッチファイルで行います。
-
-
--- - --- - --- - --- - --- - --- - --- - --- - --- - --- - --- - --- - --- - --- - ----- --
A. (test3): 「新規でファイルを作成する」やり方で、パッチファイルを適用:
-
対象ファイルを別のフォルダに待避してから、対象ファイルを削除して、新規でファイルを作成するパッチファイルを作成しました。そのパッチファイルを適用するやり方です。
→ファイル削除のスクリプトを作るのが面倒ですが、パッチ適用時のエラーを回避 でき、確実で応用もできます。
-
事前のトライで日本語化されたファイルを元に、パッチ作成を行いました
-
1). 新規にファイルが作成されるように、対象ファイルを削除するシェルスクリプトを作成:
$ cd ~/PycharmProjects/'Introduction to Python'/
$ featherpad Delete-md-File.sh
内容:
#!/bin/bash
echo
echo "----------------"
echo "警告: 次のファイルはスクリプトによって削除されます:"
echo "Warning: The following files will be deleted by the script."
echo "Delete ->  ~/PycharmProjects/'Introduction to Python'/----/task.md"
echo
read -p "Is it OK ? (y/N): " yn
case "$yn" in [yY]*) ;; *) echo "abort." ; exit ;; esac
echo
cd ~/PycharmProjects/'Introduction to Python'/
rm 'Classes and objects/Class and Instance Variables/task.md'
rm 'Classes and objects/Definition/task.md'
rm 'Classes and objects/Special __init__ method/task.md'
rm 'Classes and objects/The self parameter/task.md'
rm 'Classes and objects/Update variable/task.md'
rm 'Classes and objects/Variable access/task.md'
rm 'Classes and objects/__str__ vs __repr__/task.md'
rm 'Condition expressions/Boolean operators order/task.md'
rm 'Condition expressions/Boolean operators/task.md'
rm 'Condition expressions/Else and elif parts in if statement/task.md'
rm 'Condition expressions/If statement/task.md'
rm 'Data structures/Dictionaries/task.md'
rm 'Data structures/Dictionary keys() and values()/task.md'
rm 'Data structures/In keyword/task.md'
rm 'Data structures/Join method/task.md'
rm 'Data structures/List items/task.md'
rm 'Data structures/Lists introduction/task.md'
rm 'Data structures/Lists operations/task.md'
rm 'Data structures/Nested Lists/task.md'
rm 'Data structures/Tuples/task.md'
rm 'File input output/Open file/task.md'
rm 'File input output/Read file/task.md'
rm 'File input output/What next/task.md'
rm 'File input output/Write to file/task.md'
rm 'Functions/Args and kwargs/task.md'
rm 'Functions/Default parameters/task.md'
rm 'Functions/Definition/task.md'
rm 'Functions/Keyword Arguments/task.md'
rm 'Functions/Parameters and call arguments/task.md'
rm 'Functions/Recursion/task.md'
rm 'Functions/Return value/task.md'
rm 'Introduction/About/task.md'
rm 'Introduction/Comments/task.md'
rm 'Introduction/Course View/task.md'
rm 'Introduction/Editor/task.md'
rm 'Introduction/Navigating Around/task.md'
rm 'Introduction/Our first program/task.md'
rm 'Introduction/Task Description/task.md'
rm 'Loops/Break keyword/task.md'
rm 'Loops/Continue keyword/task.md'
rm 'Loops/Else with loops/task.md'
rm 'Loops/For loop/task.md'
rm 'Loops/List Comprehension/task.md'
rm 'Loops/Loop over a string/task.md'
rm 'Loops/Nested List Comprehension/task.md'
rm 'Loops/Nested for Loop/task.md'
rm 'Loops/While loop/task.md'
rm 'Modules and packages/Built-in modules/task.md'
rm 'Modules and packages/Executing modules as scripts/task.md'
rm 'Modules and packages/From import/task.md'
rm 'Modules and packages/Import module/task.md'
rm 'Modules and packages/Packages/task.md'
rm 'README.md'
rm 'Strings/Basic string methods/task.md'
rm 'Strings/Character escaping/task.md'
rm 'Strings/Concatenation/task.md'
rm 'Strings/F-strings/task.md'
rm 'Strings/In operator/task.md'
rm 'Strings/String formatting/task.md'
rm 'Strings/String indexing/task.md'
rm 'Strings/String length/task.md'
rm 'Strings/String multiplication/task.md'
rm 'Strings/String negative indexing/task.md'
rm 'Strings/String slicing/task.md'
rm 'Variables/Arithmetic operators/task.md'
rm 'Variables/Assignments/task.md'
rm 'Variables/Boolean operators/task.md'
rm 'Variables/Comparison operators/task.md'
rm 'Variables/Type conversion/task.md'
rm 'Variables/Undefined variable/task.md'
rm 'Variables/Variable definition/task.md'
rm 'Variables/Variable types/task.md'
-
2). 対象ファイルを削除するシェルスクリプトの実行:
$ cd ~/PycharmProjects/'Introduction to Python'/
$ bash Delete-md-File.sh
→これだと実行権限をファイルに与える作業($ chmod +x ./Delete-md-File.sh)は要りません。
-
3). 日本語化したファイルを新規に作成するためのパッチファイルを作成:
$ cd ~/PycharmProjects/'Introduction to Python'/
$ featherpad pycharm-ja.patch
↓ 連続して、すべて貼り付けてください(長いので、マウスで先頭を選んでから、Sift+下矢印「↓」を使うと楽です)
diff -Naur "a/Classes and objects/Class and Instance Variables/task.md" "b/Classes and objects/Class and Instance Variables/task.md"
--- "a/Classes and objects/Class and Instance Variables/task.md" 1970-01-01 09:00:00.000000000 +0900
+++ "b/Classes and objects/Class and Instance Variables/task.md" 2022-04-09 23:02:37.686574694 +0900
@@ -0,0 +1,53 @@
+## クラス変数とインスタンス変数 :(Class and Instance Variables)
+
+一般に、「インスタンス変数」は各インスタンスに固有のデータ用であり、
+「クラス変数」はクラスのすべてのインスタンスによって共有される属性とメソッド用です:
+
+```python
+class Cat:
+
+ species = "Felis catus"
+
+ def __init__(self, breed, name):
+ self.breed = breed
+ self.name = name
+
+cleo = Cat('mix', 'Cleo')
+furry = Cat('bengal', 'Furry')
+
+print(cleo.name)
+print(cleo.species)
+print(furry.name)
+print(furry.species)
+```
+
+```text
+Cleo
+Felis catus
+Furry
+Felis catus
+```
+`species`(種族)はすべてのインスタンスで共有されるクラス変数であり、
+`name`(名前)と `breed`(品種)は各インスタンスに固有のインスタンス変数であることがわかります。
+
+共有データは、リストや辞書などの可変オブジェクトを含む場合、驚くべき効果をもたらす可能性があります。
+
+
+クラス変数がリストであり、1つのオブジェクトに対して変更すると、
+クラスのすべてのオブジェクトに対して変更されます
+
+コードエディタの例を確認してください。
+
+`print(barsik.favorite_food)` が出力する内容を確認してください。
+
+リストを使用して各インスタンスに固有の機能を追跡する場合は、
+リストをインスタンス属性にする必要があります。
+
+コードエディタで、`Animals` クラスの実装を完了して、以下の `print` ステートメントが次のような行を出力するようにします:
+
+各ペットに `"This is Doggy the dog, one of my pets."`
+(これは私のペットの1匹である犬の犬です。)
+
+<div class='hint'>クラス変数には、すべてのインスタンス間で共有される情報が含まれている必要があります。(<code>"pets"</code> の1つです)</div>
+
+<div class='hint'>インスタンス変数には、インスタンスに固有の情報が含まれている必要があります。(名前は一意です)</div>
diff -Naur "a/Classes and objects/Definition/task.md" "b/Classes and objects/Definition/task.md"
--- "a/Classes and objects/Definition/task.md" 1970-01-01 09:00:00.000000000 +0900
+++ "b/Classes and objects/Definition/task.md" 2022-04-09 23:02:37.682574653 +0900
@@ -0,0 +1,54 @@
+## 意味 :(Definition)
+
+クラスは、データと機能をバンドルする手段を提供します。
+
+新しいクラスを作成すると、新しいタイプのオブジェクトが作成され、そのタイプの新しいインスタンスを作成できるようになります。
+
+クラスは基本的に、オブジェクトを作成するためのテンプレートです。
+各クラスインスタンス(オブジェクト)には、その状態を維持するための属性を付加できます。
+オブジェクトの関数はメソッドと呼ばれ、その状態を変更できます。
+メソッドは、オブジェクトのクラスによって定義されます。
+
+クラス定義の一般化された形式は次のようになります:
+
+```
+class ClassName:
+ <statement-1>
+ .
+ .
+ .
+ <statement-N>
+```
+
+関数定義( `def` ステートメント)のようなクラス定義は、効果を発揮する前に実行する必要があります。
+
+クラス定義内のステートメントは通常関数定義ですが、他のステートメントが役立つ場合もあります。
+クラス内の関数定義には通常、独特の形式の引数リストがあります。これについては後で説明します。
+
+クラスオブジェクトは、属性参照とインスタンス化の2種類の操作をサポートします。
+
+属性参照については、次のセクションで説明します。
+
+クラスのインスタンス化は関数表記を使用します。
+クラスオブジェクトが、クラスの新しいインスタンスを返すパラメータのない関数であると想像してみてください。
+
+例えば:
+
+```python
+class SomeClass:
+ """A simple example class"""
+ i = 12345
+
+x = SomeClass()
+```
+`x = SomeClass()` は、クラスの新しいインスタンスを作成し、このオブジェクトをローカル変数 `x` に割り当てます。
+
+クラス定義構文の詳細については、Python ドキュメントの <a href="https://docs.python.org/3/tutorial/classes.html#class-definition-syntax">このセクション</a> をご覧ください。
+
+`MyClass` 内の `variable` に値を割り当て、クラス `MyClass()` のオブジェクト `my_class` を作成します。
+
+コードを実行して、何が起こるかを確認してください。
+
+<div class='hint'>任意の値を <code>variable</code> に割り当てます。</div>
+
+<div class='hint'>テキストの例を見て、オブジェクトをインスタンス化する方法を理解してください。</div>
diff -Naur "a/Classes and objects/Special __init__ method/task.md" "b/Classes and objects/Special __init__ method/task.md"
--- "a/Classes and objects/Special __init__ method/task.md" 1970-01-01 09:00:00.000000000 +0900
+++ "b/Classes and objects/Special __init__ method/task.md" 2022-04-09 23:02:37.682574653 +0900
@@ -0,0 +1,49 @@
+## 特別な__init__メソッド :(Special __init__ method)
+
+インスタンス化操作(クラスオブジェクトの「呼び出し」)は空のオブジェクトを作成しますが、特定の初期状態にカスタマイズされたインスタンスを使用してオブジェクトを作成すると便利です。
+
+従って、クラスは `__init__()` という名前の特別なメソッドを定義する場合があります。
+
+このような:
+
+
+```python
+class MyClass:
+ def __init__(self):
+ self.data = []
+```
+`__init__` はPython で予約されているメソッドの1つです。
+
+定義されている場合、 `__init__()` メソッドは、クラスのインスタンスが作成されるときに自動的に呼び出され、オブジェクトとその属性を初期化します。
+
+それは常に少なくとも 1つの引数 `self` を取ります。
+
+従って、この例では、初期化された新しいインスタンスは次の方法で取得できます:
+
+```python
+x = MyClass()
+```
+
+ `__init__()` メソッドは、柔軟性を高めるために引数を受け取る場合があります。
+その場合、クラスインスタンス化演算子に与えられた引数は `__init__()` に渡されます。
+
+例えば:
+
+```python
+class Complex:
+ def __init__(self, real_part, imag_part):
+ self.r = real_part
+ self.i = imag_part
+ self.num = complex(self.r, self.i)
+
+x = Complex(3.0, -4.5) # Instantiating a complex number
+x.num
+```
+```text
+(3-4.5j)
+```
+
+コードエディタで、`Car` クラスの `__init__()` メソッドにパラメータを追加します。
+指定された色とブランドで作成します。
+
+<div class='hint'> <code>self</code> と <code>color</code> の 2つのパラメータを追加します。</div>
diff -Naur "a/Classes and objects/The self parameter/task.md" "b/Classes and objects/The self parameter/task.md"
--- "a/Classes and objects/The self parameter/task.md" 1970-01-01 09:00:00.000000000 +0900
+++ "b/Classes and objects/The self parameter/task.md" 2022-04-09 23:02:37.682574653 +0900
@@ -0,0 +1,35 @@
+## 自己パラメータ :(The self parameter)
+
+前の課題で見た `self` パラメータを説明する時が来ました。
+
+クラスメソッドに渡される最初の引数は `self` です。これは単なる慣例にすぎません。
+`self` という名前はPython にとって特別な意味はありません。
+
+規則に従うことをお勧めします。そうしないと、他のPython プログラマーがコードを読みにくくなる可能性があります。
+
+Python は `self` パラメータを使用して、作成または変更されたオブジェクトを参照します。
+
+メソッドは、`self` 引数のメソッド属性を使用して他のメソッドを呼び出すことができます:
+
+```python
+class Bag:
+ def __init__(self):
+ self.data = []
+
+ def add(self, x):
+ self.data.append(x)
+
+ def addtwice(self, x):
+ self.add(x) # Calling the method `add` from another method
+ self.add(x)
+```
+
+コードエディタで、`Calculator` クラスの `add` メソッドを実装します。
+フィールド `current` に `amount` を追加する必要があります。
+
+さらに、メソッド `get_current` を完了します。
+
+コードを実行して、どのように機能するかを確認します。
+
+<div class='hint'> <code>amount</code> を <code>self.current</code> 変数に追加します。</div>
+<div class='hint'> <code>+=</code> 記号を使用します。</div>
diff -Naur "a/Classes and objects/Update variable/task.md" "b/Classes and objects/Update variable/task.md"
--- "a/Classes and objects/Update variable/task.md" 1970-01-01 09:00:00.000000000 +0900
+++ "b/Classes and objects/Update variable/task.md" 2022-04-09 23:02:37.682574653 +0900
@@ -0,0 +1,11 @@
+## 変数を更新 :(Update variable)
+
+この演習では、新しい `Car` オブジェクト `car2` を作成してから、`car2` の `color` を `"red"` に設定します。
+
+`description` メソッドを呼び出して、`car1` と `car2` の説明を出力します。
+
+<div class='hint'>クラスを「呼び出す」ことにより、前の課題でオブジェクトをインスタンス化した方法を思い出してください。</div>
+
+<div class='hint'>値の割り当て (<code>=</code>) と属性参照構文 <code>obj.attribute</code>を使用して色を変更します。</div>.
+
+<div class='hint'> printステートメントで、前の課題で行ったように <code>description()</code> メソッドを呼び出します。</div>
diff -Naur "a/Classes and objects/Variable access/task.md" "b/Classes and objects/Variable access/task.md"
--- "a/Classes and objects/Variable access/task.md" 1970-01-01 09:00:00.000000000 +0900
+++ "b/Classes and objects/Variable access/task.md" 2022-04-09 23:02:37.682574653 +0900
@@ -0,0 +1,27 @@
+## 可変アクセス :(Variable access)
+
+「属性参照」を使用して、オブジェクト内の変数にアクセスできます。
+
+「属性参照」は、Python のすべての属性参照に標準の構文 `obj.name` を使用します。
+
+有効な属性名は、クラスオブジェクトが作成されたときにクラスの名前空間にあったすべての名前です。
+
+従って、クラス定義が次のようになっている場合:
+
+```python
+class MyClass:
+ year = 2021
+
+ def say_hello(self):
+ return 'hello world'
+```
+
+`MyClass.year` と `MyClass.say_hello` は、それぞれ整数と関数オブジェクトを返す有効な「属性参照」です。
+
+クラス属性を割り当てることができるため、割り当てによって `MyClass.year` の値を変更できます。
+
+例を確認して、`my_object` から `variable1` の値を出力してください。
+
+オブジェクト `my_object` の `foo` メソッドを呼び出し、結果を出力します。
+
+<div class='hint'> <code>object.name</code> 構文を使用して<code>variable1</code> にアクセスします。</div>
diff -Naur "a/Classes and objects/__str__ vs __repr__/task.md" "b/Classes and objects/__str__ vs __repr__/task.md"
--- "a/Classes and objects/__str__ vs __repr__/task.md" 1970-01-01 09:00:00.000000000 +0900
+++ "b/Classes and objects/__str__ vs __repr__/task.md" 2022-04-09 23:02:37.682574653 +0900
@@ -0,0 +1,56 @@
+## \_\_str__ と \_\_repr__ メソッド :(\_\_str__ vs \_\_repr__ methods)
+
+Python の `str()` メソッドと `repr()` メソッドは、どちらもオブジェクトの文字列表現に使用されますが、いくつかの違いがあります。
+
+例えば:
+
+```python
+s = 'Hello World'
+print (str(s))
+print(repr(s))
+```
+```text
+Hello World
+'Hello World'
+```
+
+`repr()` 関数を使用して文字列を出力すると、引用符のペアで出力されます。
+
+`str()` はユーザーの出力を作成するときに使用され、
+`repr()` は通常デバッグと開発に使用されます。
+
+ `repr()` は明確に、`str()` が読み取り可能である必要があります。
+
+`__init__` と同様に、メソッド `__repr__` と `__str__` は Python で予約されています。
+
+`print()` ステートメントと `str()` 組み込み関数は、オブジェクトのクラスで定義された `__str__` メソッドを使用して、その文字列表現を表示します。
+
+`repr()` 組み込み関数は、オブジェクトのクラスで定義された `__repr__` メソッドを使用します。
+
+従って、デバッグ用の詳細情報が必要な場合は、独自に定義したクラスに `__repr__` が必要です。
+
+また、ユーザーに文字列表現を使用すると便利だと思われる場合は、`__str__` 関数を作成する必要があります。
+
+
+コードエディタでクラス `Complex` の別の実装を確認してください。
+
+コードを実行して、2つの `print` ステートメントのそれぞれが何を出力するかを確認します。
+
+クラス `Cat` に `__str__` メソッドと `__repr__` メソッドを実装します。
+
+`__str__` メソッドは次のような文字列を返す必要があります:
+
+`"My siamese cat's name is Lucy"`
+(`"私のシャム猫の名前はルーシーです"`)
+
+`__repr__` メソッドは次のような文字列を返す必要があります:
+
+`"Cat, breed: siamese, name: Lucy"`
+(`"猫, 品種: シャム, 名前: ルーシー"`)
+
+[f-strings](course://Strings/F-strings) を使用します。
+
+<div class='hint'> <code>self.attribute</code> 構文を使用することを忘れないでください。</div>
+
+<div class='hint'> アポストロフィを出力するために文字がエスケープされることを忘れないでください。</div>
+
diff -Naur "a/Condition expressions/Boolean operators/task.md" "b/Condition expressions/Boolean operators/task.md"
--- "a/Condition expressions/Boolean operators/task.md" 1970-01-01 09:00:00.000000000 +0900
+++ "b/Condition expressions/Boolean operators/task.md" 2022-04-09 23:02:37.686574694 +0900
@@ -0,0 +1,11 @@
+## ブール演算子 :(Boolean operators)
+
+ブール演算子はステートメントを比較し、結果をブール値で返します。
+
+ブール演算子 `and` は、`and` の両側の式が `True` の場合、`True` を返します。
+ブール演算子 `or` は、`or` のいずれかの側の少なくとも1つの式が `True` である場合、`True` を返します。
+ブール演算子 `not` は、先行するブール式を反転します。
+
+`name` が `"John"` と等しく、彼が `16` 以上の場合、`True` と評価される式を記述します。
+
+<div class='hint'> <code>and</code> キーワードと <code>>=</code> 演算子を使用します</div>
diff -Naur "a/Condition expressions/Boolean operators order/task.md" "b/Condition expressions/Boolean operators order/task.md"
--- "a/Condition expressions/Boolean operators order/task.md" 1970-01-01 09:00:00.000000000 +0900
+++ "b/Condition expressions/Boolean operators order/task.md" 2022-04-09 23:02:37.686574694 +0900
@@ -0,0 +1,9 @@
+## ブール演算子の順序 :(Boolean operators order)
+
+ブール演算子は左から右に評価されません。ブール演算子の演算の順序があります。
+
+`not` が最初に評価され、` and` が次に評価され、`or` が最後に評価されます。
+
+`name` が `16` 以上で `25` より若い `"John"` または `"Jane"` のいずれかである場合、`True` と評価される式を記述します。
+
+<div class='hint'> <code>and</code> と <code>or</code> キーワードを組み合わせます。</div>
diff -Naur "a/Condition expressions/Else and elif parts in if statement/task.md" "b/Condition expressions/Else and elif parts in if statement/task.md"
--- "a/Condition expressions/Else and elif parts in if statement/task.md" 1970-01-01 09:00:00.000000000 +0900
+++ "b/Condition expressions/Else and elif parts in if statement/task.md" 2022-04-09 23:02:37.686574694 +0900
@@ -0,0 +1,32 @@
+## else および elif ステートメント :(Else and elif parts in if statement)
+
+`elif` および `else` ステートメントは `if` ステートメントを補完します。
+
+0個以上の `elif` 部分があり、`else` 部分はオプションです。キーワード `elif` は「else if」の略で、過度のインデントを回避するのに役立ちます。
+
+<div class='hint'> <code>if … elif … elif …</code> シーケンスは、Java など他の言語で見られる <code>switch</code> または <code>case</code> ステートメントの代わりになります。</div>
+
+条件付き実行では、1つが `True` であることが判明するまで、式を1つずつ評価することにより、スイートの1つだけが選択されます。
+
+次に、そのスイートが実行され、`if` ステートメントの他の部分は評価されません。
+
+すべての式が `false` の場合、 `else` 句のスイート(存在する場合)が実行されます。
+
+```python
+a = 200
+b = 33
+if b > a:
+ print("b is greater than a")
+elif a == b:
+ print("a and b are equal")
+else:
+ print("a is greater than b")
+```
+```text
+a is greater than b
+```
+
+`name` が `"John"` と等しい場合は `True` を出力し、そうでない場合は `False` を出力します。
+
+<div class='hint'> <code>if</code> キーワードと <code>==</code> 演算子を使用します。</div>
+<div class='hint'> <code>else</code> キーワードを使用します。</div>
diff -Naur "a/Condition expressions/If statement/task.md" "b/Condition expressions/If statement/task.md"
--- "a/Condition expressions/If statement/task.md" 1970-01-01 09:00:00.000000000 +0900
+++ "b/Condition expressions/If statement/task.md" 2022-04-09 23:02:37.686574694 +0900
@@ -0,0 +1,36 @@
+## If ステートメント :(If statement)
+
+Python の複合ステートメントには、他のステートメント(のグループ)が含まれています。
+それらは、何らかの方法でそれらの他のステートメントの実行に影響を与えるか、または制御します。
+
+おそらく最もよく知られているステートメントタイプは `if` ステートメントです。
+`if` キーワードは、その表現が `True` であるかどうかをチェックした後、指定されたコードを実行する条件ステートメントを形成するために使用されます。
+
+Python はインデントを使用してコードブロックを定義します:
+
+```python
+if value > 1000:
+ print("It's a large number!") # Indented block
+ a += 1 # Indented block
+
+print("Outside the block!")
+```
+
+コードブロックはインデントで始まり、インデントされていない最初の行で終わります。
+
+インデントの量は、ブロック全体で一貫している必要があります。
+通常、インデントには 4つの空白または 1つのタブが使用されます。
+
+インデントが正しくないと、`IndentationError` が発生します。
+
+実行するステートメントが 1つしかない場合は、それを `if` ステートメントと同じ行に配置できます:
+
+```python
+if a > b: print("a is greater than b")
+```
+
+`tasks` リストが空の場合は `"empty"` を出力します。
+リストがクリアされたら、もう一度確認し(別の条件が必要になる場合があります!)、
+そうである場合は `'Now empty!'` を出力します。
+
+<div class='hint'> <code>len()</code> 関数を使用して、 <code>tasks</code> が空かどうかを確認します。</div>
diff -Naur "a/Data structures/Dictionaries/task.md" "b/Data structures/Dictionaries/task.md"
--- "a/Data structures/Dictionaries/task.md" 1970-01-01 09:00:00.000000000 +0900
+++ "b/Data structures/Dictionaries/task.md" 2022-04-09 23:02:37.690574737 +0900
@@ -0,0 +1,39 @@
+## 辞書 :(Dictionaries)
+
+辞書はリストに似ていますが、インデックスの代わりにキーを検索して値にアクセスする点が異なります。
+
+キーは任意の不変タイプにすることができます。
+文字列と数字は常にキーにすることができます。
+タプルに不変オブジェクトのみが含まれている場合は、タプルをキーとして使用できます。
+リストをキーとして使用することはできません。
+
+辞書を <code>key: value</code> のペアのセットと考えてください。
+
+ただし、キーは1つの辞書内で一意である必要があります。
+
+辞書は中かっこで囲まれています:
+
+例: `dct = {'key1' : "value1", 'key2' : "value2"}`
+
+中括弧のペアは空の辞書 `{}` を作成します。
+
+辞書は、`dict` コンストラクター(constructor) を使用して作成することもできます:
+
+```python
+a = dict(one=1, two=2, three=3)
+b = {'one': 1, 'two': 2, 'three': 3}
+c = dict([('two', 2), ('one', 1), ('three', 3)])
+print(a == b == c)
+```
+```text
+True
+```
+リストの値にアクセスするのと同じようにディクショナリの値にアクセスできますが、インデックスの代わりにキーを使用します。
+
+このデータ構造の詳細については、<a href="https://docs.python.org/3/tutorial/datastructures.html#dictionaries">こちら</a> をご覧ください。
+
+Jared( `"Jared"`)の番号 `570` を電話帳に追加します。
+電話帳からGerard の番号を削除します。
+電話帳の `phone_book` から Jane(ジェーン)の電話番号を出力します。
+
+<div class='hint'>辞書のインデックスを使用します(例: <code>dct[key]</code></div>)
diff -Naur "a/Data structures/Dictionary keys() and values()/task.md" "b/Data structures/Dictionary keys() and values()/task.md"
--- "a/Data structures/Dictionary keys() and values()/task.md" 1970-01-01 09:00:00.000000000 +0900
+++ "b/Data structures/Dictionary keys() and values()/task.md" 2022-04-09 23:02:37.690574737 +0900
@@ -0,0 +1,21 @@
+## 辞書の keys() と values() :(Dictionary keys() and values())
+
+辞書には、`keys()`、`values()`、`items()` などの便利なメソッドがたくさんあります。
+
+`keys()` メソッドは、辞書内のすべてのキーのリストを挿入順に表示するビューオブジェクトを返します。
+
+`values()` は、ディクショナリの値の新しいビューを返します。
+
+`items()` メソッドが呼び出されると、辞書のアイテムの新しいビューがリスト内のタプル `(key, value)` ペアとして返されます。
+
+ `dict.keys()`、`dict.values()`、および `dict.items()` によって返されるオブジェクトは、ディクショナリのエントリの動的ビューを提供します。つまり、ディクショナリが変更されると、ビューはこれらの変更を反映します。
+
+&shortcut:CodeCompletion; を使用して残りを探索できます。
+
+ `dict_name` の後にドットが続きます。
+
+辞書がサポートする操作の詳細については、<a href="https://docs.python.org/3/library/stdtypes.html#typesmapping">こちら</a> をご覧ください。
+
+電話帳の `phone_book` からすべての値を出力します。
+
+<div class='hint'>メソッド <code>values()</code>を使用します。</div>
diff -Naur "a/Data structures/In keyword/task.md" "b/Data structures/In keyword/task.md"
--- "a/Data structures/In keyword/task.md" 1970-01-01 09:00:00.000000000 +0900
+++ "b/Data structures/In keyword/task.md" 2022-04-09 23:02:37.690574737 +0900
@@ -0,0 +1,14 @@
+## In キーワード :(In keyword)
+
+`in` キーワードは、リストまたは辞書に特定の項目が含まれているかどうかを確認するために使用されます。
+文字列で行ったのと同じ方法で、リストまたは辞書に `in` を適用できます。
+
+
+1) `grocery_dict` の値に番号 `6` が含まれているかどうかを確認します。
+2) 辞書に `"basil"` (バジル)が含まれているかどうかを確認します。
+
+指定された順序で課題を完了してください。
+
+<div class='hint'> <code>in</code> キーワードを使用します。</div>
+
+<div class='hint'> <code>.values()</code> 属性と <code>.keys()</code> 属性を使用します。</div>
diff -Naur "a/Data structures/Join method/task.md" "b/Data structures/Join method/task.md"
--- "a/Data structures/Join method/task.md" 1970-01-01 09:00:00.000000000 +0900
+++ "b/Data structures/Join method/task.md" 2022-04-09 23:02:37.686574694 +0900
@@ -0,0 +1,44 @@
+## join() メソッド :(Join method)
+
+`.join()` は実際には文字列メソッドですが、文字列、リスト、タプルなどの反復可能なオブジェクトを理解する必要があるため、ここで説明します。
+
+この[メソッド](https://docs.python.org/3/library/stdtypes.html#str.join) は、反復可能なオブジェクトから文字列を作成するための柔軟な方法を提供します。
+
+iterable の各要素(list、string、tuple など)を文字列セパレータ(`join()` メソッドが呼び出される文字列)で結合し、連結された文字列を返します。
+
+iterable に文字列以外の値がある場合、`TypeError` が発生します。
+
+`join()` メソッドの構文は次のようになります:
+
+```python
+string.join(iterable)
+```
+
+例:
+
+```python
+string_ = 'abcde' # a string iterable
+tuple_ = ('aa', 'bb', 'cc') # a tuple iterable
+list_ = ['Python', 'programming language'] # a list iterable
+
+print(' + '.join(string_)) # join with the ' + ' separator
+print(' = '.join(tuple_)) # join with the ' = ' separator
+
+sep = ' is a '
+print(sep.join(list_)) # join with the ' is a ' separator
+```
+```text
+a + b + c + d + e
+aa = bb = cc
+Python is a programming language
+```
+`print` ステートメントが次のように出力するように `joined` 変数に値を割り当てます:
+
+```text
+I like apples and I like bananas and I like peaches and I like grapes
+```
+
+<div class='hint'>例をよく見て、同じことをしてください!</div>
+
+<div class='hint'><code>fruits</code>が反復可能であり、<code>separator</code> がセパレータ文字列です。</div>
+
diff -Naur "a/Data structures/List items/task.md" "b/Data structures/List items/task.md"
--- "a/Data structures/List items/task.md" 1970-01-01 09:00:00.000000000 +0900
+++ "b/Data structures/List items/task.md" 2022-04-09 23:02:37.690574737 +0900
@@ -0,0 +1,13 @@
+## リストのアイテム :(List items)
+
+個々のリスト要素と同様に、リストのスライスに割り当てることができます。
+
+次のような操作を行うことで、リストのサイズを変更したり、リストを完全にクリアしたりすることもできます:
+
+```python
+animals[:] = []
+```
+
+最後の 2つのアイテムを置き換えて、すべての `animals` の象 (elephants) を作ります。
+
+<div class='hint'>例のようにスライスへの割り当てを使用します。</div>
diff -Naur "a/Data structures/Lists introduction/task.md" "b/Data structures/Lists introduction/task.md"
--- "a/Data structures/Lists introduction/task.md" 1970-01-01 09:00:00.000000000 +0900
+++ "b/Data structures/Lists introduction/task.md" 2022-04-09 23:02:37.690574737 +0900
@@ -0,0 +1,29 @@
+## リストの紹介 :(Lists introduction)
+
+Python には、データをグループ化するために使用されるいくつかの複合データ型があります。
+
+最も用途が広いのはリストです。
+これは、角かっこで囲まれた一連のカンマ区切りの値(アイテム)として記述できます。
+(例: `lst = [item1, item2]`)
+
+リストにはさまざまなタイプのアイテムが含まれている場合がありますが、通常、リスト内のすべてのアイテムは同じタイプです。
+
+文字列と同様に、リストにはインデックスを付けてスライスすることができます。
+([レッスン3](course:// Strings / Stringslicing)を参照)
+
+すべてのスライス操作は、要求された要素を含む新しいリストを返します。
+
+リストは、連結などの操作もサポートします:
+
+```python
+squares = [1, 4, 9, 16, 25]
+squares + [36, 49, 64, 81, 100]
+[1, 4, 9, 16, 25, 36, 49, 64, 81, 100]
+```
+
+リストの詳細については、<a href="https://docs.python.org/3.9/tutorial/introduction.html#lists">このページ</a> をご覧ください。
+
+リストスライスを使用して `[4, 9, 16]` を出力します。
+
+<div class='hint'>リストのスライス構文は、文字列の場合と同じように見えます: <code>lst[index1:index2]</code>
+インデックス <code>index2</code> の要素は含まれていないことを忘れないでください!</div>
diff -Naur "a/Data structures/Lists operations/task.md" "b/Data structures/Lists operations/task.md"
--- "a/Data structures/Lists operations/task.md" 1970-01-01 09:00:00.000000000 +0900
+++ "b/Data structures/Lists operations/task.md" 2022-04-09 23:02:37.690574737 +0900
@@ -0,0 +1,35 @@
+## リストの操作 :(List operations)
+
+文字列とは異なり、リストは変更可能なタイプです。
+つまり、`lst[index] = new_item` を使用してコンテンツを変更できます。
+
+```python
+cubes = [1, 8, 27, 65, 125] # something's wrong here
+4 ** 3 # the cube of 4 is 64, not 65!
+```
+```text
+64
+```
+```python
+cubes[3] = 64 # replace the wrong value
+cubes
+```
+```text
+[1, 8, 27, 64, 125]
+```
+ `append()` メソッドまたはリスト連結を使用して、リストの最後に新しいアイテムを追加できます。
+
+```python
+squares = [1, 4, 9, 16, 25]
+squares.append(6**2)
+squares
+```
+```text
+[1, 4, 9, 16, 25, 36]
+```
+
+<a href="https://docs.python.org/3/tutorial/datastructures.html#more-on-lists">このページ</a> で他の多くの便利なリストメソッドについて調べてください。
+
+`animals` リストの `"dino"` を `"dinosaur"` に置き換えます。
+
+<div class='hint'>リストのインデックス作成操作と値の割り当てを使用します。</div>
diff -Naur "a/Data structures/Nested Lists/task.md" "b/Data structures/Nested Lists/task.md"
--- "a/Data structures/Nested Lists/task.md" 1970-01-01 09:00:00.000000000 +0900
+++ "b/Data structures/Nested Lists/task.md" 2022-04-09 23:02:37.690574737 +0900
@@ -0,0 +1,41 @@
+## ネストされたリスト :(Nested Lists)
+
+リストには、他のリスト(サブリスト)も含め、あらゆる種類のオブジェクトを含めることができます。
+このデータ構造は、「ネストされたリスト」と呼ばれます。
+
+ネストされたリストを使用して、データを階層構造に配置できます。
+
+ネストされたリストは、サブリストのコンマ区切りシーケンスを作成することで作成できます:
+
+```python
+nested_list = [[1, 2, 3], [4, 5], 6]
+```
+以前と同じように、インデックスを使用してネストされたリストのアイテムにアクセスできます:
+
+```python
+print(nested_list[1])
+print(nested_list[2])
+```
+Output:
+```text
+[4, 5]
+6
+```
+
+複数のインデックスを使用して、ネストされたリストのサブリスト内のアイテムにアクセスできます。
+`nested_list` から番号 `1` にアクセスするには、インデックス `0` を2回使用します。
+
+まず、要素 `[1,2,3]` にアクセスし、次にそのサブリストの最初の要素にアクセスします:
+
+```python
+print(nested_list[0][0])
+```
+Output:
+```text
+1
+```
+
+コードエディタで、インデックスを使用して、ネストされたリスト `my_list` の要素 `9` と `10` にアクセスして出力します。
+
+<div class='hint'>行き詰まった場合は、「課題の説明」ウィンドウにある例をもう一度確認してください。</div>
+
diff -Naur "a/Data structures/Tuples/task.md" "b/Data structures/Tuples/task.md"
--- "a/Data structures/Tuples/task.md" 1970-01-01 09:00:00.000000000 +0900
+++ "b/Data structures/Tuples/task.md" 2022-04-09 23:02:37.698574822 +0900
@@ -0,0 +1,57 @@
+## タプル :(Tuples)
+
+タプルは、別の標準シーケンスデータ型を表します。
+
+それらはリストとほとんど同じです。
+タプルとリストの唯一の重要な違いは、タプルは不変であるということです。
+タプル内の要素を追加、置換、または削除することはできません。
+
+タプルは、括弧で囲まれたコンマ区切りの要素で構成されます。
+
+次に例を示します:
+
+```python
+(a, b, c)
+```
+
+特別な状況は、0 または 1個のアイテムを含むタプルの構築です。
+空のタプルは、空の括弧のペアで構成されます。
+1つの項目を持つタプルは、値の後にコンマを付けて作成されます。
+
+例えば:
+
+```python
+empty = ()
+singleton = 'hello', # <-- note the trailing comma
+len(empty)
+```
+```text
+0
+```
+```python
+len(singleton)
+```
+```text
+1
+```
+```python
+singleton
+```
+```text
+('hello',)
+```
+
+ステートメント `t = 12345, 54321, 'hello!'` は、タプルパッキングの例です。
+
+値 `12345`、 `54321`、および `hello!` はタプルに一緒にパックされます。
+
+他のいくつかのリストメソッドもタプルに適用できます。
+
+タプルの詳細については、<a href="https://docs.python.org/3/tutorial/datastructures.html#tuples-and-sequences">こちら</a> をご覧ください。
+
+タプル`alphabet` の長さを出力します。
+次に、単一の要素 `'fun_tuple'` を使用してタプルを作成します。
+コードを実行して、何が出力されるかを確認できます。
+
+<div class='hint'> <code>len()</code> 関数を使用します。</div>
+<div class='hint'>1つの要素を持つタプルの末尾のコンマを忘れないでください。</div>
diff -Naur "a/File input output/Open file/task.md" "b/File input output/Open file/task.md"
--- "a/File input output/Open file/task.md" 1970-01-01 09:00:00.000000000 +0900
+++ "b/File input output/Open file/task.md" 2022-04-09 23:02:37.698574822 +0900
@@ -0,0 +1,49 @@
+## ファイルを開く :(Open file)
+
+Python には、コンピューター上のファイルに対して情報を読み書きするための多数の組み込み関数があります。
+
+`open()` はファイルオブジェクトを返し、最も一般的には 2つの引数で使用されます: `open(filename, mode)`:
+
+```python
+f = open('somefile.txt', 'w')
+```
+
+最初の引数は、ファイル名を含む文字列です。
+
+2番目の引数は、ファイルの使用方法を説明するいくつかの文字を含む別の文字列です。
+
+ファイルが読み取り専用の場合は `'r'`、書き込み専用の場合は `'w'`(同じ名前の既存のファイルは消去されます)、
+追加するときは `'a'`(ファイルに書き込まれたデータはすべてそのファイルの最後に追加されます)、でファイルを開きます。
+
+読み取りと書き込みの両方のの場合は `'r+'` 、でファイルを開きます。
+
+mode 引数はオプションです。省略した場合は `'r'` が想定されます。
+
+ファイルオブジェクトを処理するときは、`with` キーワードを使用することをお勧めします。
+利点は、コードスイートの終了後にファイルが適切に閉じられることです。
+
+```python
+with open('somefile.txt') as f:
+ read_data = f.read()
+
+# We can check that the file has been automatically closed.
+f.closed
+```
+→ファイルが自動的に閉じられたことを確認できます。
+
+```text
+True
+```
+
+**重要**: `with` キーワードを使用していない場合は、 `f.close()` を呼び出してファイルを閉じ、ファイルが使用しているシステムリソースを解放する必要があります。
+
+`with` ステートメントまたは `f.close()` の呼び出しによって、ファイルオブジェクトを閉じた後は使用できません。
+
+コードエディタで、 `with` ステートメントを使用して、ファイル `input1.txt` を読み取りモードで適切に開きます。
+次の行のファイルに使用されている名前を確認して使用してください。
+
+その後、開いた出力ファイル `outfile` を閉じます。
+
+コードを実行した後、他のファイルの中で「コースの表示」ウィンドウに表示された出力ファイルを確認してください。
+
+<div class='hint'>練習のためだけに!、 <code>r</code> 引数をメソッド <code>open()</code>に指定します。</div>
diff -Naur "a/File input output/Read file/task.md" "b/File input output/Read file/task.md"
--- "a/File input output/Read file/task.md" 1970-01-01 09:00:00.000000000 +0900
+++ "b/File input output/Read file/task.md" 2022-04-09 23:02:37.702574863 +0900
@@ -0,0 +1,62 @@
+## ファイルを読む :(Read file)
+
+ファイルの内容を読み取るには、 `f.read(size)` を呼び出すことができます。
+これは、ある量のデータを読み取り、それを文字列として返します。
+サイズが省略または負の場合、ファイルの内容全体が読み取られて返されます。
+
+```python
+with open('somefile.txt') as f:
+ print(f.read())
+```
+```text
+Here's everything that's in the file.\n
+```
+<i>**注**: ファイルがマシンのメモリの 2倍の大きさである場合、問題が発生します。</i>
+
+`f.readline()` はファイルから 1行を読み取ります。
+
+改行文字 (`\n`) は文字列の最後に残され、ファイルが改行で終わっていない場合にのみファイルの最後の行で省略されます。
+
+ `f.readline()` が空の文字列を返す場合、ファイルの終わりに達していますが、空白行は、単一の改行のみを含む文字列である`\n` で表されます。
+
+```python
+f.readline()
+```
+```text
+'This is the first line of the file.\n'
+```
+```python
+f.readline()
+```
+```text
+'Second line of the file\n'
+```
+```python
+f.readline()
+```
+```text
+''
+```
+
+ファイルから行を読み取るために、ファイルオブジェクトをループできます。
+これはメモリ効率が高く、高速で、コードをシンプルにします:
+
+```python
+for line in f:
+ print(line)
+```
+```text
+This is the first line of the file.
+Second line of the file
+```
+
+リスト内のファイルのすべての行を読み取りたい場合は、 `list(f)` または `f.readlines()` を使用することもできます。
+
+詳細については、Python チュートリアルの [ファイルオブジェクトのメソッド](https://docs.python.org/3/tutorial/inputoutput.html#methods-of-file-objects) のセクションを確認してください。
+
+「input.txt」の内容を表示して、ファイルの行を繰り返して出力します。
+次に、「input1.txt」の最初の行のみを出力します。
+
+<div class='hint'>「課題の説明」ウィンドウの例のようにファイルオブジェクトをループします。</div>
+<div class='hint'> <code>print</code> 関数を使用します。</div>
+<div class='hint'> <code>readline()</code> メソッドを使用して 1行を出力します。</div>
diff -Naur "a/File input output/What next/task.md" "b/File input output/What next/task.md"
--- "a/File input output/What next/task.md" 1970-01-01 09:00:00.000000000 +0900
+++ "b/File input output/What next/task.md" 2022-04-09 23:02:37.706574906 +0900
@@ -0,0 +1,17 @@
+おめでとうございます、コースは終了しました。楽しんでいただけたでしょうか。:(What next)
+
+一般的なフィードバックを残したい場合は、コースのマーケットプレイス[ページ](https://plugins.jetbrains.com/plugin/16630-introduction-to-python/reviews) にレビューを書いてください。
+
+貢献したい場合は、コースの[GitHubレポジトリ](https://github.com/jetbrains-academy/introduction_to_python) でプルリクエスト、または問題を自由に作成してください。
+
+### 次は何?
+
+Python プログラミングの基本を学んだので、さらに深く掘り下げて新しいスキルを磨くことができます。
+ここにあなたのためのいくつかのオプションがあります:
+
+- [NumPyのコース](https://plugins.jetbrains.com/plugin/18302-python-libraries--numpy) で、最も広く使用されているPython ライブラリについて学びます。
+- Pythonで[AMazing](https://plugins.jetbrains.com/plugin/17519-amazing) 迷路を構築する方法をご覧ください。
+- [機械学習](https://plugins.jetbrains.com/plugin/18392-machine-learning-101) の基本をご覧ください。
+- JetBrains Academy の[PythonCore](https://hyperskill.org/tracks/2) または [Python for Beginners](https://hyperskill.org/tracks/6) トラックでプロジェクトを確認してください。
+
+新しいコースとアップデートをお楽しみに!
diff -Naur "a/File input output/Write to file/task.md" "b/File input output/Write to file/task.md"
--- "a/File input output/Write to file/task.md" 1970-01-01 09:00:00.000000000 +0900
+++ "b/File input output/Write to file/task.md" 2022-04-09 23:02:37.702574863 +0900
@@ -0,0 +1,69 @@
+## ファイルに書き込む :(Write to file)
+
+すでに述べたように、 `open()` の 2番目の引数として `'w'` を使用すると、ファイルは書き込み専用で開きます。
+新しい空のファイルが作成されます。
+
+同じ名前の別のファイルがすでに存在する場合、そのファイルは消去されます。
+既存のファイルにコンテンツを追加する場合は、 `'a'` (追加)修飾子を使用する必要があります。
+
+別のファイルオブジェクトメソッド `f.write(string)` は、 <i>string</i> の内容をファイルに書き込み、書き込まれた文字数を返します。
+
+```python
+f.write('This is a test\n')
+```
+```text
+15
+```
+テキストモードの他のタイプのオブジェクトは、最初に文字列に変換する必要があります:
+
+```python
+value = ('the answer', 42)
+s = str(value) # convert the tuple into string
+f.write(s)
+```
+```python
+18
+```
+指定したテキストがファイルのどこに挿入されるかは、ファイルモードによって異なります (`'a'` と `'w'`) 。
+
+`'a'`: テキストはファイルの最後に挿入されます。
+
+`'w'`: テキストが最初に挿入される前に、ファイルは空になります。
+
+改行などの記号を文字列に含める場合(新しい行から開始する場合)、「+」を付けて追加します:
+
+```python
+f.write('\n' + 'string,' + ' ' + 'another string')
+```
+
+これにより、新しい行が追加され、 `'文字列、別の文字列'`が書き込まれます。
+
+コードエディタで、`zoo` リストのすべての要素を "output.txt" に追加して、
+出力が新しい行から追加され、要素が `' and '` で区切られるようにします。
+ <code>' and '.join(lst)</code> 構文を使用して、リスト要素を必要な文字列に結合します。
+その後、同じ出力ファイルに `number` を追加します。
+
+<div class='hint'> <code>'a'</code> 修飾子を使用して、ファイルの最後に行を追加します。 </div>
+<div class='hint'> <code>write()</code> メソッドを使用します。</div>
+<div class='hint'>書き込む前に <code>number</code> を文字列に変換します。</div>
+<div class='hint'>各文字列の先頭に <code>\n</code> を追加して、別の行を編集するように書き込みます。</div>
+
+
+## 次は何ですか?
+
+さて、Python の基本をマスターしたら、次に何をすべきか疑問に思っていることでしょう。
+
+[JetBrains Academy](https://hi.hyperskill.org?utm_source=ide&utm_medium=ide&utm_campaign=ide&utm_content=last-task) をチェックすることをお勧めします。
+
+JetBrains Academy を今すぐ試す理由は次のとおりです:
+
+- 現在、37 のPython プロジェクトと348 のトピックが学習に利用可能であり、その数は増え続けています。
+Kotlin やJava などの他のプログラミング言語も学習に利用できます。
+
+- さまざまな難易度のプロジェクトは、すべての人に柔軟な学習体験を提供します。
+
+- 包括的な学習トラックは、詳細な[ナレッジマップ](https://hyperskill.org/knowledge-map?utm_source=ide&utm_medium=ide&utm_campaign=ide&utm_content=last-task) で補強されています。
+
+- どこでも学習: ブラウザを介してタブレットまたは携帯電話で学習を開始し、ラップトップまたはPC で続行できます。 [IDE でプロジェクトをビルド](https://hyperskill.org/plugin#python?utm_source=ide&utm_medium=ide&utm_campaign=ide&utm_content=last-task) することもできます。
+
+JetBrains Academy の[ここ](https://hyperskill.org/onboarding?track=python&utm_source=ide&utm_medium=ide&utm_campaign=ide&utm_content=last-task) に参加して、自分で試してみてください。
diff -Naur "a/Functions/Args and kwargs/task.md" "b/Functions/Args and kwargs/task.md"
--- "a/Functions/Args and kwargs/task.md" 1970-01-01 09:00:00.000000000 +0900
+++ "b/Functions/Args and kwargs/task.md" 2022-04-09 23:02:37.706574906 +0900
@@ -0,0 +1,49 @@
+## Args と kwargs :(Args and kwargs)
+
+`**name` 形式の最後の正式なパラメータが存在する場合、仮パラメータに対応するものを除くすべてのキーワード引数を含む辞書([データ構造 — 辞書](course://Data structures/Dictionaries) を参照)を受け取ります。
+
+これは、形式パラメータリスト以外の任意の数の位置引数を含むタプルを受け取る形式 `*name` の形式パラメータと組み合わせることができます。(`*name` は `**name` の前に出現する必要があります)
+
+例えば、コードエディタで次のような関数を定義すると、
+「call 1」に示すように呼び出すことができ、次のように出力されます:
+
+```text
+-- Do you know how to get to the Library ? ←(図書館への行き方は ?)
+-- I'm sorry, I am not from here, no idea about the Library ←(図書館はわかりません)
+Do you at least have a cigar, sir? ←(葉巻はありますか?)
+Sure, help yourself. ←(助けてください。)
+----------------------------------------
+lost_person : old banker ←(失われた人 : 古い銀行家)
+other_guy : street clown ←(他の男 : ストリートピエロ)
+scene : in a park ←(シーン:公園で)
+```
+
+この関数は、任意の数の引数を使用して呼び出すことができます。
+
+これらの引数はタプルにまとめられます。([タプル](course://Data structures/Tuples) を参照)
+
+可変の引数の前に、0個以上の通常の引数が発生する可能性があります。
+私たちの場合、「場所」が 1つあります。
+
+ `*args` パラメータの後に発生する正式なパラメータはすべて「キーワードのみ」の引数です。つまり、位置引数ではなくキーワードとしてのみ使用できます。
+
+この関数を呼び出す別の方法を「call 2」に示します。これにより、同じ出力が得られます。
+
+### 課題
+
+コードエディタで、 `cat()` 関数の下のコードを変更して、
+次のように出力します:
+
+```text
+-- This cat would eat if you gave it anything ←(この猫は何かを食べるでしょう)
+-- Lovely fur, the Maine Coon ←(素敵な毛皮、メインクーン)
+-- It's fat ! ←(太っている!)
+IT IS TOO FAT. ←(太りすぎです。)
+YOU ARE FEEDING YOUR CAT TOO MUCH. ←(猫に与えすぎ)
+```
+
+<div class='hint'> <code>*</code> を使用して余分な位置引数をアンパックすることを忘れないでください。</div>
+
+<div class='hint'> <code>**</code> を使用してキーワード引数を解凍することを忘れないでください。</div>
+
+<div class='hint'> 正式なパラメータ<code>food</code> の値を指定することを忘れないでください。</div>
diff -Naur "a/Functions/Default parameters/task.md" "b/Functions/Default parameters/task.md"
--- "a/Functions/Default parameters/task.md" 1970-01-01 09:00:00.000000000 +0900
+++ "b/Functions/Default parameters/task.md" 2022-04-09 23:02:37.710574948 +0900
@@ -0,0 +1,29 @@
+## デフォルトのパラメータ :(Default parameters)
+
+可変の引数で関数を定義することも可能です。
+
+組み合わせることができる 3つの形式があります。
+最も便利な形式は、1つ以上の引数のデフォルト値を指定することです。
+
+これにより、定義されているよりも少ない引数で呼び出すことができる関数が作成されます。
+
+例えば、コードエディタの最初の関数を確認してください。
+
+この関数は、いくつかの方法で呼び出すことができます。
+
+- 必須の引数 `a` のみを与える: `multiply_by(3)`
+- オプションの引数の 1つを与える: `multiply_by(3, 47)`、または `multiply_by(3, c=47)`
+- またはすべての議論を与える: `multiply_by(3, 47, 0)`
+
+`c=47` の 3番目のケースで行ったように、関数呼び出しで提供する引数を指定できます。
+
+これを指定しない場合、値は順序に従って割り当てられます。
+
+関数呼び出しと定義では、`=` 記号の前後にスペースを入れないでください。
+
+このトピックについて詳しくは、Pythonドキュメントの <a href="https://docs.python.org/3/tutorial/controlflow.html#default-argument-values">このセクション</a> をご覧ください。
+
+### 課題
+`hello()` 関数にパラメータを追加し、`name` パラメータのデフォルト値を設定します。
+
+<div class='hint'> <code>name</code> パラメータのデフォルト値を指定します。</div>
diff -Naur a/Functions/Definition/task.md b/Functions/Definition/task.md
--- a/Functions/Definition/task.md 1970-01-01 09:00:00.000000000 +0900
+++ b/Functions/Definition/task.md 2022-04-09 23:02:37.706574906 +0900
@@ -0,0 +1,33 @@
+## 意味 :(Definition)
+
+関数は、コードを有用なブロックに分割し、より多くのものにするための便利な方法です。
+
+読み取り可能で、再利用できます。
+
+キーワード `def` は関数定義を導入します。
+
+その後に、関数名と仮パラメーターの括弧で囲まれたリスト(空の場合もあります)を続ける必要があります。
+
+関数の本体を形成するステートメントは次の行から始まり、インデントする必要があります。
+
+関数は、呼び出されたときにのみ実行されます。
+
+関数を呼び出すには、名前の後に括弧を付けて使用します:
+
+```python
+def my_function(): # function definition
+ print("Hello from a function")
+
+my_function() # function call
+```
+
+関数の定義について詳しくは、Pythonドキュメントの <a href="https://docs.python.org/3/tutorial/controlflow.html#defining-functions">このセクション</a> をご覧ください。
+
+### 課題
+
+- ループ内で関数 `my_function` を呼び出して、その呼び出しを 5回繰り返します
+- ファイル内の重複した `print` ステートメントを置き換えることができる関数を定義します。
+
+<div class='hint'> <code>()</code> を使用して <code>my_function</code> 関数を呼び出します。</div>
+
+<div class='hint'>Use the <code>def</code> キーワードを使用して、<code>fun</code> 関数を定義します。</div>
diff -Naur "a/Functions/Keyword Arguments/task.md" "b/Functions/Keyword Arguments/task.md"
--- "a/Functions/Keyword Arguments/task.md" 1970-01-01 09:00:00.000000000 +0900
+++ "b/Functions/Keyword Arguments/task.md" 2022-04-09 23:02:37.706574906 +0900
@@ -0,0 +1,48 @@
+## キーワード引数 :(Keyword Arguments)
+
+関数は `kwarg=value` の形式のキーワード引数を使用して呼び出すこともできることをすでに示唆しました。
+
+例えば、私たちが定義した関数 `cat()` は、1つの必須引数(`food`)と 3つのオプションの引数(`state`、 `action`、および `breed`)を受け入れます。
+
+次のいずれかの方法で呼び出すことができます(すべて試してみることができます):
+
+```python
+cat('chicken') # 1 位置引数
+cat(food='chicken') # 1 キーワード引数
+cat(food='fish', action='bite') # 2 キーワード引数
+cat(action='bite', food='fish') # 2 キーワード引数
+cat('beef', 'happy', 'hiss') # 3 位置引数
+cat('a hug', state='purrring') # 1 位置引数、1 キーワード引数
+```
+
+関数呼び出しでは、キーワード引数は位置引数の後に続く必要があります。
+
+渡されるすべてのキーワード引数は、関数によって受け入れられる引数の 1つと一致する必要があり(例えば、`book` は `cat` 関数の有効な引数ではありません)、それらの順序は重要ではありません。
+
+これには、オプションではない引数も含まれます。(例えば、`cat(food='fish')` も有効です)。
+
+引数が値を複数回受け取ることはできません。
+
+次のすべての呼び出しは無効になります:
+
+```python
+cat() # 必要な引数がありません
+cat(food='fish', 'dead') # キーワード引数の後の位置引数
+cat('veggies', food='nothing') # 同じ引数の値が重複しています
+cat(actor='Johnny Depp') # 不明なキーワード引数
+```
+
+### 課題
+
+エディタで、引数を指定して関数呼び出しを行い、次のように出力します:
+
+```text
+-- This cat wouldn't growl if you gave it soup
+-- Lovely fur, the Sphinx
+-- It's still hungry!
+```
+
+<div class='hint'>キーワード引数には、<code>state='asleep'</code> などの構文を使用します。</div>
+
+<div class='hint'>キーワード引数として指定しない限り、必須の引数 <code>food</code> は最初の位置にある必要があります。</div>
+
diff -Naur "a/Functions/Parameters and call arguments/task.md" "b/Functions/Parameters and call arguments/task.md"
--- "a/Functions/Parameters and call arguments/task.md" 1970-01-01 09:00:00.000000000 +0900
+++ "b/Functions/Parameters and call arguments/task.md" 2022-04-09 23:02:37.706574906 +0900
@@ -0,0 +1,45 @@
+## パラメータと呼び出し引数 :(Parameters and call arguments)
+
+「関数パラメータ」は、関数名に続く括弧 `()` 内で定義されます。
+
+「パラメータ」は、関数に渡される引数の変数名として機能します。
+
+「パラメータ」と「引数」という用語は同じものを指します。つまり、関数に渡される情報です。
+
+ただし、「パラメータ」は関数定義の括弧内にリストされている「変数」であり、「引数」は関数が呼び出されたときに関数に送信される「値」です。
+
+デフォルトでは、関数は正しい数の引数を使用して呼び出す必要があります。
+
+関数が 2つの引数を予期している場合は、2つの引数を使用して呼び出す必要があります:
+
+```python
+def my_function(name, surname):
+ print(name + " " + surname)
+
+my_function("Jon", "Snow")
+```
+
+結果:
+```text
+Jon Snow
+```
+
+ただし、呼び出し中に引数を 1つだけ指定すると、次のようになります:
+
+```python
+my_function("Sam")
+```
+
+`TypeError`が発生します:
+```text
+TypeError Traceback (most recent call last)
+<ipython-input-29-40eb74e4b26a> in <module>
+----> 1 my_function('Jon')
+
+TypeError: my_function() missing 1 required positional argument: 'surname'
+```
+
+### 課題
+コードエディタで、渡されたパラメータの 2乗を出力する関数を定義します。
+
+<div class='hint'>関数定義の括弧内に <code>x</code> パラメーターを追加します。</div>
diff -Naur a/Functions/Recursion/task.md b/Functions/Recursion/task.md
--- a/Functions/Recursion/task.md 1970-01-01 09:00:00.000000000 +0900
+++ b/Functions/Recursion/task.md 2022-04-09 23:02:37.706574906 +0900
@@ -0,0 +1,70 @@
+## 再帰 :(Recursion)
+
+<b>recursion</b> という単語は、ラテン語の <i>recurrere</i> に由来します。
+これは、戻る、元に戻す、または繰り返すことを意味します。
+
+プログラミングでは、再帰とは、関数がそれ自体を呼び出すコーディング手法を指します。
+
+ほとんどの場合、再帰は必要ありませんが、状況によっては、自己参照の定義が必要です。
+
+ツリーのようなデータ構造を使うことは良い例です。
+このような構造はネストされており、再帰的定義に容易に適合します。
+
+同じ課題の非再帰的アルゴリズムは非常に面倒です。
+
+これは再帰関数の簡単な例です。
+
+引数として数値を取り、指定された引数からゼロまでの数値を出力します。
+
+再帰呼び出しでは、引数は現在の `n` の値より1小さいため、各再帰は基本ケース(ゼロ)に近づきます。
+
+```python
+def countdown(n):
+ print(n, end=' ')
+ if n == 0:
+ return # 再帰を終了
+ else:
+ countdown(n - 1) # 再帰呼び出し
+
+
+countdown(4)
+```
+```text
+10 9 8 7 6 5 4 3 2 1 0
+```
+
+<div class='hint'>この関数は引数の妥当性をチェックしません。<code>n</code>
+が非整数または負の場合、 <code>RecursionError</code> が発生します。
+
+基本ケースに到達しないための例外:
+
+```python
+countdown(-10)
+```
+```text
+RecursionError: maximum recursion depth exceeded while calling a Python object
+```
+sys モジュールの関数を使用して、Python の再帰制限を確認できます。
+`getrecursionlimit()` と呼ばれ、 `setrecursionlimit()` で変更できます:
+
+```python
+from sys import setrecursionlimit
+setrecursionlimit(3000)
+getrecursionlimit()
+```
+```text
+3000
+```
+</div>
+
+再帰はすべての状況で役立つわけではないことに注意してください。
+一部の問題では、再帰的な解決策は可能ですが、エレガントというよりは厄介です。
+
+再帰的な実装は、非再帰的な実装よりも多くのメモリを消費することが多く、場合によっては実行が遅くなる可能性があります。
+
+### 課題
+コードエディタで、正の整数の[階乗](https://en.wikipedia.org/wiki/Factorial) を計算する再帰関数を実装します。
+
+1 と 0 の場合は 1 を返し、1つおきの数値については、この数値 (`n`) と前の数値の階乗 (`n-1`) の積を計算します。
+
+<div class='hint'>再帰関数呼び出しを忘れないでください。</div>
diff -Naur "a/Functions/Return value/task.md" "b/Functions/Return value/task.md"
--- "a/Functions/Return value/task.md" 1970-01-01 09:00:00.000000000 +0900
+++ "b/Functions/Return value/task.md" 2022-04-09 23:02:37.710574948 +0900
@@ -0,0 +1,25 @@
+## 戻り値 :(Return value)
+
+関数は、キーワード `return` を使用して、呼び出し元に値を返す場合があります。
+戻り値を使用して変数に割り当てるか、単に出力することができます。
+
+実際、`return` ステートメントのない関数でも値を返します。
+
+この値は `None`(なし)と呼ばれます(組み込みの名前です)。
+
+値 `None` の書き込みは通常、インタープリタによって抑制されますが、
+本当に見たい場合は、 `print(some_func())` を使用できます。
+
+><i>関数本体の最初のステートメントは、オプションで文字列リテラルにすることができます。この文字列リテラルは、関数のドキュメント文字列または docstring です。
+( docstring の詳細については、Pythonドキュメントの <a href="https://docs.python.org/3/tutorial/controlflow.html#tut-docstrings">ドキュメント文字列</a> をご覧ください。)
+作成するコードに docstring を含めることをお勧めします。</i>
+
+「フィボナッチ数列」では、最初の 2つの数字は `1` と `1` であり、その後はそれぞれ
+数値は前の 2つの合計です。
+
+### 課題
+`n` までの「フィボナッチ数列」の数のリストを返す関数を記述します。
+
+<div class='hint'> <code>b</code> を 1で初期化します。</div>
+<div class='hint'> <code>b</code> を <code>a + b</code>で更新します。</div>
+<div class='hint'> <code>a</code> を <code>tmp_var</code>で更新します。</div>
diff -Naur a/Introduction/About/task.md b/Introduction/About/task.md
--- a/Introduction/About/task.md 1970-01-01 09:00:00.000000000 +0900
+++ b/Introduction/About/task.md 2022-04-09 23:02:37.710574948 +0900
@@ -0,0 +1,29 @@
+## コースについて
+
+Python プログラミングの基礎のコースへようこそ!
+
+#### なぜ Python を学ぶのですか?
+
+Python は、世界で最も人気のあるプログラミング言語の1つです。
+Pythonは、データサイエンス、ML、AI で広く使用されており、最も急速に成長している主要なプログラミング言語です。
+
+これは、プログラミングに精通するための完璧な出発点です。
+Python は、他のほとんどのプログラミング言語よりも読み取り、書き込み、学習が簡単です。
+Python を使用すると、単純な初心者の課題にとらわれることはありません。
+多数の Python フォーラムと Q&A プラットフォーム、およびサポートを提供するオープンソースコミュニティは、学習意欲を維持するのに役立つ貴重なリソースです。
+
+#### コースの目的
+
+このコースを完了すると、次のことができるようになります。
+
+- 変数、データ構造、関数、クラスなどの基本的なプログラミングの概念を理解して利用できます。
+- Python コードを読めます。
+- Python で簡単なプログラムを作成できます。
+- Python モジュールおよびパッケージを操作できます。
+- 他のコースでPython を学び続け、より複雑な資料を提供します。
+
+#### 前提条件
+
+このコースを完了するために、Python やプログラミング全般の経験は必要ありません。
+
+頑張って!
diff -Naur a/Introduction/Comments/task.md b/Introduction/Comments/task.md
--- a/Introduction/Comments/task.md 1970-01-01 09:00:00.000000000 +0900
+++ b/Introduction/Comments/task.md 2022-04-09 23:02:37.714574991 +0900
@@ -0,0 +1,40 @@
+## コメント :(Comments)
+
+Python のコメントは、ハッシュ文字 (`#`) と単一のスペースで始まり、物理行の終わりまで続きます。
+
+ &shortcut:CommentByLineComment; を使うと、
+PyCharm の行全体またはコードブロックのコメントまたはコメント解除ができます。
+
+コードを変更したときは、常にコメントを最新の状態に保つことを優先してください。
+
+コードと矛盾するコメントは、コメントがない場合よりも悪いことです。
+また、不必要ですが、明白なことを述べている場合、実際にはかなり気が散ります。
+
+なので、これを行わないでください:
+
+```python
+x = x + 1 # Increment x
+```
+コメントは完全な文章である必要があります。最初の単語は、小文字で始まる識別子でない限り、大文字にする必要があります。コメントが明確で、他の人にもわかりやすいものであることを確認してください。
+
+#### ブロックコメント :(Block Comments)
+
+ブロックコメントは通常、それに続く一部(またはすべて)のコードに適用され、そのコードと同じレベルにインデントされます。
+
+#### インラインコメント :(Inline Comments)
+
+インラインコメントは慎重に使用してください。
+インラインコメントは、ステートメントと同じ行のコメントです。
+インラインコメントは、ステートメントから少なくとも 2つのスペースで区切る必要があります。
+
+適切なコメントの詳細については、<a href="https://www.python.org/dev/peps/pep-0008/#comments">PEP 8 – Style Guide for Python Code</a> を参照してください。
+
+削除したくない場合は、コードの 1行またはブロックにコメントを付けることもできます。現時点では必要ありません。
+
+### 課題
+コードエディタで、出力しないことを示す `print` ステートメントで、行にコメントを付けます。
+コードが強調表示されなくなった様子を確認ください。
+
+<div class='hint'>
+ <code>#</code> とその <code>print</code> ステートメントの前にスペースを追加します。他はすべてそのままにしておきます。
+</div>
diff -Naur "a/Introduction/Course View/task.md" "b/Introduction/Course View/task.md"
--- "a/Introduction/Course View/task.md" 1970-01-01 09:00:00.000000000 +0900
+++ "b/Introduction/Course View/task.md" 2022-04-09 23:02:37.714574991 +0900
@@ -0,0 +1,21 @@
+## コースの表示 :(Course View)
+
+<b>「コースの表示」</b> (Course) ウィンドウには、コースの項目が表示されます: 課題を含むレッスンの一覧です:
+
+<style>
+img {
+ display: block;
+ margin-left: auto;
+ margin-right: auto;
+}
+</style>
+<img src="edu_course_view.png" class="center" width="30%"/>
+
+名前をダブルクリックすると、任意の課題に移動できます。
+
+「コースの表示」ウィンドウを非表示にするには、「プロジェクトツール」のウィンドウ ボタンをクリックするか、 <span style="color: #509DD6">&shortcut:ActivateProjectToolWindow;</span> を押します。
+
+これにより、「編集エリア」ウィンドウと「課題の説明」ウィンドウ用のスペースが増えます。
+
+非表示の「コースの表示」ウィンドウを表示するには、[プロジェクトツールウィンドウ]ボタンをクリックします。または、<span style="color: #509DD6">&shortcut:ActivateProjectToolWindow;</span> を再び押します。
+
diff -Naur a/Introduction/Editor/task.md b/Introduction/Editor/task.md
--- a/Introduction/Editor/task.md 1970-01-01 09:00:00.000000000 +0900
+++ b/Introduction/Editor/task.md 2022-04-09 23:02:37.714574991 +0900
@@ -0,0 +1,24 @@
+## 編集エリア :(Editor)
+
+<b>「編集エリア」</b> (Editor) は、プログラミングを行うための遊び場です。チェックせずに理論的な課題やクイズに取り組んでいる間、ここで実験することができます。
+
+プログラミングの割り当ての場合、「編集エリア」は既存のコードを修正するか、独自のコードを最初から作成する場所です。このコードがチェックされます。
+
+<style>
+img {
+ display: block;
+ margin-left: auto;
+ margin-right: auto;
+}
+</style>
+<img src="edu_editor.png" class="center" width="60%"/>
+
+コードをいつでも実行するには、コンテキストメニューから[実行]オプションを選択するか、<span style="color: #509DD6">&shortcut:Run;</span> を押します:
+
+<img src="edu_context_menu_run.png" class="center" width="60%"/>
+
+
+「編集エリア」に戻ってコードに集中したい場合に、最も速いやり方は、[すべてのウィンドウを非表示]コマンド
+ (<span style="color: #509DD6">&shortcut:HideAllWindows;</span>) を使うことです。
+すべてのウィンドウを元に戻すには、コマンドを繰り返します。
+
diff -Naur "a/Introduction/Navigating Around/task.md" "b/Introduction/Navigating Around/task.md"
--- "a/Introduction/Navigating Around/task.md" 1970-01-01 09:00:00.000000000 +0900
+++ "b/Introduction/Navigating Around/task.md" 2022-04-09 23:02:37.710574948 +0900
@@ -0,0 +1,25 @@
+## EduToolsプラグインの概要 :( EduTools plugin overview)
+
+このレッスンは、[EduTools プラグイン](https://www.jetbrains.com/help/education/educational-products.html) を使用して最初のステップを実行し、それを使用してPython を学習するのに役立ちます。
+
+EduTools プラグインを使用すると、コーディングタスクを完了してプログラミング言語とツールを学習し、IDE 内で即座にフィードバックを得ることができます。
+
+十分に話しましょう – 始めましょう!
+
+インターフェースに既に精通している場合は、このレッスンをスキップできます。
+
+### コースでの作業
+EduTools で利用できるすべてのコースは、レッスンのリストとして構成されています。
+次に、レッスンをセクションにグループ化できます。
+各レッスンにはいくつかの課題が含まれています。
+
+コースを開くと、ナビゲーションに使用されるメインのツールウィンドウが表示されます:
+
+<b>「コースの表示」</b>ウィンドウ
+<b>「編集エリア」</b>ウィンドウ
+<b>「課題の説明」</b>ウィンドウ
+
+<img src="edu_course_overview.png" width="100%"/>
+
+「Next」(次へ)ボタンをクリックして、次の課題に移動します。
+
diff -Naur "a/Introduction/Our first program/task.md" "b/Introduction/Our first program/task.md"
--- "a/Introduction/Our first program/task.md" 1970-01-01 09:00:00.000000000 +0900
+++ "b/Introduction/Our first program/task.md" 2022-04-09 23:02:37.714574991 +0900
@@ -0,0 +1,29 @@
+## 私たちの最初のプログラム :(Our first program)
+
+従来、プログラミング言語で最初に作成するプログラムは `"Hello World!"` です。
+
+こちらでも紹介します。
+
+このスクリプトを実行するには、 **Editor** ビュー(編集画面)の任意の場所を「右クリック」して、
+コンテキストメニューを表示し、**実行 'hello_world'** を選択します。
+
+または、&shortcut:RunClass; ショートカットを使用することもできます。
+PyCharm Edu でのみ、 男の子アイコンを使用できます。
+
+詳細については、[私たちのヘルプ](https://www.jetbrains.com/help/pycharm/running-and-rerunning-applications.html) をご覧ください。
+
+## JetBrains アカデミー :(JetBrains Academy)
+
+この課題が難しすぎると思われる場合、または、より構造化された詳細なカリキュラムを探している場合は、
+ [JetBrains Academy](https://hi.hyperskill.org?utm_source=ide&utm_medium=ide&utm_campaign=ide&utm_content=first-task) を試してみることをお勧めします。
+
+JetBrains Academy を試す理由はたくさんあります。それらのほんの一部を次に示します:
+
+- 詳細な[ナレッジマップ](https://hyperskill.org/knowledge-map?utm_source=ide&utm_medium=ide&utm_campaign=ide&utm_content=first-task) を含む包括的な学習トラック。
+
+- スキルレベルに合わせて柔軟な学習体験を提供する、さまざまな難易度のプロジェクト。
+
+- [専門能力開発ツール](https://hyperskill.org/plugin?utm_source=ide&utm_medium=ide&utm_campaign=ide&utm_content=first-task) を使用して練習し、習得することができます。
+
+Join JetBrains Academy の [こちら](https://hyperskill.org/onboarding?track=python&utm_source=ide&utm_medium=ide&utm_campaign=ide&utm_content=first-task) に参加して、自分で試してみてください。
+
diff -Naur "a/Introduction/Task Description/task.md" "b/Introduction/Task Description/task.md"
--- "a/Introduction/Task Description/task.md" 1970-01-01 09:00:00.000000000 +0900
+++ "b/Introduction/Task Description/task.md" 2022-04-09 23:02:37.714574991 +0900
@@ -0,0 +1,46 @@
+## 課題の説明 :(Task Description)
+
+**課題の説明** (Description) ウィンドウには、課題を完了するために必要なすべての情報が表示されます。
+
+理論的な課題の場合、説明は学習および読み物を提供します。
+クイズの場合、それは複数の選択肢の質問を提供します。
+プログラミングの割り当てについては、解決すべき問題が記載されています。
+
+次のアクションには、「課題の説明」ウィンドウのアイコンを使用します:
+
+|アイコン |説明 |
+| ------------------------------------ | ------------------------------- |
+|**チェック** | <font size="-1">クイズの回答 またはプログラム課題のコードが正しいか確認</font>|
+| **実行** | <font size="-1">コードを実行します(理論上の課題)</font>|
+| | <font size="-1">前のタスクに移動</font>|
+| <font size="-1">または</font> **次へ** | <font size="-1">次のタスクに進む</font>|
+| | <font size="-1">タスクで行ったすべての変更を破棄し、最初からやり直します</font>|
+| | <font size="-1">Stepikで課題ページを表示し、コメントを残してください</font>|
+|<a>ソリューションのピーク...</a>| <font size="-1">正解を明らかにし、<b>差分</b>を表示します。</font>|
+
+「課題の説明」ウィンドウを完全に非表示にせずに、表示したままにしておくことをオススメします。
+
+気が散る場合は、「課題の説明」ウィンドウの右上隅にある  ボタンをクリックして非表示にできます。
+
+2台のモニタを使用する場合は、「課題の説明」ウィンドウ(パネル)をフローティングモードに切り替えて、2台目のモニタに移動するか、IDE のメインウィンドウの近くに配置すると便利な場合があります。
+
+これを行うには、ツールウィンドウの設定  アイコンをクリックします:
+
+<img src="images/edu_task_description_window_settings.png" width="60%"/>
+
+<style>
+img {
+ display: inline !important;
+}
+table, th, td {
+ border: 1px solid black;
+ border-collapse: collapse;
+}
+th, td {
+ padding: 5px;
+}
+table td:nth-child(1) {
+ text-align: center;
+}
+</style>
+
diff -Naur "a/Loops/Break keyword/task.md" "b/Loops/Break keyword/task.md"
--- "a/Loops/Break keyword/task.md" 1970-01-01 09:00:00.000000000 +0900
+++ "b/Loops/Break keyword/task.md" 2022-04-09 23:02:37.722575075 +0900
@@ -0,0 +1,14 @@
+## Break キーワード :(Break keyword)
+
+無限ループは、決して終了しないループです。
+ループ条件が常に`True`である場合、そのようなループは無限になります。
+
+無限ループを作成する最も簡単な方法は、`while True` を使用することです。
+`break` キーワードは、ループをエスケープするために使用されます。
+
+`animal` が `elephant` と等しいかどうかを評価した後、3回目の反復でループを終了する条件を記述します。
+ `break` ステートメントを使用します。
+最後の `zoo` リストには `lion` と `tiger` だけが含まれている必要があります(ループ内の他のすべてのものを `pop` するため)。
+
+<div class='hint'> <code>==</code> を使用して、<code>animal</code> が <code>"elephant"</code> と等しいかどうかを確認します。</div>
+
diff -Naur "a/Loops/Continue keyword/task.md" "b/Loops/Continue keyword/task.md"
--- "a/Loops/Continue keyword/task.md" 1970-01-01 09:00:00.000000000 +0900
+++ "b/Loops/Continue keyword/task.md" 2022-04-09 23:02:37.730575159 +0900
@@ -0,0 +1,11 @@
+## continue キーワード :(Continue keyword)
+
+`continue` キーワードは、現在の反復でのみループ内の残りのコードをスキップし、次の反復に進むために使用されます。
+
+ループは `for` または `while` ステートメントに戻り、条件を再度評価します。
+次の項目がない場合、存在する場合は `else` 句が実行されます。
+
+奇数の `1、3、5、7、9` のみを出力します。
+
+<div class='hint'> <code>%</code> 演算子を使用して、<code>x</code> が偶数かどうかを確認します。</div>
+
diff -Naur "a/Loops/Else with loops/task.md" "b/Loops/Else with loops/task.md"
--- "a/Loops/Else with loops/task.md" 1970-01-01 09:00:00.000000000 +0900
+++ "b/Loops/Else with loops/task.md" 2022-04-09 23:02:37.722575075 +0900
@@ -0,0 +1,41 @@
+## Else with ループ :(Else with loops)
+
+「それ以外の場合はループ」
+
+`break` ステートメントは、最も内側を囲む `for` または `while` ループから抜け出すことがわかりました。
+Python では、ループステートメントに `else` 句を含めることもできます。
+
+iterable の枯渇( `for` を使用)によってループが終了したとき、または条件が `False`( `while` を使用)になったときに実行されますが、ループが `break` ステートメントによって終了したときは実行されません。
+
+素数を検索するループの次の例を確認してください:
+
+```python
+for n in range(2, 10):
+ for x in range(2, n):
+ if n % x == 0:
+ print(n, 'equals', x, '*', n//x)
+ break
+ else:
+ # loop fell through without finding a factor
+ print(n, 'is a prime number')
+```
+```text
+2 is a prime number
+3 is a prime number
+4 equals 2 * 2
+5 is a prime number
+6 equals 2 * 3
+7 is a prime number
+8 equals 2 * 4
+9 equals 3 * 3
+```
+
+このコードでは、`else` 句は `if` ステートメントではなく、`for` ループに属しています。
+
+`if` ステートメントの後の `else` はスキップされ、 `if` に続く式が `True` の場合は実行されませんが、
+ループの場合、(どこかに「休憩」がない限り)`else` 句はループ自体が完了した後に実行されます。
+
+コードエディタで、2行目のコードを 2行目に追加して、ループが 1 と 2 の数字のみを出力し、
+`"for loop is done"` というフレーズを出力しないようにします。
+
+<div class='hint'>番号3で終了する必要があります。</div>
diff -Naur "a/Loops/For loop/task.md" "b/Loops/For loop/task.md"
--- "a/Loops/For loop/task.md" 1970-01-01 09:00:00.000000000 +0900
+++ "b/Loops/For loop/task.md" 2022-04-09 23:02:37.714574991 +0900
@@ -0,0 +1,16 @@
+## for ループ :(for loop)
+
+`for` ステートメントは、シーケンスの要素(文字列、タプル、リストなど)または別の反復可能なオブジェクトを反復処理するために使用されます。
+
+シーケンスは 1回評価されます。
+各反復で、`for` ループで定義された変数がリスト内の次の値に割り当てられます。
+`for`ステートメントの行に続くコードは、アイテムごとに 1回実行されます。
+アイテムが使い果たされると、ループは終了します。
+
+Pythonドキュメントの <a href="https://docs.python.org/3/reference/compound_stmts.html#the-for-statement"> このページ</a> で `for` ステートメントの詳細を読むことができます。
+
+`for` ループを使用して、`primes` リストから各素数を出力します。
+素数は `1` より大きい自然数であり、`1` とそれ自体以外に正の約数はありません。
+
+<div class='hint'> <code>for</code> ループを使用して、<code>primes</code> を反復処理し、各要素を1つずつ出力します。</div>
+
diff -Naur "a/Loops/List Comprehension/task.md" "b/Loops/List Comprehension/task.md"
--- "a/Loops/List Comprehension/task.md" 1970-01-01 09:00:00.000000000 +0900
+++ "b/Loops/List Comprehension/task.md" 2022-04-09 23:02:37.722575075 +0900
@@ -0,0 +1,52 @@
+## リスト内包 :(List Comprehension)
+
+ループを使用して、リスト(または別のデータ構造)を作成できます。
+
+例えば:
+
+
+```python
+my_list = []
+for i in range(5):
+ my_list.append(i)
+
+print(my_list)
+```
+
+出力:
+```text
+[0, 1, 2, 3, 4]
+```
+
+これは素晴らしいですが、かなりかさばります。
+
+リスト内包表記は、既存のリストまたは別の反復可能オブジェクト(タプル、文字列、配列、範囲など)の値に基づいて新しいリストを作成する場合に、よりコンパクトな構文を提供します。
+
+それは同じタスクを実行し、プログラムを簡素化します。
+通常、リスト内包表記は 1行のコードで記述されます。
+
+
+```python
+my_list = [i for i in range(5)]
+print(my_list)
+```
+出力:
+```text
+[0, 1, 2, 3, 4]
+```
+
+リスト内包表記は、`for` ループよりも計算効率が高くなります。
+
+コードエディタで、リスト内包表記を使用して、各要素に $10$ を追加することにより、
+`my_inefficient_list` の要素から `my_efficient_list` を作成します。
+
+例えば、`my_inefficient_list` の最初の要素は $1 + 10 = 11$ であるため、
+`my_efficient_list` の最初の要素は $11 + 10 = 21$ になります。
+
+<div class='hint'>
+
+上記の例では、 `i for i in range(5)` を使用しました。この式の中で、好きなように `i` を変更できます。
+
+例えば、すべての `i` から `5` を引くには、 `i - 5 for i in range(5)` に対して `i - 5` を実行できます。
+</div>
+
diff -Naur "a/Loops/Loop over a string/task.md" "b/Loops/Loop over a string/task.md"
--- "a/Loops/Loop over a string/task.md" 1970-01-01 09:00:00.000000000 +0900
+++ "b/Loops/Loop over a string/task.md" 2022-04-09 23:02:37.722575075 +0900
@@ -0,0 +1,10 @@
+## 文字列をループする :( Loop over a string)
+
+前に説明したように、Python の文字列は多くの点でリストに似ています。
+リストを反復処理するのと同じように、文字列を反復処理できます。
+
+ループを使用して、`hello_world` に含まれる文字数をカウントします。
+この数値を変数 `length` に格納します。
+
+<div class='hint'> <code>for</code> ループを使用して、<code>hello_world</code> 文字列を反復処理します。</div>
+
diff -Naur "a/Loops/Nested List Comprehension/task.md" "b/Loops/Nested List Comprehension/task.md"
--- "a/Loops/Nested List Comprehension/task.md" 1970-01-01 09:00:00.000000000 +0900
+++ "b/Loops/Nested List Comprehension/task.md" 2022-04-09 23:02:37.722575075 +0900
@@ -0,0 +1,49 @@
+## ネストされたリスト内包 :(Nested List Comprehension)
+
+「ネストされたリスト内包」は、他の「リスト内包」内のネストされた「リスト内包」です。
+
+これは「[ネストされたループ](course://Loops/Nested for Loop) 」と非常によく似ています。
+
+「ネストされたループ」を使用して「[ネストされたリスト](course://Data structures/Nested Lists) 」を構築するプログラムは次のとおりです:
+
+```python
+matrix = []
+
+for i in range(3):
+
+ # Append an empty sublist inside the list
+ matrix.append([])
+
+ for j in range(0, 10, 2):
+ matrix[i].append(j)
+
+print(matrix)
+```
+
+出力:
+```text
+[[0, 2, 4, 6, 8], [0, 2, 4, 6, 8], [0, 2, 4, 6, 8]]
+```
+
+「ネストされたリスト内包」表記を使用すると、同じことが 1行で実行できます:
+
+```python
+matrix = [[j for j in range(0, 10, 2)] for i in range(3)]
+print(matrix)
+```
+出力:
+```text
+[[0, 2, 4, 6, 8], [0, 2, 4, 6, 8], [0, 2, 4, 6, 8]]
+```
+
+### 課題
+
+各行(サブリスト)に `string` の **文字(characters)** 0〜9 が含まれるように、$10×10$ の `matrix` を作成します。
+リスト内包表記 (list comprehension) を使用して、1行のコードで課題を完了します。
+
+<div class='hint'>
+
+「課題の説明」ウィンドウの例に従ってください。範囲の 1つではなく、反復可能として `string` を使用する必要があります。
+
+</div>
+
diff -Naur "a/Loops/Nested for Loop/task.md" "b/Loops/Nested for Loop/task.md"
--- "a/Loops/Nested for Loop/task.md" 1970-01-01 09:00:00.000000000 +0900
+++ "b/Loops/Nested for Loop/task.md" 2022-04-09 23:02:37.722575075 +0900
@@ -0,0 +1,54 @@
+## ネストされたループ :(Nested Loops)
+
+ネストされたループは、別のループ内のループです。
+内側のループは、外側のループの反復ごとに 1回実行されます。
+
+```python
+adjectives = ["black", "stylish", "expensive"]
+clothes = ["jacket", "shirt", "boots"]
+
+for x in adjectives:
+ for y in clothes:
+ print(x, y)
+```
+出力:
+```text
+black jacket
+black shirt
+black boots
+stylish jacket
+stylish shirt
+stylish boots
+expensive jacket
+expensive shirt
+expensive boots
+```
+
+<details>
+
+どのタイプのループも別のループ内にネストできることに注意してください。
+例えば、 [`while` loop](course://Loops/While loop) (詳細を参照)は、`for` ループ内にネストできます。
+その逆も可能です。
+</details>
+
+3x3 の三目並べボードが与えられます。
+課題は、すべての位置を出力することです。
+各辺に沿った座標は、リスト `coordinates` に保存されます。
+
+出力は次のようになります:
+
+```text
+1 x 1
+1 x 2
+1 x 3
+2 x 1
+...
+```
+
+座標のすべての組み合わせについても同様です。
+
+<div class='hint'>
+
+ネストされた `for` ループで、同じリストをもう一度繰り返しますが、今回は別の変数名(`coordinate2`)を使用します。
+</div>
+
diff -Naur "a/Loops/While loop/task.md" "b/Loops/While loop/task.md"
--- "a/Loops/While loop/task.md" 1970-01-01 09:00:00.000000000 +0900
+++ "b/Loops/While loop/task.md" 2022-04-09 23:02:37.722575075 +0900
@@ -0,0 +1,12 @@
+## while ループ :(while loop)
+
+`while` ループは `if` ステートメントにいくぶん似ています: ある条件が `True` の場合にコードを実行します。
+主な違いは、条件が `True` である限り、インデントされたコードを実行し続けることです。
+
+式が `False` の場合、ループは終了します。
+
+ `1` から `9` `(1, 4, ... , 81)` までのすべての正方形を出力します。
+`while` ループで `number` 変数を使用します。
+
+<div class='hint'>条件で <code>number</code> が厳密に10未満であることを確認してください。</div>
+
diff -Naur "a/Modules and packages/Built-in modules/task.md" "b/Modules and packages/Built-in modules/task.md"
--- "a/Modules and packages/Built-in modules/task.md" 1970-01-01 09:00:00.000000000 +0900
+++ "b/Modules and packages/Built-in modules/task.md" 2022-04-09 23:02:37.730575159 +0900
@@ -0,0 +1,30 @@
+## 内蔵モジュール :(Built-in modules)
+
+Python には、[標準モジュールのライブラリ](https://docs.python.org/3/library/) が付属しています。
+
+一部のモジュールはインタープリタに組み込まれています。これらは、言語のコアの一部ではないが、効率のため、またはシステムコールなどのオペレーティングシステム プリミティブへのアクセスを提供するために組み込まれている操作へのアクセスを提供します。
+
+1つの特定のモジュールは注意に値します: `sys` 。これはすべての Python インタープリターに組み込まれています。
+
+変数 ` sys.ps1` および `sys.ps2` は、インタプリタがインタラクティブモードの場合にプライマリおよびセカンダリプロンプトとして使用される文字列を定義します:
+
+```text
+>>> import sys
+>>> sys.ps1
+'>>> '
+>>> sys.ps2
+'... '
+```
+
+変数 `sys.path` は、モジュールのインタープリタの検索パスを決定する文字列のリストです。
+課題のコードを実行すると何が出力されるか、を確認してください。
+
+&shortcut :CodeCompletion; (コード補完機能)を使用できることを忘れないでください:
+ドット (.) の後に、モジュールの使用可能なメソッドを調べます。
+
+標準モジュールの詳細については、<a href="https://docs.python.org/3/tutorial/modules.html#standard-modules">こちら</a> をご覧ください。
+
+インポートされた組み込みモジュール `datetime` を使用して現在の日付を出力します。
+
+ <div class='hint'> <code>datetime.datetime.today()</code> 関数を使用します。</div>
+
diff -Naur "a/Modules and packages/Executing modules as scripts/task.md" "b/Modules and packages/Executing modules as scripts/task.md"
--- "a/Modules and packages/Executing modules as scripts/task.md" 1970-01-01 09:00:00.000000000 +0900
+++ "b/Modules and packages/Executing modules as scripts/task.md" 2022-04-09 23:02:37.730575159 +0900
@@ -0,0 +1,66 @@
+## モジュールをスクリプトとして実行します :(Executing modules as scripts)
+
+Python モジュールは、実行可能ステートメントと関数またはクラスの定義を含むファイルです。
+
+これらのステートメントは、`import` ステートメントでモジュール名が最初に検出されたときに実行されます。
+ファイル名は、接尾辞 .py が追加されたモジュール名です。
+
+モジュール内では、モジュールの名前(文字列として)は、グローバル変数 `__name__` の値として使用できます。
+
+モジュールを**直接**(つまり、別のモジュールにインポートすることなく)実行すると、
+モジュール内のコードは、インポートした場合と同じように実行されますが、
+ `__name__` は `"__main__"` に設定されています。
+
+次のように `__name__` と `__main__` を使用できます:
+
+```python
+if __name__ == "__main__":
+ # Do something here
+```
+
+このブロック内のステートメントは、モジュールが直接実行され、別のモジュールへのインポートを介さない場合にのみ実行されます。例えば、2つのファイルについて考えてみましょう:
+
+main_program:
+```python
+import some_module
+
+print(f"main_program __name__ is: {__name__}")
+
+if __name__ == "__main__":
+ print("main_program executed directly")
+else:
+ print("main_program executed when imported")
+```
+
+some_module:
+```python
+print(f"some_module __name__ is: {__name__}")
+
+if __name__ == "__main__":
+ print("some_module executed directly")
+else:
+ print("some_module executed when imported")
+```
+
+`main_program` を実行した後の出力:
+```text
+some_module __name__ is: some_module
+some_module executed when imported
+main_program __name__ is: __main__
+main_program executed directly
+```
+
+`some_module` を実行した後の出力:
+```text
+some_module __name__ is: __main__
+some_module executed directly
+```
+`task.py`と`some_module.py`を変更して、task.py を実行したときに出力が次のようになるようにします:
+
+```text
+This is a message from some_module.
+This is a message from __main__.
+This is a message from the function in the imported module.
+This should be printed ONLY when task.py is called directly.
+```
+
diff -Naur "a/Modules and packages/From import/task.md" "b/Modules and packages/From import/task.md"
--- "a/Modules and packages/From import/task.md" 1970-01-01 09:00:00.000000000 +0900
+++ "b/Modules and packages/From import/task.md" 2022-04-09 23:02:37.730575159 +0900
@@ -0,0 +1,44 @@
+## インポート :(from import)
+
+import ステートメントの 1つの形式は、`from` の名前でモジュールから直接インポートします。
+このようにして、インポートされた `module_name` をプレフィックスなしで使用できます。
+
+例えば:
+
+```python
+from calculator import Add
+
+calc = Add() # name `Add` used directly without prefix `calculator`
+```
+
+これは、インポートが取得されるモジュールの名前をローカルシンボルテーブルに導入しません(したがって、この例では、 `calculator` は定義されていません)。
+
+モジュールが定義するすべての名前をインポートするオプションもあります:
+
+```python
+from calculator import *
+calc = Multiply()
+```
+
+これにより、アンダースコア`_`で始まる名前を除くすべての名前がインポートされます。
+ほとんどの場合、Python プログラマーはこれを使用しません。
+これは、未知の名前のセットをインタープリターに導入し、既に定義したものを隠す可能性があるためです。
+
+モジュール名の後に `as` が続く場合、`as` に続く名前はインポートされたモジュールに直接バインドされます:
+
+```python
+import my_module as mm
+mm.hello_world()
+```
+
+これは、 `import my_module` が行うのと同じ方法でモジュールを効果的にインポートしますが、唯一の違いは `mm` として使用できることです。同様の効果を持つ `from` を利用する場合にも使用できます:
+
+```python
+from calculator import Subtract as Minus
+```
+
+`calculator` から `Calculator` クラスをインポートし、このクラスのインスタンスを作成します。
+この場合、正しくアクセスする方法を覚えておいてください:
+
+<div class='hint'>注: この <code>Calculator</code> クラスは、直接インポートしたので、プレフィックスなしで呼び出す必要があります。</div>
+
diff -Naur "a/Modules and packages/Import module/task.md" "b/Modules and packages/Import module/task.md"
--- "a/Modules and packages/Import module/task.md" 1970-01-01 09:00:00.000000000 +0900
+++ "b/Modules and packages/Import module/task.md" 2022-04-09 23:02:37.730575159 +0900
@@ -0,0 +1,29 @@
+## インポート モジュール :(Import module)
+
+プログラムが長くなると、メンテナンスを容易にするために、プログラムをいくつかのファイルに分割することをお勧めします。また、いくつかのプログラムで定義をコピーせずに、いくつかのプログラムで作成した便利な関数を使用することもできます。
+
+Python のモジュールは、Python の定義とステートメントを含む `.py` 拡張子を持つ単純な Python ファイルです。
+
+モジュールは、`import` キーワードと拡張子 `.py` のないファイル名を使用して他のモジュールからインポートされます。
+
+一連の関数( `func1`、` func2` など)を含む `my_funcs.py` というスクリプトを作成したとします。
+これで、同じディレクトリに配置されている別のスクリプトでそれらを使用する場合は、`import my_funcs` を実行できます。
+
+これは、 `my_funcs` で定義された関数の名前を直接インポートしませんが、モジュール名を使用して、次のように関数にアクセスできるようになります:
+
+```python
+my_funcs.func1()
+```
+モジュールは他のモジュールをインポートできます。
+慣例で行われていますが、すべてのインポートステートメントをモジュールの先頭に配置する必要はありません。
+
+Python チュートリアルの [このセクション](https://docs.python.org/3/tutorial/modules.html) を読むと、Python のモジュールについて詳しく知ることができます。
+
+コードエディタで、モジュール `calculator` をインポートし、クラス `Calculator` (`calc`) のインスタンスを作成します。
+
+ループ内の `Calculator` で定義された `add` メソッドを使用して、0 から 99 までの数値を合計します。
+
+<div class='hint'> <code>import</code> キーワードと <code>calculator</code> リファレンスを使用します。</div>
+<div class='hint'> <code>module.function()</code> などの構文を使用して、モジュールから関数にアクセスします。</div>
+<div class='hint'>関数に引数を指定することを忘れないでください。</div>
+
diff -Naur "a/Modules and packages/Packages/task.md" "b/Modules and packages/Packages/task.md"
--- "a/Modules and packages/Packages/task.md" 1970-01-01 09:00:00.000000000 +0900
+++ "b/Modules and packages/Packages/task.md" 2022-04-09 23:02:37.730575159 +0900
@@ -0,0 +1,47 @@
+## パッケージ :(Packages)
+
+パッケージは、「点線のモジュール名」を使用してPython のモジュール名前空間を構造化する方法です。
+
+例えば、モジュール名 `A.B` は、`A` という名前のパッケージ内の `B` という名前のサブモジュールを指定します。
+
+モジュールを使用することで、さまざまなモジュールの作成者が互いのグローバル変数名について心配する必要がなくなるのと同様に、点線のモジュール名を使用すると、[NumPy](https://numpy.org/) のようなマルチモジュールパッケージの作成者を省略できます。または [Pillow](https://pypi.org/project/Pillow/) は、互いのモジュール名を気にする必要がありません。
+
+<code>__init__.py</code> ファイルは、Python でファイルを含むディレクトリをパッケージとして処理するために必要です。これにより、<code> string </code> などの一般名のディレクトリが、モジュール検索パスの後半で発生する歪んだモジュールを意図せずに非表示にするのを防ぎます。最も単純なケースでは、<code>__init__.py</code> は空のファイルにすることができます。</div>
+
+私たちが作成したパッケージ `functions` と `classes` をチェックしてください。
+パッケージのユーザーは、パッケージから個々のモジュールをインポートできます。
+
+例を示します:
+
+```python
+import functions.greeting.hello
+```
+
+これにより、サブモジュール `functions.greeting.hello` がロードされます。フルネームで参照する必要があります:
+
+```python
+functions.greeting.hello.hello('Susan')
+```
+
+サブモジュールをインポートする別の方法は次のとおりです:
+
+```python
+from functions.greeting import hello
+```
+
+これにより、サブモジュール `hello` もロードされ、パッケージプレフィックスなしで使用できるようになるため、次のように使用できます:
+
+```python
+hello.hello('Susan')
+```
+パッケージの詳細については、Python ドキュメントの <a href="https://docs.python.org/3/tutorial/modules.html#packages">このページ</a> をご覧ください。
+
+コードエディタで、 `official` モジュールを適切にインポートして、最後の `print` ステートメントを機能させます。
+
+2番目の print ステートメントで、関数呼び出しを追加して(適切な関数を見つけて)、`'Alex'` に別れを告げます。
+
+<div class='hint'><code>package.subpackage.module</code> などの構文を使用してモジュールにアクセスします。</div>
+<div class='hint'><code>import module as something</code> などの構文を使用します。</div>
+<div class='hint'>インポートを確認してください: 2番目の課題に適切な機能を備えている可能性のあるインポートがあります。
+使用するときは注意してください。モジュールはすでに特定の名前でインポートされています。</div>
+
diff -Naur a/README.md b/README.md
--- a/README.md 1970-01-01 09:00:00.000000000 +0900
+++ b/README.md 2022-04-09 23:02:37.730575159 +0900
@@ -0,0 +1,12 @@
+# 「Introduction to Python」コースの紹介(教育製品バージョン)[](https://confluence.jetbrains.com/display/ALL/JetBrains+on+GitHub)
+
+<p>これは、JetBrains Educational Products によるPython の入門コースです。
+対象読者は、プログラミングの経験がほとんどまたはまったくない、Python の学習を開始したい人々です。</p>
+
+<p>このコースでは、変数とその操作、文字列とその他のデータ構造、ブール演算子、条件、制御フローなどの基本について学習します。ループ、関数、クラスを実装し、コードの一部をインポートされたモジュールとして使用し、テキストファイルを操作してみます。</p>
+
+<p>楽しんで頑張ってください!</p>
+
+<p>P.S. 貢献したいですか?このコースにプルリクエストを送信してください
+<a href=”https://github.com/jetbrains-academy/introduction_to_python”>git リポジトリ</a>.</p>
+
diff -Naur "a/Strings/Basic string methods/task.md" "b/Strings/Basic string methods/task.md"
--- "a/Strings/Basic string methods/task.md" 1970-01-01 09:00:00.000000000 +0900
+++ "b/Strings/Basic string methods/task.md" 2022-04-09 23:02:37.730575159 +0900
@@ -0,0 +1,17 @@
+## 基本的な文字列メソッド :(Basic string methods)
+
+多くの便利な文字列メソッドがあります。
+
+例えば、 `lower()` メソッドを使用して、文字列の大文字と小文字を削除できます。
+`upper()` メソッドは、文字列を大文字にするために使用されます。
+
+文字列メソッドを呼び出すには、文字列(または文字列を含む変数)の後にドットを入力し、その後にメソッド名を入力します。(例: `"John".upper()`)
+
+PyCharm では、ドットを入力した後のショートカット( &shortcut:CodeCompletion; )を使用して、使用可能なすべての文字列メソッドを調べることができます。
+
+すべての文字列メソッドの詳細については、<a href="https://docs.python.org/3/library/stdtypes.html#string-methods">こちら</a> をご覧ください。
+
+適切な文字列メソッドを使用して、大文字で `monty_python` を出力します。
+
+<div class='hint'>コードで <code>lower()</code> メソッドがどのように使用されているかに注意してください。</div>
+
diff -Naur "a/Strings/Character escaping/task.md" "b/Strings/Character escaping/task.md"
--- "a/Strings/Character escaping/task.md" 1970-01-01 09:00:00.000000000 +0900
+++ "b/Strings/Character escaping/task.md" 2022-04-09 23:02:37.738575244 +0900
@@ -0,0 +1,34 @@
+## キャラクターエスケープ :(Character escaping)
+
+バックスラッシュは、一重引用符や二重引用符などの特殊記号をエスケープするために使用されます。
+
+例えば、`"It\'s me"`(それは私です)、または `"She said \"Hello\""` (彼女は「こんにちは」と言った)などです。
+
+文字列の一部として実際に <code>\\</code> 文字を入力する必要がある場合は、それもエスケープする必要があります。
+
+例えば、単一の円記号を印刷する方法は次のとおりです:
+
+```python
+print('\\')
+```
+
+特殊記号 `'\n'` は文字列に「改行」を追加するために使用され、`'\t'` は「集計」を意味します。
+
+引用符には特別な意味があり、バックスラッシュを使用してエスケープすることもできます。
+
+文字列内に引用符を印刷する必要がある場合は、別の種類の引用符を使用してください。
+
+二重引用符で囲まれた文字列では、エスケープせずに一重引用符を使用できます。その逆も可能です。
+
+また、補足として、お気に入りの種類の引用符を選び、それらを一貫して使用することをお勧めします。
+
+エスケープの詳細については、Pythonドキュメントの <a href="https://docs.python.org/3/reference/lexical_analysis.html#string-and-bytes-literals">このセクション</a> をご覧ください。
+
+1つの文字列を使用して次のテキストを出力します:
+
+```text
+The name of this ice cream is "Sweet'n'Tasty"
+```
+
+<div class='hint'>バックスラッシュを使用して引用符をエスケープします。</div>
+
diff -Naur a/Strings/Concatenation/task.md b/Strings/Concatenation/task.md
--- a/Strings/Concatenation/task.md 1970-01-01 09:00:00.000000000 +0900
+++ b/Strings/Concatenation/task.md 2022-04-09 23:02:37.730575159 +0900
@@ -0,0 +1,10 @@
+## 連結 :(Concatenation)
+
+一部の算術演算は非数値型にも適用できることを覚えていますか?
+
+`+` 記号を使用して 2つの文字列を組み合わせると、「連結」と呼ばれます。
+
+`hello` 変数と `world` 変数を使用して、文字列 `"Hello World"` を取得します。
+
+<div class='hint'>連鎖連結と単一スペース文字列 <code>" "</code> を使用します。</div>
+
diff -Naur a/Strings/F-strings/task.md b/Strings/F-strings/task.md
--- a/Strings/F-strings/task.md 1970-01-01 09:00:00.000000000 +0900
+++ b/Strings/F-strings/task.md 2022-04-09 23:02:37.730575159 +0900
@@ -0,0 +1,36 @@
+## フォーマットされた文字列リテラル :(Formatted string literals)
+
+フォーマットされた文字列リテラル、または Fストリング (f-string) は、接頭辞 'f' または 'F' が付いた文字列リテラルです。これらの文字列には、中括弧 `{}` で区切られた式である置換フィールドが含まれる場合があります。
+
+中括弧の外側の文字列の部分は文字通り扱われます。
+エスケープシーケンスは、通常の文字列リテラルのようにデコードされます。
+置換式には改行を含めることができますが(トリプルクォート文字列など)、コメントを含めることはできません。
+各式は、フォーマットされた文字列リテラルが表示されるコンテキストで、左から右の順に評価されます。
+
+いくつかの例を示します:
+
+```python
+name = "Fred"
+f"He said his name is {name}."
+```
+```text
+'He said his name is Fred.'
+```
+
+例えば、Fストリングで実行できるよりも凝ったことができます:
+
+```python
+f"{name.lower()} is funny."
+```
+
+```text
+'fred is funny.'
+```
+
+フォーマットされた文字列リテラルの詳細については、<a href="https://docs.python.org/3/reference/lexical_analysis.html#formatted-string-literals"> Python Docs</a> を参照してください。
+
+自分で、Fストリングを作成してみてください。
+また、コードを実行して、何が出力されるかを確認してください。
+
+<div class='hint'> <code>name</code> 変数に割り当てられる値は文字列である必要があるため、<code>'Max'</code> のように引用符で囲む必要があります。</div>
+
diff -Naur "a/Strings/In operator/task.md" "b/Strings/In operator/task.md"
--- "a/Strings/In operator/task.md" 1970-01-01 09:00:00.000000000 +0900
+++ "b/Strings/In operator/task.md" 2022-04-09 23:02:37.734575202 +0900
@@ -0,0 +1,8 @@
+## In 演算子 :(In operator)
+
+文字列に特定の文字または部分文字列が含まれているかどうかを確認する場合は、`in` キーワードを使用できます。
+
+`"ice cream"`(アイスクリーム)に `"ice"`(アイス)があるかどうかを確認し、結果を変数 `contains` に割り当てます。
+
+<div class='hint'> <code>in</code> 演算子を使用します。</div>
+
diff -Naur "a/Strings/String formatting/task.md" "b/Strings/String formatting/task.md"
--- "a/Strings/String formatting/task.md" 1970-01-01 09:00:00.000000000 +0900
+++ "b/Strings/String formatting/task.md" 2022-04-09 23:02:37.730575159 +0900
@@ -0,0 +1,16 @@
+## 文字列のフォーマット :(String formatting)
+
+文字列の後の`%`演算子は、文字列を変数と組み合わせるために使用されます。
+`%` 演算子は、文字列内の `%s` をその後に続く文字列変数に置き換えます。
+`%d` 特殊記号は、数値または 10進値のプレースホルダーとして使用されます。
+
+> <i><b>注</b>: ここで説明する書式設定操作には、さまざまな癖があり、多くの一般的なエラーが発生します。
+> 新しい形式の文字列リテラル([さらに](course://Strings/F-strings) を参照)を使用して、<code><a href="https://docs.python.org/3/library/stdtypes.html#str.format">str.format()</a></code> インターフェース、
+> または <a href="https://docs.python.org/3/library/string.html#template-strings"> テンプレート文字列</a>は、これらのエラーを回避するのに役立つ場合があります。
+> これらの選択肢はそれぞれ、単純さ、柔軟性、および拡張性という独自のトレードオフと利点を提供します。</i>
+
+PyCharm にあなたが何歳かを伝えます(数字を使用)。
+
+<div class='hint'> <code>%d</code> 特殊記号を使用します。</div>
+<div class='hint'>あなたは何歳ですか?</div>
+
diff -Naur "a/Strings/String indexing/task.md" "b/Strings/String indexing/task.md"
--- "a/Strings/String indexing/task.md" 1970-01-01 09:00:00.000000000 +0900
+++ "b/Strings/String indexing/task.md" 2022-04-09 23:02:37.734575202 +0900
@@ -0,0 +1,17 @@
+## 文字列のインデックス作成 :(String indexing)
+
+文字列の位置がわかっている場合は、文字列内の文字にアクセスできます。
+
+例えば、 `str[index]` は、文字列 `str` の位置 `index` にある文字を生成します。
+
+文字列のインデックス作成は常に `0` から始まることに注意してください。
+文字列に `x` が見つからない場合、`index` は `ValueError` を発生させます。
+
+右から(つまり、文字列の終わりから)カウントを開始する必要がある場合は、インデックスが負の数になることもあります。
+
+`-0` は `0` と同じであるため、負のインデックスは `-1` から始まることに注意してください。
+
+インデックス演算子を使用して、`"Python"` から文字 `"P"` を取得します。
+
+<div class='hint'>インデックスは 0 で始まることに注意してください。</div>
+
diff -Naur "a/Strings/String length/task.md" "b/Strings/String length/task.md"
--- "a/Strings/String length/task.md" 1970-01-01 09:00:00.000000000 +0900
+++ "b/Strings/String length/task.md" 2022-04-09 23:02:37.734575202 +0900
@@ -0,0 +1,11 @@
+## 文字列の長さ :(String length)
+
+`len()` メソッドは、文字列に含まれる文字数をカウントするために使用されます。
+
+変数 `phrase` に格納されている文字列の前半を取得します。
+注: インデックスを取得するときは、型変換について覚えておいてください。
+
+<div class='hint'>文字列の最初から中間点までのスライスを取得する必要があります。</div>
+
+<div class='hint'>文字列の長さを 2で割って、中間のインデックスを取得します。除算の結果は整数である必要があります。</div>
+
diff -Naur "a/Strings/String multiplication/task.md" "b/Strings/String multiplication/task.md"
--- "a/Strings/String multiplication/task.md" 1970-01-01 09:00:00.000000000 +0900
+++ "b/Strings/String multiplication/task.md" 2022-04-09 23:02:37.734575202 +0900
@@ -0,0 +1,13 @@
+## 文字列の乗算 :(String multiplication)
+
+Python は、文字列ごとの乗算もサポートしています(ただし、その逆はサポートされていません)。
+
+`not_yet_food` 変数を使用して、`food` 変数に保存されている食品名を取得します。
+
+<div class='hint'>
+
+`"クス"`を`2`回繰り返すと`"クスクス"`になります。
+</div>
+
+<div class='hint'>乗算を使用します。</div>
+
diff -Naur "a/Strings/String negative indexing/task.md" "b/Strings/String negative indexing/task.md"
--- "a/Strings/String negative indexing/task.md" 1970-01-01 09:00:00.000000000 +0900
+++ "b/Strings/String negative indexing/task.md" 2022-04-09 23:02:37.734575202 +0900
@@ -0,0 +1,8 @@
+## 文字列の負のインデックス :(String negative indexing)
+
+すでに述べたように、負のインデックスを使用して、文字列の末尾から「逆方向」に文字をカウントできます。
+
+負のインデックスを使用して、`long_string` から `'!'` 記号を取得します。
+
+<div class='hint'>負のインデックスを使用します。</div>
+
diff -Naur "a/Strings/String slicing/task.md" "b/Strings/String slicing/task.md"
--- "a/Strings/String slicing/task.md" 1970-01-01 09:00:00.000000000 +0900
+++ "b/Strings/String slicing/task.md" 2022-04-09 23:02:37.734575202 +0900
@@ -0,0 +1,32 @@
+## スライス :(Slicing)
+
+スライスは、文字列から複数の文字(サブ文字列)を抽出するために使用されます。
+
+その構文はインデックス作成の構文と似ていますが、1つのインデックスの代わりに、コロンで区切られた 2つのインデックス(数値)を使用します。(例: `str[ind1:ind2]`)
+
+これらの 2つのインデックスは、部分文字列の開始と終了に対応します。
+インデックスが `ind1` のシンボルは含まれますが、インデックスが `ind2` のシンボルは含まれないことに注意してください。
+
+Pythonでスライスがどのように機能するかを視覚的に示します:
+
+
+```text
++---+---+---+---+---+---+
+| P | y | t | h | o | n |
++---+---+---+---+---+---+
+0 1 2 3 4 5 6
+-6 -5 -4 -3 -2 -1
+```
+
+##### 例:
+<pre><code>
+str[start:end] # アイテムは最初から最後-1まで
+str[start:] # アイテムは配列の残りの部分から始まります
+str[:end] # 最初から最後-1 までのアイテム
+str[:] # 配列全体のコピー
+</code></pre>
+
+スライスを使用して、`monty_python` 変数から `"Python"` を取得します。
+
+<div class='hint'>インデックスの 1つを空のままにしておくことができます。</div>
+
diff -Naur "a/Variables/Arithmetic operators/task.md" "b/Variables/Arithmetic operators/task.md"
--- "a/Variables/Arithmetic operators/task.md" 1970-01-01 09:00:00.000000000 +0900
+++ "b/Variables/Arithmetic operators/task.md" 2022-04-09 23:02:37.738575244 +0900
@@ -0,0 +1,39 @@
+## 算術演算子 :(Arithmetic operators)
+
+他のプログラミング言語と同じように、加算( `+` )、減算( `-` )、
+乗算( `*` )および除算( `/` )演算子は、数値とともに使用できます。
+さらに、Python には、累乗( `**` )、モジュロ( `%` )、およびフロア分割(`//` )演算子があります。
+
+- `*`(乗算)演算子は、その引数の積を生成します。
+引数は両方とも数値であるか、一方の引数が整数でもう一方がシーケンスである必要があります。
+
+- `/`(除算)および `//`(床除算)演算子は、引数の商を生成します。
+整数の除算はfloatを生成し、整数のフロア除算は整数を生成します。
+
+- `%`(モジュロ)演算子は、最初の引数を2番目の引数で除算した余りを返します。
+
+- `+`(加算)演算子は、その引数の合計を生成します。
+引数は、両方が数値であるか、両方が同じタイプのシーケンスである必要があります。
+
+- `-`(減算)演算子は、その引数の差を生成します。
+
+2進算術演算には、従来の優先度レベルがあります。
+これらの操作の一部は、特定の非数値タイプにも適用されることに注意してください。
+
+このトピックの詳細については、<a href="https://docs.python.org/3/reference/expressions.html#binary-arithmetic-operations">こちら</a>をご覧ください。
+
+### 課題
+- `number` に格納されている値を `2` で割ります。
+- そのような除算の余りを計算します。
+- 除算結果に `2` を掛けます。
+- 除算の余りを乗算結果に追加します。
+- 数値から乗算結果を減算します。
+- `number` を 2 でフロア分割します。
+- `multiplication_result` を 3 の累乗に上げます。
+
+<div class='hint'>まず、<code>/</code> 演算子を使用します。</div>
+<div class='hint'>次に、<code>%</code> 演算子を使用します。</div>
+<div class='hint'>次に、<code>*</code> 演算子を使用します。</div>
+<div class='hint'>次に、<code>+</code> 演算子を使用します。</div>
+<div class='hint'>次に、<code>-</code> 演算子を使用します。</div>
+
diff -Naur a/Variables/Assignments/task.md b/Variables/Assignments/task.md
--- a/Variables/Assignments/task.md 1970-01-01 09:00:00.000000000 +0900
+++ b/Variables/Assignments/task.md 2022-04-09 23:02:37.738575244 +0900
@@ -0,0 +1,12 @@
+## 割り当て :(Assignments)
+
+拡張代入は、二項演算と代入ステートメントを組み合わせた単一のステートメントです( `+=`、 `-=` など)。
+
+`x += 1` のような拡張代入式は、`x = x + 1` と書き直して、同様の効果を得ることができます。
+この <a href="https://docs.python.org/3/reference/simple_stmts.html#augmented-assignment-statements">こちら </a> について詳しく読むことができます。
+
+### 課題
+拡張代入を使用して `5` を `number` に追加し、変数を更新します。
+
+<div class='hint'> <code>+=</code> 演算子を使用します。</div>
+
diff -Naur "a/Variables/Boolean operators/task.md" "b/Variables/Boolean operators/task.md"
--- "a/Variables/Boolean operators/task.md" 1970-01-01 09:00:00.000000000 +0900
+++ "b/Variables/Boolean operators/task.md" 2022-04-09 23:02:37.738575244 +0900
@@ -0,0 +1,14 @@
+## ブール演算子 :(Boolean operators)
+
+ブール値は、`True`または`False`のみが可能な値のタイプです。
+ `==`(等式)演算子は 2つの変数を比較し、それらが等しいかどうかをチェックします。
+
+### 課題
+- 変数 `two` が `three` と等しいかどうかを確認します。
+- 変数 `is_equal` に不正な名前が付いているかどうかを確認します。
+- 変数 `is_false` に実際に嘘が含まれているかどうかを確認します。
+
+<div class='hint'> <code>==</code> 演算子を使用します。</div>
+<div class='hint'> <code>True</code> 値を使用します。</div>
+<div class='hint'> <code>False</code> 値を使用します。</div>
+
diff -Naur "a/Variables/Comparison operators/task.md" "b/Variables/Comparison operators/task.md"
--- "a/Variables/Comparison operators/task.md" 1970-01-01 09:00:00.000000000 +0900
+++ "b/Variables/Comparison operators/task.md" 2022-04-09 23:02:37.738575244 +0900
@@ -0,0 +1,38 @@
+## 比較演算子 :(Comparison operators)
+
+Python には、次のような多くの種類の比較演算子があります:
+
+- `<` 未満
+
+- `>` より大きい
+
+- `==` 等しい
+
+- `>=` 以上
+
+- `<=` 以下
+
+- `!=` 等しくない
+
+演算子は、2つのオブジェクトの値を比較します。
+オブジェクトは同じタイプである必要はありません。
+
+Python のすべての比較演算の優先度は同じであり、算術演算、シフト演算、またはビット演算の優先度よりも低くなっています。比較すると、ブール値(`True` または `False`)が生成されます。
+
+比較は任意に連鎖させることができ、`a <b <c` のような式は、従来の数学的意味を持っています。
+
+比較の詳細については、 <a href="https://docs.python.org/3/reference/expressions.html#comparisons">こちら</a> をご覧ください。
+
+### 課題
+- 変数 `three` の値が変数 `two` の値よりも厳密に大きいかどうかを確認します。
+- 変数 `one` の値が変数 `three` の値よりも厳密に小さいかどうかを確認します。
+- 変数 `three` の値が、変数 `two` の値と変数 `one` の値の両方よりも厳密に大きいかどうかを確認します。
+- 変数 `one` が変数 `two` と等しくないかどうかを確認します。
+- 変数 `thee` がそれ自体と等しいかどうかを確認します。
+
+<div class='hint'> <code>></code> 演算子を使用します。</div>
+<div class='hint'> <code><</code> 演算子を使用します。</div>
+<div class='hint'> <code>></code> 演算子と <code><</code> 演算子の両方を使用します。</div>
+<div class='hint'> <code>!=</code>演算子を使用します。 </div>
+<div class='hint'> <code>==</code> 演算子を使用します。</div>
+
diff -Naur "a/Variables/Type conversion/task.md" "b/Variables/Type conversion/task.md"
--- "a/Variables/Type conversion/task.md" 1970-01-01 09:00:00.000000000 +0900
+++ "b/Variables/Type conversion/task.md" 2022-04-09 23:02:37.738575244 +0900
@@ -0,0 +1,15 @@
+## 型変換 :(Type conversion)
+
+あるデータ型を別のデータ型に変換できる組み込み関数がいくつかあります。
+これらの関数は、変換された値を表す新しいオブジェクトを返します。
+
+`int(x)` は `x` を整数に変換します。
+`float(x)` は `x` を浮動小数点数に変換します。
+ `str(x)` は、オブジェクト `x` を文字列表現に変換します。
+
+### 課題
+
+`float_number` を整数に変換します。
+
+<div class='hint'> <code>int()</code> 関数を使用します。</div>
+
diff -Naur "a/Variables/Undefined variable/task.md" "b/Variables/Undefined variable/task.md"
--- "a/Variables/Undefined variable/task.md" 1970-01-01 09:00:00.000000000 +0900
+++ "b/Variables/Undefined variable/task.md" 2022-04-09 23:02:37.738575244 +0900
@@ -0,0 +1,39 @@
+## 算術演算子 :(Arithmetic operators)
+
+他のプログラミング言語と同じように、加算( `+` )、減算( `-` )、
+乗算( `*` )および除算( `/` )演算子は、数値とともに使用できます。
+さらに、Python には、累乗( `**` )、モジュロ( `%` )、およびフロア分割(`//` )演算子があります。
+
+- `*`(乗算)演算子は、その引数の積を生成します。
+引数は両方とも数値であるか、一方の引数が整数でもう一方がシーケンスである必要があります。
+
+- `/`(除算)および `//`(床除算)演算子は、引数の商を生成します。
+整数の除算はfloatを生成し、整数のフロア除算は整数を生成します。
+
+- `%`(モジュロ)演算子は、最初の引数を 2番目の引数で除算した余りを返します。
+
+- `+`(加算)演算子は、その引数の合計を生成します。
+引数は、両方が数値であるか、両方が同じタイプのシーケンスである必要があります。
+
+- `-`(減算)演算子は、その引数の差を生成します。
+
+2進算術演算には、従来の優先度レベルがあります。
+これらの操作の一部は、特定の非数値タイプにも適用されることに注意してください。
+
+このトピックの詳細については、<a href="https://docs.python.org/3/reference/expressions.html#binary-arithmetic-operations">こちら</a>をご覧ください。
+
+### 課題
+- `number` に格納されている値を `2` で割ります。
+- そのような除算の余りを計算します。
+- 除算結果に `2` を掛けます。
+- 除算の余りを乗算結果に追加します。
+- 数値から乗算結果を減算します。
+- `number` を 2 でフロア分割します。
+- `multiplication_result` を 3 の累乗に上げます。
+
+<div class='hint'>まず、<code>/</code> 演算子を使用します。</div>
+<div class='hint'>次に、<code>%</code> 演算子を使用します。</div>
+<div class='hint'>次に、<code>*</code> 演算子を使用します。</div>
+<div class='hint'>次に、<code>+</code> 演算子を使用します。</div>
+<div class='hint'>次に、<code>-</code> 演算子を使用します。</div>
+
diff -Naur "a/Variables/Variable definition/task.md" "b/Variables/Variable definition/task.md"
--- "a/Variables/Variable definition/task.md" 1970-01-01 09:00:00.000000000 +0900
+++ "b/Variables/Variable definition/task.md" 2022-04-09 23:02:37.738575244 +0900
@@ -0,0 +1,13 @@
+## 変数の定義 :(Variable definition)
+
+変数は値を格納するために使用されるため、後で参照できます。
+変数はラベルのようなものであり、Python では、代入演算子と呼ばれる '` =`' 記号を使用して、変数に値を割り当てます。
+
+割り当ては連鎖させることができます。(例: `a = b = 2`)
+
+### 課題
+- 変数 `greetings` に格納されている値を変更します。
+- チェーン代入を使用して、`a` と `b` の両方に 2 を格納します。
+
+<div class='hint'>回答プレースホルダーに新しい値を入力します。</div>
+
diff -Naur "a/Variables/Variable types/task.md" "b/Variables/Variable types/task.md"
--- "a/Variables/Variable types/task.md" 1970-01-01 09:00:00.000000000 +0900
+++ "b/Variables/Variable types/task.md" 2022-04-09 23:02:37.738575244 +0900
@@ -0,0 +1,28 @@
+## 変数タイプ :(Variable types)
+
+Python プログラムのすべてのデータは、オブジェクトまたはオブジェクト間の関係によって表されます。
+
+すべてのオブジェクトには、ID、タイプ、および値があります。
+オブジェクトのID は、一度作成されると変更されることはありません。
+これは、メモリ内のオブジェクトのアドレスと考えることができます。
+
+オブジェクトの `type` は、サポートする操作を決定し(たとえば、「長さはありますか?」)、そのタイプのオブジェクトに可能な値を定義します。
+
+`type()` 関数は、オブジェクトの型(オブジェクト自体)を返します。
+そのアイデンティティと同様に、オブジェクトのタイプも変更できません。
+
+一部のオブジェクトの値は変更される可能性があります。
+値が変更される可能性のあるオブジェクトは <i>mutable</i>(可変)です。
+作成後に値が変更できないオブジェクトは <i>immutable</i>(不変)と呼ばれます。
+
+Python には、整数と浮動小数点数の 2つの主要なタイプの数値があります。
+それらの最も重要な違いは、`float` は小数点のある数値であり、`int` は小数点のない数値であることです。
+
+このトピックの詳細については、Python ドキュメントの "<a href="https://docs.python.org/3/reference/datamodel.html#objects-values-and-types">オブジェクト、値、およびタイプ</a>" と "<a href="https://docs.python.org/3/reference/datamodel.html#the-standard-type-hierarchy">標準の型階層</a>" のセクションを参照してください。
+
+### 課題
+変数 `float_number` の型を出力します。
+
+<div class='hint'>
+2行目の <code>number</code> のタイプをどのように決定したかを確認し、<code>float_number</code> でも同じことを行います。</div>
+
→最後の空行も入れて、2552 行になりました。
-
-
--- - --- - --- - --- - --- - --- - --- - --- - --- - --- - --- - --- - --- - --- - ----- ---
A-2. パッチファイルの適用:
-
1). パッチファイルの適用:
$ cd ~/PycharmProjects/'Introduction to Python'/
$ patch -p1 < pycharm-ja.patch
:
patching file 'Classes and objects/Class and Instance Variables/task.md'
patching file 'Classes and objects/Definition/task.md'
patching file 'Classes and objects/Special __init__ method/task.md'
patching file 'Classes and objects/The self parameter/task.md'
patching file 'Classes and objects/Update variable/task.md'
patching file 'Classes and objects/Variable access/task.md'
patching file 'Classes and objects/__str__ vs __repr__/task.md'
patching file 'Condition expressions/Boolean operators/task.md'
patching file 'Condition expressions/Boolean operators order/task.md'
patching file 'Condition expressions/Else and elif parts in if statement/task.md'
patching file 'Condition expressions/If statement/task.md'
patching file 'Data structures/Dictionaries/task.md'
patching file 'Data structures/Dictionary keys() and values()/task.md'
patching file 'Data structures/In keyword/task.md'
patching file 'Data structures/Join method/task.md'
patching file 'Data structures/List items/task.md'
patching file 'Data structures/Lists introduction/task.md'
patching file 'Data structures/Lists operations/task.md'
patching file 'Data structures/Nested Lists/task.md'
patching file 'Data structures/Tuples/task.md'
patching file 'File input output/Open file/task.md'
patching file 'File input output/Read file/task.md'
patching file 'File input output/What next/task.md'
patching file 'File input output/Write to file/task.md'
patching file 'Functions/Args and kwargs/task.md'
patching file 'Functions/Default parameters/task.md'
patching file Functions/Definition/task.md
patching file 'Functions/Keyword Arguments/task.md'
patching file 'Functions/Parameters and call arguments/task.md'
patching file Functions/Recursion/task.md
patching file 'Functions/Return value/task.md'
patching file Introduction/About/task.md
patching file Introduction/Comments/task.md
patching file 'Introduction/Course View/task.md'
patching file Introduction/Editor/task.md
patching file 'Introduction/Navigating Around/task.md'
patching file 'Introduction/Our first program/task.md'
patching file 'Introduction/Task Description/task.md'
patching file 'Loops/Break keyword/task.md'
patching file 'Loops/Continue keyword/task.md'
patching file 'Loops/Else with loops/task.md'
patching file 'Loops/For loop/task.md'
patching file 'Loops/List Comprehension/task.md'
patching file 'Loops/Loop over a string/task.md'
patching file 'Loops/Nested List Comprehension/task.md'
patching file 'Loops/Nested for Loop/task.md'
patching file 'Loops/While loop/task.md'
patching file 'Modules and packages/Built-in modules/task.md'
patching file 'Modules and packages/Executing modules as scripts/task.md'
patching file 'Modules and packages/From import/task.md'
patching file 'Modules and packages/Import module/task.md'
patching file 'Modules and packages/Packages/task.md'
patching file README.md
patching file 'Strings/Basic string methods/task.md'
patching file 'Strings/Character escaping/task.md'
patching file Strings/Concatenation/task.md
patching file Strings/F-strings/task.md
patching file 'Strings/In operator/task.md'
patching file 'Strings/String formatting/task.md'
patching file 'Strings/String indexing/task.md'
patching file 'Strings/String length/task.md'
patching file 'Strings/String multiplication/task.md'
patching file 'Strings/String negative indexing/task.md'
patching file 'Strings/String slicing/task.md'
patching file 'Variables/Arithmetic operators/task.md'
patching file Variables/Assignments/task.md
patching file 'Variables/Boolean operators/task.md'
patching file 'Variables/Comparison operators/task.md'
patching file 'Variables/Type conversion/task.md'
patching file 'Variables/Undefined variable/task.md'
patching file 'Variables/Variable definition/task.md'
patching file 'Variables/Variable types/task.md'
→正常終了。このやり方は確実ですね。
-
2). 日本語化されたか確認:
-
(1). システムを再起動してから、「pycharm」を起動:
再起動させないと、キャッシュとメモリで相違があると表示される場合があります。 その場合はデフォルトの「システム(ディスク)からの読み込み」でOK
-
画面下のパネルの右にある「ギア」アイコンをクリック→「Toolbox」画面→「PyCharm Community」アイコンをクリック
→「PyCharm」で前回開いていた ファイル(タブ)が開きます。なので、学習コースの続きになります。
-
(2). 左の各項目の四角いアイコンの「課題名」をダブルクリック→翻訳が反映されます:
→再読込みされ、日本語で表示されました。
何かしらの修正を行ったら、再読込みが必要です。
-
(3). 日本語での学習が可能になりました
-
-
--- - --- - --- - --- - --- - --- - --- - --- - --- - --- - --- - --- - --- - --- - ----- ----
A-3. 参考: (test3): パッチで新規にファイルを作る場合で、差分ファイルを作ったときの作業:
-
閲覧のみで、作業は要りません。
-
「項番 C」で日本語化された、プロジェクトのファイルを元にしました
-
1). 差分ファイルの作成の準備:
$ mkdir -p ~/ダウンロード/test3/{a,b}
-
2). フォルダのコピー:
$ cp -r ~/PycharmProjects/'Introduction to Python'/* ~/ダウンロード/test3/a
$ cp -r ~/PycharmProjects/'Introduction to Python'/* ~/ダウンロード/test3/b
-
3). 対象ファイルの抽出:
$ cd ~/ダウンロード/test3/

$ sudo find a -name "*.md" | sort
内容:
a/Classes and objects/Class and Instance Variables/task.md
a/Classes and objects/Definition/task.md
a/Classes and objects/Special __init__ method/task.md
a/Classes and objects/The self parameter/task.md
a/Classes and objects/Update variable/task.md
a/Classes and objects/Variable access/task.md
a/Classes and objects/__str__ vs __repr__/task.md
a/Condition expressions/Boolean operators order/task.md
a/Condition expressions/Boolean operators/task.md
a/Condition expressions/Else and elif parts in if statement/task.md
a/Condition expressions/If statement/task.md
a/Data structures/Dictionaries/task.md
a/Data structures/Dictionary keys() and values()/task.md
a/Data structures/In keyword/task.md
a/Data structures/Join method/task.md
a/Data structures/List items/task.md
a/Data structures/Lists introduction/task.md
a/Data structures/Lists operations/task.md
a/Data structures/Nested Lists/task.md
a/Data structures/Tuples/task.md
a/File input output/Open file/task.md
a/File input output/Read file/task.md
a/File input output/What next/task.md
a/File input output/Write to file/task.md
a/Functions/Args and kwargs/task.md
a/Functions/Default parameters/task.md
a/Functions/Definition/task.md
a/Functions/Keyword Arguments/task.md
a/Functions/Parameters and call arguments/task.md
a/Functions/Recursion/task.md
a/Functions/Return value/task.md
a/Introduction/About/task.md
a/Introduction/Comments/task.md
a/Introduction/Course View/task.md
a/Introduction/Editor/task.md
a/Introduction/Navigating Around/task.md
a/Introduction/Our first program/task.md
a/Introduction/Task Description/task.md
a/Loops/Break keyword/task.md
a/Loops/Continue keyword/task.md
a/Loops/Else with loops/task.md
a/Loops/For loop/task.md
a/Loops/List Comprehension/task.md
a/Loops/Loop over a string/task.md
a/Loops/Nested List Comprehension/task.md
a/Loops/Nested for Loop/task.md
a/Loops/While loop/task.md
a/Modules and packages/Built-in modules/task.md
a/Modules and packages/Executing modules as scripts/task.md
a/Modules and packages/From import/task.md
a/Modules and packages/Import module/task.md
a/Modules and packages/Packages/task.md
a/README.md
a/Strings/Basic string methods/task.md
a/Strings/Character escaping/task.md
a/Strings/Concatenation/task.md
a/Strings/F-strings/task.md
a/Strings/In operator/task.md
a/Strings/String formatting/task.md
a/Strings/String indexing/task.md
a/Strings/String length/task.md
a/Strings/String multiplication/task.md
a/Strings/String negative indexing/task.md
a/Strings/String slicing/task.md
a/Variables/Arithmetic operators/task.md
a/Variables/Assignments/task.md
a/Variables/Boolean operators/task.md
a/Variables/Comparison operators/task.md
a/Variables/Type conversion/task.md
a/Variables/Undefined variable/task.md
a/Variables/Variable definition/task.md
a/Variables/Variable types/task.md
→フォルダ名に半角スペースが含まれているので注意。
-
4). 対象ファイルを削除するシェルスクリプトを作成:
$ cd ~/ダウンロード/test3/
$ featherpad Delete-md-File.sh
内容:
#!/bin/bash
cd ~/ダウンロード/test3/
rm a/'Classes and objects/Class and Instance Variables/task.md'
rm a/'Classes and objects/Definition/task.md'
rm a/'Classes and objects/Special __init__ method/task.md'
rm a/'Classes and objects/The self parameter/task.md'
rm a/'Classes and objects/Update variable/task.md'
rm a/'Classes and objects/Variable access/task.md'
rm a/'Classes and objects/__str__ vs __repr__/task.md'
rm a/'Condition expressions/Boolean operators order/task.md'
rm a/'Condition expressions/Boolean operators/task.md'
rm a/'Condition expressions/Else and elif parts in if statement/task.md'
rm a/'Condition expressions/If statement/task.md'
rm a/'Data structures/Dictionaries/task.md'
rm a/'Data structures/Dictionary keys() and values()/task.md'
rm a/'Data structures/In keyword/task.md'
rm a/'Data structures/Join method/task.md'
rm a/'Data structures/List items/task.md'
rm a/'Data structures/Lists introduction/task.md'
rm a/'Data structures/Lists operations/task.md'
rm a/'Data structures/Nested Lists/task.md'
rm a/'Data structures/Tuples/task.md'
rm a/'File input output/Open file/task.md'
rm a/'File input output/Read file/task.md'
rm a/'File input output/What next/task.md'
rm a/'File input output/Write to file/task.md'
rm a/'Functions/Args and kwargs/task.md'
rm a/'Functions/Default parameters/task.md'
rm a/'Functions/Definition/task.md'
rm a/'Functions/Keyword Arguments/task.md'
rm a/'Functions/Parameters and call arguments/task.md'
rm a/'Functions/Recursion/task.md'
rm a/'Functions/Return value/task.md'
rm a/'Introduction/About/task.md'
rm a/'Introduction/Comments/task.md'
rm a/'Introduction/Course View/task.md'
rm a/'Introduction/Editor/task.md'
rm a/'Introduction/Navigating Around/task.md'
rm a/'Introduction/Our first program/task.md'
rm a/'Introduction/Task Description/task.md'
rm a/'Loops/Break keyword/task.md'
rm a/'Loops/Continue keyword/task.md'
rm a/'Loops/Else with loops/task.md'
rm a/'Loops/For loop/task.md'
rm a/'Loops/List Comprehension/task.md'
rm a/'Loops/Loop over a string/task.md'
rm a/'Loops/Nested List Comprehension/task.md'
rm a/'Loops/Nested for Loop/task.md'
rm a/'Loops/While loop/task.md'
rm a/'Modules and packages/Built-in modules/task.md'
rm a/'Modules and packages/Executing modules as scripts/task.md'
rm a/'Modules and packages/From import/task.md'
rm a/'Modules and packages/Import module/task.md'
rm a/'Modules and packages/Packages/task.md'
rm a/'README.md'
rm a/'Strings/Basic string methods/task.md'
rm a/'Strings/Character escaping/task.md'
rm a/'Strings/Concatenation/task.md'
rm a/'Strings/F-strings/task.md'
rm a/'Strings/In operator/task.md'
rm a/'Strings/String formatting/task.md'
rm a/'Strings/String indexing/task.md'
rm a/'Strings/String length/task.md'
rm a/'Strings/String multiplication/task.md'
rm a/'Strings/String negative indexing/task.md'
rm a/'Strings/String slicing/task.md'
rm a/'Variables/Arithmetic operators/task.md'
rm a/'Variables/Assignments/task.md'
rm a/'Variables/Boolean operators/task.md'
rm a/'Variables/Comparison operators/task.md'
rm a/'Variables/Type conversion/task.md'
rm a/'Variables/Undefined variable/task.md'
rm a/'Variables/Variable definition/task.md'
rm a/'Variables/Variable types/task.md'
-
5). 対象ファイルを削除するシェルスクリプトを実行:
$ cd ~/ダウンロード/test3/
$ bash Delete-md-File.sh
→これだと実行権限をファイルに与える作業($ chmod +x ./delete-md-file.sh)は要りません。
-
6). 差分ファイルの作成:
$ cd ~/ダウンロード/test3/
$ diff -Naur a b > pycharm-ja.patch
$ ls
delete-md-file.sh  a  b  pycharm-ja.patch
→「項番 A」で使うパッチファイル「pycharm-ja.patch」です。
-
-
--- - --- - --- - --- - --- - --- - --- - --- - --- - --- - --- - --- - --- - --- - ----- -----
B. 参考: (test1): エラー回避を考えていない初期に、日本語化のパッチファイルを作ったときの作業:
-
閲覧のみで、作業は要りません。
-
一番最初の翻訳を終わらした時に、そのファイルから差分を作り、パッチファイルを作成したときの手順です。
md ファイル以外に更新されたファイルがあり、それを差分ファイルから取り除きました。 動作確認しながら翻訳したので、そのときに設定ファイルが変更されたと思われます。 削除しておかないと、パッチ適用したときに想定外の動きになります。
-
1). ファイル翻訳後の更新状態の確認:
$ cd ~/PycharmProjects/'Introduction to Python'/

$ ls -l
:
drwxrwxr-x  9 ubn ubn 4096  4月  2 13:44 'Classes and objects'
drwxrwxr-x  6 ubn ubn 4096  4月  2 13:44 'Condition expressions'
drwxrwxr-x 11 ubn ubn 4096  4月  2 13:44 'Data structures'
drwxrwxr-x  6 ubn ubn 4096  4月  2 13:44 'File input output'
drwxrwxr-x  9 ubn ubn 4096  4月  2 13:44  Functions
drwxrwxr-x  9 ubn ubn 4096  4月  2 13:44  Introduction
-rw-rw-r--  1 ubn ubn 1087  4月  2 13:44  LICENSE
drwxrwxr-x 11 ubn ubn 4096  4月  2 13:44  Loops
drwxrwxr-x  7 ubn ubn 4096  4月  2 13:44 'Modules and packages'
-rw-rw-r--  1 ubn ubn 1071  4月  5 12:53  README.md ←(これのみ更新あり)
drwxrwxr-x 13 ubn ubn 4096  4月  2 13:44  Strings
drwxrwxr-x 10 ubn ubn 4096  4月  2 13:44  Variables
-rw-rw-r--  1 ubn ubn 1257  4月  2 13:44  course-info.yaml
-rw-rw-r--  1 ubn ubn   72  4月  2 13:44  course-remote-info.yaml
$ ls -l Strings
:
drwxrwxr-x 3 ubn ubn 4096  4月  2 13:44 'Basic string methods'
drwxrwxr-x 3 ubn ubn 4096  4月  2 13:44 'Character escaping'
drwxrwxr-x 3 ubn ubn 4096  4月  2 13:44  Concatenation
drwxrwxr-x 3 ubn ubn 4096  4月  2 13:44  F-strings
drwxrwxr-x 3 ubn ubn 4096  4月  2 13:44 'In operator'
drwxrwxr-x 3 ubn ubn 4096  4月  2 13:44 'String formatting'
drwxrwxr-x 3 ubn ubn 4096  4月  2 13:44 'String indexing'
drwxrwxr-x 3 ubn ubn 4096  4月  2 13:44 'String length'
drwxrwxr-x 3 ubn ubn 4096  4月  2 13:44 'String multiplication'
drwxrwxr-x 3 ubn ubn 4096  4月  2 13:44 'String negative indexing'
drwxrwxr-x 3 ubn ubn 4096  4月  2 13:44 'String slicing'
-rw-rw-r-- 1 ubn ubn  217  4月  2 13:44  lesson-info.yaml
-rw-rw-r-- 1 ubn ubn   61  4月  2 13:44  lesson-remote-info.yaml
→更新なし
$ ls -l Strings/F-strings/
:
-rw-rw-r-- 1 ubn ubn   75  4月  2 13:44 f_strings.py
-rw-rw-r-- 1 ubn ubn 2995  4月  2 13:44 task-info.yaml
-rw-rw-r-- 1 ubn ubn   57  4月  2 13:44 task-remote-info.yaml
-rw-rw-r-- 1 ubn ubn 1743  4月  5 19:57 task.md  ←(これのみ更新あり)
drwxrwxr-x 2 ubn ubn 4096  4月  2 13:44 tests
→翻訳した「.md」ファイルのみ更新されており、他のファイルは更新されていないみたい。
追記: 「.md」ファイルのみ更新されているつもりでしたが、設定ファイル(のステータスフラグ)が変更されていました。
-
2). 作業フォルダの準備:
$ cd ~/ダウンロード/
$ mkdir -p test1/{a,b}
$ ls ~/ダウンロード/test1/
a  b
-
3). コピー:
$ cp -r ~/PycharmProjects-ORG/'Introduction to Python'/* ~/ダウンロード/test1/a
$ cp -r ~/PycharmProjects/'Introduction to Python'/* ~/ダウンロード/test1/b
→「PycharmProjects-ORG」は最初にセットアップしたときのイメージを退避したときのフォルダです。
-
4). 差分ファイルに影響する、更新されたファイルはないか日時で確認:
-
(1).「task-info.yaml」が更新されていました:
"b/Introduction/Course View/task-info.yaml"
"b/Introduction/Editor/task-info.yaml"
"b/Introduction/Our first program/task-info.yaml"
"b/Introduction/Task Description/task-info.yaml"
"b/File input output/What next/task-info.yaml"
ステータス行が修正されています:
-status: Unchecked
+status: Solved
-
(2). 更新されたファイルを削除:
削除しないと、設定ファイルなので想定外の動きになります。 差分を取り除くには、比較する両方から削除する必要があります。
$ cd ~/ダウンロード/test1/a/
$ rm "Introduction/Course View/task-info.yaml"
$ rm "Introduction/Editor/task-info.yaml"
$ rm "Introduction/Our first program/task-info.yaml"
$ rm "Introduction/Task Description/task-info.yaml"
$ rm "File input output/What next/task-info.yaml"
$ cd ~/ダウンロード/test1/b/
$ rm "Introduction/Course View/task-info.yaml"
$ rm "Introduction/Editor/task-info.yaml"
$ rm "Introduction/Our first program/task-info.yaml"
$ rm "Introduction/Task Description/task-info.yaml"
$ rm "File input output/What next/task-info.yaml"
-
5). 差分ファイルの作成:
$ cd ~/ダウンロード/test1/
$ ls
a  b
$ diff -Naur a b > pycharm-ja.patch
$ ls
a  b  pycharm-ja.patch
→差分ファイルが作られました。
-
6). 出来上がった差分ファイルの場所:
$ ls ~/ダウンロード/test1/pycharm-ja.patch
-
7). 差分ファイル(パッチファイル)を配置すべき場所:
$ ls ~/PycharmProjects/'Introduction to Python'/
:
'Classes and objects'    'File input output'   LICENSE                 README.md   course-info.yaml
'Condition expressions'   Functions            Loops                   Strings     course-remote-info.yaml
'Data structures'         Introduction        'Modules and packages'   Variables
→「Introduction to Python」プロジェクトのルートです。
-
- これまではパッチファイルを作成するための準備作業でした。
以降が実際に反映させる作業になります。
-
-
--- - --- - --- - --- - --- - --- - --- - --- - --- - --- - --- - --- - --- - --- - ----- ----- -
B-2. 参考: (test1): パッチファイルの適用:
-
閲覧のみで、作業は要りません。
-
1). パッチファイルの作成:
$ cd ~/PycharmProjects/'Introduction to Python'/
$ featherpad pycharm-ja.patch
↓
貼り付ける内容は、「項番 C-3.の 3).」と同じ です。
内容は追加で改修されています。
-
2). パッチファイルの適用:
$ cd ~/PycharmProjects/'Introduction to Python'/
$ patch -p1 < pycharm-ja.patch
→正常に完了すれば、「項番 A-2.の 1).」と同じメッセージが表示 されます。
-
-
--- - --- - --- - --- - --- - --- - --- - --- - --- - --- - --- - --- - --- - --- - ----- ----- --
C. 参考: (test2): エラー回避を考えて、日本語化のパッチファイルを作ったときの作業:
-
閲覧のみで、作業は要りません。
-
パッチファイルの適用時に下記のエラーがあった場合の回避策のひとつです。
すでにパッチ作成の環境(翻訳未と翻訳済みのファイルがある環境)を削除していても、使える回避策です。
-
パッチファイルの適用で、「行末のコード」でエラーしました:
$ cd ~/PycharmProjects/'Introduction to Python'/
$ patch -p1 < pycharm-ja.patch
:
patching file 'Classes and objects/Class and Instance Variables/task.md'
Hunk #1 FAILED at 1 (different line endings).
1 out of 1 hunk FAILED -- saving rejects to file 'Classes and objects/Class and Instance Variables/task.md.rej'

patching file 'Classes and objects/Definition/task.md'
Hunk #1 FAILED at 1 (different line endings).
1 out of 1 hunk FAILED -- saving rejects to file 'Classes and objects/Definition/task.md.rej'
:
→対象となるファイルで、パッチ作成前とパッチ適用時の「行末のコード」が違うというエラーです。
多くのファイルでエラーが表示されました。
-
課題ファイルは、Windows でもMac OS でも、Linux でも使われるデータ(テキストファイル)です。 Windows のテキストファイルの行末はCRLFで、Linux のテキストファイルの行末はLF です。
また、パッチ作成ツールでは、Linux では行末のコードが抜け落ちるツールもあるので、考えられる原因は色々です。
プログラムの世界ではLF かCRLF かの違いは結果に大きく影響することもあり、文字列およびコードの置換を行う、patch コマンドのチェックはきびしいです。なので、このようなエラーが発生すると思われます。
-
追記: ファイルの最後に改行コードがない場合もエラー(警告)となるようです:
今回作成したパッチファイルに、下記の警告の登録が数件ありました:
→「\ ファイル末尾に改行がありません」の文字列がパッチの適用で削除される側のお尻に追加されていました。
(翻訳するときは、各ファイルの最後に空行を付けておくのが無難です)
-
すべての対象ファイルの行末コードを事前に「削除」してから、パッチファイルを適用することでエラー回避できました:
→対象となるファイルで、パッチ作成前の状態でも、行末のコードが抜けた状態にすれば、エラーにはなりません。
→対象ファイルはひとつではなく、ファイルが多い上に、対象ファイルが置かれているファイル階層もそれぞれ違います。工夫が必要です。パッチで対応するのが楽です。
-
1). 差分ファイルの作成の準備:
$ mkdir -p ~/ダウンロード/test2/{a,b,ORG}
→スクリプトの作成を楽にするために「ORG」フォルダを作っています。
-
2). フォルダのコピー:
$ cp -r ~/PycharmProjects-ORG/'Introduction to Python'/* ~/ダウンロード/test2/ORG
$ cp -r ~/PycharmProjects-ORG/'Introduction to Python'/* ~/ダウンロード/test2/a
→対象ファイルのコピーと対象の置かれたフォルダを作成する作業を兼ねます。
-
3). 行末の改行を削除するコマンドを作成:
(1). 対象ファイルの抽出:
$ cd ~/ダウンロード/test2/

$ sudo find ORG -name "*.md" | sort
内容:
ORG/Classes and objects/Class and Instance Variables/task.md
ORG/Classes and objects/Definition/task.md
ORG/Classes and objects/Special __init__ method/task.md
ORG/Classes and objects/The self parameter/task.md
ORG/Classes and objects/Update variable/task.md
ORG/Classes and objects/Variable access/task.md
ORG/Classes and objects/__str__ vs __repr__/task.md
ORG/Condition expressions/Boolean operators order/task.md
ORG/Condition expressions/Boolean operators/task.md
ORG/Condition expressions/Else and elif parts in if statement/task.md
ORG/Condition expressions/If statement/task.md
ORG/Data structures/Dictionaries/task.md
ORG/Data structures/Dictionary keys() and values()/task.md
ORG/Data structures/In keyword/task.md
ORG/Data structures/Join method/task.md
ORG/Data structures/List items/task.md
ORG/Data structures/Lists introduction/task.md
ORG/Data structures/Lists operations/task.md
ORG/Data structures/Nested Lists/task.md
ORG/Data structures/Tuples/task.md
ORG/File input output/Open file/task.md
ORG/File input output/Read file/task.md
ORG/File input output/What next/task.md
ORG/File input output/Write to file/task.md
ORG/Functions/Args and kwargs/task.md
ORG/Functions/Default parameters/task.md
ORG/Functions/Definition/task.md
ORG/Functions/Keyword Arguments/task.md
ORG/Functions/Parameters and call arguments/task.md
ORG/Functions/Recursion/task.md
ORG/Functions/Return value/task.md
ORG/Introduction/About/task.md
ORG/Introduction/Comments/task.md
ORG/Introduction/Course View/task.md
ORG/Introduction/Editor/task.md
ORG/Introduction/Navigating Around/task.md
ORG/Introduction/Our first program/task.md
ORG/Introduction/Task Description/task.md
ORG/Loops/Break keyword/task.md
ORG/Loops/Continue keyword/task.md
ORG/Loops/Else with loops/task.md
ORG/Loops/For loop/task.md
ORG/Loops/List Comprehension/task.md
ORG/Loops/Loop over a string/task.md
ORG/Loops/Nested List Comprehension/task.md
ORG/Loops/Nested for Loop/task.md
ORG/Loops/While loop/task.md
ORG/Modules and packages/Built-in modules/task.md
ORG/Modules and packages/Executing modules as scripts/task.md
ORG/Modules and packages/From import/task.md
ORG/Modules and packages/Import module/task.md
ORG/Modules and packages/Packages/task.md
ORG/README.md
ORG/Strings/Basic string methods/task.md
ORG/Strings/Character escaping/task.md
ORG/Strings/Concatenation/task.md
ORG/Strings/F-strings/task.md
ORG/Strings/In operator/task.md
ORG/Strings/String formatting/task.md
ORG/Strings/String indexing/task.md
ORG/Strings/String length/task.md
ORG/Strings/String multiplication/task.md
ORG/Strings/String negative indexing/task.md
ORG/Strings/String slicing/task.md
ORG/Variables/Arithmetic operators/task.md
ORG/Variables/Assignments/task.md
ORG/Variables/Boolean operators/task.md
ORG/Variables/Comparison operators/task.md
ORG/Variables/Type conversion/task.md
ORG/Variables/Undefined variable/task.md
ORG/Variables/Variable definition/task.md
ORG/Variables/Variable types/task.md
→フォルダ名に半角スペースが含まれているので注意。
-
(2). 行末の改行を削除するコマンドの例:
$ cd ~/ダウンロード/test2/
$ tr -d '\r' < ORG/task.md > a/task.md
→「a/task.md」からは行末コードが削除されています。
-
(3). コマンドの編集過程:
tr -d '\r' < ORG/'Classes and objects/Class and Instance Variables/task.md'
 > a/'Classes and objects/Class and Instance Variables/task.md'
↓ 置換をうまく使って修正
$ tr -d '\r' < ORG/'Classes and objects/Class and Instance Variables/task.md' > a/'Classes and objects/Class and Instance Variables/task.md'
-
(4). 使っているシェルの確認:
$ echo $SHELL
/bin/bash
-
-
4). 行末の改行を削除する、シェルスクリプトの作成:
$ cd ~/ダウンロード/test2/
$ featherpad Delete-LineEnd.sh
内容:
#!/bin/bash
cd ~/ダウンロード/test2/
tr -d '\r' < ORG/'Classes and objects/Class and Instance Variables/task.md' > a/'Classes and objects/Class and Instance Variables/task.md'
tr -d '\r' < ORG/'Classes and objects/Definition/task.md' > a/'Classes and objects/Definition/task.md'
tr -d '\r' < ORG/'Classes and objects/Special __init__ method/task.md' > a/'Classes and objects/Special __init__ method/task.md'
tr -d '\r' < ORG/'Classes and objects/The self parameter/task.md' > a/'Classes and objects/The self parameter/task.md'
tr -d '\r' < ORG/'Classes and objects/Update variable/task.md' > a/'Classes and objects/Update variable/task.md'
tr -d '\r' < ORG/'Classes and objects/Variable access/task.md' > a/'Classes and objects/Variable access/task.md'
tr -d '\r' < ORG/'Classes and objects/__str__ vs __repr__/task.md' > a/'Classes and objects/__str__ vs __repr__/task.md'
tr -d '\r' < ORG/'Condition expressions/Boolean operators order/task.md' > a/'Condition expressions/Boolean operators order/task.md'
tr -d '\r' < ORG/'Condition expressions/Boolean operators/task.md' > a/'Condition expressions/Boolean operators/task.md'
tr -d '\r' < ORG/'Condition expressions/Else and elif parts in if statement/task.md' > a/'Condition expressions/Else and elif parts in if statement/task.md'
tr -d '\r' < ORG/'Condition expressions/If statement/task.md' > a/'Condition expressions/If statement/task.md'
tr -d '\r' < ORG/'Data structures/Dictionaries/task.md' > a/'Data structures/Dictionaries/task.md'
tr -d '\r' < ORG/'Data structures/Dictionary keys() and values()/task.md' > a/'Data structures/Dictionary keys() and values()/task.md'
tr -d '\r' < ORG/'Data structures/In keyword/task.md' > a/'Data structures/In keyword/task.md'
tr -d '\r' < ORG/'Data structures/Join method/task.md' > a/'Data structures/Join method/task.md'
tr -d '\r' < ORG/'Data structures/List items/task.md' > a/'Data structures/List items/task.md'
tr -d '\r' < ORG/'Data structures/Lists introduction/task.md' > a/'Data structures/Lists introduction/task.md'
tr -d '\r' < ORG/'Data structures/Lists operations/task.md' > a/'Data structures/Lists operations/task.md'
tr -d '\r' < ORG/'Data structures/Nested Lists/task.md' > a/'Data structures/Nested Lists/task.md'
tr -d '\r' < ORG/'Data structures/Tuples/task.md' > a/'Data structures/Tuples/task.md'
tr -d '\r' < ORG/'File input output/Open file/task.md' > a/'File input output/Open file/task.md'
tr -d '\r' < ORG/'File input output/Read file/task.md' > a/'File input output/Read file/task.md'
tr -d '\r' < ORG/'File input output/What next/task.md' > a/'File input output/What next/task.md'
tr -d '\r' < ORG/'File input output/Write to file/task.md' > a/'File input output/Write to file/task.md'
tr -d '\r' < ORG/'Functions/Args and kwargs/task.md' > a/'Functions/Args and kwargs/task.md'
tr -d '\r' < ORG/'Functions/Default parameters/task.md' > a/'Functions/Default parameters/task.md'
tr -d '\r' < ORG/'Functions/Definition/task.md' > a/'Functions/Definition/task.md'
tr -d '\r' < ORG/'Functions/Keyword Arguments/task.md' > a/'Functions/Keyword Arguments/task.md'
tr -d '\r' < ORG/'Functions/Parameters and call arguments/task.md' > a/'Functions/Parameters and call arguments/task.md'
tr -d '\r' < ORG/'Functions/Recursion/task.md' > a/'Functions/Recursion/task.md'
tr -d '\r' < ORG/'Functions/Return value/task.md' > a/'Functions/Return value/task.md'
tr -d '\r' < ORG/'Introduction/About/task.md' > a/'Introduction/About/task.md'
tr -d '\r' < ORG/'Introduction/Comments/task.md' > a/'Introduction/Comments/task.md'
tr -d '\r' < ORG/'Introduction/Course View/task.md' > a/'Introduction/Course View/task.md'
tr -d '\r' < ORG/'Introduction/Editor/task.md' > a/'Introduction/Editor/task.md'
tr -d '\r' < ORG/'Introduction/Navigating Around/task.md' > a/'Introduction/Navigating Around/task.md'
tr -d '\r' < ORG/'Introduction/Our first program/task.md' > a/'Introduction/Our first program/task.md'
tr -d '\r' < ORG/'Introduction/Task Description/task.md' > a/'Introduction/Task Description/task.md'
tr -d '\r' < ORG/'Loops/Break keyword/task.md' > a/'Loops/Break keyword/task.md'
tr -d '\r' < ORG/'Loops/Continue keyword/task.md' > a/'Loops/Continue keyword/task.md'
tr -d '\r' < ORG/'Loops/Else with loops/task.md' > a/'Loops/Else with loops/task.md'
tr -d '\r' < ORG/'Loops/For loop/task.md' > a/'Loops/For loop/task.md'
tr -d '\r' < ORG/'Loops/List Comprehension/task.md' > a/'Loops/List Comprehension/task.md'
tr -d '\r' < ORG/'Loops/Loop over a string/task.md' > a/'Loops/Loop over a string/task.md'
tr -d '\r' < ORG/'Loops/Nested List Comprehension/task.md' > a/'Loops/Nested List Comprehension/task.md'
tr -d '\r' < ORG/'Loops/Nested for Loop/task.md' > a/'Loops/Nested for Loop/task.md'
tr -d '\r' < ORG/'Loops/While loop/task.md' > a/'Loops/While loop/task.md'
tr -d '\r' < ORG/'Modules and packages/Built-in modules/task.md' > a/'Modules and packages/Built-in modules/task.md'
tr -d '\r' < ORG/'Modules and packages/Executing modules as scripts/task.md' > a/'Modules and packages/Executing modules as scripts/task.md'
tr -d '\r' < ORG/'Modules and packages/From import/task.md' > a/'Modules and packages/From import/task.md'
tr -d '\r' < ORG/'Modules and packages/Import module/task.md' > a/'Modules and packages/Import module/task.md'
tr -d '\r' < ORG/'Modules and packages/Packages/task.md' > a/'Modules and packages/Packages/task.md'
tr -d '\r' < ORG/'README.md' > a/'README.md'
tr -d '\r' < ORG/'Strings/Basic string methods/task.md' > a/'Strings/Basic string methods/task.md'
tr -d '\r' < ORG/'Strings/Character escaping/task.md' > a/'Strings/Character escaping/task.md'
tr -d '\r' < ORG/'Strings/Concatenation/task.md' > a/'Strings/Concatenation/task.md'
tr -d '\r' < ORG/'Strings/F-strings/task.md' > a/'Strings/F-strings/task.md'
tr -d '\r' < ORG/'Strings/In operator/task.md' > a/'Strings/In operator/task.md'
tr -d '\r' < ORG/'Strings/String formatting/task.md' > a/'Strings/String formatting/task.md'
tr -d '\r' < ORG/'Strings/String indexing/task.md' > a/'Strings/String indexing/task.md'
tr -d '\r' < ORG/'Strings/String length/task.md' > a/'Strings/String length/task.md'
tr -d '\r' < ORG/'Strings/String multiplication/task.md' > a/'Strings/String multiplication/task.md'
tr -d '\r' < ORG/'Strings/String negative indexing/task.md' > a/'Strings/String negative indexing/task.md'
tr -d '\r' < ORG/'Strings/String slicing/task.md' > a/'Strings/String slicing/task.md'
tr -d '\r' < ORG/'Variables/Arithmetic operators/task.md' > a/'Variables/Arithmetic operators/task.md'
tr -d '\r' < ORG/'Variables/Assignments/task.md' > a/'Variables/Assignments/task.md'
tr -d '\r' < ORG/'Variables/Boolean operators/task.md' > a/'Variables/Boolean operators/task.md'
tr -d '\r' < ORG/'Variables/Comparison operators/task.md' > a/'Variables/Comparison operators/task.md'
tr -d '\r' < ORG/'Variables/Type conversion/task.md' > a/'Variables/Type conversion/task.md'
tr -d '\r' < ORG/'Variables/Undefined variable/task.md' > a/'Variables/Undefined variable/task.md'
tr -d '\r' < ORG/'Variables/Variable definition/task.md' > a/'Variables/Variable definition/task.md'
tr -d '\r' < ORG/'Variables/Variable types/task.md' > a/'Variables/Variable types/task.md'
→「cd ~/ダウンロード/test2/」の部分は、適用時の環境に合わせての修正が必要です。
-
5). シェルスクリプトの実行:
$ cd ~/ダウンロード/test2/
$ bash Delete-LineEnd.sh
→これだと実行権限をファイルに与える作業($ chmod +x ./Delete-LineEnd.sh)は要りません。
これで「~/ダウンロード/test2/a/*.md」ファイルの行末のコードが削除されます。
-
6). 行末のコードが削除されたフォルダをコピー:
$ cp -r ~/ダウンロード/test2/a/* ~/ダウンロード/test2/b
→「a」フォルダを保持しておけば、後々の作業を省けます。「b」フォルダのみで作業します。
確認:
$ ls -l ~/ダウンロード/test2/ORG/'Classes and objects/Class and Instance Variables/task.md'
-rw-rw-r-- 1 ubn ubn 1613  4月  9 07:25 '/home/ubn/ダウンロード/test2/ORG/Classes and objects/Class and Instance Variables/task.md'

$ ls -l ~/ダウンロード/test2/b/'Classes and objects/Class and Instance Variables/task.md'
-rw-rw-r-- 1 ubn ubn 1570  4月  9 07:33 '/home/ubn/ダウンロード/test2/b/Classes and objects/Class and Instance Variables/task.md'
→行末のコードが削除され、サイズが小さくなりました。つまり、何かしらの行末のコードが存在していたということ。
-
7). パッチファイルの作成(動作確認用):
$ cd ~/ダウンロード/test2/b/
$ featherpad pycharm-ja.patch
↓
貼り付ける内容は、「項番 B-2」と同じです。更に改修されています。
- パッチファイルを置くフォルダは違うので注意。
-
「\ ファイル末尾に改行がありません」
の文字列がパッチの修正前のお尻に記録されていました:
-
それに伴う、パッチファイルの修正:
上記の対策として、パッチの差分行の表示(例えば、@@ -1,37 +1,55 @@)の、後ろの数字を「1」増やして(@@ -1,37 +1,56 @@)、翻訳した差分の最後に改行「+」の1行を追加しました:
459 行目:
"b/Classes and objects/__str__ vs __repr__/task.md"
@@ -1,37 +1,56 @@

894 行目:
"b/Data structures/Join method/task.md"
@@ -1,42 +1,44 @@

1145 行目:
"b/Data structures/Nested Lists/task.md"
@@ -1,36 +1,41 @@

1944 行目:
"b/Functions/Keyword Arguments/task.md"
@@ -1,38 +1,48 @@

2504 行目:
b/Introduction/Editor/task.md
@@ -1,22 +1,24 @@

2555 行目:
"b/Introduction/Navigating Around/task.md"
@@ -1,18 +1,21 @@

2654 行目:
"b/Introduction/Task Description/task.md"
@@ -1,41 +1,46 @@

2800 行目:
"b/Loops/Else with loops/task.md"
@@ -1,40 +1,42 @@

2921 行目:
"b/Loops/List Comprehension/task.md"
@@ -1,41 +1,52 @@

3142 行目:
"b/Loops/Nested for Loop/task.md"
@@ -1,48 +1,54 @@

3335 行目:
"b/Modules and packages/Executing modules as scripts/task.md"
@@ -1,66 +1,66 @@
→今回は問題ありませんが、次回のパッチの作成時にエラーしないように、 エラーメッセージの登録がないファイルでも「空行」を追加しました。
-
パッチファイルが完成
→パッチの行数は 4599 行になりました。
-
8). パッチの適用(テスト確認用):
$ cd ~/ダウンロード/test2/b/
$ patch -p1 < pycharm-ja.patch
→正常に完了すれば、「項番 A-2.の 1).」と同じメッセージが表示 されます。
-
もし必要なら、ここで再度、「a」と「b」を使って差分を作成し、パッチファイルを作成することもできますが、今回は行いません。
-
-
--- - --- - --- - --- - --- - --- - --- - --- - --- - --- - --- - --- - --- - --- - ----- ----- ---
C-2. 参考: (test2): テスト確認に続いて、そのまま翻訳を本番のフォルダに反映させる場合:
-
閲覧のみで、作業は要りません。
-
翻訳されたフォルダを反映(コピー):
$ rm -r ~/PycharmProjects/'Introduction to Python'/*
$ cp -r ~/ダウンロード/test2/b/* ~/PycharmProjects/'Introduction to Python'/
-
キャッシュの絡みがあるので、一度システムを再起動します。
-
-
--- - --- - --- - --- - --- - --- - --- - --- - --- - --- - --- - --- - --- - --- - ----- ----- ----
C-3. 参考: (test2): テスト環境がない状態で、エラー回避しながら、日本語化のパッチファイルを反映させる手順:
-
閲覧のみで、作業は要りません。
-
1). 行末の改行を削除する、シェルスクリプト「Delete-LineEnd.sh」の作成:
$ cd ~/PycharmProjects/'Introduction to Python'/
$ featherpad Delete-LineEnd.sh
内容:
#!/bin/bash
cd ~/PycharmProjects/'Introduction to Python'/
tr -d '\r' < ORG/'Classes and objects/Class and Instance Variables/task.md' > a/'Classes and objects/Class and Instance Variables/task.md'
tr -d '\r' < ORG/'Classes and objects/Definition/task.md' > a/'Classes and objects/Definition/task.md'
tr -d '\r' < ORG/'Classes and objects/Special __init__ method/task.md' > a/'Classes and objects/Special __init__ method/task.md'
tr -d '\r' < ORG/'Classes and objects/The self parameter/task.md' > a/'Classes and objects/The self parameter/task.md'
tr -d '\r' < ORG/'Classes and objects/Update variable/task.md' > a/'Classes and objects/Update variable/task.md'
tr -d '\r' < ORG/'Classes and objects/Variable access/task.md' > a/'Classes and objects/Variable access/task.md'
tr -d '\r' < ORG/'Classes and objects/__str__ vs __repr__/task.md' > a/'Classes and objects/__str__ vs __repr__/task.md'
tr -d '\r' < ORG/'Condition expressions/Boolean operators order/task.md' > a/'Condition expressions/Boolean operators order/task.md'
tr -d '\r' < ORG/'Condition expressions/Boolean operators/task.md' > a/'Condition expressions/Boolean operators/task.md'
tr -d '\r' < ORG/'Condition expressions/Else and elif parts in if statement/task.md' > a/'Condition expressions/Else and elif parts in if statement/task.md'
tr -d '\r' < ORG/'Condition expressions/If statement/task.md' > a/'Condition expressions/If statement/task.md'
tr -d '\r' < ORG/'Data structures/Dictionaries/task.md' > a/'Data structures/Dictionaries/task.md'
tr -d '\r' < ORG/'Data structures/Dictionary keys() and values()/task.md' > a/'Data structures/Dictionary keys() and values()/task.md'
tr -d '\r' < ORG/'Data structures/In keyword/task.md' > a/'Data structures/In keyword/task.md'
tr -d '\r' < ORG/'Data structures/Join method/task.md' > a/'Data structures/Join method/task.md'
tr -d '\r' < ORG/'Data structures/List items/task.md' > a/'Data structures/List items/task.md'
tr -d '\r' < ORG/'Data structures/Lists introduction/task.md' > a/'Data structures/Lists introduction/task.md'
tr -d '\r' < ORG/'Data structures/Lists operations/task.md' > a/'Data structures/Lists operations/task.md'
tr -d '\r' < ORG/'Data structures/Nested Lists/task.md' > a/'Data structures/Nested Lists/task.md'
tr -d '\r' < ORG/'Data structures/Tuples/task.md' > a/'Data structures/Tuples/task.md'
tr -d '\r' < ORG/'File input output/Open file/task.md' > a/'File input output/Open file/task.md'
tr -d '\r' < ORG/'File input output/Read file/task.md' > a/'File input output/Read file/task.md'
tr -d '\r' < ORG/'File input output/What next/task.md' > a/'File input output/What next/task.md'
tr -d '\r' < ORG/'File input output/Write to file/task.md' > a/'File input output/Write to file/task.md'
tr -d '\r' < ORG/'Functions/Args and kwargs/task.md' > a/'Functions/Args and kwargs/task.md'
tr -d '\r' < ORG/'Functions/Default parameters/task.md' > a/'Functions/Default parameters/task.md'
tr -d '\r' < ORG/'Functions/Definition/task.md' > a/'Functions/Definition/task.md'
tr -d '\r' < ORG/'Functions/Keyword Arguments/task.md' > a/'Functions/Keyword Arguments/task.md'
tr -d '\r' < ORG/'Functions/Parameters and call arguments/task.md' > a/'Functions/Parameters and call arguments/task.md'
tr -d '\r' < ORG/'Functions/Recursion/task.md' > a/'Functions/Recursion/task.md'
tr -d '\r' < ORG/'Functions/Return value/task.md' > a/'Functions/Return value/task.md'
tr -d '\r' < ORG/'Introduction/About/task.md' > a/'Introduction/About/task.md'
tr -d '\r' < ORG/'Introduction/Comments/task.md' > a/'Introduction/Comments/task.md'
tr -d '\r' < ORG/'Introduction/Course View/task.md' > a/'Introduction/Course View/task.md'
tr -d '\r' < ORG/'Introduction/Editor/task.md' > a/'Introduction/Editor/task.md'
tr -d '\r' < ORG/'Introduction/Navigating Around/task.md' > a/'Introduction/Navigating Around/task.md'
tr -d '\r' < ORG/'Introduction/Our first program/task.md' > a/'Introduction/Our first program/task.md'
tr -d '\r' < ORG/'Introduction/Task Description/task.md' > a/'Introduction/Task Description/task.md'
tr -d '\r' < ORG/'Loops/Break keyword/task.md' > a/'Loops/Break keyword/task.md'
tr -d '\r' < ORG/'Loops/Continue keyword/task.md' > a/'Loops/Continue keyword/task.md'
tr -d '\r' < ORG/'Loops/Else with loops/task.md' > a/'Loops/Else with loops/task.md'
tr -d '\r' < ORG/'Loops/For loop/task.md' > a/'Loops/For loop/task.md'
tr -d '\r' < ORG/'Loops/List Comprehension/task.md' > a/'Loops/List Comprehension/task.md'
tr -d '\r' < ORG/'Loops/Loop over a string/task.md' > a/'Loops/Loop over a string/task.md'
tr -d '\r' < ORG/'Loops/Nested List Comprehension/task.md' > a/'Loops/Nested List Comprehension/task.md'
tr -d '\r' < ORG/'Loops/Nested for Loop/task.md' > a/'Loops/Nested for Loop/task.md'
tr -d '\r' < ORG/'Loops/While loop/task.md' > a/'Loops/While loop/task.md'
tr -d '\r' < ORG/'Modules and packages/Built-in modules/task.md' > a/'Modules and packages/Built-in modules/task.md'
tr -d '\r' < ORG/'Modules and packages/Executing modules as scripts/task.md' > a/'Modules and packages/Executing modules as scripts/task.md'
tr -d '\r' < ORG/'Modules and packages/From import/task.md' > a/'Modules and packages/From import/task.md'
tr -d '\r' < ORG/'Modules and packages/Import module/task.md' > a/'Modules and packages/Import module/task.md'
tr -d '\r' < ORG/'Modules and packages/Packages/task.md' > a/'Modules and packages/Packages/task.md'
tr -d '\r' < ORG/'README.md' > a/'README.md'
tr -d '\r' < ORG/'Strings/Basic string methods/task.md' > a/'Strings/Basic string methods/task.md'
tr -d '\r' < ORG/'Strings/Character escaping/task.md' > a/'Strings/Character escaping/task.md'
tr -d '\r' < ORG/'Strings/Concatenation/task.md' > a/'Strings/Concatenation/task.md'
tr -d '\r' < ORG/'Strings/F-strings/task.md' > a/'Strings/F-strings/task.md'
tr -d '\r' < ORG/'Strings/In operator/task.md' > a/'Strings/In operator/task.md'
tr -d '\r' < ORG/'Strings/String formatting/task.md' > a/'Strings/String formatting/task.md'
tr -d '\r' < ORG/'Strings/String indexing/task.md' > a/'Strings/String indexing/task.md'
tr -d '\r' < ORG/'Strings/String length/task.md' > a/'Strings/String length/task.md'
tr -d '\r' < ORG/'Strings/String multiplication/task.md' > a/'Strings/String multiplication/task.md'
tr -d '\r' < ORG/'Strings/String negative indexing/task.md' > a/'Strings/String negative indexing/task.md'
tr -d '\r' < ORG/'Strings/String slicing/task.md' > a/'Strings/String slicing/task.md'
tr -d '\r' < ORG/'Variables/Arithmetic operators/task.md' > a/'Variables/Arithmetic operators/task.md'
tr -d '\r' < ORG/'Variables/Assignments/task.md' > a/'Variables/Assignments/task.md'
tr -d '\r' < ORG/'Variables/Boolean operators/task.md' > a/'Variables/Boolean operators/task.md'
tr -d '\r' < ORG/'Variables/Comparison operators/task.md' > a/'Variables/Comparison operators/task.md'
tr -d '\r' < ORG/'Variables/Type conversion/task.md' > a/'Variables/Type conversion/task.md'
tr -d '\r' < ORG/'Variables/Undefined variable/task.md' > a/'Variables/Undefined variable/task.md'
tr -d '\r' < ORG/'Variables/Variable definition/task.md' > a/'Variables/Variable definition/task.md'
tr -d '\r' < ORG/'Variables/Variable types/task.md' > a/'Variables/Variable types/task.md'
-
2). シェルスクリプトの実行:
$ cd ~/PycharmProjects/'Introduction to Python'/
$ chmod +x ./Delete-LineEnd.sh
$ ./Delete-LineEnd.sh
→これで「md」ファイルの行末のコードが削除されました。
-
3). パッチファイルを作成:
$ cd ~/PycharmProjects/'Introduction to Python'/
$ featherpad pycharm-ja.patch
↓ 連続して、すべて貼り付けてください(長いので、マウスで先頭を選んでから、Sift+下矢印「↓」を使うと楽です)
diff -Naur "a/Classes and objects/Class and Instance Variables/task.md" "b/Classes and objects/Class and Instance Variables/task.md"
--- "a/Classes and objects/Class and Instance Variables/task.md" 2022-04-06 14:37:38.779007644 +0900
+++ "b/Classes and objects/Class and Instance Variables/task.md" 2022-04-06 14:38:43.187947948 +0900
@@ -1,43 +1,53 @@
-## Class and Instance Variables
-
-In general, instance variables are for data unique to each instance,
-and class variables are for attributes and methods shared by all instances of the class:
-
-```python
-class Cat:
-
- species = "Felis catus"
-
- def __init__(self, breed, name):
- self.breed = breed
- self.name = name
-
-cleo = Cat('mix', 'Cleo')
-furry = Cat('bengal', 'Furry')
-
-print(cleo.name)
-print(cleo.species)
-print(furry.name)
-print(furry.species)
-```
-
-```text
-Cleo
-Felis catus
-Furry
-Felis catus
-```
-You can see that `species` is a class variable shared by all instances, while
-`name` and `breed` are instance variable unique to each instance.
-
-Shared data can have possibly surprising effects when involving mutable objects,
-such as lists and dictionaries. If a class variable is a list and you modify it for
-one object, it will be changed for all objects of the class (check out the example in the code
-editor – see what `print(barsik.favorite_food)` will print). If you intend using a list to keep track
-of features unique to each instance, you need to make it an instance attribute.
-
-In the code editor, complete the implementation of the `Animals` class so that the `print` statement
-below prints a line like this: `"This is Doggy the dog, one of my pets."` for each of the pets.
-
-<div class="hint">The class variable should contain information shared between all instances (it's one of the <code>"pets"</code>).</div>
-<div class="hint">Instance variables should contain information unique for the instances (name is unique).</div>
+## クラス変数とインスタンス変数 :(Class and Instance Variables)
+
+一般に、「インスタンス変数」は各インスタンスに固有のデータ用であり、
+「クラス変数」はクラスのすべてのインスタンスによって共有される属性とメソッド用です:
+
+```python
+class Cat:
+
+ species = "Felis catus"
+
+ def __init__(self, breed, name):
+ self.breed = breed
+ self.name = name
+
+cleo = Cat('mix', 'Cleo')
+furry = Cat('bengal', 'Furry')
+
+print(cleo.name)
+print(cleo.species)
+print(furry.name)
+print(furry.species)
+```
+
+```text
+Cleo
+Felis catus
+Furry
+Felis catus
+```
+`species`(種族)はすべてのインスタンスで共有されるクラス変数であり、
+`name`(名前)と `breed`(品種)は各インスタンスに固有のインスタンス変数であることがわかります。
+
+共有データは、リストや辞書などの可変オブジェクトを含む場合、驚くべき効果をもたらす可能性があります。
+
+
+クラス変数がリストであり、1つのオブジェクトに対して変更すると、
+クラスのすべてのオブジェクトに対して変更されます
+
+コードエディタの例を確認してください。
+
+`print(barsik.favorite_food)` が出力する内容を確認してください。
+
+リストを使用して各インスタンスに固有の機能を追跡する場合は、
+リストをインスタンス属性にする必要があります。
+
+コードエディタで、`Animals` クラスの実装を完了して、以下の `print` ステートメントが次のような行を出力するようにします:
+
+各ペットに `"This is Doggy the dog, one of my pets."`
+(これは私のペットの1匹である犬の犬です。)
+
+<div class='hint'>クラス変数には、すべてのインスタンス間で共有される情報が含まれている必要があります。(<code>"pets"</code> の1つです)</div>
+
+<div class='hint'>インスタンス変数には、インスタンスに固有の情報が含まれている必要があります。(名前は一意です)</div>
diff -Naur "a/Classes and objects/Definition/task.md" "b/Classes and objects/Definition/task.md"
--- "a/Classes and objects/Definition/task.md" 2022-04-06 14:37:38.731006942 +0900
+++ "b/Classes and objects/Definition/task.md" 2022-04-06 14:38:43.135947191 +0900
@@ -1,53 +1,54 @@
-## Definition
-
-Classes provide a means of bundling data and functionality together. Creating a new
-class creates a new type of object, allowing new instances of that type to be made.
-Classes are essentially templates for creating your objects.
-Each class instance (object) can have attributes attached to it for maintaining its state.
-Functions of objects are called methods, and they can modify their state. Methods are
-defined by the object's class.
-
-The generalized form of class definition looks like this:
-
-```
-class ClassName:
- <statement-1>
- .
- .
- .
- <statement-N>
-```
-Class definitions, like function definitions (`def` statements) must be executed before
-they have any effect.
-
-The statements inside a class definition will usually be function definitions,
-but other statements are sometimes useful. The function definitions inside a
-class normally have a peculiar form of argument list — this is explained later.
-
-Class objects support two kinds of operations: attribute references and instantiation.
-Attribute references will be discussed in the following sections. Class instantiation uses
-function notation. Just imagine that the class object is a parameterless function that
-returns a new instance of the class. For example:
-
-```python
-class SomeClass:
- """A simple example class"""
- i = 12345
-
-x = SomeClass()
-```
-
-`x = SomeClass()` creates a new instance of the class and assigns this object to the local
-variable `x`.
-
-You can find out more about class definition syntax by reading <a href="https://docs.python.org/3/tutorial/classes.html#class-definition-syntax">this section</a>
-of Python Documentation.
-
-Assign a value to `variable` inside `MyClass` and create an object `my_class` of the class `MyClass()`.
-Run the code and see what happens!
-
-<div class='hint'>Assign any value to <code>variable</code>.</div>
-
-<div class='hint'>Look at the example in the text to figure out how to instantiate an object.</div>
-
-
+## 意味 :(Definition)
+
+クラスは、データと機能をバンドルする手段を提供します。
+
+新しいクラスを作成すると、新しいタイプのオブジェクトが作成され、そのタイプの新しいインスタンスを作成できるようになります。
+
+クラスは基本的に、オブジェクトを作成するためのテンプレートです。
+各クラスインスタンス(オブジェクト)には、その状態を維持するための属性を付加できます。
+オブジェクトの関数はメソッドと呼ばれ、その状態を変更できます。
+メソッドは、オブジェクトのクラスによって定義されます。
+
+クラス定義の一般化された形式は次のようになります:
+
+```
+class ClassName:
+ <statement-1>
+ .
+ .
+ .
+ <statement-N>
+```
+
+関数定義( `def` ステートメント)のようなクラス定義は、効果を発揮する前に実行する必要があります。
+
+クラス定義内のステートメントは通常関数定義ですが、他のステートメントが役立つ場合もあります。
+クラス内の関数定義には通常、独特の形式の引数リストがあります。これについては後で説明します。
+
+クラスオブジェクトは、属性参照とインスタンス化の2種類の操作をサポートします。
+
+属性参照については、次のセクションで説明します。
+
+クラスのインスタンス化は関数表記を使用します。
+クラスオブジェクトが、クラスの新しいインスタンスを返すパラメータのない関数であると想像してみてください。
+
+例えば:
+
+```python
+class SomeClass:
+ """A simple example class"""
+ i = 12345
+
+x = SomeClass()
+```
+`x = SomeClass()` は、クラスの新しいインスタンスを作成し、このオブジェクトをローカル変数 `x` に割り当てます。
+
+クラス定義構文の詳細については、Python ドキュメントの <a href="https://docs.python.org/3/tutorial/classes.html#class-definition-syntax">このセクション</a> をご覧ください。
+
+`MyClass` 内の `variable` に値を割り当て、クラス `MyClass()` のオブジェクト `my_class` を作成します。
+
+コードを実行して、何が起こるかを確認してください。
+
+<div class='hint'>任意の値を <code>variable</code> に割り当てます。</div>
+
+<div class='hint'>テキストの例を見て、オブジェクトをインスタンス化する方法を理解してください。</div>
diff -Naur "a/Classes and objects/Special __init__ method/task.md" "b/Classes and objects/Special __init__ method/task.md"
--- "a/Classes and objects/Special __init__ method/task.md" 2022-04-06 14:37:38.771007527 +0900
+++ "b/Classes and objects/Special __init__ method/task.md" 2022-04-06 14:38:43.175947774 +0900
@@ -1,43 +1,49 @@
-## Special __init__ method
-
-The instantiation operation (“calling” a class object) creates an empty object,
-but it is useful to create objects with instances customized to a specific
-initial state. Therefore, a class may define a special method named `__init__()`,
-like this:
-
-```python
-class MyClass:
- def __init__(self):
- self.data = []
-```
-`__init__` is one of the reserved methods in Python. If defined, the `__init__()`
-method is invoked automatically when an instance of the class is created,
-and it initializes the object and its attributes. It always takes at least
-one argument, `self`. So in our example,
-a new, initialized instance can be obtained by:
-
-```python
-x = MyClass()
-```
-The `__init__()` method may receive arguments for greater flexibility.
-In that case, arguments given to the class instantiation operator are passed
-on to `__init__()`. For example:
-```python
-class Complex:
- def __init__(self, real_part, imag_part):
- self.r = real_part
- self.i = imag_part
- self.num = complex(self.r, self.i)
-
-x = Complex(3.0, -4.5) # Instantiating a complex number
-x.num
-```
-```text
-(3-4.5j)
-```
-
-
-In the code editor, add parameters to the`__init__()` method of the `Car` class, so we can
-create it with a specified color and brand.
-
-<div class='hint'>Add two parameters — <code>self</code> and <code>color</code>.</div>
+## 特別な__init__メソッド :(Special __init__ method)
+
+インスタンス化操作(クラスオブジェクトの「呼び出し」)は空のオブジェクトを作成しますが、特定の初期状態にカスタマイズされたインスタンスを使用してオブジェクトを作成すると便利です。
+
+従って、クラスは `__init__()` という名前の特別なメソッドを定義する場合があります。
+
+このような:
+
+
+```python
+class MyClass:
+ def __init__(self):
+ self.data = []
+```
+`__init__` はPython で予約されているメソッドの1つです。
+
+定義されている場合、 `__init__()` メソッドは、クラスのインスタンスが作成されるときに自動的に呼び出され、オブジェクトとその属性を初期化します。
+
+それは常に少なくとも 1つの引数 `self` を取ります。
+
+従って、この例では、初期化された新しいインスタンスは次の方法で取得できます:
+
+```python
+x = MyClass()
+```
+
+ `__init__()` メソッドは、柔軟性を高めるために引数を受け取る場合があります。
+その場合、クラスインスタンス化演算子に与えられた引数は `__init__()` に渡されます。
+
+例えば:
+
+```python
+class Complex:
+ def __init__(self, real_part, imag_part):
+ self.r = real_part
+ self.i = imag_part
+ self.num = complex(self.r, self.i)
+
+x = Complex(3.0, -4.5) # Instantiating a complex number
+x.num
+```
+```text
+(3-4.5j)
+```
+
+コードエディタで、`Car` クラスの `__init__()` メソッドにパラメータを追加します。
+指定された色とブランドで作成します。
+
+<div class='hint'> <code>self</code> と <code>color</code> の 2つのパラメータを追加します。</div>
diff -Naur "a/Classes and objects/The self parameter/task.md" "b/Classes and objects/The self parameter/task.md"
--- "a/Classes and objects/The self parameter/task.md" 2022-04-06 14:37:38.763007410 +0900
+++ "b/Classes and objects/The self parameter/task.md" 2022-04-06 14:38:43.171947715 +0900
@@ -1,30 +1,35 @@
-## The self parameter
-
-It's time to explain the `self` parameter we saw in previous tasks.
-The first argument passed to a class method is `self`. This is nothing more
-than a convention: the name `self` has no special meaning to Python.
-It is advised to follow the convention, otherwise your code may be less readable
-to other Python programmers.
-
-Python will use the `self` parameter to refer to the object that is created or modified.
-Methods may call other methods by using method attributes of the `self` argument:
-
-```python
-class Bag:
- def __init__(self):
- self.data = []
-
- def add(self, x):
- self.data.append(x)
-
- def addtwice(self, x):
- self.add(x) # Calling the method `add` from another method
- self.add(x)
-```
-
-In the code editor, implement the `add` method of the `Calculator` class. It should
-add `amount` to the field `current`. In addition, complete the method `get_current`.
-Run the code to see how it works.
-
-<div class='hint'>Add <code>amount</code> to the <code>self.current</code> variable.</div>
-<div class="hint">Use the <code>+=</code> sign.</div>
+## 自己パラメータ :(The self parameter)
+
+前の課題で見た `self` パラメータを説明する時が来ました。
+
+クラスメソッドに渡される最初の引数は `self` です。これは単なる慣例にすぎません。
+`self` という名前はPython にとって特別な意味はありません。
+
+規則に従うことをお勧めします。そうしないと、他のPython プログラマーがコードを読みにくくなる可能性があります。
+
+Python は `self` パラメータを使用して、作成または変更されたオブジェクトを参照します。
+
+メソッドは、`self` 引数のメソッド属性を使用して他のメソッドを呼び出すことができます:
+
+```python
+class Bag:
+ def __init__(self):
+ self.data = []
+
+ def add(self, x):
+ self.data.append(x)
+
+ def addtwice(self, x):
+ self.add(x) # Calling the method `add` from another method
+ self.add(x)
+```
+
+コードエディタで、`Calculator` クラスの `add` メソッドを実装します。
+フィールド `current` に `amount` を追加する必要があります。
+
+さらに、メソッド `get_current` を完了します。
+
+コードを実行して、どのように機能するかを確認します。
+
+<div class='hint'> <code>amount</code> を <code>self.current</code> 変数に追加します。</div>
+<div class='hint'> <code>+=</code> 記号を使用します。</div>
diff -Naur "a/Classes and objects/Update variable/task.md" "b/Classes and objects/Update variable/task.md"
--- "a/Classes and objects/Update variable/task.md" 2022-04-06 14:37:38.747007176 +0900
+++ "b/Classes and objects/Update variable/task.md" 2022-04-06 14:38:43.159947540 +0900
@@ -1,12 +1,11 @@
-## Update variable
-
-In this exercise, create a new `Car` object `car2` and then set `color`
-of `car2` to `"red"`. Print the descriptions of `car1` and `car2` by calling the
-`description` method.
-
-<div class='hint'>Remember how we instantiated objects in the previous task by
-"calling" the class.</div>
-<div class='hint'>Change the color using value assignment (<code>=</code>) and
-attribute reference syntax <code>obj.attribute</code>.</div>
-<div class='hint'>In the print statements, call the <code>description()</code> method
-like you did in the previous task.</div>
+## 変数を更新 :(Update variable)
+
+この演習では、新しい `Car` オブジェクト `car2` を作成してから、`car2` の `color` を `"red"` に設定します。
+
+`description` メソッドを呼び出して、`car1` と `car2` の説明を出力します。
+
+<div class='hint'>クラスを「呼び出す」ことにより、前の課題でオブジェクトをインスタンス化した方法を思い出してください。</div>
+
+<div class='hint'>値の割り当て (<code>=</code>) と属性参照構文 <code>obj.attribute</code>を使用して色を変更します。</div>.
+
+<div class='hint'> printステートメントで、前の課題で行ったように <code>description()</code> メソッドを呼び出します。</div>
diff -Naur "a/Classes and objects/Variable access/task.md" "b/Classes and objects/Variable access/task.md"
--- "a/Classes and objects/Variable access/task.md" 2022-04-06 14:37:38.739007059 +0900
+++ "b/Classes and objects/Variable access/task.md" 2022-04-06 14:38:43.147947366 +0900
@@ -1,24 +1,27 @@
-## Variable access
-
-You can use attribute references to access variables inside an object.
-Attribute references use the standard syntax for all attribute references
-in Python: `obj.name`. Valid attribute names are all the names that were in
-the class’s namespace when the class object was created. So, if the class
-definition looked like this:
-
-```python
-class MyClass:
- year = 2021
-
- def say_hello(self):
- return 'hello world'
-```
-then `MyClass.year` and `MyClass.say_hello` are valid attribute references returning an
-integer and a function object, respectively. Class attributes can be
-assigned to, so you can change the value of `MyClass.year` by assignment.
-
-
-Check out our example and print the value of `variable1` from `my_object`.
-Call the `foo` method of the object `my_object`, print the result.
-
-<div class='hint'>Access <code>variable1</code> using the <code>object.name</code> syntax.</div>
+## 可変アクセス :(Variable access)
+
+「属性参照」を使用して、オブジェクト内の変数にアクセスできます。
+
+「属性参照」は、Python のすべての属性参照に標準の構文 `obj.name` を使用します。
+
+有効な属性名は、クラスオブジェクトが作成されたときにクラスの名前空間にあったすべての名前です。
+
+従って、クラス定義が次のようになっている場合:
+
+```python
+class MyClass:
+ year = 2021
+
+ def say_hello(self):
+ return 'hello world'
+```
+
+`MyClass.year` と `MyClass.say_hello` は、それぞれ整数と関数オブジェクトを返す有効な「属性参照」です。
+
+クラス属性を割り当てることができるため、割り当てによって `MyClass.year` の値を変更できます。
+
+例を確認して、`my_object` から `variable1` の値を出力してください。
+
+オブジェクト `my_object` の `foo` メソッドを呼び出し、結果を出力します。
+
+<div class='hint'> <code>object.name</code> 構文を使用して<code>variable1</code> にアクセスします。</div>
diff -Naur "a/Classes and objects/__str__ vs __repr__/task.md" "b/Classes and objects/__str__ vs __repr__/task.md"
--- "a/Classes and objects/__str__ vs __repr__/task.md" 2022-04-06 14:37:38.771007527 +0900
+++ "b/Classes and objects/__str__ vs __repr__/task.md" 2022-04-06 14:38:43.179947832 +0900
@@ -1,37 +1,56 @@
-## \_\_str__ vs \_\_repr__ methods
-
-Both `str()` and `repr()` methods in Python are used for string representation of an object,
-but there are some differences.
-For example:
-```python
-s = 'Hello World'
-print (str(s))
-print(repr(s))
-```
-```text
-Hello World
-'Hello World'
-```
-You can see that if we print a string using the `repr()` function, then it prints
-with a pair of quotes. `str()` is used for creating output for the user, while `repr()`
-is normally used for debugging and development. `repr()` needs to be unambiguous,
-and `str()` — to be readable.
-
-Much like `__init__`, the methods `__repr__` and `__str__` are reserved in Python.
-The `print()` statement and the `str()` built-in function use the `__str__` method defined in the object's class
-to display its string representation. The `repr()` built-in function uses the `__repr__` method
-defined in the object's class.
-
-Our own defined class should therefore have a `__repr__` if we need detailed information for debugging.
-Also, if we think it would be useful to have a string representation for users, we should create
-a `__str__` function. Check out another implementation of the class `Complex` in the code editor. Run the code
-to see what each of the two `print` statements prints.
-
-Implement `__str__` and `__repr__` methods for the class `Cat`. `__str__` method should return a string like this:
-`"My siamese cat's name is Lucy"`; `__repr__` method should return a string like this:
-`"Cat, breed: siamese, name: Lucy"`. Use [f-strings](course://Strings/F-strings).
-
-
-
-<div class="hint">Do not forget to use <code>self.attribute</code> syntax.</div>
-<div class="hint"> Do not forget about character escaping to print the apostrophe.</div>
\ ファイル末尾に改行がありません
+## \_\_str__ と \_\_repr__ メソッド :(\_\_str__ vs \_\_repr__ methods)
+
+Python の `str()` メソッドと `repr()` メソッドは、どちらもオブジェクトの文字列表現に使用されますが、いくつかの違いがあります。
+
+例えば:
+
+```python
+s = 'Hello World'
+print (str(s))
+print(repr(s))
+```
+```text
+Hello World
+'Hello World'
+```
+
+`repr()` 関数を使用して文字列を出力すると、引用符のペアで出力されます。
+
+`str()` はユーザーの出力を作成するときに使用され、
+`repr()` は通常デバッグと開発に使用されます。
+
+ `repr()` は明確に、`str()` が読み取り可能である必要があります。
+
+`__init__` と同様に、メソッド `__repr__` と `__str__` は Python で予約されています。
+
+`print()` ステートメントと `str()` 組み込み関数は、オブジェクトのクラスで定義された `__str__` メソッドを使用して、その文字列表現を表示します。
+
+`repr()` 組み込み関数は、オブジェクトのクラスで定義された `__repr__` メソッドを使用します。
+
+従って、デバッグ用の詳細情報が必要な場合は、独自に定義したクラスに `__repr__` が必要です。
+
+また、ユーザーに文字列表現を使用すると便利だと思われる場合は、`__str__` 関数を作成する必要があります。
+
+
+コードエディタでクラス `Complex` の別の実装を確認してください。
+
+コードを実行して、2つの `print` ステートメントのそれぞれが何を出力するかを確認します。
+
+クラス `Cat` に `__str__` メソッドと `__repr__` メソッドを実装します。
+
+`__str__` メソッドは次のような文字列を返す必要があります:
+
+`"My siamese cat's name is Lucy"`
+(`"私のシャム猫の名前はルーシーです"`)
+
+`__repr__` メソッドは次のような文字列を返す必要があります:
+
+`"Cat, breed: siamese, name: Lucy"`
+(`"猫, 品種: シャム, 名前: ルーシー"`)
+
+[f-strings](course://Strings/F-strings) を使用します。
+
+<div class='hint'> <code>self.attribute</code> 構文を使用することを忘れないでください。</div>
+
+<div class='hint'> アポストロフィを出力するために文字がエスケープされることを忘れないでください。</div>
+
diff -Naur "a/Condition expressions/Boolean operators/task.md" "b/Condition expressions/Boolean operators/task.md"
--- "a/Condition expressions/Boolean operators/task.md" 2022-04-06 14:37:38.783007703 +0900
+++ "b/Condition expressions/Boolean operators/task.md" 2022-04-06 14:38:43.195948065 +0900
@@ -1,11 +1,11 @@
-## Boolean operators
-
-Boolean operators compare statements and return results in boolean values. The boolean
-operator `and` returns `True` when the expressions on both sides of `and` are `True`.
-The boolean operator `or` returns `True` when at least one expression on either side
-of `or` is `True`. The boolean operator `not` inverts the boolean expression it precedes.
-
-Write an expression that evaluates to `True` if `name` is equal to `"John"` and
-he is `16` or older.
-
-<div class='hint'>Use the <code>and</code> keyword and the <code>>=</code> operator.</div>
+## ブール演算子 :(Boolean operators)
+
+ブール演算子はステートメントを比較し、結果をブール値で返します。
+
+ブール演算子 `and` は、`and` の両側の式が `True` の場合、`True` を返します。
+ブール演算子 `or` は、`or` のいずれかの側の少なくとも1つの式が `True` である場合、`True` を返します。
+ブール演算子 `not` は、先行するブール式を反転します。
+
+`name` が `"John"` と等しく、彼が `16` 以上の場合、`True` と評価される式を記述します。
+
+<div class='hint'> <code>and</code> キーワードと <code>>=</code> 演算子を使用します</div>
diff -Naur "a/Condition expressions/Boolean operators order/task.md" "b/Condition expressions/Boolean operators order/task.md"
--- "a/Condition expressions/Boolean operators order/task.md" 2022-04-06 14:37:38.787007761 +0900
+++ "b/Condition expressions/Boolean operators order/task.md" 2022-04-06 14:38:43.211948299 +0900
@@ -1,8 +1,9 @@
-## Boolean operators order
-
-Boolean operators are not evaluated from left to right. There's an order of operations for
-boolean operators: `not` is evaluated first, `and` is evaluated next, and `or` is evaluated last.
-
-Write an expression that evaluates to `True` if `name` is either `"John"` or `"Jane"` who are `16` or older, but younger than `25`.
-
-<div class='hint'>Combine the <code>and</code> and <code>or</code> keywords.</div>
+## ブール演算子の順序 :(Boolean operators order)
+
+ブール演算子は左から右に評価されません。ブール演算子の演算の順序があります。
+
+`not` が最初に評価され、` and` が次に評価され、`or` が最後に評価されます。
+
+`name` が `16` 以上で `25` より若い `"John"` または `"Jane"` のいずれかである場合、`True` と評価される式を記述します。
+
+<div class='hint'> <code>and</code> と <code>or</code> キーワードを組み合わせます。</div>
diff -Naur "a/Condition expressions/Else and elif parts in if statement/task.md" "b/Condition expressions/Else and elif parts in if statement/task.md"
--- "a/Condition expressions/Else and elif parts in if statement/task.md" 2022-04-06 14:37:38.795007878 +0900
+++ "b/Condition expressions/Else and elif parts in if statement/task.md" 2022-04-06 14:38:43.219948415 +0900
@@ -1,32 +1,32 @@
-## Else and elif statements
-
-The `elif` and `else` statements complement the `if` statement.
-There can be zero or more `elif` parts, and the `else` part is optional. The keyword
-`elif` is short for ‘else if’, and is useful to avoid excessive indentation.
-
-<div class="hint">An <code>if … elif … elif …</code> sequence is a substitute for the <code>switch</code> or
-<code>case</code> statements found in other languages, such as Java.</div>
-
-In conditional execution, only one of the suites is selected by evaluating the expressions one by one until one is found
-to be `True`. Then that suite is executed and no other part of the `if` statement is evaluated.
-If all expressions are false, the suite of the `else` clause, if present, is executed.
-
-
-```python
-a = 200
-b = 33
-if b > a:
- print("b is greater than a")
-elif a == b:
- print("a and b are equal")
-else:
- print("a is greater than b")
-```
-```text
-a is greater than b
-```
-
-Print `True` if `name` is equal to `"John"` and `False` otherwise.
-
-<div class='hint'>Use the <code>if</code> keyword and the <code>==</code> operator.</div>
-<div class='hint'>Use the <code>else</code> keyword.</div>
+## else および elif ステートメント :(Else and elif parts in if statement)
+
+`elif` および `else` ステートメントは `if` ステートメントを補完します。
+
+0個以上の `elif` 部分があり、`else` 部分はオプションです。キーワード `elif` は「else if」の略で、過度のインデントを回避するのに役立ちます。
+
+<div class='hint'> <code>if … elif … elif …</code> シーケンスは、Java など他の言語で見られる <code>switch</code> または <code>case</code> ステートメントの代わりになります。</div>
+
+条件付き実行では、1つが `True` であることが判明するまで、式を1つずつ評価することにより、スイートの1つだけが選択されます。
+
+次に、そのスイートが実行され、`if` ステートメントの他の部分は評価されません。
+
+すべての式が `false` の場合、 `else` 句のスイート(存在する場合)が実行されます。
+
+```python
+a = 200
+b = 33
+if b > a:
+ print("b is greater than a")
+elif a == b:
+ print("a and b are equal")
+else:
+ print("a is greater than b")
+```
+```text
+a is greater than b
+```
+
+`name` が `"John"` と等しい場合は `True` を出力し、そうでない場合は `False` を出力します。
+
+<div class='hint'> <code>if</code> キーワードと <code>==</code> 演算子を使用します。</div>
+<div class='hint'> <code>else</code> キーワードを使用します。</div>
diff -Naur "a/Condition expressions/If statement/task.md" "b/Condition expressions/If statement/task.md"
--- "a/Condition expressions/If statement/task.md" 2022-04-06 14:37:38.791007820 +0900
+++ "b/Condition expressions/If statement/task.md" 2022-04-06 14:38:43.215948356 +0900
@@ -1,32 +1,36 @@
-## If statement
-
-Compound statements in Python contain (groups of) other statements; they affect or control
-the execution of those other statements in some way.
-
-Perhaps the most well-known statement type is the `if` statement. The `if` keyword is
-used to form a conditional statement that executes some
-specified code after checking if its expression is `True`. Python uses indentation
-to define code blocks:
-
-```python
-if value > 1000:
- print("It's a large number!") # Indented block
- a += 1 # Indented block
-
-print("Outside the block!")
-```
-
-A code block starts with indentation and ends with the first unindented line. The amount of indentation must
-be consistent throughout the block. Generally, four whitespaces or single tabs are used for indentation.
-Incorrect indentation will result in `IndentationError`.
-
-If you have only one statement to execute, you can put it on the same line as the `if` statement.
-
-```python
-if a > b: print("a is greater than b")
-```
-
-Print `"empty"` if the `tasks` list is empty.
-After the list is cleared, check again (you might need a different condition!) and print `'Now empty!'` if it is.
-
-<div class='hint'>Use the <code>len()</code> function to check if <code>tasks</code> is empty.</div>
+## If ステートメント :(If statement)
+
+Python の複合ステートメントには、他のステートメント(のグループ)が含まれています。
+それらは、何らかの方法でそれらの他のステートメントの実行に影響を与えるか、または制御します。
+
+おそらく最もよく知られているステートメントタイプは `if` ステートメントです。
+`if` キーワードは、その表現が `True` であるかどうかをチェックした後、指定されたコードを実行する条件ステートメントを形成するために使用されます。
+
+Python はインデントを使用してコードブロックを定義します:
+
+```python
+if value > 1000:
+ print("It's a large number!") # Indented block
+ a += 1 # Indented block
+
+print("Outside the block!")
+```
+
+コードブロックはインデントで始まり、インデントされていない最初の行で終わります。
+
+インデントの量は、ブロック全体で一貫している必要があります。
+通常、インデントには 4つの空白または 1つのタブが使用されます。
+
+インデントが正しくないと、`IndentationError` が発生します。
+
+実行するステートメントが 1つしかない場合は、それを `if` ステートメントと同じ行に配置できます:
+
+```python
+if a > b: print("a is greater than b")
+```
+
+`tasks` リストが空の場合は `"empty"` を出力します。
+リストがクリアされたら、もう一度確認し(別の条件が必要になる場合があります!)、
+そうである場合は `'Now empty!'` を出力します。
+
+<div class='hint'> <code>len()</code> 関数を使用して、 <code>tasks</code> が空かどうかを確認します。</div>
diff -Naur "a/Data structures/Dictionaries/task.md" "b/Data structures/Dictionaries/task.md"
--- "a/Data structures/Dictionaries/task.md" 2022-04-06 14:37:38.819008229 +0900
+++ "b/Data structures/Dictionaries/task.md" 2022-04-06 14:38:43.243948765 +0900
@@ -1,32 +1,39 @@
-## Dictionaries
-
-A dictionary is similar to a list, except that you access its values by looking up a
-key instead of an index. A key can be any immutable type. Strings and numbers can
-always be keys; tuples can be used as keys if they contain only immutable objects.
-You can’t use lists as keys.
-
-Think of a dictionary as a set of <code>key: value</code> pairs, with the requirement
-that the keys are unique within one dictionary. Dictionaries are enclosed
-in curly braces, e.g., `dct = {'key1' : "value1", 'key2' : "value2"}`. A pair of
-braces creates an empty dictionary: `{}`.
-
-A dictionary can also be created with the `dict` constructor:
-```python
-a = dict(one=1, two=2, three=3)
-b = {'one': 1, 'two': 2, 'three': 3}
-c = dict([('two', 2), ('one', 1), ('three', 3)])
-print(a == b == c)
-```
-```text
-True
-```
-
-You can access a value in a dictionary similarly to how you would access a value in a list,
-but using a key instead of an index. More info about this data structure can be found
-<a href="https://docs.python.org/3/tutorial/datastructures.html#dictionaries">here</a>.
-
-Add Jared's (`"Jared"`) number `570` to the phone book.
-Remove Gerard's number from the phone book.
-Print Jane's phone number from the `phone_book`.
-
-<div class='hint'>Use dictionary indexing, e.g., <code>dct[key]</code></div>
+## 辞書 :(Dictionaries)
+
+辞書はリストに似ていますが、インデックスの代わりにキーを検索して値にアクセスする点が異なります。
+
+キーは任意の不変タイプにすることができます。
+文字列と数字は常にキーにすることができます。
+タプルに不変オブジェクトのみが含まれている場合は、タプルをキーとして使用できます。
+リストをキーとして使用することはできません。
+
+辞書を <code>key: value</code> のペアのセットと考えてください。
+
+ただし、キーは1つの辞書内で一意である必要があります。
+
+辞書は中かっこで囲まれています:
+
+例: `dct = {'key1' : "value1", 'key2' : "value2"}`
+
+中括弧のペアは空の辞書 `{}` を作成します。
+
+辞書は、`dict` コンストラクター(constructor) を使用して作成することもできます:
+
+```python
+a = dict(one=1, two=2, three=3)
+b = {'one': 1, 'two': 2, 'three': 3}
+c = dict([('two', 2), ('one', 1), ('three', 3)])
+print(a == b == c)
+```
+```text
+True
+```
+リストの値にアクセスするのと同じようにディクショナリの値にアクセスできますが、インデックスの代わりにキーを使用します。
+
+このデータ構造の詳細については、<a href="https://docs.python.org/3/tutorial/datastructures.html#dictionaries">こちら</a> をご覧ください。
+
+Jared( `"Jared"`)の番号 `570` を電話帳に追加します。
+電話帳からGerard の番号を削除します。
+電話帳の `phone_book` から Jane(ジェーン)の電話番号を出力します。
+
+<div class='hint'>辞書のインデックスを使用します(例: <code>dct[key]</code></div>)
diff -Naur "a/Data structures/Dictionary keys() and values()/task.md" "b/Data structures/Dictionary keys() and values()/task.md"
--- "a/Data structures/Dictionary keys() and values()/task.md" 2022-04-06 14:37:38.823008287 +0900
+++ "b/Data structures/Dictionary keys() and values()/task.md" 2022-04-06 14:38:43.247948823 +0900
@@ -1,19 +1,21 @@
-## Dictionary keys() and values()
-
-There are many useful methods in dictionaries, such as `keys()`, `values()`, and `items()`.
-The `keys()` method returns a view object that displays a list of all the keys in the dictionary in order of insertion.
-`values()` returns a new view of the dictionary’s values. When the `items()` method is called,
-it returns a new view of the dictionary’s items as tuples in a list (`(key, value)` pairs).
-
-The objects returned by `dict.keys()`, `dict.values()`, and `dict.items()` provide a
-dynamic view on the dictionary’s entries, which means
-that when the dictionary changes, the view reflects these changes.
-
-You can explore the rest using &shortcut:CodeCompletion; after `dict_name`
-followed by a dot.
-
-Read more about the operations that dictionaries support <a href="https://docs.python.org/3/library/stdtypes.html#typesmapping">here</a>.
-
-Print all values from the `phone_book` .
-
-<div class='hint'>Use the method <code>values()</code>.</div>
+## 辞書の keys() と values() :(Dictionary keys() and values())
+
+辞書には、`keys()`、`values()`、`items()` などの便利なメソッドがたくさんあります。
+
+`keys()` メソッドは、辞書内のすべてのキーのリストを挿入順に表示するビューオブジェクトを返します。
+
+`values()` は、ディクショナリの値の新しいビューを返します。
+
+`items()` メソッドが呼び出されると、辞書のアイテムの新しいビューがリスト内のタプル `(key, value)` ペアとして返されます。
+
+ `dict.keys()`、`dict.values()`、および `dict.items()` によって返されるオブジェクトは、ディクショナリのエントリの動的ビューを提供します。つまり、ディクショナリが変更されると、ビューはこれらの変更を反映します。
+
+&shortcut:CodeCompletion; を使用して残りを探索できます。
+
+ `dict_name` の後にドットが続きます。
+
+辞書がサポートする操作の詳細については、<a href="https://docs.python.org/3/library/stdtypes.html#typesmapping">こちら</a> をご覧ください。
+
+電話帳の `phone_book` からすべての値を出力します。
+
+<div class='hint'>メソッド <code>values()</code>を使用します。</div>
diff -Naur "a/Data structures/In keyword/task.md" "b/Data structures/In keyword/task.md"
--- "a/Data structures/In keyword/task.md" 2022-04-06 14:37:38.827008346 +0900
+++ "b/Data structures/In keyword/task.md" 2022-04-06 14:38:43.251948881 +0900
@@ -1,13 +1,14 @@
-## In keyword
-
-The `in` keyword is used to check if a list or a dictionary contains a specific
-item. You can apply `in` to lists or dictionaries the same way you did it with strings.
-
-1) Check if `grocery_dict` values contain number `6`.
-2) Check if the dictionary contains `"basil"`.
-
-Please complete the task in the specified order.
-
-<div class="hint">Use the <code>in</code> keyword.</div>
-
-<div class="hint">Use the <code>.values()</code> and <code>.keys()</code> attributes.</div>
+## In キーワード :(In keyword)
+
+`in` キーワードは、リストまたは辞書に特定の項目が含まれているかどうかを確認するために使用されます。
+文字列で行ったのと同じ方法で、リストまたは辞書に `in` を適用できます。
+
+
+1) `grocery_dict` の値に番号 `6` が含まれているかどうかを確認します。
+2) 辞書に `"basil"` (バジル)が含まれているかどうかを確認します。
+
+指定された順序で課題を完了してください。
+
+<div class='hint'> <code>in</code> キーワードを使用します。</div>
+
+<div class='hint'> <code>.values()</code> 属性と <code>.keys()</code> 属性を使用します。</div>
diff -Naur "a/Data structures/Join method/task.md" "b/Data structures/Join method/task.md"
--- "a/Data structures/Join method/task.md" 2022-04-06 14:37:38.815008171 +0900
+++ "b/Data structures/Join method/task.md" 2022-04-06 14:38:43.239948707 +0900
@@ -1,42 +1,44 @@
-## The join() method
-
-`.join()` is, in fact, a string method, but we're discussing it now because it
-requires understanding of iterable objects, such as strings, lists, and tuples.
-This [method](https://docs.python.org/3/library/stdtypes.html#str.join) provides a flexible way to create strings from iterable objects.
-It joins each element of an iterable (such as list, string, or tuple) by
-a string separator (a string on which the `join()` method is called) and
-returns a concatenated string. A `TypeError` will be raised if there are
-any non-string values in the iterable.
-
-The syntax of the `join()` method looks as follows:
-
-```python
-string.join(iterable)
-```
-
-Examples:
-
-```python
-string_ = 'abcde' # a string iterable
-tuple_ = ('aa', 'bb', 'cc') # a tuple iterable
-list_ = ['Python', 'programming language'] # a list iterable
-
-print(' + '.join(string_)) # join with the ' + ' separator
-print(' = '.join(tuple_)) # join with the ' = ' separator
-
-sep = ' is a '
-print(sep.join(list_)) # join with the ' is a ' separator
-```
-```text
-a + b + c + d + e
-aa = bb = cc
-Python is a programming language
-```
-
-Assign a value to the `joined` variable such that the `print` statement prints the following:
-```text
-I like apples and I like bananas and I like peaches and I like grapes
-```
-
-<div class="hint">Look closely at the examples and simply do the same!</div>
-<div class="hint"><code>fruits</code> is your iterable here, and <code>separator</code> is the separator string.</div>
\ ファイル末尾に改行がありません
+## join() メソッド :(Join method)
+
+`.join()` は実際には文字列メソッドですが、文字列、リスト、タプルなどの反復可能なオブジェクトを理解する必要があるため、ここで説明します。
+
+この[メソッド](https://docs.python.org/3/library/stdtypes.html#str.join) は、反復可能なオブジェクトから文字列を作成するための柔軟な方法を提供します。
+
+iterable の各要素(list、string、tuple など)を文字列セパレータ(`join()` メソッドが呼び出される文字列)で結合し、連結された文字列を返します。
+
+iterable に文字列以外の値がある場合、`TypeError` が発生します。
+
+`join()` メソッドの構文は次のようになります:
+
+```python
+string.join(iterable)
+```
+
+例:
+
+```python
+string_ = 'abcde' # a string iterable
+tuple_ = ('aa', 'bb', 'cc') # a tuple iterable
+list_ = ['Python', 'programming language'] # a list iterable
+
+print(' + '.join(string_)) # join with the ' + ' separator
+print(' = '.join(tuple_)) # join with the ' = ' separator
+
+sep = ' is a '
+print(sep.join(list_)) # join with the ' is a ' separator
+```
+```text
+a + b + c + d + e
+aa = bb = cc
+Python is a programming language
+```
+`print` ステートメントが次のように出力するように `joined` 変数に値を割り当てます:
+
+```text
+I like apples and I like bananas and I like peaches and I like grapes
+```
+
+<div class='hint'>例をよく見て、同じことをしてください!</div>
+
+<div class='hint'><code>fruits</code>が反復可能であり、<code>separator</code> がセパレータ文字列です。</div>
+
diff -Naur "a/Data structures/List items/task.md" "b/Data structures/List items/task.md"
--- "a/Data structures/List items/task.md" 2022-04-06 14:37:38.807008054 +0900
+++ "b/Data structures/List items/task.md" 2022-04-06 14:38:43.231948590 +0900
@@ -1,12 +1,13 @@
-## List items
-
-Assignment is possible to slices of lists, just like to individual list elements.
-This way you can even change the size of a list or clear it entirely by doing something like:
-
-```python
-animals[:] = []
-```
-
-Make all `animals` elephants by replacing the last two items.
-
-<div class='hint'>Use assignment to a slice as in examples.</div>
+## リストのアイテム :(List items)
+
+個々のリスト要素と同様に、リストのスライスに割り当てることができます。
+
+次のような操作を行うことで、リストのサイズを変更したり、リストを完全にクリアしたりすることもできます:
+
+```python
+animals[:] = []
+```
+
+最後の 2つのアイテムを置き換えて、すべての `animals` の象 (elephants) を作ります。
+
+<div class='hint'>例のようにスライスへの割り当てを使用します。</div>
diff -Naur "a/Data structures/Lists introduction/task.md" "b/Data structures/Lists introduction/task.md"
--- "a/Data structures/Lists introduction/task.md" 2022-04-06 14:37:38.799007937 +0900
+++ "b/Data structures/Lists introduction/task.md" 2022-04-06 14:38:43.219948415 +0900
@@ -1,23 +1,29 @@
-## Lists introduction
-
-Python has a number of compound data types used to group data together.
-The most versatile is the list, which can be written as a series of comma-separated
-values (items) enclosed in square brackets, e.g., `lst = [item1, item2]`.
-Lists might contain items of different types, but usually all the items in a list
-are of the same type. Like strings, lists can be indexed and sliced (see [Lesson 3](course://Strings/String slicing)).
-All slice operations return a new list containing the requested elements.
-
-Lists also support operations like concatenation:
-
-```python
-squares = [1, 4, 9, 16, 25]
-squares + [36, 49, 64, 81, 100]
-[1, 4, 9, 16, 25, 36, 49, 64, 81, 100]
-```
-
-You can explore lists in more detail by reading <a href="https://docs.python.org/3.9/tutorial/introduction.html#lists">this page</a>.
-
-Use list slicing to print `[4, 9, 16]`.
-
-<div class='hint'>List slicing syntax looks just like that for strings: <code>lst[index1:index2]</code>.
-Don't forget that the element with the index <code>index2</code> is not included!</div>
+## リストの紹介 :(Lists introduction)
+
+Python には、データをグループ化するために使用されるいくつかの複合データ型があります。
+
+最も用途が広いのはリストです。
+これは、角かっこで囲まれた一連のカンマ区切りの値(アイテム)として記述できます。
+(例: `lst = [item1, item2]`)
+
+リストにはさまざまなタイプのアイテムが含まれている場合がありますが、通常、リスト内のすべてのアイテムは同じタイプです。
+
+文字列と同様に、リストにはインデックスを付けてスライスすることができます。
+([レッスン3](course:// Strings / Stringslicing)を参照)
+
+すべてのスライス操作は、要求された要素を含む新しいリストを返します。
+
+リストは、連結などの操作もサポートします:
+
+```python
+squares = [1, 4, 9, 16, 25]
+squares + [36, 49, 64, 81, 100]
+[1, 4, 9, 16, 25, 36, 49, 64, 81, 100]
+```
+
+リストの詳細については、<a href="https://docs.python.org/3.9/tutorial/introduction.html#lists">このページ</a> をご覧ください。
+
+リストスライスを使用して `[4, 9, 16]` を出力します。
+
+<div class='hint'>リストのスライス構文は、文字列の場合と同じように見えます: <code>lst[index1:index2]</code>
+インデックス <code>index2</code> の要素は含まれていないことを忘れないでください!</div>
diff -Naur "a/Data structures/Lists operations/task.md" "b/Data structures/Lists operations/task.md"
--- "a/Data structures/Lists operations/task.md" 2022-04-06 14:37:38.803007995 +0900
+++ "b/Data structures/Lists operations/task.md" 2022-04-06 14:38:43.227948532 +0900
@@ -1,36 +1,35 @@
-## List operations
-
-Unlike strings, lists are a mutable type, i.e., it is possible to
-change their content using `lst[index] = new_item`.
-
-```python
-cubes = [1, 8, 27, 65, 125] # something's wrong here
-4 ** 3 # the cube of 4 is 64, not 65!
-```
-```text
-64
-```
-```python
-cubes[3] = 64 # replace the wrong value
-cubes
-```
-```text
-[1, 8, 27, 64, 125]
-```
-
-You can add new items at the end of the list by using the `append()` method or
-list concatenation.
-
-```python
-squares = [1, 4, 9, 16, 25]
-squares.append(6**2)
-squares
-```
-```text
-[1, 4, 9, 16, 25, 36]
-```
-
-Find out about many other useful list methods on <a href="https://docs.python.org/3/tutorial/datastructures.html#more-on-lists">this page</a>.
-
-Replace `"dino"` with `"dinosaur"` in the `animals` list.
-<div class='hint'>Use list indexing operation and value assignment.</div>
+## リストの操作 :(List operations)
+
+文字列とは異なり、リストは変更可能なタイプです。
+つまり、`lst[index] = new_item` を使用してコンテンツを変更できます。
+
+```python
+cubes = [1, 8, 27, 65, 125] # something's wrong here
+4 ** 3 # the cube of 4 is 64, not 65!
+```
+```text
+64
+```
+```python
+cubes[3] = 64 # replace the wrong value
+cubes
+```
+```text
+[1, 8, 27, 64, 125]
+```
+ `append()` メソッドまたはリスト連結を使用して、リストの最後に新しいアイテムを追加できます。
+
+```python
+squares = [1, 4, 9, 16, 25]
+squares.append(6**2)
+squares
+```
+```text
+[1, 4, 9, 16, 25, 36]
+```
+
+<a href="https://docs.python.org/3/tutorial/datastructures.html#more-on-lists">このページ</a> で他の多くの便利なリストメソッドについて調べてください。
+
+`animals` リストの `"dino"` を `"dinosaur"` に置き換えます。
+
+<div class='hint'>リストのインデックス作成操作と値の割り当てを使用します。</div>
diff -Naur "a/Data structures/Nested Lists/task.md" "b/Data structures/Nested Lists/task.md"
--- "a/Data structures/Nested Lists/task.md" 2022-04-06 14:37:38.811008112 +0900
+++ "b/Data structures/Nested Lists/task.md" 2022-04-06 14:38:43.231948590 +0900
@@ -1,36 +1,41 @@
-## Nested Lists
-
-A list can contain any kind of objects, even other lists (sublists). This
-data structure is known as a nested list.
-
-You can use nested lists to arrange data into hierarchical structures.
-
-A nested list can be created by writing a comma-separated sequence of sublists:
-
-```python
-nested_list = [[1, 2, 3], [4, 5], 6]
-```
-
-You can access items in a nested list using indices just like before:
-
-```python
-print(nested_list[1])
-print(nested_list[2])
-```
-Output:
-```text
-[4, 5]
-6
-```
-You can access items within sublists in a nested list using multiple indices.
-To access number `1` from `nested_list`, use the index `0` twice. First, you access the element `[1,2,3]` and then, the first element of that sublist:
-```python
-print(nested_list[0][0])
-```
-Output:
-```text
-1
-```
-In the code editor, use indexing to access and print elements `9` and `10` from of the nested list `my_list`.
-
-<div class="hint">If you're stuck, review the examples in the task description again.</div>
\ ファイル末尾に改行がありません
+## ネストされたリスト :(Nested Lists)
+
+リストには、他のリスト(サブリスト)も含め、あらゆる種類のオブジェクトを含めることができます。
+このデータ構造は、「ネストされたリスト」と呼ばれます。
+
+ネストされたリストを使用して、データを階層構造に配置できます。
+
+ネストされたリストは、サブリストのコンマ区切りシーケンスを作成することで作成できます:
+
+```python
+nested_list = [[1, 2, 3], [4, 5], 6]
+```
+以前と同じように、インデックスを使用してネストされたリストのアイテムにアクセスできます:
+
+```python
+print(nested_list[1])
+print(nested_list[2])
+```
+Output:
+```text
+[4, 5]
+6
+```
+
+複数のインデックスを使用して、ネストされたリストのサブリスト内のアイテムにアクセスできます。
+`nested_list` から番号 `1` にアクセスするには、インデックス `0` を2回使用します。
+
+まず、要素 `[1,2,3]` にアクセスし、次にそのサブリストの最初の要素にアクセスします:
+
+```python
+print(nested_list[0][0])
+```
+Output:
+```text
+1
+```
+
+コードエディタで、インデックスを使用して、ネストされたリスト `my_list` の要素 `9` と `10` にアクセスして出力します。
+
+<div class='hint'>行き詰まった場合は、「課題の説明」ウィンドウにある例をもう一度確認してください。</div>
+
diff -Naur "a/Data structures/Tuples/task.md" "b/Data structures/Tuples/task.md"
--- "a/Data structures/Tuples/task.md" 2022-04-06 14:37:38.815008171 +0900
+++ "b/Data structures/Tuples/task.md" 2022-04-06 14:38:43.235948648 +0900
@@ -1,49 +1,57 @@
-## Tuples
-
-Tuples represent another standard sequence data type.
-They are almost identical to lists. The only significant difference between tuples and
-lists is that tuples are immutable: you cannot add, replace, or delete elements in
-a tuple. Tuples are constructed by comma-separated elements enclosed in parentheses, for
-example:
-
-```python
-(a, b, c)
-```
-
-A special situation is the construction of tuples containing 0 or 1 items.
-Empty tuples are constructed by an empty pair of parentheses;
-a tuple with one item is constructed by following a value with a comma. For example:
-
-```python
-empty = ()
-singleton = 'hello', # <-- note the trailing comma
-len(empty)
-```
-```text
-0
-```
-```python
-len(singleton)
-```
-```text
-1
-```
-```python
-singleton
-```
-```text
-('hello',)
-```
-
-The statement `t = 12345, 54321, 'hello!'` is an example of tuple packing: the
-values `12345`, `54321`, and `hello!` are packed together in a tuple.
-
-Some other list methods are also
-applicable to tuples. You can read more about tuples <a href="https://docs.python.org/3/tutorial/datastructures.html#tuples-and-sequences">here</a>.
-
-Print the length of the tuple `alphabet`. Then create a tuple with a single element `'fun_tuple'`.
-You can run the code to see what it prints.
-
-<div class='hint'>Use the <code>len()</code> function.</div>
-
-<div class='hint'>Don't forget the trailing comma in the tuple with one element.</div>
+## タプル :(Tuples)
+
+タプルは、別の標準シーケンスデータ型を表します。
+
+それらはリストとほとんど同じです。
+タプルとリストの唯一の重要な違いは、タプルは不変であるということです。
+タプル内の要素を追加、置換、または削除することはできません。
+
+タプルは、括弧で囲まれたコンマ区切りの要素で構成されます。
+
+次に例を示します:
+
+```python
+(a, b, c)
+```
+
+特別な状況は、0 または 1個のアイテムを含むタプルの構築です。
+空のタプルは、空の括弧のペアで構成されます。
+1つの項目を持つタプルは、値の後にコンマを付けて作成されます。
+
+例えば:
+
+```python
+empty = ()
+singleton = 'hello', # <-- note the trailing comma
+len(empty)
+```
+```text
+0
+```
+```python
+len(singleton)
+```
+```text
+1
+```
+```python
+singleton
+```
+```text
+('hello',)
+```
+
+ステートメント `t = 12345, 54321, 'hello!'` は、タプルパッキングの例です。
+
+値 `12345`、 `54321`、および `hello!` はタプルに一緒にパックされます。
+
+他のいくつかのリストメソッドもタプルに適用できます。
+
+タプルの詳細については、<a href="https://docs.python.org/3/tutorial/datastructures.html#tuples-and-sequences">こちら</a> をご覧ください。
+
+タプル`alphabet` の長さを出力します。
+次に、単一の要素 `'fun_tuple'` を使用してタプルを作成します。
+コードを実行して、何が出力されるかを確認できます。
+
+<div class='hint'> <code>len()</code> 関数を使用します。</div>
+<div class='hint'>1つの要素を持つタプルの末尾のコンマを忘れないでください。</div>
diff -Naur "a/File input output/Open file/task.md" "b/File input output/Open file/task.md"
--- "a/File input output/Open file/task.md" 2022-04-06 14:37:38.835008463 +0900
+++ "b/File input output/Open file/task.md" 2022-04-06 14:38:43.259948998 +0900
@@ -1,37 +1,49 @@
-## Open file
-Python has a number of built-in functions to read and write information to a file on your computer.
-
-`open()` returns a file object, and is most commonly used with two arguments: `open(filename, mode)`:
-```python
-f = open('somefile.txt', 'w')
-```
-The first argument is a string containing the filename. The second argument is another string containing
-a few characters describing the way in which the file will be used. It can be `'r'` if the file
-will only be read, `'w'` – for writing only (an already existing file with the same name will be erased), and
-`'a'` opens the file for appending – any data written to the file is added to its end.
-`'r+'` opens the file for both reading and writing. The mode argument is optional; `'r'` will be assumed
-if it’s omitted.
-
-It is good practice to use the `with` keyword when dealing with file objects. The advantage is that the
-file is properly closed after the code suite finishes.
-
-```python
-with open('somefile.txt') as f:
- read_data = f.read()
-
-# We can check that the file has been automatically closed.
-f.closed
-```
-```text
-True
-```
-**Important**: If you’re not using the `with` keyword, then you should call `f.close()` to close the file and
-free up any system resources used by it. You cannot use the file object after it is closed, whether by a `with` statement or by calling `f.close()`.
-
-In the code editor, open the file `input1.txt` in read mode properly using the `with` statement. Check out the
-name that is used for the file on the next line and use it. Afterwards, close the output file `outfile` that was opened.
-
-After running your code, check out the output file that appeared in the course view among the other files.
-
-<div class="hint">Supply the <code>r</code> argument to the method <code>open()</code>,
-just for the sake of practicing!</div>
+## ファイルを開く :(Open file)
+
+Python には、コンピューター上のファイルに対して情報を読み書きするための多数の組み込み関数があります。
+
+`open()` はファイルオブジェクトを返し、最も一般的には 2つの引数で使用されます: `open(filename, mode)`:
+
+```python
+f = open('somefile.txt', 'w')
+```
+
+最初の引数は、ファイル名を含む文字列です。
+
+2番目の引数は、ファイルの使用方法を説明するいくつかの文字を含む別の文字列です。
+
+ファイルが読み取り専用の場合は `'r'`、書き込み専用の場合は `'w'`(同じ名前の既存のファイルは消去されます)、
+追加するときは `'a'`(ファイルに書き込まれたデータはすべてそのファイルの最後に追加されます)、でファイルを開きます。
+
+読み取りと書き込みの両方のの場合は `'r+'` 、でファイルを開きます。
+
+mode 引数はオプションです。省略した場合は `'r'` が想定されます。
+
+ファイルオブジェクトを処理するときは、`with` キーワードを使用することをお勧めします。
+利点は、コードスイートの終了後にファイルが適切に閉じられることです。
+
+```python
+with open('somefile.txt') as f:
+ read_data = f.read()
+
+# We can check that the file has been automatically closed.
+f.closed
+```
+→ファイルが自動的に閉じられたことを確認できます。
+
+```text
+True
+```
+
+**重要**: `with` キーワードを使用していない場合は、 `f.close()` を呼び出してファイルを閉じ、ファイルが使用しているシステムリソースを解放する必要があります。
+
+`with` ステートメントまたは `f.close()` の呼び出しによって、ファイルオブジェクトを閉じた後は使用できません。
+
+コードエディタで、 `with` ステートメントを使用して、ファイル `input1.txt` を読み取りモードで適切に開きます。
+次の行のファイルに使用されている名前を確認して使用してください。
+
+その後、開いた出力ファイル `outfile` を閉じます。
+
+コードを実行した後、他のファイルの中で「コースの表示」ウィンドウに表示された出力ファイルを確認してください。
+
+<div class='hint'>練習のためだけに!、 <code>r</code> 引数をメソッド <code>open()</code>に指定します。</div>
diff -Naur "a/File input output/Read file/task.md" "b/File input output/Read file/task.md"
--- "a/File input output/Read file/task.md" 2022-04-06 14:37:38.839008521 +0900
+++ "b/File input output/Read file/task.md" 2022-04-06 14:38:43.263949056 +0900
@@ -1,62 +1,62 @@
-## Read file
-
-
-To read a file’s contents, you can call `f.read(size)`, which reads some quantity of data and returns it as
-a string. When size is omitted or negative, the entire contents of the file will be read and returned.
-
-```python
-with open('somefile.txt') as f:
- print(f.read())
-```
-```text
-Here's everything that's in the file.\n
-```
-<i>**Note**: there will be a problem if the file is twice as large as your machine’s memory.</i>
-
-
-`f.readline()` reads a single line from the file; a newline character (`\n`) is left at the end of the
-string and is only omitted on the last line of the file if the file doesn’t end in a newline. If `f.readline()`
-returns an empty string, the end of the file has been reached, while a blank line is represented by `\n`,
-a string containing only a single newline.
-
-```python
-f.readline()
-```
-```text
-'This is the first line of the file.\n'
-```
-```python
-f.readline()
-```
-```text
-'Second line of the file\n'
-```
-```python
-f.readline()
-```
-```text
-''
-```
-For reading lines from a file, you can loop over the file object. This is memory efficient, fast, and
-makes the code simple:
-```python
-for line in f:
- print(line)
-```
-```text
-This is the first line of the file.
-Second line of the file
-```
-
-If you want to read all the lines of a file in a list, you can also use `list(f)` or `f.readlines()`.
-
-
-For more details, check out the section [Methods of File Objects](https://docs.python.org/3/tutorial/inputoutput.html#methods-of-file-objects) in Python Tutorial.
-
-
-Print the contents of "input.txt" to output by iterating over the lines of the file and printing each one.
-Then print only the first line of "input1.txt".
-
-<div class="hint">Loop over the file object as in the example in the task description.</div>
-<div class='hint'>Use the <code>print</code> function.</div>
-<div class='hint'>Use the <code>readline()</code> method to print a single line.</div>
+## ファイルを読む :(Read file)
+
+ファイルの内容を読み取るには、 `f.read(size)` を呼び出すことができます。
+これは、ある量のデータを読み取り、それを文字列として返します。
+サイズが省略または負の場合、ファイルの内容全体が読み取られて返されます。
+
+```python
+with open('somefile.txt') as f:
+ print(f.read())
+```
+```text
+Here's everything that's in the file.\n
+```
+<i>**注**: ファイルがマシンのメモリの 2倍の大きさである場合、問題が発生します。</i>
+
+`f.readline()` はファイルから 1行を読み取ります。
+
+改行文字 (`\n`) は文字列の最後に残され、ファイルが改行で終わっていない場合にのみファイルの最後の行で省略されます。
+
+ `f.readline()` が空の文字列を返す場合、ファイルの終わりに達していますが、空白行は、単一の改行のみを含む文字列である`\n` で表されます。
+
+```python
+f.readline()
+```
+```text
+'This is the first line of the file.\n'
+```
+```python
+f.readline()
+```
+```text
+'Second line of the file\n'
+```
+```python
+f.readline()
+```
+```text
+''
+```
+
+ファイルから行を読み取るために、ファイルオブジェクトをループできます。
+これはメモリ効率が高く、高速で、コードをシンプルにします:
+
+```python
+for line in f:
+ print(line)
+```
+```text
+This is the first line of the file.
+Second line of the file
+```
+
+リスト内のファイルのすべての行を読み取りたい場合は、 `list(f)` または `f.readlines()` を使用することもできます。
+
+詳細については、Python チュートリアルの [ファイルオブジェクトのメソッド](https://docs.python.org/3/tutorial/inputoutput.html#methods-of-file-objects) のセクションを確認してください。
+
+「input.txt」の内容を表示して、ファイルの行を繰り返して出力します。
+次に、「input1.txt」の最初の行のみを出力します。
+
+<div class='hint'>「課題の説明」ウィンドウの例のようにファイルオブジェクトをループします。</div>
+<div class='hint'> <code>print</code> 関数を使用します。</div>
+<div class='hint'> <code>readline()</code> メソッドを使用して 1行を出力します。</div>
diff -Naur "a/File input output/What next/task.md" "b/File input output/What next/task.md"
--- "a/File input output/What next/task.md" 2022-04-06 14:37:38.843008580 +0900
+++ "b/File input output/What next/task.md" 2022-04-06 14:38:43.267949115 +0900
@@ -1,14 +1,17 @@
-Congratulations, you made it to the end of the course! We hope you enjoyed it.
-
-If you would like to leave general feedback – write us a review on the course’s Marketplace [page](https://plugins.jetbrains.com/plugin/16630-introduction-to-python/reviews).
-If you want to contribute, feel free to create a pull request or an issue in the course’s [GitHub repo](https://github.com/jetbrains-academy/introduction_to_python).
-
-### What next?
-
-Now that you’ve explored the basics of Python programming, you can dive deeper and polish your new skills! Here are some options for you:
-- Learn about the most widely used Python library with our [course on NumPy](https://plugins.jetbrains.com/plugin/18302-python-libraries--numpy).
-- Find out how to build an [AMazing](https://plugins.jetbrains.com/plugin/17519-amazing) maze with Python.
-- Discover the basics of [Machine Learning](https://plugins.jetbrains.com/plugin/18392-machine-learning-101).
-- Check out the projects in the [Python Core](https://hyperskill.org/tracks/2) or [Python for Beginners](https://hyperskill.org/tracks/6) track at JetBrains Academy.
-
-Stay tuned for new courses and updates!
+おめでとうございます、コースは終了しました。楽しんでいただけたでしょうか。:(What next)
+
+一般的なフィードバックを残したい場合は、コースのマーケットプレイス[ページ](https://plugins.jetbrains.com/plugin/16630-introduction-to-python/reviews) にレビューを書いてください。
+
+貢献したい場合は、コースの[GitHubレポジトリ](https://github.com/jetbrains-academy/introduction_to_python) でプルリクエスト、または問題を自由に作成してください。
+
+### 次は何?
+
+Python プログラミングの基本を学んだので、さらに深く掘り下げて新しいスキルを磨くことができます。
+ここにあなたのためのいくつかのオプションがあります:
+
+- [NumPyのコース](https://plugins.jetbrains.com/plugin/18302-python-libraries--numpy) で、最も広く使用されているPython ライブラリについて学びます。
+- Pythonで[AMazing](https://plugins.jetbrains.com/plugin/17519-amazing) 迷路を構築する方法をご覧ください。
+- [機械学習](https://plugins.jetbrains.com/plugin/18392-machine-learning-101) の基本をご覧ください。
+- JetBrains Academy の[PythonCore](https://hyperskill.org/tracks/2) または [Python for Beginners](https://hyperskill.org/tracks/6) トラックでプロジェクトを確認してください。
+
+新しいコースとアップデートをお楽しみに!
diff -Naur "a/File input output/Write to file/task.md" "b/File input output/Write to file/task.md"
--- "a/File input output/Write to file/task.md" 2022-04-06 14:37:38.843008580 +0900
+++ "b/File input output/Write to file/task.md" 2022-04-06 14:38:43.263949056 +0900
@@ -1,63 +1,69 @@
-## Write to file
-
-As we already mentioned, if you use `'w'` as the second argument in `open()`, the file opens for
-writing only. A new empty file will be created. If another file with the same name already exists, it
-will be erased. If you want to add some content to an existing file, you should use the `'a'`
-(append) modifier.
-
-Another file object method, `f.write(string)`, writes the contents of a <i>string</i> to the file, returning the
-number of characters written.
-
-```python
-f.write('This is a test\n')
-```
-```text
-15
-```
-Other types of objects in text mode need to be converted into a string first:
-```python
-value = ('the answer', 42)
-s = str(value) # convert the tuple into string
-f.write(s)
-```
-```python
-18
-```
-Where the specified text will be inserted in the file depends on the file mode (`'a'` vs `'w'`).
-
-`'a'`: the text will be inserted at the end of the file.
-
-`'w'`: the file will be emptied before the text will be inserted at the beginning.
-
-If you want to include a symbol such as a line break, into your string (to start from a new line),
-add it with a `+`:
-```python
-f.write('\n' + 'string,' + ' ' + 'another string')
-```
-This will add a new line and write `'string, another string'`.
-
-In the code editor, add all elements from the `zoo` list to "output.txt" so that the output is added from
-a new line and the elements are separated by `' and '`. Use the <code>' and '.join(lst)</code> syntax to
-join the list elements into the required string. Afterwards, add `number` to the same output file.
-
-<div class='hint'>Use the <code>'a'</code> modifier to append lines at the end of the file.</div>
-<div class='hint'>Use the <code>write()</code> method.</div>
-<div class='hint'>Convert <code>number</code> into a string before writing.</div>
-<div class="hint">Add <code>\n</code> at the beginning of each string to write so that it eds up a separate line.</div>
-
-
-
-## What's next?
-
-Now, once you have mastered the basics of Python, we bet that you’re wondering what to do next.
-We recommend checking out [JetBrains Academy](https://hi.hyperskill.org?utm_source=ide&utm_medium=ide&utm_campaign=ide&utm_content=last-task).
-Here are several reasons to try JetBrains Academy now:
-
-- At the moment, 37 Python projects and 348 topics are available for learning, and the number keeps growing.
- Other programming languages, such as Kotlin and Java, are also available.
-- Projects of varying difficulty levels provide a flexible learning experience for all.
-- Comprehensive learning tracks are augmented with a detailed [Knowledge Map](https://hyperskill.org/knowledge-map?utm_source=ide&utm_medium=ide&utm_campaign=ide&utm_content=last-task).
-- Learn anywhere: you can start learning on your tablet or mobile phone via a browser and continue on your
- laptop or PC; you can even build the projects [right in your IDE](https://hyperskill.org/plugin#python?utm_source=ide&utm_medium=ide&utm_campaign=ide&utm_content=last-task).
-
-Join JetBrains Academy [here](https://hyperskill.org/onboarding?track=python&utm_source=ide&utm_medium=ide&utm_campaign=ide&utm_content=last-task) and try it yourself!
+## ファイルに書き込む :(Write to file)
+
+すでに述べたように、 `open()` の 2番目の引数として `'w'` を使用すると、ファイルは書き込み専用で開きます。
+新しい空のファイルが作成されます。
+
+同じ名前の別のファイルがすでに存在する場合、そのファイルは消去されます。
+既存のファイルにコンテンツを追加する場合は、 `'a'` (追加)修飾子を使用する必要があります。
+
+別のファイルオブジェクトメソッド `f.write(string)` は、 <i>string</i> の内容をファイルに書き込み、書き込まれた文字数を返します。
+
+```python
+f.write('This is a test\n')
+```
+```text
+15
+```
+テキストモードの他のタイプのオブジェクトは、最初に文字列に変換する必要があります:
+
+```python
+value = ('the answer', 42)
+s = str(value) # convert the tuple into string
+f.write(s)
+```
+```python
+18
+```
+指定したテキストがファイルのどこに挿入されるかは、ファイルモードによって異なります (`'a'` と `'w'`) 。
+
+`'a'`: テキストはファイルの最後に挿入されます。
+
+`'w'`: テキストが最初に挿入される前に、ファイルは空になります。
+
+改行などの記号を文字列に含める場合(新しい行から開始する場合)、「+」を付けて追加します:
+
+```python
+f.write('\n' + 'string,' + ' ' + 'another string')
+```
+
+これにより、新しい行が追加され、 `'文字列、別の文字列'`が書き込まれます。
+
+コードエディタで、`zoo` リストのすべての要素を "output.txt" に追加して、
+出力が新しい行から追加され、要素が `' and '` で区切られるようにします。
+ <code>' and '.join(lst)</code> 構文を使用して、リスト要素を必要な文字列に結合します。
+その後、同じ出力ファイルに `number` を追加します。
+
+<div class='hint'> <code>'a'</code> 修飾子を使用して、ファイルの最後に行を追加します。 </div>
+<div class='hint'> <code>write()</code> メソッドを使用します。</div>
+<div class='hint'>書き込む前に <code>number</code> を文字列に変換します。</div>
+<div class='hint'>各文字列の先頭に <code>\n</code> を追加して、別の行を編集するように書き込みます。</div>
+
+
+## 次は何ですか?
+
+さて、Python の基本をマスターしたら、次に何をすべきか疑問に思っていることでしょう。
+
+[JetBrains Academy](https://hi.hyperskill.org?utm_source=ide&utm_medium=ide&utm_campaign=ide&utm_content=last-task) をチェックすることをお勧めします。
+
+JetBrains Academy を今すぐ試す理由は次のとおりです:
+
+- 現在、37 のPython プロジェクトと348 のトピックが学習に利用可能であり、その数は増え続けています。
+Kotlin やJava などの他のプログラミング言語も学習に利用できます。
+
+- さまざまな難易度のプロジェクトは、すべての人に柔軟な学習体験を提供します。
+
+- 包括的な学習トラックは、詳細な[ナレッジマップ](https://hyperskill.org/knowledge-map?utm_source=ide&utm_medium=ide&utm_campaign=ide&utm_content=last-task) で補強されています。
+
+- どこでも学習: ブラウザを介してタブレットまたは携帯電話で学習を開始し、ラップトップまたはPC で続行できます。 [IDE でプロジェクトをビルド](https://hyperskill.org/plugin#python?utm_source=ide&utm_medium=ide&utm_campaign=ide&utm_content=last-task) することもできます。
+
+JetBrains Academy の[ここ](https://hyperskill.org/onboarding?track=python&utm_source=ide&utm_medium=ide&utm_campaign=ide&utm_content=last-task) に参加して、自分で試してみてください。
diff -Naur "a/Functions/Args and kwargs/task.md" "b/Functions/Args and kwargs/task.md"
--- "a/Functions/Args and kwargs/task.md" 2022-04-06 14:37:38.871008989 +0900
+++ "b/Functions/Args and kwargs/task.md" 2022-04-06 14:38:43.287949406 +0900
@@ -1,44 +1,49 @@
-## Args and kwargs
-
-When a final formal parameter of the form `**name` is present, it receives a dictionary
-(see [Data Structures — Dictionaries ](course://Data structures/Dictionaries)) containing
-all keyword arguments except for those corresponding
-to a formal parameter. This may be combined with a formal parameter of the form `*name` which
-receives a tuple containing any number of positional arguments beyond the formal parameter list
-(`*name` must occur before `**name`). For example, if we define a function like the one in the
-code editor, it could be called as shown in call 1, which would print:
-```text
--- Do you know how to get to the Library ?
--- I'm sorry, I am not from here, no idea about the Library
-Do you at least have a cigar, sir?
-Sure, help yourself.
-----------------------------------------
-lost_person : old banker
-other_guy : street clown
-scene : in a park
-```
-This function can be called with an arbitrary number of arguments. These arguments will be wrapped
-up in a tuple (see [Tuples](course://Data structures/Tuples)). Before the variable number of arguments, zero or
-more normal arguments may occur; in our case there's one – `place`. Any formal parameters that occur
-after the `*args` parameter are ‘keyword-only’ arguments, meaning that they can only be used as keywords
-rather than positional arguments. Another way to call this function is shown in call 2, and it will give
-us the same output.
-
-### Task
-
-In the code editor, modify the code below the `cat()` function so that it prints
-the following:
-```text
--- This cat would eat if you gave it anything
--- Lovely fur, the Maine Coon
--- It's fat !
-IT IS TOO FAT.
-YOU ARE FEEDING YOUR CAT TOO MUCH.
-```
-<div class="hint">Remember to unpack extra positional arguments with <code>*</code>.</div>
-
-<div class="hint">Remember to unpack keyword arguments with <code>**</code>.</div>
-
-<div class="hint">Do not forget to provide the value for the formal parameter <code>food</code>.</div>
-
-
+## Args と kwargs :(Args and kwargs)
+
+`**name` 形式の最後の正式なパラメータが存在する場合、仮パラメータに対応するものを除くすべてのキーワード引数を含む辞書([データ構造 — 辞書](course://Data structures/Dictionaries) を参照)を受け取ります。
+
+これは、形式パラメータリスト以外の任意の数の位置引数を含むタプルを受け取る形式 `*name` の形式パラメータと組み合わせることができます。(`*name` は `**name` の前に出現する必要があります)
+
+例えば、コードエディタで次のような関数を定義すると、
+「call 1」に示すように呼び出すことができ、次のように出力されます:
+
+```text
+-- Do you know how to get to the Library ? ←(図書館への行き方は ?)
+-- I'm sorry, I am not from here, no idea about the Library ←(図書館はわかりません)
+Do you at least have a cigar, sir? ←(葉巻はありますか?)
+Sure, help yourself. ←(助けてください。)
+----------------------------------------
+lost_person : old banker ←(失われた人 : 古い銀行家)
+other_guy : street clown ←(他の男 : ストリートピエロ)
+scene : in a park ←(シーン:公園で)
+```
+
+この関数は、任意の数の引数を使用して呼び出すことができます。
+
+これらの引数はタプルにまとめられます。([タプル](course://Data structures/Tuples) を参照)
+
+可変の引数の前に、0個以上の通常の引数が発生する可能性があります。
+私たちの場合、「場所」が 1つあります。
+
+ `*args` パラメータの後に発生する正式なパラメータはすべて「キーワードのみ」の引数です。つまり、位置引数ではなくキーワードとしてのみ使用できます。
+
+この関数を呼び出す別の方法を「call 2」に示します。これにより、同じ出力が得られます。
+
+### 課題
+
+コードエディタで、 `cat()` 関数の下のコードを変更して、
+次のように出力します:
+
+```text
+-- This cat would eat if you gave it anything ←(この猫は何かを食べるでしょう)
+-- Lovely fur, the Maine Coon ←(素敵な毛皮、メインクーン)
+-- It's fat ! ←(太っている!)
+IT IS TOO FAT. ←(太りすぎです。)
+YOU ARE FEEDING YOUR CAT TOO MUCH. ←(猫に与えすぎ)
+```
+
+<div class='hint'> <code>*</code> を使用して余分な位置引数をアンパックすることを忘れないでください。</div>
+
+<div class='hint'> <code>**</code> を使用してキーワード引数を解凍することを忘れないでください。</div>
+
+<div class='hint'> 正式なパラメータ<code>food</code> の値を指定することを忘れないでください。</div>
diff -Naur "a/Functions/Default parameters/task.md" "b/Functions/Default parameters/task.md"
--- "a/Functions/Default parameters/task.md" 2022-04-06 14:37:38.863008872 +0900
+++ "b/Functions/Default parameters/task.md" 2022-04-06 14:38:43.283949348 +0900
@@ -1,26 +1,29 @@
-## Default parameters
-
-It is also possible to define functions with a variable number of arguments. There are
-three forms, which can be combined. The most useful form is to specify a default value
-for one or more arguments. This creates a function that can be called with fewer
-arguments than it is defined with. For example, check out the first function in the code editor.
-This function can be called in several ways:
-
-- giving only the mandatory argument `a`: `multiply_by(3)`
-
-- giving one of the optional arguments: `multiply_by(3, 47)`, or `multiply_by(3, c=47)`
-
-- or even giving all arguments: `multiply_by(3, 47, 0)`
-
-You can specify which argument you are providing in the function call, just like we did in the third case
-with `c=47`. If you do not specify that, values will be assigned according to their order.
-Do not put spaces around the `=` symbol in function calls and definitions.
-
-Explore this topic further by reading <a href="https://docs.python.org/3/tutorial/controlflow.html#default-argument-values">this section</a>
-of Python Documentation.
-
-
-### Task
-Add parameters to the `hello()` function and set a default value for the `name` parameter.
-
-<div class='hint'>Specify any default value for the <code>name</code> parameter.</div>
+## デフォルトのパラメータ :(Default parameters)
+
+可変の引数で関数を定義することも可能です。
+
+組み合わせることができる 3つの形式があります。
+最も便利な形式は、1つ以上の引数のデフォルト値を指定することです。
+
+これにより、定義されているよりも少ない引数で呼び出すことができる関数が作成されます。
+
+例えば、コードエディタの最初の関数を確認してください。
+
+この関数は、いくつかの方法で呼び出すことができます。
+
+- 必須の引数 `a` のみを与える: `multiply_by(3)`
+- オプションの引数の 1つを与える: `multiply_by(3, 47)`、または `multiply_by(3, c=47)`
+- またはすべての議論を与える: `multiply_by(3, 47, 0)`
+
+`c=47` の 3番目のケースで行ったように、関数呼び出しで提供する引数を指定できます。
+
+これを指定しない場合、値は順序に従って割り当てられます。
+
+関数呼び出しと定義では、`=` 記号の前後にスペースを入れないでください。
+
+このトピックについて詳しくは、Pythonドキュメントの <a href="https://docs.python.org/3/tutorial/controlflow.html#default-argument-values">このセクション</a> をご覧ください。
+
+### 課題
+`hello()` 関数にパラメータを追加し、`name` パラメータのデフォルト値を設定します。
+
+<div class='hint'> <code>name</code> パラメータのデフォルト値を指定します。</div>
diff -Naur a/Functions/Definition/task.md b/Functions/Definition/task.md
--- a/Functions/Definition/task.md 2022-04-06 14:37:38.847008638 +0900
+++ b/Functions/Definition/task.md 2022-04-06 14:38:43.271949173 +0900
@@ -1,25 +1,33 @@
-## Definition
-
-Functions are a convenient way to divide your code into useful blocks, make it more
-readable, and reuse it.
-The keyword `def` introduces a function definition.
-It must be followed by the function name and the parenthesized list of formal parameters (which can be empty).
-The statements that form the body of the function start at the next line and must be indented.
-
-
-Functions only run when they are called. To call a function, use its name followed by parentheses:
-
-```python
-def my_function(): # function definition
- print("Hello from a function")
-
-my_function() # function call
-```
-
-Read more about defining functions in <a href="https://docs.python.org/3/tutorial/controlflow.html#defining-functions">this section</a> of Python Documentation.
-### Task
- - Call the function `my_function` inside the loop to repeat its invocation 5 times
- - Define a function that can replace the duplicated `print` statements in the file.
-
-<div class='hint'>Use the <code>()</code> to call the <code>my_function</code> function.</div>
-<div class='hint'>Use the <code>def</code> keyword to define the <code>fun</code> function.</div>
+## 意味 :(Definition)
+
+関数は、コードを有用なブロックに分割し、より多くのものにするための便利な方法です。
+
+読み取り可能で、再利用できます。
+
+キーワード `def` は関数定義を導入します。
+
+その後に、関数名と仮パラメーターの括弧で囲まれたリスト(空の場合もあります)を続ける必要があります。
+
+関数の本体を形成するステートメントは次の行から始まり、インデントする必要があります。
+
+関数は、呼び出されたときにのみ実行されます。
+
+関数を呼び出すには、名前の後に括弧を付けて使用します:
+
+```python
+def my_function(): # function definition
+ print("Hello from a function")
+
+my_function() # function call
+```
+
+関数の定義について詳しくは、Pythonドキュメントの <a href="https://docs.python.org/3/tutorial/controlflow.html#defining-functions">このセクション</a> をご覧ください。
+
+### 課題
+
+- ループ内で関数 `my_function` を呼び出して、その呼び出しを 5回繰り返します
+- ファイル内の重複した `print` ステートメントを置き換えることができる関数を定義します。
+
+<div class='hint'> <code>()</code> を使用して <code>my_function</code> 関数を呼び出します。</div>
+
+<div class='hint'>Use the <code>def</code> キーワードを使用して、<code>fun</code> 関数を定義します。</div>
diff -Naur "a/Functions/Keyword Arguments/task.md" "b/Functions/Keyword Arguments/task.md"
--- "a/Functions/Keyword Arguments/task.md" 2022-04-06 14:37:38.863008872 +0900
+++ "b/Functions/Keyword Arguments/task.md" 2022-04-06 14:38:43.287949406 +0900
@@ -1,38 +1,48 @@
-## Keyword Arguments
-
-We already hinted that functions can also be called using keyword arguments of the form `kwarg=value`. For
-instance, the function `cat()`, which we defined for you,
-accepts one required argument (`food`) and three optional arguments (`state`, `action`, and `breed`).
-It can be called in any of the following ways (you can try them all out):
-
-```python
-cat('chicken') # 1 positional argument
-cat(food='chicken') # 1 keyword argument
-cat(food='fish', action='bite') # 2 keyword arguments
-cat(action='bite', food='fish') # 2 keyword arguments
-cat('beef', 'happy', 'hiss') # 3 positional arguments
-cat('a hug', state='purrring') # 1 positional, 1 keyword
-```
-In a function call, keyword arguments must follow positional arguments. All the keyword
-arguments passed must match one of the arguments accepted by the function (e.g., `book` is not a valid
-argument for the `cat` function), and their order is not important. This also includes non-optional
-arguments (e.g., `cat(food='fish')` is valid too). No argument may receive a value more than once.
-All the following calls would be invalid:
-
-```python
-cat() # required argument missing
-cat(food='fish', 'dead') # positional argument after a keyword argument
-cat('veggies', food='nothing') # duplicate value for the same argument
-cat(actor='Johnny Depp') # unknown keyword argument
-```
-
-### Task
-In the editor, complete the function call with arguments so that it prints the following:
-```text
--- This cat wouldn't growl if you gave it soup
--- Lovely fur, the Sphinx
--- It's still hungry!
-```
-
-<div class="hint">For keyword arguments, use syntax such as <code>state='asleep'</code>.</div>
-<div class="hint">The required argument <code>food</code> has to be in the first position, unless you supply it as a keyword argument.</div>
\ ファイル末尾に改行がありません
+## キーワード引数 :(Keyword Arguments)
+
+関数は `kwarg=value` の形式のキーワード引数を使用して呼び出すこともできることをすでに示唆しました。
+
+例えば、私たちが定義した関数 `cat()` は、1つの必須引数(`food`)と 3つのオプションの引数(`state`、 `action`、および `breed`)を受け入れます。
+
+次のいずれかの方法で呼び出すことができます(すべて試してみることができます):
+
+```python
+cat('chicken') # 1 位置引数
+cat(food='chicken') # 1 キーワード引数
+cat(food='fish', action='bite') # 2 キーワード引数
+cat(action='bite', food='fish') # 2 キーワード引数
+cat('beef', 'happy', 'hiss') # 3 位置引数
+cat('a hug', state='purrring') # 1 位置引数、1 キーワード引数
+```
+
+関数呼び出しでは、キーワード引数は位置引数の後に続く必要があります。
+
+渡されるすべてのキーワード引数は、関数によって受け入れられる引数の 1つと一致する必要があり(例えば、`book` は `cat` 関数の有効な引数ではありません)、それらの順序は重要ではありません。
+
+これには、オプションではない引数も含まれます。(例えば、`cat(food='fish')` も有効です)。
+
+引数が値を複数回受け取ることはできません。
+
+次のすべての呼び出しは無効になります:
+
+```python
+cat() # 必要な引数がありません
+cat(food='fish', 'dead') # キーワード引数の後の位置引数
+cat('veggies', food='nothing') # 同じ引数の値が重複しています
+cat(actor='Johnny Depp') # 不明なキーワード引数
+```
+
+### 課題
+
+エディタで、引数を指定して関数呼び出しを行い、次のように出力します:
+
+```text
+-- This cat wouldn't growl if you gave it soup
+-- Lovely fur, the Sphinx
+-- It's still hungry!
+```
+
+<div class='hint'>キーワード引数には、<code>state='asleep'</code> などの構文を使用します。</div>
+
+<div class='hint'>キーワード引数として指定しない限り、必須の引数 <code>food</code> は最初の位置にある必要があります。</div>
+
diff -Naur "a/Functions/Parameters and call arguments/task.md" "b/Functions/Parameters and call arguments/task.md"
--- "a/Functions/Parameters and call arguments/task.md" 2022-04-06 14:37:38.851008697 +0900
+++ "b/Functions/Parameters and call arguments/task.md" 2022-04-06 14:38:43.275949231 +0900
@@ -1,41 +1,45 @@
-## Parameters and call arguments
-
-Function parameters are defined inside the parentheses `()` following the
-function name. A parameter acts as a variable name for an argument passed to the
-function.
-
-The terms parameter and argument refer to the same thing: information
-that is passed into a function. However, a parameter is the variable listed
-inside the parentheses in the function definition, while an argument is the
-value that is sent to the function when it is called.
-
-By default, a function must be called with the correct number of arguments.
-If your function expects 2 arguments, you have to call it
-with 2 arguments:
-
-```python
-def my_function(name, surname):
- print(name + " " + surname)
-
-my_function("Jon", "Snow")
-```
-Result:
-```text
-Jon Snow
-```
-However, if you supply it with just one argument during the call:
-```python
-my_function("Sam")
-```
-`TypeError` will be raised:
-```text
-TypeError Traceback (most recent call last)
-<ipython-input-29-40eb74e4b26a> in <module>
-----> 1 my_function('Jon')
-
-TypeError: my_function() missing 1 required positional argument: 'surname'
-```
-### Task
-In the code editor, define a function that prints the square of a passed parameter.
-
-<div class='hint'>Add the <code>x</code> parameter inside parentheses in the function definition.</div>
+## パラメータと呼び出し引数 :(Parameters and call arguments)
+
+「関数パラメータ」は、関数名に続く括弧 `()` 内で定義されます。
+
+「パラメータ」は、関数に渡される引数の変数名として機能します。
+
+「パラメータ」と「引数」という用語は同じものを指します。つまり、関数に渡される情報です。
+
+ただし、「パラメータ」は関数定義の括弧内にリストされている「変数」であり、「引数」は関数が呼び出されたときに関数に送信される「値」です。
+
+デフォルトでは、関数は正しい数の引数を使用して呼び出す必要があります。
+
+関数が 2つの引数を予期している場合は、2つの引数を使用して呼び出す必要があります:
+
+```python
+def my_function(name, surname):
+ print(name + " " + surname)
+
+my_function("Jon", "Snow")
+```
+
+結果:
+```text
+Jon Snow
+```
+
+ただし、呼び出し中に引数を 1つだけ指定すると、次のようになります:
+
+```python
+my_function("Sam")
+```
+
+`TypeError`が発生します:
+```text
+TypeError Traceback (most recent call last)
+<ipython-input-29-40eb74e4b26a> in <module>
+----> 1 my_function('Jon')
+
+TypeError: my_function() missing 1 required positional argument: 'surname'
+```
+
+### 課題
+コードエディタで、渡されたパラメータの 2乗を出力する関数を定義します。
+
+<div class='hint'>関数定義の括弧内に <code>x</code> パラメーターを追加します。</div>
diff -Naur a/Functions/Recursion/task.md b/Functions/Recursion/task.md
--- a/Functions/Recursion/task.md 2022-04-06 14:37:38.875009048 +0900
+++ b/Functions/Recursion/task.md 2022-04-06 14:38:43.295949523 +0900
@@ -1,64 +1,70 @@
-## Recursion
-
-The word <b>recursion</b> comes from the Latin word <i>recurrere</i>, meaning to return, revert, or recur.
-In programming, recursion refers to a coding technique in which a function calls itself.
-
-In most cases, recursion isn't necessary, but in some situations, self-referential
-definition is warranted. Walking through tree-like data structures would be a good example.
-Such structures are nested, and they readily fit a recursive definition. A non-recursive
-algorithm for the same task would be quite cumbersome.
-
-Here's a simple example of a recursive function. It takes a number as an argument
-and prints the numbers from the specified argument down to zero. In the recursive call,
-the argument is one less than the current value of `n`, so each recursion moves closer
-to the base case (which is zero).
-
-```python
-def countdown(n):
- print(n, end=' ')
- if n == 0:
- return # Terminates recursion
- else:
- countdown(n - 1) # Recursive call
-
-
-countdown(4)
-```
-```text
-10 9 8 7 6 5 4 3 2 1 0
-```
-
-<div class="hint">This function doesn’t check its argument for validity: if <code>n</code>
-is either a non-integer or negative, you’ll get a <code>RecursionError</code> exception because the base case is never reached:
-
-```python
-countdown(-10)
-```
-```text
-RecursionError: maximum recursion depth exceeded while calling a Python object
-```
-You can find out what Python’s recursion limit is with a function from the sys module
-called `getrecursionlimit()`, and you can change it with `setrecursionlimit()`:
-
-```python
-from sys import setrecursionlimit
-setrecursionlimit(3000)
-getrecursionlimit()
-```
-```text
-3000
-```
-</div>
-
-Keep in mind that recursion isn’t useful in every situation. For some problems, a recursive solution, although
-possible, will be awkward rather than elegant. Recursive implementations often consume more
-memory than non-recursive ones and in some cases may result in slower execution.
-
-### Task
-In the code editor, implement a recursive function that calculates the [factorial](https://en.wikipedia.org/wiki/Factorial) of a positive integer.
-For 1 and 0 it returns 1, for every other number it calculates the product of this number (`n`) and
-the factorial of the previous number (`n-1`).
-
-<div class="hint">Do not forget about the recursive function call.</div>
-
-
+## 再帰 :(Recursion)
+
+<b>recursion</b> という単語は、ラテン語の <i>recurrere</i> に由来します。
+これは、戻る、元に戻す、または繰り返すことを意味します。
+
+プログラミングでは、再帰とは、関数がそれ自体を呼び出すコーディング手法を指します。
+
+ほとんどの場合、再帰は必要ありませんが、状況によっては、自己参照の定義が必要です。
+
+ツリーのようなデータ構造を使うことは良い例です。
+このような構造はネストされており、再帰的定義に容易に適合します。
+
+同じ課題の非再帰的アルゴリズムは非常に面倒です。
+
+これは再帰関数の簡単な例です。
+
+引数として数値を取り、指定された引数からゼロまでの数値を出力します。
+
+再帰呼び出しでは、引数は現在の `n` の値より1小さいため、各再帰は基本ケース(ゼロ)に近づきます。
+
+```python
+def countdown(n):
+ print(n, end=' ')
+ if n == 0:
+ return # 再帰を終了
+ else:
+ countdown(n - 1) # 再帰呼び出し
+
+
+countdown(4)
+```
+```text
+10 9 8 7 6 5 4 3 2 1 0
+```
+
+<div class='hint'>この関数は引数の妥当性をチェックしません。<code>n</code>
+が非整数または負の場合、 <code>RecursionError</code> が発生します。
+
+基本ケースに到達しないための例外:
+
+```python
+countdown(-10)
+```
+```text
+RecursionError: maximum recursion depth exceeded while calling a Python object
+```
+sys モジュールの関数を使用して、Python の再帰制限を確認できます。
+`getrecursionlimit()` と呼ばれ、 `setrecursionlimit()` で変更できます:
+
+```python
+from sys import setrecursionlimit
+setrecursionlimit(3000)
+getrecursionlimit()
+```
+```text
+3000
+```
+</div>
+
+再帰はすべての状況で役立つわけではないことに注意してください。
+一部の問題では、再帰的な解決策は可能ですが、エレガントというよりは厄介です。
+
+再帰的な実装は、非再帰的な実装よりも多くのメモリを消費することが多く、場合によっては実行が遅くなる可能性があります。
+
+### 課題
+コードエディタで、正の整数の[階乗](https://en.wikipedia.org/wiki/Factorial) を計算する再帰関数を実装します。
+
+1 と 0 の場合は 1 を返し、1つおきの数値については、この数値 (`n`) と前の数値の階乗 (`n-1`) の積を計算します。
+
+<div class='hint'>再帰関数呼び出しを忘れないでください。</div>
diff -Naur "a/Functions/Return value/task.md" "b/Functions/Return value/task.md"
--- "a/Functions/Return value/task.md" 2022-04-06 14:37:38.859008814 +0900
+++ "b/Functions/Return value/task.md" 2022-04-06 14:38:43.279949289 +0900
@@ -1,25 +1,25 @@
-## Return value
-
-Functions may return a value to the caller, using the keyword `return` . You can use the
-returned value to assign it to a variable or just print it out. In fact, even functions
-without a `return` statement do return a value. This value is
-called `None` (it’s a built-in name). Writing the value `None` is normally suppressed by
-the interpreter, but if you really want to see it, you can use `print(some_func())`.
-
-><i>The first statement of the function body can optionally be a string literal; this string
-literal is the function’s documentation string, or docstring (more about docstrings can
-be found in the section <a href="https://docs.python.org/3/tutorial/controlflow.html#tut-docstrings">Documentation Strings</a>
-in Python Documentation). It’s good practice to include docstrings in the code that you write.</i>
-
-In the Fibonacci sequence, the first two numbers are `1` and `1`, and each subsequent
-number is the sum of the previous two.
-
-### Task
-Write a function that returns a list of numbers
-of the Fibonacci sequence up to `n` .
-
-<div class='hint'>Initialize <code>b</code> with 1.</div>
-<div class='hint'>Update <code>b</code> with <code>a + b</code>.</div>
-<div class='hint'>Update <code>a</code> with <code>tmp_var</code>.</div>
-
-
+## 戻り値 :(Return value)
+
+関数は、キーワード `return` を使用して、呼び出し元に値を返す場合があります。
+戻り値を使用して変数に割り当てるか、単に出力することができます。
+
+実際、`return` ステートメントのない関数でも値を返します。
+
+この値は `None`(なし)と呼ばれます(組み込みの名前です)。
+
+値 `None` の書き込みは通常、インタープリタによって抑制されますが、
+本当に見たい場合は、 `print(some_func())` を使用できます。
+
+><i>関数本体の最初のステートメントは、オプションで文字列リテラルにすることができます。この文字列リテラルは、関数のドキュメント文字列または docstring です。
+( docstring の詳細については、Pythonドキュメントの <a href="https://docs.python.org/3/tutorial/controlflow.html#tut-docstrings">ドキュメント文字列</a> をご覧ください。)
+作成するコードに docstring を含めることをお勧めします。</i>
+
+「フィボナッチ数列」では、最初の 2つの数字は `1` と `1` であり、その後はそれぞれ
+数値は前の 2つの合計です。
+
+### 課題
+`n` までの「フィボナッチ数列」の数のリストを返す関数を記述します。
+
+<div class='hint'> <code>b</code> を 1で初期化します。</div>
+<div class='hint'> <code>b</code> を <code>a + b</code>で更新します。</div>
+<div class='hint'> <code>a</code> を <code>tmp_var</code>で更新します。</div>
diff -Naur a/Introduction/About/task.md b/Introduction/About/task.md
--- a/Introduction/About/task.md 2022-04-06 14:37:38.879009106 +0900
+++ b/Introduction/About/task.md 2022-04-06 14:38:43.299949581 +0900
@@ -1,29 +1,29 @@
-## About the Course
-
-Welcome to the course in basics of Python programming!
-
-#### Why Learn Python?
-Python is one of the most popular programming languages in the world.
-Used extensively in data science, ML, and AI, Python is the fastest growing major programming language.
-
-It is a perfect starting point for getting acquainted with programming.
-Python is easier to read, write, and learn than most other programming languages.
-With Python, you won’t get stuck on a simple beginner’s task.
-Numerous Python forums and Q&A platforms, as well as a supportive open-source community are invaluable resources to help you stay motivated as you learn.
-
-#### Course Aims
-
-After completing this course, you should be able to:
-
-- understand and make use of basic programming concepts, such as variables, data structures, functions, and classes;
-- read Python code;
-- write simple programs in Python;
-- work with Python modules and packages;
-- continue learning Python with other courses, offering more complex material.
-
-#### Prerequisites
-
-You don't need to have any previous experience in Python or programming in general
-to complete this course.
-
-Good luck!
+## コースについて
+
+Python プログラミングの基礎のコースへようこそ!
+
+#### なぜ Python を学ぶのですか?
+
+Python は、世界で最も人気のあるプログラミング言語の1つです。
+Pythonは、データサイエンス、ML、AI で広く使用されており、最も急速に成長している主要なプログラミング言語です。
+
+これは、プログラミングに精通するための完璧な出発点です。
+Python は、他のほとんどのプログラミング言語よりも読み取り、書き込み、学習が簡単です。
+Python を使用すると、単純な初心者の課題にとらわれることはありません。
+多数の Python フォーラムと Q&A プラットフォーム、およびサポートを提供するオープンソースコミュニティは、学習意欲を維持するのに役立つ貴重なリソースです。
+
+#### コースの目的
+
+このコースを完了すると、次のことができるようになります。
+
+- 変数、データ構造、関数、クラスなどの基本的なプログラミングの概念を理解して利用できます。
+- Python コードを読めます。
+- Python で簡単なプログラムを作成できます。
+- Python モジュールおよびパッケージを操作できます。
+- 他のコースでPython を学び続け、より複雑な資料を提供します。
+
+#### 前提条件
+
+このコースを完了するために、Python やプログラミング全般の経験は必要ありません。
+
+頑張って!
diff -Naur a/Introduction/Comments/task.md b/Introduction/Comments/task.md
--- a/Introduction/Comments/task.md 2022-04-06 14:37:38.911009574 +0900
+++ b/Introduction/Comments/task.md 2022-04-06 14:38:43.335950106 +0900
@@ -1,39 +1,40 @@
-## Comments
-
-Comments in Python start with the hash character (`#`) and a single space,
-and they extend to the end of the physical line. You can use &shortcut:CommentByLineComment; to comment
-or uncomment the whole line or a block of code in PyCharm.
-
-
-Always make a priority of keeping the comments up-to-date when the code changes!
-Comments that contradict the code are worse than no comments.
-Also, they are unnecessary and in fact quite distracting if they state the obvious. Don't do this:
-
-```python
-x = x + 1 # Increment x
-```
-
-Comments should be complete sentences. The first word should be capitalized,
-unless it is an identifier that begins with a lower case letter. Ensure that
-your comments are clear and easily understandable to other people.
-
-#### Block Comments
-
-Block comments generally apply to some (or all) code that follows them, and
-are indented to the same level as that code.
-
-#### Inline Comments
-Use inline comments sparingly. An inline comment is a comment on the
-same line as a statement. Inline comments should be separated by at least two spaces from the statement.
-
-You can read more about proper commenting in <a href="https://www.python.org/dev/peps/pep-0008/#comments">PEP 8 – Style Guide for Python Code</a>.
-
-You can also comment a line or a block of code if you don't want to delete it it's not needed it at the moment.
-
-### Task
-In the code editor, comment the line with the `print` statement that says it should not be printed.
-See how the code is not highlighted anymore.
-
-<div class="hint">
- Add a <code>#</code> and a space before that <code>print</code> statement. Leave everything else as is.
-</div>
+## コメント :(Comments)
+
+Python のコメントは、ハッシュ文字 (`#`) と単一のスペースで始まり、物理行の終わりまで続きます。
+
+ &shortcut:CommentByLineComment; を使うと、
+PyCharm の行全体またはコードブロックのコメントまたはコメント解除ができます。
+
+コードを変更したときは、常にコメントを最新の状態に保つことを優先してください。
+
+コードと矛盾するコメントは、コメントがない場合よりも悪いことです。
+また、不必要ですが、明白なことを述べている場合、実際にはかなり気が散ります。
+
+なので、これを行わないでください:
+
+```python
+x = x + 1 # Increment x
+```
+コメントは完全な文章である必要があります。最初の単語は、小文字で始まる識別子でない限り、大文字にする必要があります。コメントが明確で、他の人にもわかりやすいものであることを確認してください。
+
+#### ブロックコメント :(Block Comments)
+
+ブロックコメントは通常、それに続く一部(またはすべて)のコードに適用され、そのコードと同じレベルにインデントされます。
+
+#### インラインコメント :(Inline Comments)
+
+インラインコメントは慎重に使用してください。
+インラインコメントは、ステートメントと同じ行のコメントです。
+インラインコメントは、ステートメントから少なくとも 2つのスペースで区切る必要があります。
+
+適切なコメントの詳細については、<a href="https://www.python.org/dev/peps/pep-0008/#comments">PEP 8 – Style Guide for Python Code</a> を参照してください。
+
+削除したくない場合は、コードの 1行またはブロックにコメントを付けることもできます。現時点では必要ありません。
+
+### 課題
+コードエディタで、出力しないことを示す `print` ステートメントで、行にコメントを付けます。
+コードが強調表示されなくなった様子を確認ください。
+
+<div class='hint'>
+ <code>#</code> とその <code>print</code> ステートメントの前にスペースを追加します。他はすべてそのままにしておきます。
+</div>
diff -Naur "a/Introduction/Course View/task.md" "b/Introduction/Course View/task.md"
--- "a/Introduction/Course View/task.md" 2022-04-06 14:37:38.887009223 +0900
+++ "b/Introduction/Course View/task.md" 2022-04-06 14:38:43.311949756 +0900
@@ -1,18 +1,21 @@
-## Course View
-
-<b>Course View</b> shows you the course syllabus: a list of lessons with tasks.
-
-<style>
-img {
- display: block;
- margin-left: auto;
- margin-right: auto;
-}
-</style>
-<img src="edu_course_view.png" class="center" width="75%"/>
-
-You can navigate to any task by double-clicking its name.
-
-To hide the Course View window, click the Project Tool Window button or press <span style="color: #509DD6">&shortcut:ActivateProjectToolWindow;</span>. This will give you more space for the Editor and Task Description windows.
-
-To show the hidden Course View window, click the Project Tool Window button (or press <span style="color: #509DD6">&shortcut:ActivateProjectToolWindow;</span>) again.
+## コースの表示 :(Course View)
+
+<b>「コースの表示」</b> (Course) ウィンドウには、コースの項目が表示されます: 課題を含むレッスンの一覧です:
+
+<style>
+img {
+ display: block;
+ margin-left: auto;
+ margin-right: auto;
+}
+</style>
+<img src="edu_course_view.png" class="center" width="30%"/>
+
+名前をダブルクリックすると、任意の課題に移動できます。
+
+「コースの表示」ウィンドウを非表示にするには、「プロジェクトツール」のウィンドウ ボタンをクリックするか、 <span style="color: #509DD6">&shortcut:ActivateProjectToolWindow;</span> を押します。
+
+これにより、「編集エリア」ウィンドウと「課題の説明」ウィンドウ用のスペースが増えます。
+
+非表示の「コースの表示」ウィンドウを表示するには、[プロジェクトツールウィンドウ]ボタンをクリックします。または、<span style="color: #509DD6">&shortcut:ActivateProjectToolWindow;</span> を再び押します。
+
diff -Naur a/Introduction/Editor/task.md b/Introduction/Editor/task.md
--- a/Introduction/Editor/task.md 2022-04-06 14:37:38.895009340 +0900
+++ b/Introduction/Editor/task.md 2022-04-06 14:38:43.315949814 +0900
@@ -1,22 +1,24 @@
-## Editor
-
-The <b>Editor</b> is your playground where you will be programming. You can experiment here while you work on theoretical tasks and quizzes without being checked.
-
-For programming assignments, the Editor is where you’ll fix the existing code or write your own code from scratch. This code will be checked.
-
-<style>
-img {
- display: block;
- margin-left: auto;
- margin-right: auto;
-}
-</style>
-<img src="edu_editor.png" class="center" width="100%"/>
-
-
-To run your code at any time, choose the Run option from the context menu or press <span style="color: #509DD6">&shortcut:Run;</span>:
-
-<img src="edu_context_menu_run.png" class="center" width="100%"/>
-
-
-If you want to go back to the Editor and focus on your code, the fastest way to do it is with the Hide All Windows command (<span style="color: #509DD6">&shortcut:HideAllWindows;</span>). To get all the windows back, repeat the command.
\ ファイル末尾に改行がありません
+## 編集エリア :(Editor)
+
+<b>「編集エリア」</b> (Editor) は、プログラミングを行うための遊び場です。チェックせずに理論的な課題やクイズに取り組んでいる間、ここで実験することができます。
+
+プログラミングの割り当ての場合、「編集エリア」は既存のコードを修正するか、独自のコードを最初から作成する場所です。このコードがチェックされます。
+
+<style>
+img {
+ display: block;
+ margin-left: auto;
+ margin-right: auto;
+}
+</style>
+<img src="edu_editor.png" class="center" width="60%"/>
+
+コードをいつでも実行するには、コンテキストメニューから[実行]オプションを選択するか、<span style="color: #509DD6">&shortcut:Run;</span> を押します:
+
+<img src="edu_context_menu_run.png" class="center" width="60%"/>
+
+
+「編集エリア」に戻ってコードに集中したい場合に、最も速いやり方は、[すべてのウィンドウを非表示]コマンド
+ (<span style="color: #509DD6">&shortcut:HideAllWindows;</span>) を使うことです。
+すべてのウィンドウを元に戻すには、コマンドを繰り返します。
+
diff -Naur "a/Introduction/Navigating Around/task.md" "b/Introduction/Navigating Around/task.md"
--- "a/Introduction/Navigating Around/task.md" 2022-04-06 14:37:38.883009165 +0900
+++ "b/Introduction/Navigating Around/task.md" 2022-04-06 14:38:43.303949639 +0900
@@ -1,18 +1,25 @@
-## EduTools plugin overview
-
-This lesson will help you take your first steps with the [EduTools plugin](https://www.jetbrains.com/help/education/educational-products.html) and use it to learn Python.
-
-With the EduTools plugin, you can learn programming languages and tools by completing coding tasks and get instant feedback right inside the IDE.
-
-Enough talking – let's get started!
-
-If you're already familiar with the interface, you can skip this lesson.
-
-### Working with courses
-Every course available in EduTools is structured as a list of lessons. Lessons, in turn, can be grouped into sections. Each lesson contains several tasks.
-
-When you open a course, you will see the main tool windows used for navigation: <b>Course View</b>, <b>Editor</b>, and <b>Task Description</b>:
-
-<img src="edu_course_overview.png" width="100%"/>
-
-Click the "Next" button to navigate to the next task.
\ ファイル末尾に改行がありません
+## EduToolsプラグインの概要 :( EduTools plugin overview)
+
+このレッスンは、[EduTools プラグイン](https://www.jetbrains.com/help/education/educational-products.html) を使用して最初のステップを実行し、それを使用してPython を学習するのに役立ちます。
+
+EduTools プラグインを使用すると、コーディングタスクを完了してプログラミング言語とツールを学習し、IDE 内で即座にフィードバックを得ることができます。
+
+十分に話しましょう – 始めましょう!
+
+インターフェースに既に精通している場合は、このレッスンをスキップできます。
+
+### コースでの作業
+EduTools で利用できるすべてのコースは、レッスンのリストとして構成されています。
+次に、レッスンをセクションにグループ化できます。
+各レッスンにはいくつかの課題が含まれています。
+
+コースを開くと、ナビゲーションに使用されるメインのツールウィンドウが表示されます:
+
+<b>「コースの表示」</b>ウィンドウ
+<b>「編集エリア」</b>ウィンドウ
+<b>「課題の説明」</b>ウィンドウ
+
+<img src="edu_course_overview.png" width="100%"/>
+
+「Next」(次へ)ボタンをクリックして、次の課題に移動します。
+
diff -Naur "a/Introduction/Our first program/task.md" "b/Introduction/Our first program/task.md"
--- "a/Introduction/Our first program/task.md" 2022-04-06 14:37:38.907009516 +0900
+++ "b/Introduction/Our first program/task.md" 2022-04-06 14:38:43.331950047 +0900
@@ -1,23 +1,29 @@
-## Our first program
-
-Traditionally, the first program you write in any programming language is `"Hello World!"`.
-
-Introduce yourself to the World.
-
-To run this script, right-click anywhere in the **Editor** view so you can see the context menu and select **Run 'hello_world'**.
-Alternatively, you can use the &shortcut:RunClass; shortcut.
-Exclusively in PyCharm Edu, you can use the  gutter icon.
-
-For more information, check out [our help](https://www.jetbrains.com/help/pycharm/running-and-rerunning-applications.html).
-
-## JetBrains Academy
-
-If this task seems too hard or you are looking for a more structured and detailed curriculum, we suggest trying [JetBrains Academy](https://hi.hyperskill.org?utm_source=ide&utm_medium=ide&utm_campaign=ide&utm_content=first-task).
-
-There are many reasons for you to try JetBrains Academy. Here are just a few of them:
-
-- Comprehensive learning tracks with a detailed [Knowledge Map](https://hyperskill.org/knowledge-map?utm_source=ide&utm_medium=ide&utm_campaign=ide&utm_content=first-task).
-- Projects with different difficulty levels that provide a flexible learning experience to match your skill level.
-- You can practice with and master [professional development tools](https://hyperskill.org/plugin?utm_source=ide&utm_medium=ide&utm_campaign=ide&utm_content=first-task).
-
-Join JetBrains Academy [here](https://hyperskill.org/onboarding?track=python&utm_source=ide&utm_medium=ide&utm_campaign=ide&utm_content=first-task) and try it yourself.
+## 私たちの最初のプログラム :(Our first program)
+
+従来、プログラミング言語で最初に作成するプログラムは `"Hello World!"` です。
+
+こちらでも紹介します。
+
+このスクリプトを実行するには、 **Editor** ビュー(編集画面)の任意の場所を「右クリック」して、
+コンテキストメニューを表示し、**実行 'hello_world'** を選択します。
+
+または、&shortcut:RunClass; ショートカットを使用することもできます。
+PyCharm Edu でのみ、 男の子アイコンを使用できます。
+
+詳細については、[私たちのヘルプ](https://www.jetbrains.com/help/pycharm/running-and-rerunning-applications.html) をご覧ください。
+
+## JetBrains アカデミー :(JetBrains Academy)
+
+この課題が難しすぎると思われる場合、または、より構造化された詳細なカリキュラムを探している場合は、
+ [JetBrains Academy](https://hi.hyperskill.org?utm_source=ide&utm_medium=ide&utm_campaign=ide&utm_content=first-task) を試してみることをお勧めします。
+
+JetBrains Academy を試す理由はたくさんあります。それらのほんの一部を次に示します:
+
+- 詳細な[ナレッジマップ](https://hyperskill.org/knowledge-map?utm_source=ide&utm_medium=ide&utm_campaign=ide&utm_content=first-task) を含む包括的な学習トラック。
+
+- スキルレベルに合わせて柔軟な学習体験を提供する、さまざまな難易度のプロジェクト。
+
+- [専門能力開発ツール](https://hyperskill.org/plugin?utm_source=ide&utm_medium=ide&utm_campaign=ide&utm_content=first-task) を使用して練習し、習得することができます。
+
+Join JetBrains Academy の [こちら](https://hyperskill.org/onboarding?track=python&utm_source=ide&utm_medium=ide&utm_campaign=ide&utm_content=first-task) に参加して、自分で試してみてください。
+
diff -Naur "a/Introduction/Task Description/task.md" "b/Introduction/Task Description/task.md"
--- "a/Introduction/Task Description/task.md" 2022-04-06 14:37:38.903009457 +0900
+++ "b/Introduction/Task Description/task.md" 2022-04-06 14:38:43.327949989 +0900
@@ -1,41 +1,46 @@
-## Task Description
-
-The **Task Description** window gives you all the information you need to complete a task:
-
-For theoretical tasks, the description provides learning and reading materials.
-For quizzes, it offers multiple choice questions.
-For programming assignments, it states the problem to be solved.
-
-Use Task Description icons for the following actions:
-
-| Icon | Description |
-|------------------------------------|-------------------------------|
-|**Check** | <font size="-1">Check the correctness of your answer (for a quiz) or your code solution (for a programming task)</font>|
-| **Run** | <font size="-1">Run your code (for a theoretical tasks)</font>|
-| | <font size="-1">Go to the previous task</font> |
-| <font size="-1">or</font> **Next** | <font size="-1">Go to the next task</font>|
-| | <font size="-1">Discard all the changes you’ve made in the task, and start over</font>|
-| | <font size="-1">View the task page on Stepik and leave a comment</font>|
-|<a>Peek Solution...</a> | <font size="-1">Reveal the correct answer and show the <b>diff</b></font>|
-
-We recommend keeping the Task Description window visible and not hiding it completely. If it is too distracting, you can hide it by clicking the  button in the top right-hand corner of the Task Description window.
-
-If you use two monitors, it may be helpful to switch the Task Description panel to the floating mode and move it to the second monitor, or just place it near the main IDE window. To do this, click the tool window settings  icon :
-
-<img src="images/edu_task_description_window_settings.png" width="85%"/>
-
-<style>
-img {
- display: inline !important;
-}
-table, th, td {
- border: 1px solid black;
- border-collapse: collapse;
-}
-th, td {
- padding: 5px;
-}
-table td:nth-child(1) {
- text-align: center;
-}
-</style>
\ ファイル末尾に改行がありません
+## 課題の説明 :(Task Description)
+
+**課題の説明** (Description) ウィンドウには、課題を完了するために必要なすべての情報が表示されます。
+
+理論的な課題の場合、説明は学習および読み物を提供します。
+クイズの場合、それは複数の選択肢の質問を提供します。
+プログラミングの割り当てについては、解決すべき問題が記載されています。
+
+次のアクションには、「課題の説明」ウィンドウのアイコンを使用します:
+
+|アイコン |説明 |
+| ------------------------------------ | ------------------------------- |
+|**チェック** | <font size="-1">クイズの回答 またはプログラム課題のコードが正しいか確認</font>|
+| **実行** | <font size="-1">コードを実行します(理論上の課題)</font>|
+| | <font size="-1">前のタスクに移動</font>|
+| <font size="-1">または</font> **次へ** | <font size="-1">次のタスクに進む</font>|
+| | <font size="-1">タスクで行ったすべての変更を破棄し、最初からやり直します</font>|
+| | <font size="-1">Stepikで課題ページを表示し、コメントを残してください</font>|
+|<a>ソリューションのピーク...</a>| <font size="-1">正解を明らかにし、<b>差分</b>を表示します。</font>|
+
+「課題の説明」ウィンドウを完全に非表示にせずに、表示したままにしておくことをオススメします。
+
+気が散る場合は、「課題の説明」ウィンドウの右上隅にある  ボタンをクリックして非表示にできます。
+
+2台のモニタを使用する場合は、「課題の説明」ウィンドウ(パネル)をフローティングモードに切り替えて、2台目のモニタに移動するか、IDE のメインウィンドウの近くに配置すると便利な場合があります。
+
+これを行うには、ツールウィンドウの設定  アイコンをクリックします:
+
+<img src="images/edu_task_description_window_settings.png" width="60%"/>
+
+<style>
+img {
+ display: inline !important;
+}
+table, th, td {
+ border: 1px solid black;
+ border-collapse: collapse;
+}
+th, td {
+ padding: 5px;
+}
+table td:nth-child(1) {
+ text-align: center;
+}
+</style>
+
diff -Naur "a/Loops/Break keyword/task.md" "b/Loops/Break keyword/task.md"
--- "a/Loops/Break keyword/task.md" 2022-04-06 14:37:38.947010101 +0900
+++ "b/Loops/Break keyword/task.md" 2022-04-06 14:38:43.363950514 +0900
@@ -1,13 +1,14 @@
-## Break keyword
-
-An infinite loop is a loop that never exits. If the loop condition happens to
-always be `True`, such a loop becomes infinite. The most straightforward way to create
-an infinite loop is to use `while True`. The `break` keyword is used to
-escape the loop.
-
-
-Write a condition to exit the loop on its third iteration after evaluating if `animal`
-is equal to `elephant`. Use the `break` statement. The `zoo` list in the end should contain
-only `lion` and `tiger` (because you `pop` all the other ones in the loop).
-
-<div class="hint">Use <code>==</code> to check if <code>animal</code> is equal to <code>"elephant"</code>.</div>
+## Break キーワード :(Break keyword)
+
+無限ループは、決して終了しないループです。
+ループ条件が常に`True`である場合、そのようなループは無限になります。
+
+無限ループを作成する最も簡単な方法は、`while True` を使用することです。
+`break` キーワードは、ループをエスケープするために使用されます。
+
+`animal` が `elephant` と等しいかどうかを評価した後、3回目の反復でループを終了する条件を記述します。
+ `break` ステートメントを使用します。
+最後の `zoo` リストには `lion` と `tiger` だけが含まれている必要があります(ループ内の他のすべてのものを `pop` するため)。
+
+<div class='hint'> <code>==</code> を使用して、<code>animal</code> が <code>"elephant"</code> と等しいかどうかを確認します。</div>
+
diff -Naur "a/Loops/Continue keyword/task.md" "b/Loops/Continue keyword/task.md"
--- "a/Loops/Continue keyword/task.md" 2022-04-06 14:37:38.955010218 +0900
+++ "b/Loops/Continue keyword/task.md" 2022-04-06 14:38:43.371950630 +0900
@@ -1,10 +1,11 @@
-## Continue keyword
-
-The `continue` keyword is used to skip the rest of the code inside the loop for
-the current iteration only and proceed right to the next one. The loop returns to the `for` or
-`while` statement and evaluates the condition again. If there is no next item,
-the `else` clause is executed if it is present.
-
-Print only the odd numbers `1, 3, 5, 7, 9`.
-
-<div class='hint'>Use the <code>%</code> operator to check if <code>x</code> is even.</div>
+## continue キーワード :(Continue keyword)
+
+`continue` キーワードは、現在の反復でのみループ内の残りのコードをスキップし、次の反復に進むために使用されます。
+
+ループは `for` または `while` ステートメントに戻り、条件を再度評価します。
+次の項目がない場合、存在する場合は `else` 句が実行されます。
+
+奇数の `1、3、5、7、9` のみを出力します。
+
+<div class='hint'> <code>%</code> 演算子を使用して、<code>x</code> が偶数かどうかを確認します。</div>
+
diff -Naur "a/Loops/Else with loops/task.md" "b/Loops/Else with loops/task.md"
--- "a/Loops/Else with loops/task.md" 2022-04-06 14:37:38.951010159 +0900
+++ "b/Loops/Else with loops/task.md" 2022-04-06 14:38:43.367950572 +0900
@@ -1,40 +1,41 @@
-## Else with loops
-
-We saw that the `break` statement breaks out of the innermost enclosing `for` or `while` loop.
-
-Python also allows loop statements to have an `else` clause. It is executed when the loop terminates
-through exhaustion of the iterable (with `for`) or when the condition becomes `False`
-(with `while`), but not when the loop is terminated by a `break` statement. Check
-out this example of a loop which searches for prime numbers:
-
-```python
-for n in range(2, 10):
- for x in range(2, n):
- if n % x == 0:
- print(n, 'equals', x, '*', n//x)
- break
- else:
- # loop fell through without finding a factor
- print(n, 'is a prime number')
-```
-```text
-2 is a prime number
-3 is a prime number
-4 equals 2 * 2
-5 is a prime number
-6 equals 2 * 3
-7 is a prime number
-8 equals 2 * 4
-9 equals 3 * 3
-```
-In this code, the `else` clause belongs to the `for` loop, not the
-`if` statement.
-
-Remember, an `else` after an `if` statement is skipped and NOT executed if the expression following
-`if` is `True`, while in the case of loops, an `else` clause is executed after the loop itself
-is completed (unless there was a `break` in there somewhere).
-
-In the code editor, add two lines of code to the second loop to make sure the loop only prints
-numbers 1 and 2 and never prints the phrase `"for loop is done"`.
-
-<div class="hint">It should terminate at number 3.</div>
\ ファイル末尾に改行がありません
+## Else with ループ :(Else with loops)
+
+「それ以外の場合はループ」
+
+`break` ステートメントは、最も内側を囲む `for` または `while` ループから抜け出すことがわかりました。
+Python では、ループステートメントに `else` 句を含めることもできます。
+
+iterable の枯渇( `for` を使用)によってループが終了したとき、または条件が `False`( `while` を使用)になったときに実行されますが、ループが `break` ステートメントによって終了したときは実行されません。
+
+素数を検索するループの次の例を確認してください:
+
+```python
+for n in range(2, 10):
+ for x in range(2, n):
+ if n % x == 0:
+ print(n, 'equals', x, '*', n//x)
+ break
+ else:
+ # loop fell through without finding a factor
+ print(n, 'is a prime number')
+```
+```text
+2 is a prime number
+3 is a prime number
+4 equals 2 * 2
+5 is a prime number
+6 equals 2 * 3
+7 is a prime number
+8 equals 2 * 4
+9 equals 3 * 3
+```
+
+このコードでは、`else` 句は `if` ステートメントではなく、`for` ループに属しています。
+
+`if` ステートメントの後の `else` はスキップされ、 `if` に続く式が `True` の場合は実行されませんが、
+ループの場合、(どこかに「休憩」がない限り)`else` 句はループ自体が完了した後に実行されます。
+
+コードエディタで、2行目のコードを 2行目に追加して、ループが 1 と 2 の数字のみを出力し、
+`"for loop is done"` というフレーズを出力しないようにします。
+
+<div class='hint'>番号3で終了する必要があります。</div>
+
diff -Naur "a/Loops/For loop/task.md" "b/Loops/For loop/task.md"
--- "a/Loops/For loop/task.md" 2022-04-06 14:37:38.919009691 +0900
+++ "b/Loops/For loop/task.md" 2022-04-06 14:38:43.343950222 +0900
@@ -1,15 +1,16 @@
-## for loop
-
-The `for` statement is used to iterate over the elements of a sequence (such as
-a string, tuple, or list) or another iterable object. The sequence is evaluated once.
-On each iteration, the variable defined in the `for` loop will be assigned to the next value
-in the list. The code following the line with the `for` statement is executed once
-for each item. When the items are exhausted, the loop terminates.
-
-You can read more about the `for` statement on <a href="https://docs.python.org/3/reference/compound_stmts.html#the-for-statement">this page</a> of Python Documentation.
-
-Print each prime number from the `primes` list using the `for` loop. A prime
-number is a natural number greater than `1` that has no positive divisors
-other than `1` and itself.
-
-<div class='hint'>Use a <code>for</code> loop to iterate over <code>primes</code> and print each element one by one.</div>
+## for ループ :(for loop)
+
+`for` ステートメントは、シーケンスの要素(文字列、タプル、リストなど)または別の反復可能なオブジェクトを反復処理するために使用されます。
+
+シーケンスは 1回評価されます。
+各反復で、`for` ループで定義された変数がリスト内の次の値に割り当てられます。
+`for`ステートメントの行に続くコードは、アイテムごとに 1回実行されます。
+アイテムが使い果たされると、ループは終了します。
+
+Pythonドキュメントの <a href="https://docs.python.org/3/reference/compound_stmts.html#the-for-statement"> このページ</a> で `for` ステートメントの詳細を読むことができます。
+
+`for` ループを使用して、`primes` リストから各素数を出力します。
+素数は `1` より大きい自然数であり、`1` とそれ自体以外に正の約数はありません。
+
+<div class='hint'> <code>for</code> ループを使用して、<code>primes</code> を反復処理し、各要素を1つずつ出力します。</div>
+
diff -Naur "a/Loops/List Comprehension/task.md" "b/Loops/List Comprehension/task.md"
--- "a/Loops/List Comprehension/task.md" 2022-04-06 14:37:38.931009867 +0900
+++ "b/Loops/List Comprehension/task.md" 2022-04-06 14:38:43.355950397 +0900
@@ -1,41 +1,52 @@
-## List Comprehension
-
-You can use a loop to build a list (or another data structure).
-For example:
-
-```python
-my_list = []
-for i in range(5):
- my_list.append(i)
-
-print(my_list)
-```
-Output:
-```text
-[0, 1, 2, 3, 4]
-```
-
-This is nice, but quite bulky. List comprehension offers a more compact syntax when you want to create a new list based on the values of an existing list
-or another iterable (tuple, string, array, range, etc.). It does the same task and simplifies the program. Typically, list comprehensions are written in a single line of code.
-
-```python
-my_list = [i for i in range(5)]
-print(my_list)
-```
-Output:
-```text
-[0, 1, 2, 3, 4]
-```
-List comprehensions are also more efficient computationally than a `for` loop.
-
-In the code editor, use list comprehension to build `my_efficient_list` from the elements of `my_inefficient_list`
-by adding $10$ to each of them. For example, the first element of `my_inefficient_list` is $1 + 10 = 11$,
-so the first element of `my_efficient_list` should be $11 + 10 = 21$, and so on.
-
-
-<div class="hint">
-
-In the example above, we used `i for i in range(5)`. You can modify `i` as you like
-right inside this expression. For example, to subtract `5` from every `i`, you can do
-`i - 5 for i in range(5)`.
-</div>
\ ファイル末尾に改行がありません
+## リスト内包 :(List Comprehension)
+
+ループを使用して、リスト(または別のデータ構造)を作成できます。
+
+例えば:
+
+
+```python
+my_list = []
+for i in range(5):
+ my_list.append(i)
+
+print(my_list)
+```
+
+出力:
+```text
+[0, 1, 2, 3, 4]
+```
+
+これは素晴らしいですが、かなりかさばります。
+
+リスト内包表記は、既存のリストまたは別の反復可能オブジェクト(タプル、文字列、配列、範囲など)の値に基づいて新しいリストを作成する場合に、よりコンパクトな構文を提供します。
+
+それは同じタスクを実行し、プログラムを簡素化します。
+通常、リスト内包表記は 1行のコードで記述されます。
+
+
+```python
+my_list = [i for i in range(5)]
+print(my_list)
+```
+出力:
+```text
+[0, 1, 2, 3, 4]
+```
+
+リスト内包表記は、`for` ループよりも計算効率が高くなります。
+
+コードエディタで、リスト内包表記を使用して、各要素に $10$ を追加することにより、
+`my_inefficient_list` の要素から `my_efficient_list` を作成します。
+
+例えば、`my_inefficient_list` の最初の要素は $1 + 10 = 11$ であるため、
+`my_efficient_list` の最初の要素は $11 + 10 = 21$ になります。
+
+<div class='hint'>
+
+上記の例では、 `i for i in range(5)` を使用しました。この式の中で、好きなように `i` を変更できます。
+
+例えば、すべての `i` から `5` を引くには、 `i - 5 for i in range(5)` に対して `i - 5` を実行できます。
+</div>
+
diff -Naur "a/Loops/Loop over a string/task.md" "b/Loops/Loop over a string/task.md"
--- "a/Loops/Loop over a string/task.md" 2022-04-06 14:37:38.923009750 +0900
+++ "b/Loops/Loop over a string/task.md" 2022-04-06 14:38:43.347950280 +0900
@@ -1,9 +1,10 @@
-## Loop over a string
-
-As we discussed earlier, strings in Python are in many ways similar to lists.
-You can iterate over a string just like you would iterate over a list.
-
-Use a loop to count how many characters `hello_world` contains. Store
-this number in the variable `length`.
-
-<div class='hint'>Use a <code>for</code> loop to iterate over the <code>hello_world</code> string.</div>
+## 文字列をループする :( Loop over a string)
+
+前に説明したように、Python の文字列は多くの点でリストに似ています。
+リストを反復処理するのと同じように、文字列を反復処理できます。
+
+ループを使用して、`hello_world` に含まれる文字数をカウントします。
+この数値を変数 `length` に格納します。
+
+<div class='hint'> <code>for</code> ループを使用して、<code>hello_world</code> 文字列を反復処理します。</div>
+
diff -Naur "a/Loops/Nested List Comprehension/task.md" "b/Loops/Nested List Comprehension/task.md"
--- "a/Loops/Nested List Comprehension/task.md" 2022-04-06 14:37:38.935009925 +0900
+++ "b/Loops/Nested List Comprehension/task.md" 2022-04-06 14:38:43.359950455 +0900
@@ -1,49 +1,49 @@
-## Nested List Comprehension
-
-Nested list comprehensions are simply list comprehensions nested within other
-list comprehension. This is quite similar to [nested loops](course://Loops/Nested for Loop).
-Here is a program that builds a [nested list](course://Data structures/Nested Lists) using a nested loop:
-
-```python
-matrix = []
-
-for i in range(3):
-
- # Append an empty sublist inside the list
- matrix.append([])
-
- for j in range(0, 10, 2):
- matrix[i].append(j)
-
-print(matrix)
-```
-Output:
-```text
-[[0, 2, 4, 6, 8], [0, 2, 4, 6, 8], [0, 2, 4, 6, 8]]
-```
-
-The same can be done in just one line using nested list comprehension:
-
-```python
-matrix = [[j for j in range(0, 10, 2)] for i in range(3)]
-print(matrix)
-```
-Output:
-```text
-[[0, 2, 4, 6, 8], [0, 2, 4, 6, 8], [0, 2, 4, 6, 8]]
-```
-
-### Task
-
-Create a $10×10$ `matrix` such that each row (sublist) contains **characters** 0–9 from
-`string`. Use list comprehension to complete the task in one line of code.
-
-<div class="hint">
-
-Follow the example in the task description. You simply need to use `string` as an iterable instead
-of one of the ranges.
-
-</div>
-
-
-
+## ネストされたリスト内包 :(Nested List Comprehension)
+
+「ネストされたリスト内包」は、他の「リスト内包」内のネストされた「リスト内包」です。
+
+これは「[ネストされたループ](course://Loops/Nested for Loop) 」と非常によく似ています。
+
+「ネストされたループ」を使用して「[ネストされたリスト](course://Data structures/Nested Lists) 」を構築するプログラムは次のとおりです:
+
+```python
+matrix = []
+
+for i in range(3):
+
+ # Append an empty sublist inside the list
+ matrix.append([])
+
+ for j in range(0, 10, 2):
+ matrix[i].append(j)
+
+print(matrix)
+```
+
+出力:
+```text
+[[0, 2, 4, 6, 8], [0, 2, 4, 6, 8], [0, 2, 4, 6, 8]]
+```
+
+「ネストされたリスト内包」表記を使用すると、同じことが 1行で実行できます:
+
+```python
+matrix = [[j for j in range(0, 10, 2)] for i in range(3)]
+print(matrix)
+```
+出力:
+```text
+[[0, 2, 4, 6, 8], [0, 2, 4, 6, 8], [0, 2, 4, 6, 8]]
+```
+
+### 課題
+
+各行(サブリスト)に `string` の **文字(characters)** 0〜9 が含まれるように、$10×10$ の `matrix` を作成します。
+リスト内包表記 (list comprehension) を使用して、1行のコードで課題を完了します。
+
+<div class='hint'>
+
+「課題の説明」ウィンドウの例に従ってください。範囲の 1つではなく、反復可能として `string` を使用する必要があります。
+
+</div>
+
diff -Naur "a/Loops/Nested for Loop/task.md" "b/Loops/Nested for Loop/task.md"
--- "a/Loops/Nested for Loop/task.md" 2022-04-06 14:37:38.927009808 +0900
+++ "b/Loops/Nested for Loop/task.md" 2022-04-06 14:38:43.351950339 +0900
@@ -1,48 +1,54 @@
-## Nested Loops
-
-A nested loop is a loop inside another loop.
-The inner loop is executed once for each iteration of the outer loop.
-
-```python
-adjectives = ["black", "stylish", "expensive"]
-clothes = ["jacket", "shirt", "boots"]
-
-for x in adjectives:
- for y in clothes:
- print(x, y)
-```
-Output:
-```text
-black jacket
-black shirt
-black boots
-stylish jacket
-stylish shirt
-stylish boots
-expensive jacket
-expensive shirt
-expensive boots
-```
-<details>
-
-Note that any type of loop can be nested inside another loop.
-For example, a [`while` loop](course://Loops/While loop) (see further) can be nested inside a `for` loop, or vice versa.
-</details>
-
-
-You are given a tic-tac-toe board of 3x3, your task is to print every position. Coordinates along each side
-are stored in the list `coordinates`. The output should be:
-```text
-1 x 1
-1 x 2
-1 x 3
-2 x 1
-...
-```
-and so on for every combination of coordinates.
-
-<div class="hint">
-
-In the nested `for` loop, iterate over the same list once again but using another variable name
-this time (`coordinate2`).
-</div>
\ ファイル末尾に改行がありません
+## ネストされたループ :(Nested Loops)
+
+ネストされたループは、別のループ内のループです。
+内側のループは、外側のループの反復ごとに 1回実行されます。
+
+```python
+adjectives = ["black", "stylish", "expensive"]
+clothes = ["jacket", "shirt", "boots"]
+
+for x in adjectives:
+ for y in clothes:
+ print(x, y)
+```
+出力:
+```text
+black jacket
+black shirt
+black boots
+stylish jacket
+stylish shirt
+stylish boots
+expensive jacket
+expensive shirt
+expensive boots
+```
+
+<details>
+
+どのタイプのループも別のループ内にネストできることに注意してください。
+例えば、 [`while` loop](course://Loops/While loop) (詳細を参照)は、`for` ループ内にネストできます。
+その逆も可能です。
+</details>
+
+3x3 の三目並べボードが与えられます。
+課題は、すべての位置を出力することです。
+各辺に沿った座標は、リスト `coordinates` に保存されます。
+
+出力は次のようになります:
+
+```text
+1 x 1
+1 x 2
+1 x 3
+2 x 1
+...
+```
+
+座標のすべての組み合わせについても同様です。
+
+<div class='hint'>
+
+ネストされた `for` ループで、同じリストをもう一度繰り返しますが、今回は別の変数名(`coordinate2`)を使用します。
+</div>
+
diff -Naur "a/Loops/While loop/task.md" "b/Loops/While loop/task.md"
--- "a/Loops/While loop/task.md" 2022-04-06 14:37:38.939009984 +0900
+++ "b/Loops/While loop/task.md" 2022-04-06 14:38:43.363950514 +0900
@@ -1,10 +1,12 @@
-## while loop
-
-A `while` loop is somewhat similar to an `if` statement: it executes some code if some
-condition is `True`. The key difference is that it will continue to execute indented
-code for as long as the condition is `True`. If the expression is `False`, the loop terminates.
-
-Print all squares from `1` to `9` `(1, 4, ... , 81)`. Use the `number` variable in a
-`while` loop.
-
-<div class='hint'>Make sure that <code>number</code> is strictly less than 10 in the condition.</div>
+## while ループ :(while loop)
+
+`while` ループは `if` ステートメントにいくぶん似ています: ある条件が `True` の場合にコードを実行します。
+主な違いは、条件が `True` である限り、インデントされたコードを実行し続けることです。
+
+式が `False` の場合、ループは終了します。
+
+ `1` から `9` `(1, 4, ... , 81)` までのすべての正方形を出力します。
+`while` ループで `number` 変数を使用します。
+
+<div class='hint'>条件で <code>number</code> が厳密に10未満であることを確認してください。</div>
+
diff -Naur "a/Modules and packages/Built-in modules/task.md" "b/Modules and packages/Built-in modules/task.md"
--- "a/Modules and packages/Built-in modules/task.md" 2022-04-06 14:37:38.967010394 +0900
+++ "b/Modules and packages/Built-in modules/task.md" 2022-04-06 14:38:43.387950863 +0900
@@ -1,28 +1,30 @@
-## Built-in modules
-
-Python comes with a [library of standard modules](https://docs.python.org/3/library/).
-
-Some modules are built into the interpreter; these provide access to operations that are
-not part of the core of the language but are nevertheless built in, either for efficiency
-or to provide access to operating system primitives, such as system calls.
-One particular module deserves some attention: `sys`, which is built into every Python
-interpreter. The variables `sys.ps1` and `sys.ps2` define the strings used as primary and
-secondary prompts if the interpreter is in the interactive mode:
-
-```text
->>> import sys
->>> sys.ps1
-'>>> '
->>> sys.ps2
-'... '
-```
-
-The variable `sys.path` is a list of strings that determines the interpreter’s search path
-for modules: see what it prints for you when you run the code of the task.
-
-Remember that you can use &shortcut:CodeCompletion; after a dot (.) to explore available
-methods of a module. You can read more about standard modules <a href="https://docs.python.org/3/tutorial/modules.html#standard-modules">here</a>.
-
-Print the current date using an imported built-in module `datetime`.
-
-<div class='hint'>Use the <code>datetime.datetime.today()</code> function.</div>
+## 内蔵モジュール :(Built-in modules)
+
+Python には、[標準モジュールのライブラリ](https://docs.python.org/3/library/) が付属しています。
+
+一部のモジュールはインタープリタに組み込まれています。これらは、言語のコアの一部ではないが、効率のため、またはシステムコールなどのオペレーティングシステム プリミティブへのアクセスを提供するために組み込まれている操作へのアクセスを提供します。
+
+1つの特定のモジュールは注意に値します: `sys` 。これはすべての Python インタープリターに組み込まれています。
+
+変数 ` sys.ps1` および `sys.ps2` は、インタプリタがインタラクティブモードの場合にプライマリおよびセカンダリプロンプトとして使用される文字列を定義します:
+
+```text
+>>> import sys
+>>> sys.ps1
+'>>> '
+>>> sys.ps2
+'... '
+```
+
+変数 `sys.path` は、モジュールのインタープリタの検索パスを決定する文字列のリストです。
+課題のコードを実行すると何が出力されるか、を確認してください。
+
+&shortcut :CodeCompletion; (コード補完機能)を使用できることを忘れないでください:
+ドット (.) の後に、モジュールの使用可能なメソッドを調べます。
+
+標準モジュールの詳細については、<a href="https://docs.python.org/3/tutorial/modules.html#standard-modules">こちら</a> をご覧ください。
+
+インポートされた組み込みモジュール `datetime` を使用して現在の日付を出力します。
+
+ <div class='hint'> <code>datetime.datetime.today()</code> 関数を使用します。</div>
+
diff -Naur "a/Modules and packages/Executing modules as scripts/task.md" "b/Modules and packages/Executing modules as scripts/task.md"
--- "a/Modules and packages/Executing modules as scripts/task.md" 2022-04-06 14:37:38.987010686 +0900
+++ "b/Modules and packages/Executing modules as scripts/task.md" 2022-04-06 14:38:43.407951155 +0900
@@ -1,66 +1,66 @@
-## Executing modules as scripts
-
-A Python module is a file containing executable statements as well as function or class definitions.
-These statements are executed the first time the module name is encountered in an `import` statement.
-The file name is the module name with the suffix .py appended. Within a module, the
-module’s name (as a string) is available as the value of the global variable `__name__`.
-
-
-When you run a module **directly** (that is, not by importing it into another one),
-the code in the module will be executed, just as if you imported it, but with
-`__name__` set to `"__main__"`.
-
-You can use `__name__` and `__main__` like this:
-
-```python
-if __name__ == "__main__":
- # Do something here
-```
-
-The statements inside this block will be executed only if the module is run directly and not through import
-into another module. For example, let's consider two files:
-
-main_program:
-```python
-import some_module
-
-print(f"main_program __name__ is: {__name__}")
-
-if __name__ == "__main__":
- print("main_program executed directly")
-else:
- print("main_program executed when imported")
-```
-
-some_module:
-```python
-print(f"some_module __name__ is: {__name__}")
-
-if __name__ == "__main__":
- print("some_module executed directly")
-else:
- print("some_module executed when imported")
-```
-
-Output after running `main_program`:
-```text
-some_module __name__ is: some_module
-some_module executed when imported
-main_program __name__ is: __main__
-main_program executed directly
-```
-
-Output after running `some_module`:
-```text
-some_module __name__ is: __main__
-some_module executed directly
-```
-
-Modify `task.py` and `some_module.py` so that when you run task.py, your output is as follows:
-
-```text
-This is a message from some_module.
-This is a message from __main__.
-This is a message from the function in the imported module.
-This should be printed ONLY when task.py is called directly.
-```
\ ファイル末尾に改行がありません
+## モジュールをスクリプトとして実行します :(Executing modules as scripts)
+
+Python モジュールは、実行可能ステートメントと関数またはクラスの定義を含むファイルです。
+
+これらのステートメントは、`import` ステートメントでモジュール名が最初に検出されたときに実行されます。
+ファイル名は、接尾辞 .py が追加されたモジュール名です。
+
+モジュール内では、モジュールの名前(文字列として)は、グローバル変数 `__name__` の値として使用できます。
+
+モジュールを**直接**(つまり、別のモジュールにインポートすることなく)実行すると、
+モジュール内のコードは、インポートした場合と同じように実行されますが、
+ `__name__` は `"__main__"` に設定されています。
+
+次のように `__name__` と `__main__` を使用できます:
+
+```python
+if __name__ == "__main__":
+ # Do something here
+```
+
+このブロック内のステートメントは、モジュールが直接実行され、別のモジュールへのインポートを介さない場合にのみ実行されます。例えば、2つのファイルについて考えてみましょう:
+
+main_program:
+```python
+import some_module
+
+print(f"main_program __name__ is: {__name__}")
+
+if __name__ == "__main__":
+ print("main_program executed directly")
+else:
+ print("main_program executed when imported")
+```
+
+some_module:
+```python
+print(f"some_module __name__ is: {__name__}")
+
+if __name__ == "__main__":
+ print("some_module executed directly")
+else:
+ print("some_module executed when imported")
+```
+
+`main_program` を実行した後の出力:
+```text
+some_module __name__ is: some_module
+some_module executed when imported
+main_program __name__ is: __main__
+main_program executed directly
+```
+
+`some_module` を実行した後の出力:
+```text
+some_module __name__ is: __main__
+some_module executed directly
+```
+`task.py`と`some_module.py`を変更して、task.py を実行したときに出力が次のようになるようにします:
+
+```text
+This is a message from some_module.
+This is a message from __main__.
+This is a message from the function in the imported module.
+This should be printed ONLY when task.py is called directly.
+```
+
diff -Naur "a/Modules and packages/From import/task.md" "b/Modules and packages/From import/task.md"
--- "a/Modules and packages/From import/task.md" 2022-04-06 14:37:38.975010511 +0900
+++ "b/Modules and packages/From import/task.md" 2022-04-06 14:38:43.395950980 +0900
@@ -1,45 +1,44 @@
-## from import
-
-One form of the import statement imports names `from` a module directly. This way, you
-can use the imported name without the `module_name` prefix. For example:
-
-```python
-from calculator import Add
-
-calc = Add() # name `Add` used directly without prefix `calculator`
-```
-
-This does not introduce the name of the module from which the imports are taken in the
-local symbol table (so in our example, `calculator` is not defined).
-
-There is even an option to import all names that a module defines:
-```python
-from calculator import *
-calc = Multiply()
-```
-This imports all names except those beginning with an underscore `_`.
-In most cases, Python programmers do not use this, since it introduces
-an unknown set of names into the interpreter, possibly hiding some things
-you have already defined.
-
-If the module name is followed by `as`, then the name following `as` is bound
-directly to the imported module:
-
-```python
-import my_module as mm
-mm.hello_world()
-```
-This is effectively importing the module in the same way that `import my_module` will
-do, with the only difference of it being available as `mm`. It can also be used
-when utilising `from` with similar effects:
-
-```python
-from calculator import Subtract as Minus
-```
-
-Import the `Calculator` class from `calculator` and create an instance of this class. Remember how to access it correctly in
-this case.
-
-
-<div class="hint">Note: The <code>Calculator</code> class should be called without a prefix because you
-imported it directly.</div>
+## インポート :(from import)
+
+import ステートメントの 1つの形式は、`from` の名前でモジュールから直接インポートします。
+このようにして、インポートされた `module_name` をプレフィックスなしで使用できます。
+
+例えば:
+
+```python
+from calculator import Add
+
+calc = Add() # name `Add` used directly without prefix `calculator`
+```
+
+これは、インポートが取得されるモジュールの名前をローカルシンボルテーブルに導入しません(したがって、この例では、 `calculator` は定義されていません)。
+
+モジュールが定義するすべての名前をインポートするオプションもあります:
+
+```python
+from calculator import *
+calc = Multiply()
+```
+
+これにより、アンダースコア`_`で始まる名前を除くすべての名前がインポートされます。
+ほとんどの場合、Python プログラマーはこれを使用しません。
+これは、未知の名前のセットをインタープリターに導入し、既に定義したものを隠す可能性があるためです。
+
+モジュール名の後に `as` が続く場合、`as` に続く名前はインポートされたモジュールに直接バインドされます:
+
+```python
+import my_module as mm
+mm.hello_world()
+```
+
+これは、 `import my_module` が行うのと同じ方法でモジュールを効果的にインポートしますが、唯一の違いは `mm` として使用できることです。同様の効果を持つ `from` を利用する場合にも使用できます:
+
+```python
+from calculator import Subtract as Minus
+```
+
+`calculator` から `Calculator` クラスをインポートし、このクラスのインスタンスを作成します。
+この場合、正しくアクセスする方法を覚えておいてください:
+
+<div class='hint'>注: この <code>Calculator</code> クラスは、直接インポートしたので、プレフィックスなしで呼び出す必要があります。</div>
+
diff -Naur "a/Modules and packages/Import module/task.md" "b/Modules and packages/Import module/task.md"
--- "a/Modules and packages/Import module/task.md" 2022-04-06 14:37:38.963010335 +0900
+++ "b/Modules and packages/Import module/task.md" 2022-04-06 14:38:43.383950805 +0900
@@ -1,31 +1,29 @@
-## Import module
-
-As your program gets longer, you may want to split it into several files for
-easier maintenance. You may also want to use a handy function that you’ve written
-in several programs without copying its definition into each of them.
-
-Modules in Python are simply Python files with the `.py` extension containing
-Python definitions and statements.
-Modules are imported from other modules using the `import` keyword
-and the file name without the extension `.py`.
-
-Let's say you wrote a script called `my_funcs.py` with a bunch of functions (`func1`, `func2`,
-etc.). Now, if you want to use those in another script that is placed in the same directory,
-you can do `import my_funcs`. This does not import the names of the functions defined in `my_funcs`
-directly, but using the module name, you can now access the functions, for example:
-```python
-my_funcs.func1()
-```
-
-Modules can import other modules. It is customary but not required to place all
-import statements at the beginning of a module.
-
-You can find out more about modules in Python by reading [this section](https://docs.python.org/3/tutorial/modules.html) of The Python Tutorial.
-
-In the code editor, import the module `calculator` and create an instance of the class `Calculator` (`calc`).
-Use the `add` method defined in `Calculator` in a loop to add up numbers from 0 to 99.
-
-<div class='hint'>Use the <code>import</code> keyword and the <code>calculator</code> reference.</div>
-<div class='hint'>Access the function from the module using syntax such as <code>module.function()</code>.</div>
-<div class="hint">Don't forget to provide the function with an argument.</div>
-
+## インポート モジュール :(Import module)
+
+プログラムが長くなると、メンテナンスを容易にするために、プログラムをいくつかのファイルに分割することをお勧めします。また、いくつかのプログラムで定義をコピーせずに、いくつかのプログラムで作成した便利な関数を使用することもできます。
+
+Python のモジュールは、Python の定義とステートメントを含む `.py` 拡張子を持つ単純な Python ファイルです。
+
+モジュールは、`import` キーワードと拡張子 `.py` のないファイル名を使用して他のモジュールからインポートされます。
+
+一連の関数( `func1`、` func2` など)を含む `my_funcs.py` というスクリプトを作成したとします。
+これで、同じディレクトリに配置されている別のスクリプトでそれらを使用する場合は、`import my_funcs` を実行できます。
+
+これは、 `my_funcs` で定義された関数の名前を直接インポートしませんが、モジュール名を使用して、次のように関数にアクセスできるようになります:
+
+```python
+my_funcs.func1()
+```
+モジュールは他のモジュールをインポートできます。
+慣例で行われていますが、すべてのインポートステートメントをモジュールの先頭に配置する必要はありません。
+
+Python チュートリアルの [このセクション](https://docs.python.org/3/tutorial/modules.html) を読むと、Python のモジュールについて詳しく知ることができます。
+
+コードエディタで、モジュール `calculator` をインポートし、クラス `Calculator` (`calc`) のインスタンスを作成します。
+
+ループ内の `Calculator` で定義された `add` メソッドを使用して、0 から 99 までの数値を合計します。
+
+<div class='hint'> <code>import</code> キーワードと <code>calculator</code> リファレンスを使用します。</div>
+<div class='hint'> <code>module.function()</code> などの構文を使用して、モジュールから関数にアクセスします。</div>
+<div class='hint'>関数に引数を指定することを忘れないでください。</div>
+
diff -Naur "a/Modules and packages/Packages/task.md" "b/Modules and packages/Packages/task.md"
--- "a/Modules and packages/Packages/task.md" 2022-04-06 14:37:38.983010628 +0900
+++ "b/Modules and packages/Packages/task.md" 2022-04-06 20:30:01.659610152 +0900
@@ -1,51 +1,47 @@
-## Packages
-
-Packages are a way of structuring Python’s module namespace by using “dotted module
-names”. For example, the module name `A.B` designates a submodule named `B` in a package
-named `A`. Just like the use of modules saves the authors of different modules from
-having to worry about each other’s global variable names, the use of dotted module
-names saves the authors of multi-module packages like [NumPy](https://numpy.org/)
-or [Pillow](https://pypi.org/project/Pillow/) from having to worry about each other’s
-module names.
-
-<div class="hint">The <code>__init__.py</code> files are required to make Python treat directories
-containing the file as packages. This prevents directories with a common name, such
-as <code>string</code>, from unintentionally hiding valid modules that occur later on the module search
-path. In the simplest case, <code>__init__.py</code> can just be an empty file.</div>
-
-Check out the packages `functions` and `classes` we've created. Users of the packages
-can import individual modules from the package, for example:
-
-```python
-import functions.greeting.hello
-```
-
-This loads the submodule `functions.greeting.hello`. It must be referenced with its full name:
-
-```python
-functions.greeting.hello.hello('Susan')
-```
-An alternative way of importing the submodule is:
-
-```python
-from functions.greeting import hello
-```
-
-This also loads the submodule `hello`, and makes it available without its package prefix,
-so it can be used as follows:
-
-```python
-hello.hello('Susan')
-```
-
-You can learn more about packages by reading <a href="https://docs.python.org/3/tutorial/modules.html#packages">this page</a> of Python Documentation.
-
-In the code editor, import the `official` module properly to make the last `print`
-statement work.
-
-In the second print statement, add a function call (find the right function) so that it prints a goodbye to `'Alex'`.
-
-<div class="hint">Access the module using syntax such as <code>package.subpackage.module</code>.</div>
-<div class="hint">Use syntax such as <code>import module as something</code>.</div>
-<div class="hint">Check out imports: there's one that might have the right function for the second task.
-Be careful when using it: the module is already imported with a specific name.</div>
+## パッケージ :(Packages)
+
+パッケージは、「点線のモジュール名」を使用してPython のモジュール名前空間を構造化する方法です。
+
+例えば、モジュール名 `A.B` は、`A` という名前のパッケージ内の `B` という名前のサブモジュールを指定します。
+
+モジュールを使用することで、さまざまなモジュールの作成者が互いのグローバル変数名について心配する必要がなくなるのと同様に、点線のモジュール名を使用すると、[NumPy](https://numpy.org/) のようなマルチモジュールパッケージの作成者を省略できます。または [Pillow](https://pypi.org/project/Pillow/) は、互いのモジュール名を気にする必要がありません。
+
+<code>__init__.py</code> ファイルは、Python でファイルを含むディレクトリをパッケージとして処理するために必要です。これにより、<code> string </code> などの一般名のディレクトリが、モジュール検索パスの後半で発生する歪んだモジュールを意図せずに非表示にするのを防ぎます。最も単純なケースでは、<code>__init__.py</code> は空のファイルにすることができます。</div>
+
+私たちが作成したパッケージ `functions` と `classes` をチェックしてください。
+パッケージのユーザーは、パッケージから個々のモジュールをインポートできます。
+
+例を示します:
+
+```python
+import functions.greeting.hello
+```
+
+これにより、サブモジュール `functions.greeting.hello` がロードされます。フルネームで参照する必要があります:
+
+```python
+functions.greeting.hello.hello('Susan')
+```
+
+サブモジュールをインポートする別の方法は次のとおりです:
+
+```python
+from functions.greeting import hello
+```
+
+これにより、サブモジュール `hello` もロードされ、パッケージプレフィックスなしで使用できるようになるため、次のように使用できます:
+
+```python
+hello.hello('Susan')
+```
+パッケージの詳細については、Python ドキュメントの <a href="https://docs.python.org/3/tutorial/modules.html#packages">このページ</a> をご覧ください。
+
+コードエディタで、 `official` モジュールを適切にインポートして、最後の `print` ステートメントを機能させます。
+
+2番目の print ステートメントで、関数呼び出しを追加して(適切な関数を見つけて)、`'Alex'` に別れを告げます。
+
+<div class='hint'><code>package.subpackage.module</code> などの構文を使用してモジュールにアクセスします。</div>
+<div class='hint'><code>import module as something</code> などの構文を使用します。</div>
+<div class='hint'>インポートを確認してください: 2番目の課題に適切な機能を備えている可能性のあるインポートがあります。
+使用するときは注意してください。モジュールはすでに特定の名前でインポートされています。</div>
+
diff -Naur a/README.md b/README.md
--- a/README.md 2022-04-06 14:37:38.991010745 +0900
+++ b/README.md 2022-04-06 14:38:43.411951213 +0900
@@ -1,14 +1,12 @@
-# Introduction to Python course (Educational Products version) [](https://confluence.jetbrains.com/display/ALL/JetBrains+on+GitHub)
-<p>This is an introductory Python course by JetBrains Educational Products.
- The target audience are the people with little or no experience in programming who
- would like to start learning Python.</p>
-
- <p>In this course, you will learn about the basics, such as variables and operations
- with them, strings and other data structures, boolean operators, conditions, control
- flow, and so on. You will try implementing loops, functions, and classes, as well as
- using parts of your code as imported modules, and working with text files.</p>
-
- <p>Have fun and good luck!</p>
-
- <p>P.S. Want to contribute? Feel free to send a pull request to this course’s
- <a href=”https://github.com/jetbrains-academy/introduction_to_python”>git repo</a>.</p>
+# 「Introduction to Python」コースの紹介(教育製品バージョン)[](https://confluence.jetbrains.com/display/ALL/JetBrains+on+GitHub)
+
+<p>これは、JetBrains Educational Products によるPython の入門コースです。
+対象読者は、プログラミングの経験がほとんどまたはまったくない、Python の学習を開始したい人々です。</p>
+
+<p>このコースでは、変数とその操作、文字列とその他のデータ構造、ブール演算子、条件、制御フローなどの基本について学習します。ループ、関数、クラスを実装し、コードの一部をインポートされたモジュールとして使用し、テキストファイルを操作してみます。</p>
+
+<p>楽しんで頑張ってください!</p>
+
+<p>P.S. 貢献したいですか?このコースにプルリクエストを送信してください
+<a href=”https://github.com/jetbrains-academy/introduction_to_python”>git リポジトリ</a>.</p>
+
diff -Naur "a/Strings/Basic string methods/task.md" "b/Strings/Basic string methods/task.md"
--- "a/Strings/Basic string methods/task.md" 2022-04-06 14:37:39.023011212 +0900
+++ "b/Strings/Basic string methods/task.md" 2022-04-06 14:38:43.459951913 +0900
@@ -1,12 +1,17 @@
-## Basic string methods
-
-There are many useful string methods. For instance, you can use the `lower()` method to get
-rid of any capitalization in your strings. The `upper()` method is used to make a string
-uppercase. To call any string method, type a dot after the string (or a variable containing
-the string) and the method name after it, e.g., `"John".upper()`. In PyCharm, you can
-explore all available string methods by using the &shortcut:CodeCompletion; shortcut after the dot.
-Detailed information about all string methods can be found <a href="https://docs.python.org/3/library/stdtypes.html#string-methods">here</a>.
-
-Print `monty_python` in upper case using an appropriate string method.
-
-<div class='hint'>Pay attention to how the <code>lower()</code> method is used in our code.</div>
+## 基本的な文字列メソッド :(Basic string methods)
+
+多くの便利な文字列メソッドがあります。
+
+例えば、 `lower()` メソッドを使用して、文字列の大文字と小文字を削除できます。
+`upper()` メソッドは、文字列を大文字にするために使用されます。
+
+文字列メソッドを呼び出すには、文字列(または文字列を含む変数)の後にドットを入力し、その後にメソッド名を入力します。(例: `"John".upper()`)
+
+PyCharm では、ドットを入力した後のショートカット( &shortcut:CodeCompletion; )を使用して、使用可能なすべての文字列メソッドを調べることができます。
+
+すべての文字列メソッドの詳細については、<a href="https://docs.python.org/3/library/stdtypes.html#string-methods">こちら</a> をご覧ください。
+
+適切な文字列メソッドを使用して、大文字で `monty_python` を出力します。
+
+<div class='hint'>コードで <code>lower()</code> メソッドがどのように使用されているかに注意してください。</div>
+
diff -Naur "a/Strings/Character escaping/task.md" "b/Strings/Character escaping/task.md"
--- "a/Strings/Character escaping/task.md" 2022-04-06 14:37:39.019011154 +0900
+++ "b/Strings/Character escaping/task.md" 2022-04-06 14:38:43.455951855 +0900
@@ -1,27 +1,34 @@
-## Character escaping
-
-Backslash is used to escape special symbols, such as single or double quotation marks,
-for example, `"It\'s me"` or `"She said \"Hello\""`. If you need to actually type the <code>\\</code>
-character as part of your string, you will need to escape it too. For example, here's how
-you print a single backslash:
-
-```python
-print('\\')
-```
-
-The special symbol `'\n'` is used to add a line break to a string, while `'\t'` means tabulation.
-
-Quotes have special meanings, and they can be escaped with a backslash too.
-If you need to print quotes inside a string, use a different kind of quotes: single quotation
-marks may be used in a double-quoted string without escaping, and vice versa. Also, as a side note, it is a good
-idea to pick your favorite kind of quotes and use them consistently.
-
-You can learn more about escaping from <a href="https://docs.python.org/3/reference/lexical_analysis.html#string-and-bytes-literals">this section</a> of Python Documentation.
-
-Print out the following text using one string:
-```text
-The name of this ice cream is "Sweet'n'Tasty"
-```
-
-
-<div class='hint'>Use the backslash to escape quotes.</div>
+## キャラクターエスケープ :(Character escaping)
+
+バックスラッシュは、一重引用符や二重引用符などの特殊記号をエスケープするために使用されます。
+
+例えば、`"It\'s me"`(それは私です)、または `"She said \"Hello\""` (彼女は「こんにちは」と言った)などです。
+
+文字列の一部として実際に <code>\\</code> 文字を入力する必要がある場合は、それもエスケープする必要があります。
+
+例えば、単一の円記号を印刷する方法は次のとおりです:
+
+```python
+print('\\')
+```
+
+特殊記号 `'\n'` は文字列に「改行」を追加するために使用され、`'\t'` は「集計」を意味します。
+
+引用符には特別な意味があり、バックスラッシュを使用してエスケープすることもできます。
+
+文字列内に引用符を印刷する必要がある場合は、別の種類の引用符を使用してください。
+
+二重引用符で囲まれた文字列では、エスケープせずに一重引用符を使用できます。その逆も可能です。
+
+また、補足として、お気に入りの種類の引用符を選び、それらを一貫して使用することをお勧めします。
+
+エスケープの詳細については、Pythonドキュメントの <a href="https://docs.python.org/3/reference/lexical_analysis.html#string-and-bytes-literals">このセクション</a> をご覧ください。
+
+1つの文字列を使用して次のテキストを出力します:
+
+```text
+The name of this ice cream is "Sweet'n'Tasty"
+```
+
+<div class='hint'>バックスラッシュを使用して引用符をエスケープします。</div>
+
diff -Naur a/Strings/Concatenation/task.md b/Strings/Concatenation/task.md
--- a/Strings/Concatenation/task.md 2022-04-06 14:37:38.995010803 +0900
+++ b/Strings/Concatenation/task.md 2022-04-06 14:38:43.415951271 +0900
@@ -1,8 +1,10 @@
-## Concatenation
-
-Remember that some arithmetic operations can also apply to non-numeric types?
-Combining two strings using the `+` symbol is called concatenation.
-
-Use the `hello` and `world` variables to get a string `"Hello World"`.
-
-<div class='hint'>Use chained concatenation and a single-space string <code>" "</code>.</div>
+## 連結 :(Concatenation)
+
+一部の算術演算は非数値型にも適用できることを覚えていますか?
+
+`+` 記号を使用して 2つの文字列を組み合わせると、「連結」と呼ばれます。
+
+`hello` 変数と `world` 変数を使用して、文字列 `"Hello World"` を取得します。
+
+<div class='hint'>連鎖連結と単一スペース文字列 <code>" "</code> を使用します。</div>
+
diff -Naur a/Strings/F-strings/task.md b/Strings/F-strings/task.md
--- a/Strings/F-strings/task.md 2022-04-06 14:37:39.027011271 +0900
+++ b/Strings/F-strings/task.md 2022-04-06 14:38:43.471952088 +0900
@@ -1,36 +1,36 @@
-## Formatted string literals
-
-A formatted string literal, or an f-string, is a string literal that is prefixed
-with 'f' or 'F'. These strings may contain replacement fields, which are
-expressions delimited by curly braces `{}`.
-
-The parts of the string outside curly braces are treated literally.
-Escape sequences are decoded like in ordinary string literals.
-Replacement expressions can contain line breaks (e.g., in triple-quoted strings),
-but they cannot contain comments. Each expression is evaluated in the context
-where the formatted string literal appears, in order from left to right.
-
-Here are some examples:
-```python
-name = "Fred"
-f"He said his name is {name}."
-```
-```text
-'He said his name is Fred.'
-```
-
-There are more fancy things you can do in f-strings, for example:
-```python
-f"{name.lower()} is funny."
-```
-
-```text
-'fred is funny.'
-```
-For more information about formatted string literals you can refer to <a href="https://docs.python.org/3/reference/lexical_analysis.html#formatted-string-literals">Python Docs</a>.
-
-Try creating an f-string yourself. Also try running the code to see what it prints.
-
-<div class="hint">The value assigned to the <code>name</code> variable has to be a string, so it needs to be in quotes,
-like so: <code>'Max'</code>.</div>
-
+## フォーマットされた文字列リテラル :(Formatted string literals)
+
+フォーマットされた文字列リテラル、または Fストリング (f-string) は、接頭辞 'f' または 'F' が付いた文字列リテラルです。これらの文字列には、中括弧 `{}` で区切られた式である置換フィールドが含まれる場合があります。
+
+中括弧の外側の文字列の部分は文字通り扱われます。
+エスケープシーケンスは、通常の文字列リテラルのようにデコードされます。
+置換式には改行を含めることができますが(トリプルクォート文字列など)、コメントを含めることはできません。
+各式は、フォーマットされた文字列リテラルが表示されるコンテキストで、左から右の順に評価されます。
+
+いくつかの例を示します:
+
+```python
+name = "Fred"
+f"He said his name is {name}."
+```
+```text
+'He said his name is Fred.'
+```
+
+例えば、Fストリングで実行できるよりも凝ったことができます:
+
+```python
+f"{name.lower()} is funny."
+```
+
+```text
+'fred is funny.'
+```
+
+フォーマットされた文字列リテラルの詳細については、<a href="https://docs.python.org/3/reference/lexical_analysis.html#formatted-string-literals"> Python Docs</a> を参照してください。
+
+自分で、Fストリングを作成してみてください。
+また、コードを実行して、何が出力されるかを確認してください。
+
+<div class='hint'> <code>name</code> 変数に割り当てられる値は文字列である必要があるため、<code>'Max'</code> のように引用符で囲む必要があります。</div>
+
diff -Naur "a/Strings/In operator/task.md" "b/Strings/In operator/task.md"
--- "a/Strings/In operator/task.md" 2022-04-06 14:37:39.015011095 +0900
+++ "b/Strings/In operator/task.md" 2022-04-06 14:38:43.443951680 +0900
@@ -1,8 +1,8 @@
-## In operator
-
-If you want to check whether a string contains a specific letter or a substring,
-you can use the `in` keyword.
-
-Check if there is `"ice"` in `"ice cream"` and assign the result to the variable `contains`.
-
-<div class="hint">Use the <code>in</code> operator.</div>
+## In 演算子 :(In operator)
+
+文字列に特定の文字または部分文字列が含まれているかどうかを確認する場合は、`in` キーワードを使用できます。
+
+`"ice cream"`(アイスクリーム)に `"ice"`(アイス)があるかどうかを確認し、結果を変数 `contains` に割り当てます。
+
+<div class='hint'> <code>in</code> 演算子を使用します。</div>
+
diff -Naur "a/Strings/String formatting/task.md" "b/Strings/String formatting/task.md"
--- "a/Strings/String formatting/task.md" 2022-04-06 14:37:39.027011271 +0900
+++ "b/Strings/String formatting/task.md" 2022-04-06 14:38:43.463951971 +0900
@@ -1,19 +1,16 @@
-## String formatting
-
-The `%` operator after a string is used to combine the string with variables.
-The `%` operator will replace `%s` in a string with the string variable that
-comes after it. The `%d` special symbol is used as a placeholder for numeric
-or decimal values.
-
-> <i><b>Note</b>: The formatting operations described here exhibit a variety
-> of quirks that lead to a number of common errors.
-> Using the newer formatted string literals (see [further](course://Strings/F-strings)),
-> the <code><a href="https://docs.python.org/3/library/stdtypes.html#str.format">str.format()</a></code>
-> interface, or <a href="https://docs.python.org/3/library/string.html#template-strings">template strings</a> may help avoid these errors.
-> Each of these alternatives provides their own trade-offs and benefits of
-> simplicity, flexibility, and/or extensibility.</i>
-
-Tell PyCharm how old you are (using digits).
-
-<div class='hint'>Use the <code>%d</code> special symbol.</div>
-<div class='hint'>How old are you?</div>
+## 文字列のフォーマット :(String formatting)
+
+文字列の後の`%`演算子は、文字列を変数と組み合わせるために使用されます。
+`%` 演算子は、文字列内の `%s` をその後に続く文字列変数に置き換えます。
+`%d` 特殊記号は、数値または 10進値のプレースホルダーとして使用されます。
+
+> <i><b>注</b>: ここで説明する書式設定操作には、さまざまな癖があり、多くの一般的なエラーが発生します。
+> 新しい形式の文字列リテラル([さらに](course://Strings/F-strings) を参照)を使用して、<code><a href="https://docs.python.org/3/library/stdtypes.html#str.format">str.format()</a></code> インターフェース、
+> または <a href="https://docs.python.org/3/library/string.html#template-strings"> テンプレート文字列</a>は、これらのエラーを回避するのに役立つ場合があります。
+> これらの選択肢はそれぞれ、単純さ、柔軟性、および拡張性という独自のトレードオフと利点を提供します。</i>
+
+PyCharm にあなたが何歳かを伝えます(数字を使用)。
+
+<div class='hint'> <code>%d</code> 特殊記号を使用します。</div>
+<div class='hint'>あなたは何歳ですか?</div>
+
diff -Naur "a/Strings/String indexing/task.md" "b/Strings/String indexing/task.md"
--- "a/Strings/String indexing/task.md" 2022-04-06 14:37:39.003010920 +0900
+++ "b/Strings/String indexing/task.md" 2022-04-06 14:38:43.427951447 +0900
@@ -1,14 +1,17 @@
-## String indexing
-
-You can access a character in a string if you know its position. For example,
-`str[index]` will yield the character at position `index` in the string `str`.
-Note that string indexing always starts at `0`. `index` raises `ValueError`
-when `x` is not found in the string.
-
-Indices may also be negative numbers if you need to start counting from the right
-(i.e., from the end of your string).
-Note that since `-0` is the same as `0` , negative indices start from `-1`.
-
-Use the index operator to get the letter `"P"` from `"Python"` .
-
-<div class="hint">Note that indices start with 0.</div>
+## 文字列のインデックス作成 :(String indexing)
+
+文字列の位置がわかっている場合は、文字列内の文字にアクセスできます。
+
+例えば、 `str[index]` は、文字列 `str` の位置 `index` にある文字を生成します。
+
+文字列のインデックス作成は常に `0` から始まることに注意してください。
+文字列に `x` が見つからない場合、`index` は `ValueError` を発生させます。
+
+右から(つまり、文字列の終わりから)カウントを開始する必要がある場合は、インデックスが負の数になることもあります。
+
+`-0` は `0` と同じであるため、負のインデックスは `-1` から始まることに注意してください。
+
+インデックス演算子を使用して、`"Python"` から文字 `"P"` を取得します。
+
+<div class='hint'>インデックスは 0 で始まることに注意してください。</div>
+
diff -Naur "a/Strings/String length/task.md" "b/Strings/String length/task.md"
--- "a/Strings/String length/task.md" 2022-04-06 14:37:39.015011095 +0900
+++ "b/Strings/String length/task.md" 2022-04-06 14:38:43.447951738 +0900
@@ -1,12 +1,11 @@
-## String length
-
-The `len()` method is used to count how many characters a string contains.
-
-Get the first half of the string stored in the variable `phrase`.
-Note: when getting the index, remember about type conversion.
-
-<div class='hint'>You need to obtain a slice of the string from its start
-to the middle point.</div>
-
-<div class='hint'>Get the middle index by dividing the string length by 2. The
-division result needs to be an integer.</div>
+## 文字列の長さ :(String length)
+
+`len()` メソッドは、文字列に含まれる文字数をカウントするために使用されます。
+
+変数 `phrase` に格納されている文字列の前半を取得します。
+注: インデックスを取得するときは、型変換について覚えておいてください。
+
+<div class='hint'>文字列の最初から中間点までのスライスを取得する必要があります。</div>
+
+<div class='hint'>文字列の長さを 2で割って、中間のインデックスを取得します。除算の結果は整数である必要があります。</div>
+
diff -Naur "a/Strings/String multiplication/task.md" "b/Strings/String multiplication/task.md"
--- "a/Strings/String multiplication/task.md" 2022-04-06 14:37:38.999010862 +0900
+++ "b/Strings/String multiplication/task.md" 2022-04-06 14:38:43.419951330 +0900
@@ -1,13 +1,13 @@
-## String multiplication
-
-Python also supports string-by-number multiplication (but not the other way around!).
-
-Use `not_yet_food` variable to get a food name stored in `food`
-variable.
-
-<div class="hint">
-
-`"cous"` repeated `2` times gives you `"couscous"`.
-</div>
-
-<div class='hint'>Use multiplication.</div>
+## 文字列の乗算 :(String multiplication)
+
+Python は、文字列ごとの乗算もサポートしています(ただし、その逆はサポートされていません)。
+
+`not_yet_food` 変数を使用して、`food` 変数に保存されている食品名を取得します。
+
+<div class='hint'>
+
+`"クス"`を`2`回繰り返すと`"クスクス"`になります。
+</div>
+
+<div class='hint'>乗算を使用します。</div>
+
diff -Naur "a/Strings/String negative indexing/task.md" "b/Strings/String negative indexing/task.md"
--- "a/Strings/String negative indexing/task.md" 2022-04-06 14:37:39.007010979 +0900
+++ "b/Strings/String negative indexing/task.md" 2022-04-06 14:38:43.431951505 +0900
@@ -1,8 +1,8 @@
-## String negative indexing
-
-As we said, you can use negative indices to count characters ‘backwards’ starting
-from the end of a string.
-
-Use a negative index to get the `'!'` sign from `long_string`.
-
-<div class='hint'>Use a negative index.</div>
+## 文字列の負のインデックス :(String negative indexing)
+
+すでに述べたように、負のインデックスを使用して、文字列の末尾から「逆方向」に文字をカウントできます。
+
+負のインデックスを使用して、`long_string` から `'!'` 記号を取得します。
+
+<div class='hint'>負のインデックスを使用します。</div>
+
diff -Naur "a/Strings/String slicing/task.md" "b/Strings/String slicing/task.md"
--- "a/Strings/String slicing/task.md" 2022-04-06 14:37:39.011011037 +0900
+++ "b/Strings/String slicing/task.md" 2022-04-06 14:38:43.435951563 +0900
@@ -1,29 +1,32 @@
-## Slicing
-
-Slicing is used to extract multiple characters (a substring) from a string.
-Its syntax is similar to that of indexing, but instead of just one index you use
-two indices (numbers) separated by a colon, e.g., `str[ind1:ind2]`. These two
-indices correspond to the start and the end of the substring. Note that the symbol
-with the index `ind1` will be included, while the symbol with the index `ind2` – won't.
-
-Here's a visual on how slicing works in Python:
-
-```text
-+---+---+---+---+---+---+
-| P | y | t | h | o | n |
-+---+---+---+---+---+---+
-0 1 2 3 4 5 6
--6 -5 -4 -3 -2 -1
-```
-
-##### Example
-<pre><code>
-str[start:end] # items start through end-1
-str[start:] # items start through the rest of the array
-str[:end] # items from the beginning through end-1
-str[:] # a copy of the whole array
-</code></pre>
-
-Use slicing to get `"Python"` from the `monty_python` variable.
-
-<div class='hint'>You can leave one of the indices empty.</div>
+## スライス :(Slicing)
+
+スライスは、文字列から複数の文字(サブ文字列)を抽出するために使用されます。
+
+その構文はインデックス作成の構文と似ていますが、1つのインデックスの代わりに、コロンで区切られた 2つのインデックス(数値)を使用します。(例: `str[ind1:ind2]`)
+
+これらの 2つのインデックスは、部分文字列の開始と終了に対応します。
+インデックスが `ind1` のシンボルは含まれますが、インデックスが `ind2` のシンボルは含まれないことに注意してください。
+
+Pythonでスライスがどのように機能するかを視覚的に示します:
+
+
+```text
++---+---+---+---+---+---+
+| P | y | t | h | o | n |
++---+---+---+---+---+---+
+0 1 2 3 4 5 6
+-6 -5 -4 -3 -2 -1
+```
+
+##### 例:
+<pre><code>
+str[start:end] # アイテムは最初から最後-1まで
+str[start:] # アイテムは配列の残りの部分から始まります
+str[:end] # 最初から最後-1 までのアイテム
+str[:] # 配列全体のコピー
+</code></pre>
+
+スライスを使用して、`monty_python` 変数から `"Python"` を取得します。
+
+<div class='hint'>インデックスの 1つを空のままにしておくことができます。</div>
+
diff -Naur "a/Variables/Arithmetic operators/task.md" "b/Variables/Arithmetic operators/task.md"
--- "a/Variables/Arithmetic operators/task.md" 2022-04-06 14:37:39.051011622 +0900
+++ "b/Variables/Arithmetic operators/task.md" 2022-04-06 14:38:43.503952554 +0900
@@ -1,40 +1,39 @@
-## Arithmetic operators
-
-Just as in any other programming language, the addition ( `+` ), subtraction ( `-` ),
-multiplication ( `*` ), and division ( `/` ) operators can be used with numbers. In
-addition, Python has the power ( `**` ), modulo ( `%` ), and floor division ( `//` ) operators.
-
-- The `*` (multiplication) operator yields the product of its arguments. The arguments must
-either both be numbers, or one argument must be an integer and the other – a sequence.
-
-- The `/` (division) and `//` (floor division) operators yield the quotient of their arguments.
- Division of integers yields a float, while floor division of integers results in an integer.
-
-- The `%` (modulo) operator yields the remainder of the division of the first argument by the second.
-
-- The `+` (addition) operator yields the sum of its arguments. The arguments must either both
- be numbers or both be sequences of the same type.
-
-- The `-` (subtraction) operator yields the difference of its arguments.
-
-The binary arithmetic operations have the conventional priority levels. Note that
-some of these operations also apply to certain non-numeric types.
-
-You can read more on this topic <a href="https://docs.python.org/3/reference/expressions.html#binary-arithmetic-operations">here</a>.
-### Task
- - Divide the value stored in `number` by `2`.
- - Calculate a remainder of such a division.
- - Multiply the division result by `2`.
- - Add the division remainder to the multiplication result.
- - Subtract the multiplication result from the number.
- - Perform a floor division of `number` by 2.
- - Raise the `multiplication_result` to the power of 3
-
-<div class='hint'>First, use the <code>/</code> operator.</div>
-<div class='hint'>Then use the <code>%</code> operator.</div>
-
-<div class='hint'>Then use the <code>*</code> operator.</div>
-
-<div class='hint'>Then use the <code>+</code> operator.</div>
-
-<div class='hint'>Then use the <code>-</code> operator.</div>
+## 算術演算子 :(Arithmetic operators)
+
+他のプログラミング言語と同じように、加算( `+` )、減算( `-` )、
+乗算( `*` )および除算( `/` )演算子は、数値とともに使用できます。
+さらに、Python には、累乗( `**` )、モジュロ( `%` )、およびフロア分割(`//` )演算子があります。
+
+- `*`(乗算)演算子は、その引数の積を生成します。
+引数は両方とも数値であるか、一方の引数が整数でもう一方がシーケンスである必要があります。
+
+- `/`(除算)および `//`(床除算)演算子は、引数の商を生成します。
+整数の除算はfloatを生成し、整数のフロア除算は整数を生成します。
+
+- `%`(モジュロ)演算子は、最初の引数を2番目の引数で除算した余りを返します。
+
+- `+`(加算)演算子は、その引数の合計を生成します。
+引数は、両方が数値であるか、両方が同じタイプのシーケンスである必要があります。
+
+- `-`(減算)演算子は、その引数の差を生成します。
+
+2進算術演算には、従来の優先度レベルがあります。
+これらの操作の一部は、特定の非数値タイプにも適用されることに注意してください。
+
+このトピックの詳細については、<a href="https://docs.python.org/3/reference/expressions.html#binary-arithmetic-operations">こちら</a>をご覧ください。
+
+### 課題
+- `number` に格納されている値を `2` で割ります。
+- そのような除算の余りを計算します。
+- 除算結果に `2` を掛けます。
+- 除算の余りを乗算結果に追加します。
+- 数値から乗算結果を減算します。
+- `number` を 2 でフロア分割します。
+- `multiplication_result` を 3 の累乗に上げます。
+
+<div class='hint'>まず、<code>/</code> 演算子を使用します。</div>
+<div class='hint'>次に、<code>%</code> 演算子を使用します。</div>
+<div class='hint'>次に、<code>*</code> 演算子を使用します。</div>
+<div class='hint'>次に、<code>+</code> 演算子を使用します。</div>
+<div class='hint'>次に、<code>-</code> 演算子を使用します。</div>
+
diff -Naur a/Variables/Assignments/task.md b/Variables/Assignments/task.md
--- a/Variables/Assignments/task.md 2022-04-06 14:37:39.055011680 +0900
+++ b/Variables/Assignments/task.md 2022-04-06 14:38:43.511952671 +0900
@@ -1,11 +1,12 @@
-## Assignments
-
-An augmented assignment is a single statement combining a binary operation and an
-assignment statement, such as `+=`, `-=`, etc.
-
-An augmented assignment expression like `x += 1` can be rewritten as `x = x + 1` to achieve a similar effect.
-You can read more about this <a href="https://docs.python.org/3/reference/simple_stmts.html#augmented-assignment-statements">here</a>.
-### Task
-Use an augmented assignment to add `5` to `number` and update the variable.
-
-<div class='hint'>Use the <code>+=</code> operator.</div>
+## 割り当て :(Assignments)
+
+拡張代入は、二項演算と代入ステートメントを組み合わせた単一のステートメントです( `+=`、 `-=` など)。
+
+`x += 1` のような拡張代入式は、`x = x + 1` と書き直して、同様の効果を得ることができます。
+この <a href="https://docs.python.org/3/reference/simple_stmts.html#augmented-assignment-statements">こちら </a> について詳しく読むことができます。
+
+### 課題
+拡張代入を使用して `5` を `number` に追加し、変数を更新します。
+
+<div class='hint'> <code>+=</code> 演算子を使用します。</div>
+
diff -Naur "a/Variables/Boolean operators/task.md" "b/Variables/Boolean operators/task.md"
--- "a/Variables/Boolean operators/task.md" 2022-04-06 14:37:39.055011680 +0900
+++ "b/Variables/Boolean operators/task.md" 2022-04-06 14:38:43.515952729 +0900
@@ -1,16 +1,14 @@
-## Boolean operators
-
-Boolean is a type of value that can only be `True` or `False`. The `==` (equality) operator
-compares two variables and checks whether they are equal.
-
-### Task
- - Check whether the variable `two` is equal to `three`.
- - Check if the variable `is_equal` has a deceiving name.
- - Check if the variable `is_false` does indeed contain a lie.
-
-
-<div class='hint'>Use the <code>==</code> operator.</div>
-
-<div class='hint'>Use the <code>True</code> value.</div>
-
-<div class='hint'>Use the <code>False</code> value.</div>
+## ブール演算子 :(Boolean operators)
+
+ブール値は、`True`または`False`のみが可能な値のタイプです。
+ `==`(等式)演算子は 2つの変数を比較し、それらが等しいかどうかをチェックします。
+
+### 課題
+- 変数 `two` が `three` と等しいかどうかを確認します。
+- 変数 `is_equal` に不正な名前が付いているかどうかを確認します。
+- 変数 `is_false` に実際に嘘が含まれているかどうかを確認します。
+
+<div class='hint'> <code>==</code> 演算子を使用します。</div>
+<div class='hint'> <code>True</code> 値を使用します。</div>
+<div class='hint'> <code>False</code> 値を使用します。</div>
+
diff -Naur "a/Variables/Comparison operators/task.md" "b/Variables/Comparison operators/task.md"
--- "a/Variables/Comparison operators/task.md" 2022-04-06 14:37:39.063011797 +0900
+++ "b/Variables/Comparison operators/task.md" 2022-04-06 14:38:43.519952787 +0900
@@ -1,39 +1,38 @@
-## Comparison operators
-
-Python has many types of comparison operators, including:
-- `<` less than
-
-- `>` greater than
-
-- `==` equal
-
-- `>=` greater or equal
-
-- `<=` less or equal
-
-- `!=` not equal
-
-The operators compare the values of two objects. The objects do not need
-to have the same type.
-
-
-All comparison operations in Python have the same priority, which is lower than
-that of any arithmetic, shifting or bitwise operation. Comparisons yield boolean
-values: either `True` or `False`. Comparisons can be chained arbitrarily, and
-expressions like `a < b < c` have the
-conventional mathematical meaning. Read more on comparisons <a href="https://docs.python.org/3/reference/expressions.html#comparisons">here</a>.
-### Task
- - Check whether the value of the variable `three` is strictly greater than the value of
-the variable `two`.
- - Check whether the value of the variable `one` is strictly smaller than the value of
- the variable `three`.
- - Check whether the value of the variable `three` is strictly greater than both the value of
- the variable `two` and the value of the variable `one`.
- - Check if the variable `one` is not equal to the variable `two`.
- - Check if the variable `thee` equals itself.
-
-<div class='hint'>Use the <code>></code> operator.</div>
-<div class='hint'>Use the <code><</code> operator.</div>
-<div class='hint'>Use both the <code>></code> and the <code><</code> operators.</div>
-<div class='hint'>Use the <code>!=</code> operator.</div>
-<div class='hint'>Use the <code>==</code> operator.</div>
+## 比較演算子 :(Comparison operators)
+
+Python には、次のような多くの種類の比較演算子があります:
+
+- `<` 未満
+
+- `>` より大きい
+
+- `==` 等しい
+
+- `>=` 以上
+
+- `<=` 以下
+
+- `!=` 等しくない
+
+演算子は、2つのオブジェクトの値を比較します。
+オブジェクトは同じタイプである必要はありません。
+
+Python のすべての比較演算の優先度は同じであり、算術演算、シフト演算、またはビット演算の優先度よりも低くなっています。比較すると、ブール値(`True` または `False`)が生成されます。
+
+比較は任意に連鎖させることができ、`a <b <c` のような式は、従来の数学的意味を持っています。
+
+比較の詳細については、 <a href="https://docs.python.org/3/reference/expressions.html#comparisons">こちら</a> をご覧ください。
+
+### 課題
+- 変数 `three` の値が変数 `two` の値よりも厳密に大きいかどうかを確認します。
+- 変数 `one` の値が変数 `three` の値よりも厳密に小さいかどうかを確認します。
+- 変数 `three` の値が、変数 `two` の値と変数 `one` の値の両方よりも厳密に大きいかどうかを確認します。
+- 変数 `one` が変数 `two` と等しくないかどうかを確認します。
+- 変数 `thee` がそれ自体と等しいかどうかを確認します。
+
+<div class='hint'> <code>></code> 演算子を使用します。</div>
+<div class='hint'> <code><</code> 演算子を使用します。</div>
+<div class='hint'> <code>></code> 演算子と <code><</code> 演算子の両方を使用します。</div>
+<div class='hint'> <code>!=</code>演算子を使用します。 </div>
+<div class='hint'> <code>==</code> 演算子を使用します。</div>
+
diff -Naur "a/Variables/Type conversion/task.md" "b/Variables/Type conversion/task.md"
--- "a/Variables/Type conversion/task.md" 2022-04-06 14:37:39.043011505 +0900
+++ "b/Variables/Type conversion/task.md" 2022-04-06 14:38:43.495952438 +0900
@@ -1,10 +1,15 @@
-## Type conversion
-
-There are several built-in functions that let you convert one data type into another.
-These functions return a new object representing the converted value. `int(x)`
-converts `x` into an integer. `float(x)` converts `x` into a floating-point number. `str(x)`
-converts object `x` into a string representation.
-### Task
-Convert `float_number` into an integer.
-
-<div class="hint">Use the <code>int()</code> function.</div>
+## 型変換 :(Type conversion)
+
+あるデータ型を別のデータ型に変換できる組み込み関数がいくつかあります。
+これらの関数は、変換された値を表す新しいオブジェクトを返します。
+
+`int(x)` は `x` を整数に変換します。
+`float(x)` は `x` を浮動小数点数に変換します。
+ `str(x)` は、オブジェクト `x` を文字列表現に変換します。
+
+### 課題
+
+`float_number` を整数に変換します。
+
+<div class='hint'> <code>int()</code> 関数を使用します。</div>
+
diff -Naur "a/Variables/Undefined variable/task.md" "b/Variables/Undefined variable/task.md"
--- "a/Variables/Undefined variable/task.md" 2022-04-06 14:37:39.039011446 +0900
+++ "b/Variables/Undefined variable/task.md" 2022-04-06 14:38:43.483952263 +0900
@@ -1,12 +1,39 @@
-## Undefined variable
-
-Variable names may only contain Latin letters, digits, and/or the underscore
-character, and they cannot start with a digit. They also cannot be any of the
-reserved <a href="https://docs.python.org/3/reference/lexical_analysis.html#keywords">keywords</a>.
-### Task
-Check what happens if you use a variable which is not defined yet. Run the code in the editor – try to print out an undefined name.
-
-Note, that "check" command only runs the testing system, and you will not see the output.
-
-<div class="hint">Type the name of an undefined variable inside the brackets of the <code>print</code> statement.
-Note that variable names must start with a letter and can contain only letters, '_', and numbers.</div>
+## 算術演算子 :(Arithmetic operators)
+
+他のプログラミング言語と同じように、加算( `+` )、減算( `-` )、
+乗算( `*` )および除算( `/` )演算子は、数値とともに使用できます。
+さらに、Python には、累乗( `**` )、モジュロ( `%` )、およびフロア分割(`//` )演算子があります。
+
+- `*`(乗算)演算子は、その引数の積を生成します。
+引数は両方とも数値であるか、一方の引数が整数でもう一方がシーケンスである必要があります。
+
+- `/`(除算)および `//`(床除算)演算子は、引数の商を生成します。
+整数の除算はfloatを生成し、整数のフロア除算は整数を生成します。
+
+- `%`(モジュロ)演算子は、最初の引数を 2番目の引数で除算した余りを返します。
+
+- `+`(加算)演算子は、その引数の合計を生成します。
+引数は、両方が数値であるか、両方が同じタイプのシーケンスである必要があります。
+
+- `-`(減算)演算子は、その引数の差を生成します。
+
+2進算術演算には、従来の優先度レベルがあります。
+これらの操作の一部は、特定の非数値タイプにも適用されることに注意してください。
+
+このトピックの詳細については、<a href="https://docs.python.org/3/reference/expressions.html#binary-arithmetic-operations">こちら</a>をご覧ください。
+
+### 課題
+- `number` に格納されている値を `2` で割ります。
+- そのような除算の余りを計算します。
+- 除算結果に `2` を掛けます。
+- 除算の余りを乗算結果に追加します。
+- 数値から乗算結果を減算します。
+- `number` を 2 でフロア分割します。
+- `multiplication_result` を 3 の累乗に上げます。
+
+<div class='hint'>まず、<code>/</code> 演算子を使用します。</div>
+<div class='hint'>次に、<code>%</code> 演算子を使用します。</div>
+<div class='hint'>次に、<code>*</code> 演算子を使用します。</div>
+<div class='hint'>次に、<code>+</code> 演算子を使用します。</div>
+<div class='hint'>次に、<code>-</code> 演算子を使用します。</div>
+
diff -Naur "a/Variables/Variable definition/task.md" "b/Variables/Variable definition/task.md"
--- "a/Variables/Variable definition/task.md" 2022-04-06 14:37:39.031011329 +0900
+++ "b/Variables/Variable definition/task.md" 2022-04-06 14:38:43.475952146 +0900
@@ -1,11 +1,13 @@
-## Variable definition
-
-Variables are used to store values so we can refer to them later. A variable
-is like a label, and in Python we use the ' `=` ' symbol, known as the
-assignment operator, to assign a value to a variable. An assignment can be
-chained, e.g., `a = b = 2`.
-### Task
- - Change the value stored in the variable `greetings`.
- - Use the chain assignment to store 2 in both `a` and `b`.
-
-<div class="hint">Type a new value in the answer placeholder.</div>
+## 変数の定義 :(Variable definition)
+
+変数は値を格納するために使用されるため、後で参照できます。
+変数はラベルのようなものであり、Python では、代入演算子と呼ばれる '` =`' 記号を使用して、変数に値を割り当てます。
+
+割り当ては連鎖させることができます。(例: `a = b = 2`)
+
+### 課題
+- 変数 `greetings` に格納されている値を変更します。
+- チェーン代入を使用して、`a` と `b` の両方に 2 を格納します。
+
+<div class='hint'>回答プレースホルダーに新しい値を入力します。</div>
+
diff -Naur "a/Variables/Variable types/task.md" "b/Variables/Variable types/task.md"
--- "a/Variables/Variable types/task.md" 2022-04-06 14:37:39.039011446 +0900
+++ "b/Variables/Variable types/task.md" 2022-04-06 14:38:43.487952321 +0900
@@ -1,28 +1,28 @@
-## Variable types
-
-All data in a Python program is represented by objects or by relations between
-objects. Every object has an identity, a type, and a value. An object’s identity
-never changes once it has been created; you may think of it as the object’s
-address in memory.
-
-An object’s `type` determines the operations that it supports (e.g.,
-“does it have a length?”) and defines the possible values for objects of
-that type. The `type()` function returns an object’s type (which is an object itself).
-Like its identity, an object’s type is also unchangeable.
-
-The value of some objects can change. Objects whose value
-can change are <i>mutable</i>; objects whose value is unchangeable once
-they are created are called <i>immutable</i>.
-
-In Python, there are two main types of numbers: integers and floats. The most important
-difference between them is that a `float` is a number that has a decimal point,
-and an `int` is a number without a decimal point.
-
-For more information on this topic, refer to the "<a href="https://docs.python.org/3/reference/datamodel.html#objects-values-and-types">Objects, values and types</a>"
-and "<a href="https://docs.python.org/3/reference/datamodel.html#the-standard-type-hierarchy">The standard type hierarchy</a>" sections in Python Documentation.
-
-### Task
-Print the type of the variable `float_number`.
-
-<div class="hint">
-Check out how we determined the type of <code>number</code> on line 2 and do the same with <code>float_number</code>.</div>
+## 変数タイプ :(Variable types)
+
+Python プログラムのすべてのデータは、オブジェクトまたはオブジェクト間の関係によって表されます。
+
+すべてのオブジェクトには、ID、タイプ、および値があります。
+オブジェクトのID は、一度作成されると変更されることはありません。
+これは、メモリ内のオブジェクトのアドレスと考えることができます。
+
+オブジェクトの `type` は、サポートする操作を決定し(たとえば、「長さはありますか?」)、そのタイプのオブジェクトに可能な値を定義します。
+
+`type()` 関数は、オブジェクトの型(オブジェクト自体)を返します。
+そのアイデンティティと同様に、オブジェクトのタイプも変更できません。
+
+一部のオブジェクトの値は変更される可能性があります。
+値が変更される可能性のあるオブジェクトは <i>mutable</i>(可変)です。
+作成後に値が変更できないオブジェクトは <i>immutable</i>(不変)と呼ばれます。
+
+Python には、整数と浮動小数点数の 2つの主要なタイプの数値があります。
+それらの最も重要な違いは、`float` は小数点のある数値であり、`int` は小数点のない数値であることです。
+
+このトピックの詳細については、Python ドキュメントの "<a href="https://docs.python.org/3/reference/datamodel.html#objects-values-and-types">オブジェクト、値、およびタイプ</a>" と "<a href="https://docs.python.org/3/reference/datamodel.html#the-standard-type-hierarchy">標準の型階層</a>" のセクションを参照してください。
+
+### 課題
+変数 `float_number` の型を出力します。
+
+<div class='hint'>
+2行目の <code>number</code> のタイプをどのように決定したかを確認し、<code>float_number</code> でも同じことを行います。</div>
+
→連続して、すべて貼り付けてください。ファイルの最後に空行「+」があるのがパッチの最新版であることの目印です。
→その都度内容は改修されています。
-
-
--- - --- - --- - --- - --- - --- - --- - --- - --- - --- - --- - --- - --- - --- - ----- ----- -----
C-4. 参考: (test2): パッチファイルの適用:
-
閲覧のみで、作業は要りません。
-
1). パッチファイルの適用:
$ cd ~/PycharmProjects/'Introduction to Python'/
$ patch -p1 < pycharm-ja.patch
→正常に完了すれば、「項番 A-2.の 1).」と同じメッセージが表示 されます。
-
-
2). 日本語化されたか確認:
-
(1). システムを再起動してから、「pycharm」を起動:
再起動させないと、キャッシュとメモリで相違があると表示される場合があります。 その場合はデフォルトの「システム(ディスク)からの読み込み」でOK
-
画面下のパネルの右にある「ギア」アイコンをクリック→「Toolbox」画面→「PyCharm Community」アイコンをクリック
→「PyCharm」で前回開いていた ファイル(タブ)が開きます。なので、学習コースの続きになります。
-
(2). 左の各項目の四角いアイコンの「課題名」をダブルクリック→翻訳が反映されます:
→再読込みされ、日本語で表示されました。
何かしらの修正を行ったら、再読込みが必要です。
-
(3). 日本語での学習が可能になりました
-
-
--- - --- - --- - --- - --- - --- - --- - --- - --- - --- - --- - --- - --- - --- - ----- ----- ----- -
9. 参考: せっかく翻訳したので、貢献できないか検討:
-
コンテンツの翻訳なので、通常の国際化(ローカライズ)の文字列置換では無理があります
そのせいか、GitHub には「Translations」や「po」などの該当フォルダがありません。 プルリクエストでは、ソースのルートに「Translations」フォルダを作ってファイルを置くことになりそうです。
強引に思われそうですが、採用はなくてもフォーク先もあることで、GitHub にデータが残り、再利用はできそう。
-
1). 「プルリクエスト」の提案先:
jetbrains-academy/introduction_to_python
-
-
2). コミット時の「表題」:
'Translated the "Description" of "Introduction to Python" into Japanese'
和訳: 「Introduction to Python」(Python入門)の「説明」を日本語に翻訳
-
3). プルリクエストで登録した「コメント」の内容:
### description:
The explanation displayed is in English. I translated it into
 Japanese to make it easier for people living in Japan to learn Python.

Once you have created a patch file, you can apply it to
 other languages as well.

### Setup procedure:
Check the attached file "README.md".

---
### Attachment:
(1). "README.md" : Setup procedure.
(2). "README-ja.md" : Setup procedure (Japanese version)
(3). "screenshot-ja.jpg" : Screen using "Introduction to Python" translated into Japanese
(4). "Delete-md-File.sh"  : Shell script that deletes the target file
(5). "ja.patch"  : patch file:
-
その後、追加したコメント:
### Added description:

It is a patch that you do yourself after installation,
 instead of applying PATCH to the source code as you normally do on "GitHub".

This is an option you can run when you want to see a content guide in your own language.

Doing this will translate only the tasks supported by PATCH in the installed content.

This is already mature (no major updates) "Introduction to Python" content,
 so it's a viable way to do it.
→抜粋:
インストール後に自分で行うパッチです。
これは、自分の国の言語でコンテンツのガイドを見たいときに実行できる選択肢のひとつです。
-
-
4). 参考: 添付の「README-ja.md」にて、セットアップ手順を確認(日本語版):
$ cat Translations/README-ja.md
ブログ上でちゃんとMarkdown が表示されるように、手直ししています:
-
表題:
「Introduction to Python」(Python入門)コースの「説明」を日本語に翻訳しました:
-
説明:
表示される説明は英語です。
日本人が Python を学びやすいように、日本語に翻訳しました。
-
セットアップ手順:
-
1. 「PyCharm」に下記のプラグインをインストールしておきます:
- 「Edu Tools」
- 「Japanese Language Pack」
-
2. 「PyCharm」の「Courses」タブで「Introduction to Python」コースを選択し、「Start」をクリックします:
→「~/PycharmProjects/'Introduction to Python'/」フォルダが作成されます。
これはすでに行われているはずです。
-
3. 念のため、元のファイルを保存してください:
$ cp -r ~/PycharmProjects ~/PycharmProjects-ORG
-
4. 作業に使用するファイルを確認します:
次のフォルダに添付ファイルが置かれているとします:
$ cd ~/PycharmProjects/'Introduction to Python'/Translations/

$ ls -1
Delete-md-File.sh   ←(必要)
README-ja.md
README.md
ja.patch         ←(必要)
screenshot-ja.jpg
-
5. シェルスクリプトを実行可能に設定します:
$ chmod +x ./Delete-md-File.sh
-
6. 対象となるファイルを削除するシェルスクリプトを実行します:
$ cd ~/PycharmProjects/'Introduction to Python'/
$ ./Translations/Delete-md-File.sh
→パッチファイルを適用する際の以下のエラーを回避します:
"Hunk #1 FAILED at 1 (different line endings)."
および、新しいファイルにすることで、パッチを適用しやすくします。
-
7. パッチファイルを適用します:
$ patch -p1 <Translations/ja.patch
→新しい md ファイルが各ファイル階層に作成されます。
-
8. 開始して確認します:
→左側のツリーで課題名をダブルクリックすると、翻訳された説明が表示されます。
-
添付ファイル:
(1). 「README.md 」 : セットアップ手順。GitHub で表示される説明です
(2). 「README-ja.md 」 : セットアップ手順(日本語版) ←(現在、ブログで見ているファイル)
(3). 「screenshot-ja.jpg 」 : 「Introduction to Python」を日本語に翻訳した画面
(4). 「Delete-md-File.sh 」 : 対象となるファイルを事前に削除するシェルスクリプト
(5). 「ja.patch 」 : パッチファイル
-
-
5). 参考: 「screenshot-ja.jpg」の表示:
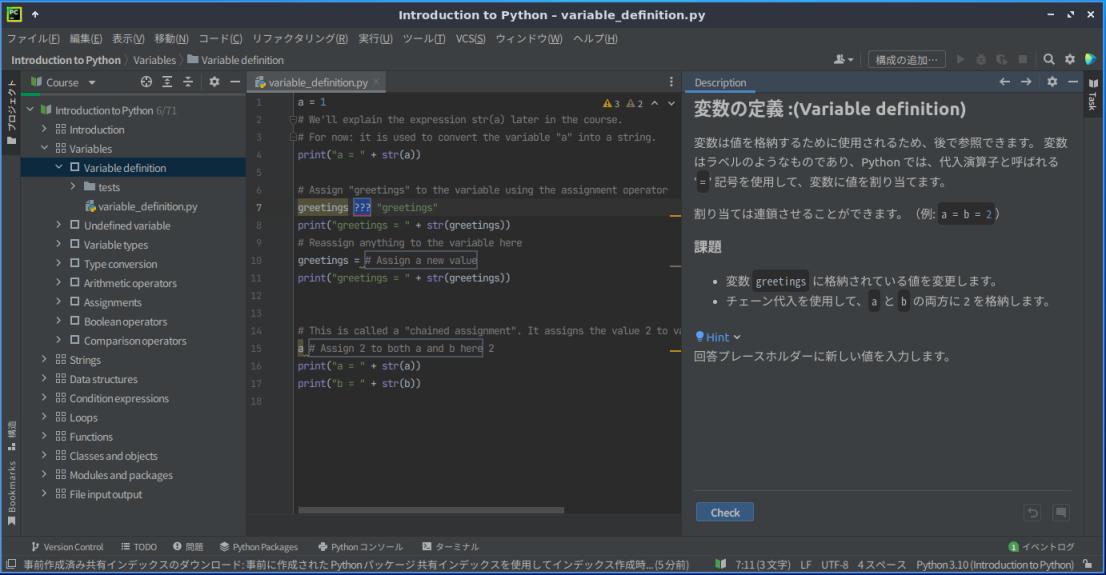
→「Introduction to Python」を日本語に翻訳した表示です。
すべてが日本語化されているわけではありませんが、日本語ガイドが表示されるだけで、学習しやすさは違います。
-
-
--- - --- - --- - --- - --- - --- - --- - --- - --- - --- - --- - --- - --- - --- - ----- ----- ----- --
10. 参考: プルリクエストしました:
-
パッチファイルが大きいのが目立ちます:
パッチファイルが大きいので、検証には時間が必要です。
言語ごとに翻訳が必要だと思っている人、もしくは日本人でないと、レビューされないかも。
-
基本的に(手順A)のやり方です。
-
プルリクエスト:
Translated the "Description" of "Introduction to Python" into Japanese #77
→右上の「Files changed(5)」タブをクリックすれば、添付ファイルの確認が(差分表示で)できます。
-
もしくは、フォーク先の「GitHub: FuRuYa7/introduction_to_python 」でも添付ファイルの確認ができます。
-
添付ファイルをダウンロードしたいときは、
「ここ 」をクリック、保存して展開すれば、「Translations」フォルダの中にファイルはあります。 使用は自己責任です。
-
ダウンロードしたら、念の為に、チェックサムの確認をして下さい:
$ sha256sum introduction_to_python-develop.zip
880a08e92d147a4287de3814b739e6c42f28b769a71cb487bc7f4515c1916338  introduction_to_python-develop.zip
→結果が違うようなら使ってはダメです。改ざんのリスクがあります。
-
添付ファイルが置かれている位置は、「採用された時に置かれる位置」です:
今回、もしくは、採用されていないときは、GitHub からダウンロードして展開した後に、
「Translations」フォルダを同じ位置にコピーすれば、同じ環境になります:
例:
$ cp -r ~/ダウンロード/introduction_to_python-develop/Translations/ ~/PycharmProjects/'Introduction to Python'/
-
(手順A)のやり方で問題になるのは、
ソースの更新があったときに気付きにくいこと。更新の多いプログラムのソースファイル等には向きません。
(手順B)や(手順C)だと反映時にその部分でエラーするのでわかりますが、(手順A)だとすんなりと通って、強制的に旧バージョンの翻訳になります。
こちらの基本コースは、すでに固まっていて更新の少ないコンテンツなので問題ないだろうと判断しました。 更新でよくあるのがタイプミスの修正(typo)ですが、含めての翻訳になるので問題ありません。 わかりやすい翻訳かは翻訳者のスキル次第です。
-
(手順A)の利点は、
パッチ適用時のエラーも少く、サイズが小さくなるだけでなく、ほぼソースと同じ(差分ファイルだけど全部入り)なので、小さな修正なら直接パッチファイルをエディタで修正できます。「差分の行と行数の指定」を合わせて修正する必要はありますが、修正時の手間を省けます。また、必要ならソースファイルに戻すことも可能です。
-
-
まとめ
学習教材の「Introduction to Python」(Python の基本)にて、英語のままだと Python の学習が進まないので「Introduction to Python」の「課題の説明」部分を翻訳してみました。
翻訳量は多かったのですが、おかげで、学習しやすくなりました。
-
パッチの適用のしかたは、test1(手順B)→test2(手順C)→test3 (手順A)と必要に迫られて変更しました。
本当は最終的な(手順A)もしくは(プルリクエストの手順)だけにして投稿を小さくできましたが、(手順B)は通常のパッチ作成のときに行うやり方で、(手順C)はパッチ適用時のエラーの回避策になるので、残しました。
何かのときに参考になるかもしれません。
-
-
-
目次
-
-
- 目次
- --- - --- - --- - --- - --- - --- - --- - --- - --- - --- - --- - --- - --- - --- - -
- 「Lubuntu 22.04 LTS」:
- --- - --- - --- - --- - --- - --- - --- - --- - --- - --- - --- - --- - --- - --- - --
- 1. 参考: 学習に使う「~/PycharmProjects」のファイルを確認:
- --- - --- - --- - --- - --- - --- - --- - --- - --- - --- - --- - --- - --- - --- - ---
- 2. 参考: 学習に使う「~/PycharmProjects」のファイルツリーを表示:
- --- - --- - --- - --- - --- - --- - --- - --- - --- - --- - --- - --- - --- - --- - ----
- 3. 試しに、日本語の翻訳にトライ:
- --- - --- - --- - --- - --- - --- - --- - --- - --- - --- - --- - --- - --- - --- - -----
- 4. 翻訳すべきファイルを抽出:
- --- - --- - --- - --- - --- - --- - --- - --- - --- - --- - --- - --- - --- - --- - ----- -
- 5. md ファイルを翻訳:
- --- - --- - --- - --- - --- - --- - --- - --- - --- - --- - --- - --- - --- - --- - ----- --
- A. (test3): 「新規でファイルを作成する」やり方で、パッチファイルを適用:
- --- - --- - --- - --- - --- - --- - --- - --- - --- - --- - --- - --- - --- - --- - ----- ---
- A-2. パッチファイルの適用:
- --- - --- - --- - --- - --- - --- - --- - --- - --- - --- - --- - --- - --- - --- - ----- ----
- A-3. 参考: (test3): パッチで新規にファイルを作る場合で、差分ファイルを作ったときの作業:
- --- - --- - --- - --- - --- - --- - --- - --- - --- - --- - --- - --- - --- - --- - ----- -----
- B. 参考: (test1): エラー回避を考えていない初期に、日本語化のパッチファイルを作ったときの作業:
- --- - --- - --- - --- - --- - --- - --- - --- - --- - --- - --- - --- - --- - --- - ----- ----- -
- B-2. 参考: (test1): パッチファイルの適用:
- --- - --- - --- - --- - --- - --- - --- - --- - --- - --- - --- - --- - --- - --- - ----- ----- --
- C. 参考: (test2): エラー回避を考えて、日本語化のパッチファイルを作ったときの作業:
- --- - --- - --- - --- - --- - --- - --- - --- - --- - --- - --- - --- - --- - --- - ----- ----- ---
- C-2. 参考: (test2): テスト確認に続いて、そのまま翻訳を本番のフォルダに反映させる場合:
- --- - --- - --- - --- - --- - --- - --- - --- - --- - --- - --- - --- - --- - --- - ----- ----- ----
- C-3. 参考: (test2): テスト環境がない状態で、エラー回避しながら、日本語化のパッチファイルを反映させる手順:
- --- - --- - --- - --- - --- - --- - --- - --- - --- - --- - --- - --- - --- - --- - ----- ----- -----
- C-4. 参考: (test2): パッチファイルの適用:
- --- - --- - --- - --- - --- - --- - --- - --- - --- - --- - --- - --- - --- - --- - ----- ----- ----- -
- 9. 参考: せっかく翻訳したので、貢献できないか検討:
- --- - --- - --- - --- - --- - --- - --- - --- - --- - --- - --- - --- - --- - --- - ----- ----- ----- --
- 10. 参考: プルリクエストしました:
- まとめ
- -
-
-
-